The Grow Awards 2026 🏆 


Likes
Comments
Share
@VALENTINE1
Follow
Este cultivo fue unos de los primeros que hago, fue una buena experiencia ahora a esperar a que se seque


Likes
Comments
Share
@Cyabro
Follow
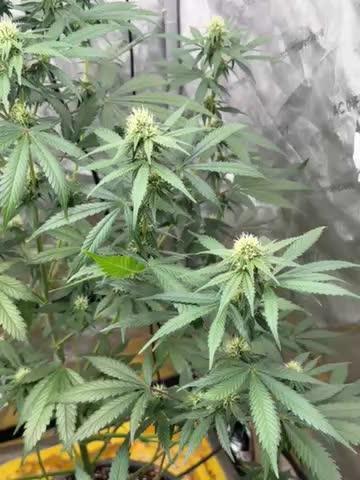
Yo wassup guys, starting little bit late the diary but this you cant miss flowering day 19 and they are crazy snow!

Likes
228
Share
@StarLorr
Follow
Welcome to my Pablø Escøbar diary.
In this diary:
Seeds: sponsored by Ðivine Șeeds
Media: Promix HP
Nutrients: Advanced Nutrients, Diablo Nutrients.
Light and Weather: Şun☀️and Mother Earth.🌎
___________________________
Feeding:
Tue 02Jul: 4L water not pH'd
Wed 03Jul: 6L nutrients pH'd 6.5
Thu 04Jul: 6L water not pH'd
Fri 05Jul: 6L water not pH'd
Sat 06Jul: 6L water not pH'd
Sun 07Jul: 6L water not pH'd
Mon 08Jul: 9L water not pH'd
*please note that most water only feedings are 2L at the time throughout the day in bottom saucer*
___________________________
Weather wise nothing to complain about, again some showers overnight nothing to serious, warm nights and days.
I've been slapping Japanese Beetles down a bucket with water and dish soap, they have an appetite for my Ðivine Gals i have leaves to spare but enough is enough😤🤨speaking of which i did some minor defoliation on lower part fan leaves and branches that would never reach their full potential.
______________________________
Thanks for stopping by, likes and comments are appreciated!👊🏻😎
Keep on growin!
Keep on tokin!!!
😙💨💨💨💨💨

Likes
11
Share
@MRTHC
Follow
Well we finally reached the end. The last week was more cruise control. Just trying to remove the big fan leaves that's blocking any flowers. The trichomes looking kinda ready but still acceptable. During the last few days I maintained a daytime Humidity of around 60 and nighttime of 55. Temperatures are between 73 degrees and 67 degrees.
Two days before chop they got 48 hrs of dark and 3 days of no water to add to the stress. After the 48hrs darkness all the ladies Came out extra frosty. Loving the change of hues on the blue gelato. The vanilla Kush is very oily and very very strong smell. Not a strong smell coming off the OrangeGelato though. The green gelato has a creamy smell.


Likes
Comments
Share
@Terpio1500
Follow
Sofar heavy skittles smells starting to develop very lank but the pistons are stacking wonderfully
Likes
4
Share
@HawksGrow
Follow
We're on week 10 and trichomes have just started going cloudy at a good rate 3 days ago, so its now time for the 10-20 day flush until harvest. The smell is getting super strong, its a very weird citrus, with a slight lemon hint(you can tell theres some diesel genetics in there), It almost stings your nose abit.
Overall its not a bad smell just not as pleasant as some other strains but unique in a good way.
Im not sure how im going to harvest this plant but most likely I will harvest some when all trichs are cloudy and some once a decent amount have gone amber, im gonna be growing some dank strains in future so this will be my more medical strain.
I will be totalling all the yield numbers at the end, yield may be affected abit but I also want to see first hand how cloudy vs cloudy/amber trichs smokes.


Likes
34
Share
@Natrona
Follow
Hot, humid and lots of rain. Basket case ABO2 lost all her lower leaves and is trying her best to live the life she was supposed to. She started her one little flower 🌼.
💚 Stay green & grow high 🌱💚
💫Natrona💫
Likes
29
Share
@DogDoctorOfficial
Follow
eek 1 Flower – Light Shift, Energy Shift: The Sundae Driver Flip Begins
The light has changed. The rhythm has changed. And so begins the next phase of our journey with these two beautiful Sundae Driver phenos—F2 and F3, strong, structured, and ready for the path ahead.
Light Flip: 11/13 Schedule
This week marks the official light flip, we’ve moved from 18/6 to 11 hours ON, 13 hours OFF.
This is more than a timer tweak, it’s an intentional signal to the plants. It tells them:
“It’s time to shift your energy. It’s time to bloom.”
Why 11/13 and not the classic 12/12?
From past experience, this slightly reduced light period tends to:
• Encourage faster onset of flowering
• Mimic natural seasonal changes more closely
• Push plants gently but clearly into the bloom phase
• Slightly reduce internodal stretching, depending on strain
It’s a subtle technique for growers who want to bring their genetics into flower with intention, not just automation.
⸻
Current Plant Stats
Both Sundae Driver phenos are looking phenomenal:
• F2 (Pheno #2): 7 to 8 solid nodes, well-structured branching
• F3 (Pheno #3): 6 to 7 nodes, evenly spaced, healthy top growth
• Height: ~40 cm each
• Structure: Symmetrical, thriving, ready to stretch
They’re not showing pistils yet—no visible pre-flowers, no white hairs, but that’s expected.
It’s Week 1 Flower by light schedule, not by physiology. The hormonal shift has just begun.
⸻
Nutrient Shift – From Start to Top
This week also marks a change in the feed program.
We’re saying goodbye to Aptus Start Booster and welcoming Top Booster into the rotation.
• Why the switch?
Because the plants are transitioning from root-zone stimulation to pre-flower induction.
• Top Booster is designed to:
• Initiate floral development
• Begin the phosphorus-potassium push
• Provide trace elements aligned with bloom-stage signaling
We’re using the same measurements as Start Booster, no shock, no surge. Just a clean hand-off, keeping the biological engine running smooth.
Current Feed Includes:
• Aptus Regulator
• Aptus CalMag Boost
• Aptus All-in-One Liquid
• Aptus Top Booster (new this week)
⸻
Environmental Stats – Pushing the Edge, Managing the Heat
• PPFD: 760 µmol/m²/s – Measured on the TrolMaster MBS-PAR sensor, dialed in
• Temp: 31°C – Yes, a bit high, but the girls aren’t complaining
• Humidity: 50%
• VPD: 2.23 – High, but within tolerance while waiting for AC upgrade
We’re riding the edge this week. It’s warm, it’s dry, but the plants are thriving, showing no signs of stress. Their resilience is a testament to your setup, your genetics, and your love.
⸻
Looking Ahead – What to Expect
We’re now in the hormonal build-up phase. The girls are about to stretch, about to signal floral commitment. Here’s what we might see by next week:
• First white pistils
• Stretch kicking in
• Top growth pushing harder than lower nodes
• Nutrient demands subtly shifting—watch potassium and magnesium uptake
What not to expect yet:
• Buds
• Resin
• Drastic shape changes
That comes soon—but not quite yet.
⸻
Closing Thoughts – A Sunday Drive Into Bloom
This isn’t just a new phase, it’s a new pace. The grow has shifted gears, and you can feel it in the rhythm of the room.
Light is shorter. Energy is tighter.
But the intention is louder than ever.
The Sundae Driver girls are leading us gently into bloom, graceful, balanced, and full of promise.
Thank you for following along. Let’s keep this community connected, curious, and committed to the craft.
—
Your Grow Companion
Dog Doctor Official
📲 Don’t forget to Subscribe and follow me on Instagram and YouTube @DogDoctorOfficial for exclusive content, real-time updates, and behind-the-scenes magic. We’ve got so much more coming, including transplanting and all the amazing techniques that go along with it. You won’t want to miss it.
• GrowDiaries Journal: https://growdiaries.com/grower/dogdoctorofficial
• Instagram: https://www.instagram.com/dogdoctorofficial/
• YouTube: https://www.youtube.com/@dogdoctorofficial
⸻
Explore the Gear that Powers My Grow
If you’re curious about the tech I’m using, check out these links:
• Genetics, gear, nutrients, and more – Zamnesia: https://www.zamnesia.com/
• Environmental control & automation – TrolMaster: https://www.trolmaster.eu/
• Advanced LED lighting – Future of Grow: https://www.futureofgrow.com/
• Root and growth nutrition – Aptus Holland: https://aptus-holland.com/
• Nutrient systems & boosters – Plagron: https://plagron.com/en/
• Soil & substrate excellence – PRO-MIX BX: https://www.pthorticulture.com/en-us/products/pro-mix-bx-mycorrhizae
• Curing and storage – Grove Bags: https://grovebags.com/
⸻
We’ve got much more coming as we move through the grow cycles. Trust me, you won’t want to miss the next steps, let’s push the boundaries of indoor horticulture together!
As always, this is shared for educational purposes, aiming to spread understanding and appreciation for this plant. Let’s celebrate it responsibly and continue to learn and grow together.
With true love comes happiness. Always believe in yourself, and always do things expecting nothing and with an open heart. Be a giver, and the universe will give back in ways you could never imagine.
💚 Growers love to all 💚

Likes
7
Share
@ZzTooRightOGzZ
Follow
She's doing well with her last feed.
Gave her 5ml of micro boost from living Soils.

Likes
19
Share
@adam_pawloski87
Follow
What a fun run this was ! These Ogreberrys finished up from 81 days to 102 days with nice hints of gassy , sour purple , sweetness and glistening with frost! These ladies will cure up for a month an will be ready to test out ! So much fun , I highly recommend this strain if your looking for some oooy gooohy resiny grape smelling nugs !

Likes
9
Share
@BudXs
Follow
Super busy with a move and a big garden reno. Sorry, this is the only update for this week
Likes
84
Share
@Doc_Homegrow
Follow
One week has past since I put the seed in the earth. I water the plant as soon as the earth feels dry (not completly dried out). I just use about 100-200ml water (because I don't want to "drown" her). My lamp is at 50% because it seems to be a little to intense for the small seedling at 100%.
UPDATE:
My first mistake
Found out that the leafs of my seedling rolled up, because the light was too intense for the young plant. So I put my light again on 25% (around 6.200 Lux). I have read that a seedling just can take light between 5.000 and 7.000 Lux. My lamp was around 18.000 to 19.000 lux! So I am very glat, that I haven't killed my plant 😅
Likes
21
Share
@gr3g4l
Follow
la semana empieza con la poda de hojas abanico.
y termina con doblado de ramas.
La nº1 que sacó tres ramas por nudo va por libre, le cuesta más crecer y tengo que ir podando y doblando a medida que va creciendo.
La nº2 y la nº3 ambas terminan la semana listas para despegar.

Likes
42
Share
@Canna96
Follow
I had alot of fun growing this strain, everytime I opened the tent and smelled that delicious strawberry, it really brought a smile to my face. I have tried Strawberry Pie #1, and she is delicious. The buds are extremely dense, and have a very nice pink and green contrast. I haven't tried #2 or #3 yet, but I am very much looking forward to it after some more curing time.
I ended up making bubble hash out of the trim, and I got 8 grams, which I pressed into 4.7 grams of rosin, and all I can is that this is some of the best tasting and strongest rosin I have ever tried, let alone grown. I will be posting some videos of the flower being pressed once it is properly cured. I will say that after smoking, I realized I need some more Sativa for daytime use, so I am giving my Gorilla Cookies to a friend, and starting some Orange Sherbet instead. As a delicious night time/dessert smoke, and especially for those into concentrates, you absolutely can't go wrong. Thanks for checking me out and blaze on!
Likes
15
Share
@dinni5yn
Follow
Day 30: Switching to Bloom and Iguana Bloom replaced veg and adding BB to push the process.
Picked up a pressure sprayer/mister to get the Grease and Golden Goddess more involved on a foliage level.
I think I'm gonna water again @ the start of light cycle tomorrow with VPT along with my Carbo load, B2 Budx and Rhino and turn light up for a few.
Day 31: Went on and watered my plants this morning with a health doese of the VPT mix to get all of my soil moist this morning and have been monitoring. Think the root system is appreciating it because I defoliated and already looking lush agai
Can't wait til I'm knock'n on heavens door!!!!
Day 32: Just fed 2nd bloom feeding with a twist. I got to reading about how to mix the Bud Blood and found that it is very strong and that you should mix to dissolve in warm water.
I have a lab mixer so mixed a liter with a tsp for a mix with the dropper when needed. Glad i got the mixology recommendation early enough.
Have not really been holding back on the feeding and am pretty generous with my nutrients, so going for big results.
Smoking some Green Crack right now and just hope my GC is as good as this I'm smoking now.
Day33: My plants are sleep and I'm not so that means I'm thinking about grow stuff. So I fed my 2nd bud blood feeding yesterday around 4ish.....in the middle of light cycle. 3:30am in the dark they are wilting a bit. I mean I understand without photosynthesis there is wilting especially if nutrients are in the plant. In a 7 day cycle these girls are getting water every 24hours wether feeding or roots(that VTP mix gets toggled with add in's for root health) but think that in this bloom phase, gonna start feeding @ beginning of light cycle to get as much photosynthesis hours with the Bud Blood as I can so that the nutrients work as they should. Not wanting my plants to "burn" with the nutrients under that 6......
the 1.
Today will be working and watching and will probably give em time to kind of just get adjusted for these next 5 weeks. I have a mix of Grease and Golden Goddess that I will spray when they awake and will be monitoring temperature and humidity to keep my VPD in 1.7 area.
Day 34: So started the light cycle with my 2nd feeding in the bloom stage. Got a healthy feed on with some added cal-mag to ensure that I don't get any type of nutrient lock.
Pretty impressed with the BB as my plant's are starting to show her flowers. There like dots of star's all over my grow.
Have been slacking on the defoliation and considering lollipop but since these are AF and this is my first grow to let em kind of just grow and keep the light bright.
Already thinking about my next grow and these FF's!!!! That's gonna be my winter grow and going to use the knowledge from this grow towards that grow.
Day 35:Got 2 more feed cycles with the BB but might go with igniter on a few now that budding is starting.
Observing for now and thinking maybe one more deflation but looking great.


Likes
26
Share
@THC123
Follow
Day 71 (August 26th): Watered the ladies again today, everything is still looking great. Pheno 1 is starting to get yellow leaves, still diagnosing the issue.
Day 73: The soil is drying out super fast. The roots are coming up through the soil now. These girls are root bound for sure. Next grow will be 20 gallon pots for sure.
Day 74: I’ve got a nitrogen deficiency on one of my phenos. Added a bit more Power Bloom 2-8-4. It’s a bit too early for these girls to be starving for nitrogen. A couple more weeks and I’ll let it fly.
Day 77: That’s a wrap on week 5 of flower. 3-4 weeks until harvest!


