The Grow Awards 2026 🏆 


Likes
Comments
Share
@MusicQueen
Follow
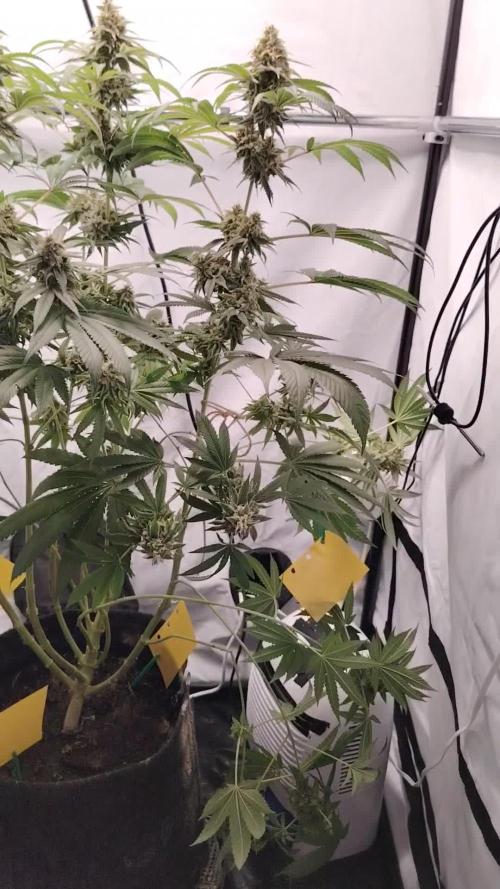
I have a very small bit of powdery mildew on the girls. I have been using CuSo4-copper sulphate about every 3 days to keep it at bay. It seems to be working really well. They look great, are happy and are working hard on plumping up their flowers. I have 4-6 weeks until harvest would be my guess. Fingers crossed I can keep the effing PM from taking over. 😬

Likes
223
Share
@GERGrowDesigns
Follow
Welcome to Flower Week 6:
-Sweet Seeds Grow -
6 x Tropicana Poison F1 6-7Weeks Flower
4 x Gorilla Girl F1 7Weeks Flower
2x 720w Lights
-Each Plant gains 1-3 Liter Water every Day
-Shoutouts To my Partner Narcos Seeds which Sponsoring This Sweet Seeds Grow with theyre Amazing Narcos Nutriets
Day Temp: 27
Night Temp :19
Humidity: 45-50%
Shout Out to Narcos Organic Nutriets since Day one . They have Everything from Organic to Hydro or Coco and i cant Complain to my dutch Friends !
The Sweet Seeds Phenos doing Amazing and im looking forward for the last weeks .
Shout out to Apollo and Sweed Seeds aswell !
The tropicana Poison is changing Bud Coloure and Leaves .
Both Smell Amazing . Tropicana like berrys and the gorilla like Zypressen/zitrus .
The buds are Stacking up Each day .
I dimmed the light today at day 69 to 400w in a total of 800w . This will be straight to the Last harvest .
Also were going for 4 days No Water concept at the Last Days with another 2days Complete Darknes before harvest .
Loving This Coloureful Paradise :D
Stay tuned and Keep up Growing Everyone !


Likes
25
Share
@Esoteric_growing
Follow
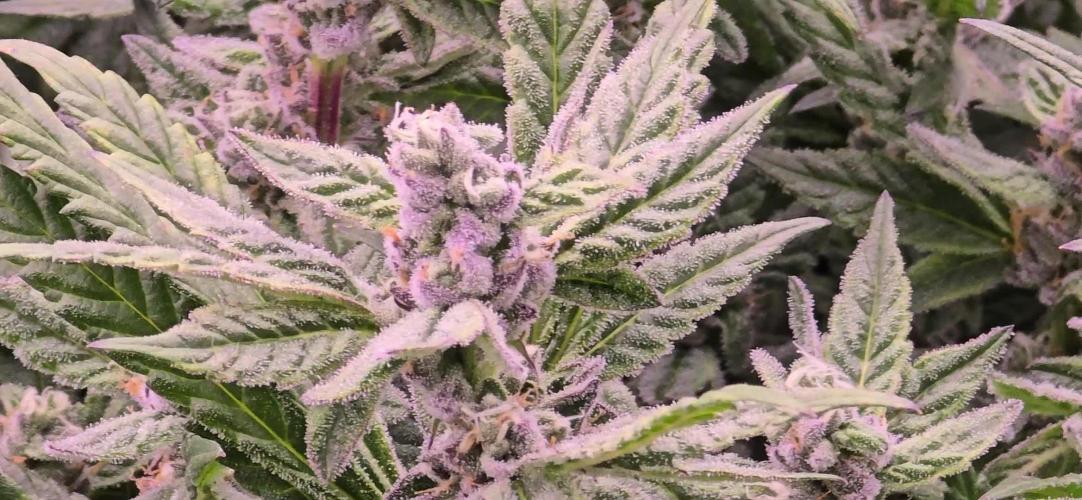
The hardest buds I have grown, like rocks. Thc content is like the last grow insanely good. Bag appeal, smell and bud structure is 10/10.
After growing this strain in organics and then coco I am now going to try it in hydro.
I really do like barneys farm seeds and highly recommend the Runtz Muffin strain.

Likes
17
Share
@BLAZED
Follow
W19 (Harvest)
6-6
Last day before harvest.
7-6
Harvest day!
Installed a humidifier outside the tent, set to 55% aiming for a 60% humidity inside the dry tent.
17-6
After 10 days of drying she is ready to be trimmed.
While posting this a couple of months later i found out that i totally forgot to make pictures and video's of the trimmed buds 😅
End result #1:
37 Grams of dried buds.
35.84 Grams of dried trim and very small buds, into the freezer.
I would describe pheno 1 as normal frosty, almost stone like buds, smells chemical with hints of dish soap (i really like it!)
I cant describe the taste but it was very tasty out of the box, before the cure, very sad i only had 37 grams of it haha.
End result #2:
Around 70 grams of dried buds.
43.23 Grams of dried trim and small buds, into the freezer for bubble hash.
I would describe pheno 2 as very frosty buds, little bit fluffy, smells very gassy, with a nice sour taste after curing a couple of months.
Very interesting strain, i will definitely grow it again!
I have some trim and small buds saved up from different strains and i will be posting a diary of the full process making hash of them!
If you are interested in me making bubble hash feel free to follow me as i will make some in the next month, this way you keep notified!

Likes
18
Share
@Diips
Follow
day 15 shes a bit more ahead than plant nr 1. looking good!
day 18 shes also stretching a lot!
shes actually the tallest at this moment xD

Likes
21
Share
@BB_UK
Follow
This girl has only been in action! She has got up to the scrog now and I’m confident in her stretch capabilities as she’s about to preflower, it’s the things with photos, even at 4 weeks well let’s say 12-12 from seed as I’ve done this! They tend to flower when they’re ready! But as I said she’s doing amazing and I’m feeding her with an irrigation method as she’s so far at the back I set up a system that’s working tf and helps me take it easy when feeding! May do it to them all on a lazy vibe next time lol maybe lol defoliated her lower fan leaves too and as time goes on I can see I’ll be in some difficulty to prune her and the other rear plants but I will figure it out I’m sure! 😎


Likes
151
Share
@biggreens420
Follow
This girl is beasting doing really well good production this week nice size buds forming already compared to last week she's the tallest of the bunch bending bits of her under the trellis to try keep her level with the other two she's drinking well drying her pot every day having to water more 2.5-3 l to get good runoff loving her smells can't quite describe it it definitely smells kushy though nremoving odd fan leaves from the lower parts will keep trying to keep her level not much else to say thanks for reading happy growing guys

Likes
9
Share
@Herbz_Unkraut
Follow
another resin monster from seedstockers, with a very special scent, full of flavors! grinded it smelled like peppermint, and vaped it has a great sweet creamy taste!

Likes
30
Share
@valiotoro
Follow
Hello everyone, all good for this week 😎
They grow fast and with a beautiful green colour on the leaves!
In this grow i will be testing out Plagron Nutrients and Mars Hydro SP 6500

Likes
8
Share
@Aranseed
Follow
Mejor de lo esperado. No había trabajado nunca con el banco así que no sabía exactamente que esperar pero al momento de ir avanzando en el cultivo, pude apreciar que la planta tomaba una forma hermosa e incluso en las bajas temperaturas se comportaba bastante bien. Cpe bastante recomendable incluso para cultivadores noveles


Likes
294
Share
@StarLorr
Follow
Welcome to my Ðivine ØĠ Ķush diary.
In this diary:
Seeds: sponsored by Ðivine Șeeds
Media: Promix HP
Nutrients: Advanced Nutrients, Diablo Nutrients.
Light and Weather: Şun☀️and Mother Earth.🌎
___________________________
Feeding:
Tue 18Jun: 13L water not pH'd
Wed 19Jun: 10L water not pH'd
Thu 20Jun: 6L nutrients pH'd 6.5
Sat 22Jun: 6L water not pH'd
___________________________
We went through a heatwave from Monday June 17th to Saturday June 22nd with temperatures of 34°Celsius with humid factor of 44°Celsius girls got thirsty and finally it poured rain from Saturday afternoon to Monday morning witch was more than welcome for the girls and our garden. Temps are back to normal now🌤️
Kush kush fell on Wednesday due of wind gusts, made an anti-tilting device🤓😂seems to work so far... we'll see when branches get heavier with the buds weights😅
___________________________
Thanks for stopping by, likes and comments are appreciated!👊🏻😎
Keep on growin!
Keep on tokin!!!
😙💨💨💨💨💨

Likes
15
Share
@Siriuz
Follow
Check out the videos guys, she is flowering real good even tho we are not using any special nute like big bud for example, but i really want to try it soon, hopefully!
Still she is doing great and im happy to have her!
How are you doing growers whats up!?
Dont forget to leave a comment
Any suggestion is welcome!
We are happy to learn new things alwas,
Thanks for the support happy growing everybody
Enjoy the footage thanks to Siriuz
Likes
2
Share
@Bluemels
Follow
Tag 33: Aus irgendeinem Grund wächst die Green Gelato extrem ungleichmäßig. Was das scroggen sehr schwer macht beziehungsweise das Netz gleichmäßig zu füllen . Hach ja könnte noch eng werden.


Likes
16
Share
@ChronicFinest
Follow
Wow what a strong weed. The yellowing stopped immediately after repotting and she wasn't stunted at all. I give her 3 liter water every other day. The temps are higher in this season I hope that will not be too much of an effect on yield.
Humidity is OK so mold should stay out too.

Likes
2
Share
@SpaceCadet3000
Follow
No idea about the weight. I'll have to update when they are dry. I'll buy a hanging scale next cycle so I can measure moisture loss.
The temp is now around 21-23 C, but the RH is holding around 60% so hopefully it'll still be a slow, steady dry.
One smelled of pure grapefruit, one almost like Rhubarb and very gassy, the other was more citrus.. still a bit of grapefruit and gas, but more of a bergamot smell.
At different points I've smelled Rhubarb, pepper, mint and cream/milk coming from these plants. Will be an interesting smoke.


Likes
5
Share
@weedelicious
Follow
Day 64:
I've been on vacation for four days now. However, I was able to keep an eye on everything remotely using the spiderfarmer app. They look great. The Pink Cookies and the Purple Kush have grown quite a bit taller. The buds have generally grown larger and the first frost is visible. I watered all the plants with 2 liters of water mixed with fertilizer and Cal Mag. More shoots have also woven into the web.
Day 65:
Not much has changed since yesterday. The plants look healthy and happy. I lowered the light by 10 cm. I hung the fan over the lamp and set it to a faster speed. The flowers look beautiful. Since the Pink Gelato is growing taller now, I had to adjust the humidifier a bit. What varieties are you currently growing?
Day 66:
The girls are doing well! Today I defoliated the plants again. I decided to remove some of the leaves so that the top buds would grow nicely and I'd have as few popcorn buds as possible. I hope it wasn't too much. I also watered all three plants with 2 liters of water mixed with Hesi-Bio-Bloom and Cal Mag. Unfortunately, it's still quite warm in the tent. Do you have any ideas how I can get the temperature down?
Day 67:
Everything's still going well. They've taken the defoliation well so far and look healthy.
Day 68:
Today I gave them another 2 liters of water with fertilizer and cal mag. They look beautiful and have another 5-6 weeks to develop the flowers!
Day 69:
Today, all three girls received 2 liters of water with fertilizer and Cal Mag. I also raised the Purple Kush and created a raised area underneath it. I also increased the humidity to counteract the heat.
Day 70:
Today, all three girls were given 2 liters of water with fertilizer and CalMag. Otherwise, not much has happened. The buds are getting bigger and bigger. Unfortunately, it's still too hot in the tent—I hope it cools down soon!
