The Grow Awards 2026 🏆 


Likes
Comments
Share


Likes
8
Share
@Alchemy
Follow
Harvesting Gx2 x CAG from Selfie Seeds was extremely easy. Not a very leafy strain and all nugs were solid as rocks, so it took no time to get in there with some trimmers and have a wonderful looking end result.
Likes
Comments
Share
@Kadash368
Follow
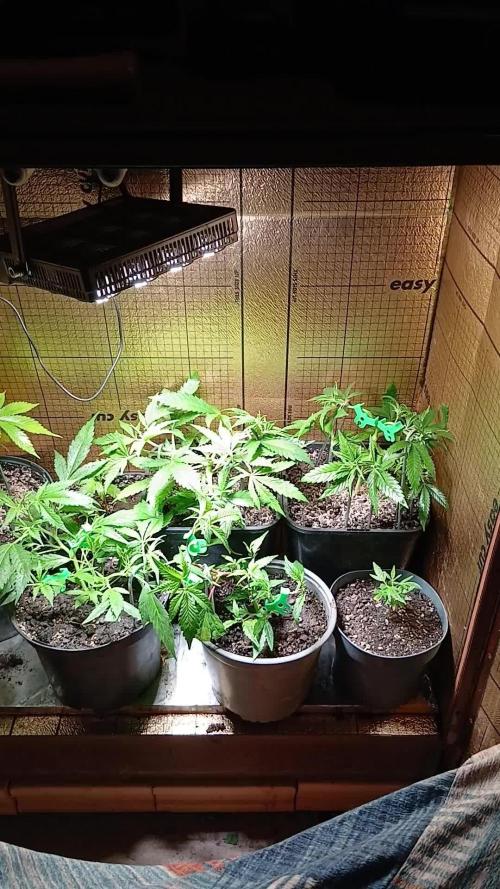
Babies looks nice, Topping is going on almost every fourth day, i changed now from cocos/perlite to a livong soil from Sonnenerde. Les chemicals, more bio 🍇❤️🍑🍅☄️🌞
Likes
6
Share
@mandaladam
Follow
I have a hard time adjusting the room temperature because of the air conditioner failure.
I started growing with one plant, a week later I added two more, and the next week 2 more.This is why my job is really hard.
AK 49s have not started blooming even though they are in their 6th week!DNA genetic seeds and I bought them 3 years ago. In my previous cultivations they flowered in 4 or 5 weeks.With the 12/12 light cycle I encourage them to bloom.Since they're all at 6 weeks of auto seeds, I've started adding the bloom fertilizers.
I guess I just need a little luck and good wishes! Please send your beautiful energies...Thanks :))


Processing
Likes
2
Share
@GirlGoneWeed
Follow
Recovery at its finest, that's what you will see on week 4 around here! Guess who's loving the CO2 with high temperature? Thats right, all plants are!
The comparison of last week with this week have such a difference, on day 24 I introduced a DIY CO2 bottle, the recipe consist in:
-CO2-
2 cups of sugar
1 tablespoon of yeast
1 tablespoon of baking soda
1 later of warm water
Mix all ingredients on a bottle, make a nail hole on the cap shake a little (when shaking put your finger on the nail hole, you should hear a hissssss when you release the hole) use it when lights are on, increase temperature to 30-35C, watch for high levels of humidity, and voila! Any other details you want to know ask way :)
I haven't started any LST yet, I am waiting for a bit more growth to start bending, I have to make sure all 5 plants will have enough space inside this 2x4 tent.
All suggestions are welcomed :)
Thats is for now, Stay Lit folks!
Processing
Likes
11
Share
@kcartel
Follow
For the first time this week I added fertilizer of 0.5 each, and faced a very unpleasant problem, the plant rushed up so much that at the moment the top cola reached the height of the lamp, and the temperature there is quite high, very much afraid that it could damage the plant itself, and It all happened because I did the maine lining, and the central cola went to grow up, I don’t know how to solve this issue, but soon I think I’ll decide this question, wait for 6 weeks!
Likes
22
Share
@DogDoctorOfficial
Follow
🌱 White OG - Week 11 VEG
Strain: White OG by Seedsman Seeds
Stage: Week 11 Vegetative
Grower: DogDoctor
Medium: PRO-MIX HP Mycorrhizae + Bacillus
Pot: 30L Fabric Pot
Lighting: Future of Grow LEDs
Climate Control: TrolMaster
Nutrients: Aptus Holland Clean Program
Environment:
🌡️ Temp: 18.3°C
💧 pH: 6.0
⚡ EC: 1.0
⸻
🔄 The Last Week Before the Flip
Week 11… a moment of calm before the bloom storm. A critical phase in our girl’s journey. This is the week we prepare her for greatness. 💪
✅ Defoliation Madness:
This week, we defoliate the hell out of her. That’s right—removing those large fan leaves that block light, those unnecessary suckers that won’t make it to the top floor, and freeing up her inner structure to breathe and expand.
Why now? Because right before flipping to flower is the perfect time to help her redirect energy to the strong tops and main branches. It reduces the risk of mold, improves air circulation, and ensures even light distribution. Plus, it gives us a blank canvas for the flower stage to explode onto. 🌸💥
✅ Clamp Release & Scrog Setup:
We gently remove the training clamps, and in she goes into the SCROG net. But not in a rigid way—we’re inviting her to stretch, encouraging her to reach out and take up space. She’s a big mama now, and it’s time she gets the full stage. Each branch is dancing through the net like a diva ready for her solo performance.
✅ Roots on a Mission:
She’s hungry for life. Roots are peeking out from the fabric pot, diving toward the light, the floor—everywhere. This PRO-MIX soil is magic, and with the help of the Aptus Clean Mix, she’s thriving. Her root zone is bright white and packed with potential. Healthy roots, healthy shoots, happy fruit.
⸻
Feeding This Week
We’re still rolling with the Aptus Clean Line for this stage. Simple, effective, elegant.
🔹 Regulator – Helping her stay strong and stress-free.
🔹 RO Water Conditioner – Stabilizing and prepping our base.
🔹 All-In-One Liquid – Feeding her exactly what she needs without overcomplication.
⸻
🌐 Shout Outs & Love
Forever grateful to our amazing partners and supporters:
💚 Seedsman Seeds
💚 Aptus Holland
💚 Future of Grow LED
💚 TrolMaster
💚 PRO-MIX Soil
💚 Cannakan
💚 GrowDiaries
💚 The entire community—lovers, haters, followers, and the in-betweeners—you’re all part of this journey. 🌍
Come say hi on Instagram [@DogDoctorOfficial] and check out the Dognabis Cup – First Edition—open now! 🎉 Let’s celebrate passion, plants, and positive vibes.
⸻
🌸 Let’s Bloom
White OG is ready to bloom. She’s strong, structured, and full of fire. Next week begins a new chapter—the flowering stage. Let’s see what she has in store.
🌱 Stay kind. Stay curious. Stay growing.
Much love,
DogDoctor 💚🐾
#GrowDiaries #WhiteOG #ToppingMadness #AptusHolland #Mainlining #PlantTraining #GrowersLove #SeedsmanSeeds
As always, this is shared for educational purposes, aiming to spread understanding and appreciation for this plant.Let’s celebrate it responsibly and continue to learn and grow together!
💚Growers Love 💚 🌿
DISCOUNT CODE - SeedsmanSeeds - DOGDOCTOR 10% off
As always thank you all for stopping by, for the love and for it all , this journey of mine wold just not be the same without you guys, the love and support is very much appreciated and i fell honored and so joyful with you all in my life 🙏
With true love comes happiness 💚🙏 Always believe in your self and always do things expecting nothing and with an open heart , be a giver and the universe will give back to you in ways you could not even imagine so 💚
Friendly reminder all you see here is pure research and for educational purposes only
💚Growers Love To you All and remember to keep that smile big and alive 💚


Likes
17
Share
@420DeepGrow
Follow
Gracias al equipo de AnesiaSeeds, Marshydro, XpertNutrients y Trolmaster sin ellos esto no sería posible.
💐🍁 Violet Face:
Esta variedad feminizada es como un dream team de la realeza del cannabis, que mezcla la majestuosa Blue Face con las frías vibraciones de la Frozen Black Cherry. Es como el perfecto día de verano: vibraciones soleadas con una brisa fresca.
Blue Face aporta esa refinada magia Z, con notas cremosas de naranja y pastel de plátano que te harán sentir como si estuvieras en un paraíso tropical. A continuación, Frozen Black Cherry entra en escena con su aspecto escarchado y su aroma a cereza dulce y ácida que es sencillamente adictivo.
Sube el volumen porque Violet Face golpea fuerte con niveles de THC que se disparan hasta el 35%. Cada calada es un billete al paraíso, que combina los lujosos aromas de la cereza con una embriagadora mezcla de dulzura y sabor afrutado.
Violet Face no es sólo un estilo de vida relajado; también es una campeona de peso pesado, con rendimientos de 600 g/m² en interior y unos exuberantes 900 - 1200 g por planta en exterior. Esta belleza florece en 8-9 semanas, y está lista para la cosecha a finales de septiembre. Tanto si la mantienes acogedora en interior como si la extiendes bajo el cielo, Violet Face se extiende con alturas de 80-120 cm en interior y 160-200 cm en exterior.
🌻🚀 Consigue aqui tus semillas:
💡TS-3000 + TS-1000: se usaran dos de las lámparas de la serie TS de Marshydro, para cubrir todas las necesidades de las plantas durante el ciclo de cultivo, uso las dos lámparas en floracion para llegar a toda la carpa de 1.50 x 1.50 x 1.80.
https://marshydro.eu/products/mars-hydro-ts-3000-led-grow-light/
🏠 : Marshydro 1.50 x 1.50 x 1.80, carpa 100% estanca con ventanas laterales para llegar a todos los lugares durante el grow
https://marshydro.eu/products/diy-150x150x200cm-grow-tent-kit
🌬️💨 Marshydro 6inch + filtro carbon para evitar olores indeseables.
https://marshydro.eu/products/ifresh-smart-6inch-filter-kits/
💻 Trolmaster Tent-X TCS-1 como controlador de luz, optimiza tu cultivo con la última tecnología del mercado, desde donde puedes controlar todos los parametros.
https://www.trolmaster.com/Products/Details/TCS-1
🍣🍦🌴 Xpert Nutrients es una empresa especializada en la producción y comercialización de fertilizantes líquidos y tierras, que garantizan excelentes cosechas y un crecimiento activo para sus plantas durante todas las fases de cultivo.
Consigue aqui tus Nutrientes:
https://xpertnutrients.com/es/shop/
📆 Semana 1:
Ha sido una buena semana, ella ha dado otro gran cambio en su lugar definitivo 😎.
La carpa está ocupada al 75% y comienza una floracion explosiva gracias a @Marshydro y @Xpertnutrients y @Trolmaster con esta gran genética 💪.
A partir de ahora se riega manualmente con las dosis recomendadas por el fabricante.

Likes
12
Share


Processing
Likes
5
Share
@Mr_nugs_lover_David
Follow
She looks very healthy and strong, maybe a little bit small for 22 days old but it's okey,she's a happy wonderful lady,let's hope she can get a big enough size with the preflower stretching.


Likes
9
Share
@4F1M6
Follow
Stretch is done and flowers are piling on now! I treated with lost coast as a preventative. I kept the feed the same but it will be altered end of grow week. Canopy is getting hella full can't wait to watch these colas stack on. Until next update. Happy growing and stay lit fam.

Likes
11
Share
@adam_pawloski87
Follow
Pre98 Bubba , oh how I’ve missed you for so many years! These ones came out absolutely gorgeous! Loving the the purple phenos 😍 ! These ladies liked to stretch quite a bit so you’re gonna want to use some LST on em but I also recommend topping at least 6 times to get a better bang on your yield ! Expect nice tight purple buds with a tremendous amount of frost covering, some of the frostiest Bubba I’ve ever had! Over all I give it 10 stars an would definitely over an over run this strain!

Likes
71
Share
@DogDoctorOfficial
Follow
Greetings, fellow cultivators! Week 6 has brought us to a pivotal moment in our Anesia adventure as we witness our green beauties reach new heights of vitality and vigor. Join me as we delve into the latest developments in our thriving veg garden!
Our Anesia girls continue to impress with their robust growth and lush foliage, each plant a testament to the care and dedication poured into their cultivation. From the graceful Future#1 to the energetic Zoomiez, it's a sight to behold and a joy to witness their journey towards maturity.
But the excitement doesn't end there! As we enter the final stretch of veg, anticipation is building for the transition to flower and the promise of bountiful blooms to come. With each passing day, our plants grow stronger and more resilient, ready to face the challenges of the flowering phase head-on.
And speaking of excitement, I'm thrilled to announce that Episode 1 of "Welcome to the Green Oasis" is now available on YouTube! Join me as we embark on this journey of growth and discovery, exploring the wonders of our green sanctuary and celebrating the beauty of nature in all its glory.
So be sure to check out the link in my bio and join us on this epic adventure. Don't forget to like, comment, and subscribe for more green goodness, and stay tuned for the next chapter in our Anesia saga. Until then, happy growing!
https://www.youtube.com/watch?v=8l_e2Jc2Q0E Welcome to the Green Oasis: Episode 1 - Tent Transformation! Direct link with full explanation of whats happening as the video is to big file to upload here
Genetics Red Banana Pudding = RBP
Apricot Oreoz = AO
Zoomiez = Z
Future#1 = F
https://anesiaseeds.com/
Plant nutrition - Aptus Holland - https://aptus-holland.com
LED Photons - Future of Grow - https://www.thefuturofgrow.com/
Controls - Trol Master - https://www.trolmaster.eu/
Watering - Autopot - https://autopot.co.uk/
Tent - Mars Hydro - https://marshydro.eu/
Love and attention - Me, myself and i
As always thank you all for stopping by, for the love and for it all , this journey of mine wold just not be the same without you guys, the love and support is very much appreciated and i fell honored and blessed with you all in my life, With true love comes happiness. Always believe in your self and always do things expecting nothing and with an open heart , be a giver and the universe will give back to you in ways you could not even imagine so
More info, the ocasional give-away and exclusive updates from all my adventures can be found - links in the profile description
Friendly reminder all you see here is pure research and for educational purposes only
Growers Love To you All 💚
Likes
36
Share
@TerpTurtle
Follow
Introducing some carbs this week (Bud candy & molasses) 🍬
some additional mycorrhizae (great white) with the Liquid Karma every water 🍵
will end the week with a final defoliation 🍅
Likes
100
Share
@AsNoriu
Follow
Day 85. Few days ago I trimmed most leafy Northern Lights and she loved it ! So tomorrow two most mature Alaskan Diesels go to chop room. All other plants will get defoliation too, will have space to reach all plants.
Third Alaskan Diesel is catching, but he is a week behind.
Green Cracks will fall in 2-3 weeks, Northern needs at least 4 ....
Will move my Bruce Banner's to main tent.
I still feed Northern , but all other plants are on pure water.
Day 86. Rearranged all girls, trimmed them heavy, gave new positions.
One Northern lights is still in dark part of tent, I think I need 7-10 days til last Alaskan Diesel will mature and it will be only 8 girls left.
Brought other diaries girls to main tent and added Mars Hydro SP150 as supplemental side lightning ... They miss height a lot compaired to older plants, so I hope it will help a bit . Never used lights that way before ...
Happy Growing !!!
Likes
34
Share
@PrairieFrostGrow
Follow
*****Week 14 growth – March 13 to 19, 2021 – Week 6 flower ******
Feeding has ended this week and we are in flush mode now. The girls have just started to slow down their drinking and pistols are changing colour, buds are swelling, they are getting ready to finish. Added the UV and IR light bars in this week. Started the week with just one bar and then both in place by end of week. Each bar has 10 x 730nm, 10 x 395nm, 6 x 660nm pulling 30 watts each. Trichome enhancers!!
Working with the new light this run I have certainly pushed them with more light intensity than they should have received, broke 1100 PAR for a bit. This has also started to cause some foxtails to begin rather than staying compact and swelling the buds. Know for next time……always changes to make 😊
Little more detail…..
Mar 13/21, Day 36
- Feed day with full line of Innovating Plant Products but at ¾ strength.
- Keeping up the feeding but thinking about nitrogen levels and working on reducing.
- feeding with grow – 0.5, micro – 1.5, bloom – 2.5, ult B – 0.5, carbs – 0.75, B Storm – 2, S Storm – 3, Terp – 3, Jet Fuel – 1.5, Rezin 1
- 1300ppm and 6.2pH
- MM1 – 4L and MM2 – 3L
- Added in the first UV bar today
Mar 14/21, Day 37
- Seeing lots of swelling these days from the girls.
- Microbe feeding today…….possibly last round of microbes.
- Plain tap water with Recharge @ ½ tsp/gal and Natures Candy @ 1.5ml
- 400ppm and 6.1pH
- 3L all around today…..very little run off.
Mar 15/21, Day 38
- Another feed day today. Last week of feed so pushing them a little more. No Grow added! Last couple of feeds with CalMag as well, seeing some magnesium issues so giving last dose.
- feeding with micro – 1.5, bloom – 2.5, ult B – 0.5, carbs – 1, B Storm – 2.5, S Storm – 3, Terp – 3, Jet Fuel – 1.5, MagNifiCal – 1.5ml
- 1175ppm and 6.0pH
- MM1 – 4L and MM2 – 3L
-
Mar 16/21, Day 39
- Just giving the basic building blocks at this stage. Most of the supplements not added this feeding.
- feeding with Grow – 0.5, micro – 1.5, bloom – 2, carbs – 1, Rezin – 1.5ml, MagNifiCal – 0.5ml
- 875ppm and 6.0pH
- MM1 – 4L and MM2 – 2.5L
Mar 17/21, Day 40
- Last Feed Day……calling it at day 40 this run!!!!!
- 4L of feed water left from yesterday so added in 12L of RO water to keep the ppm down.
- Left over plus Rezin @ 2ml, Overdrive @ 2ml (its hard to let go of your routines…I have been using Overdrive for so long……it feels wrong to not be using it this run….snuck in a couple ml😊)
- 485ppm and 6.0pH
- MM1 – 4L and MM2 – 2.5L
- Light power pushed back up to 525 watts……..keeping the intensity up to hit the lower bud sites….will see what happens to the uppers.
Mar 18/21, Day 41
- Starting flush but not hitting the pots with 12 gallons of water each type of flush! Will just drop the ppm down to nothing and use RO water……planning on having close to 3 weeks to flush….second guessing that I really have that long though so may actually end up adding a flushing agent to the girls…..decide in the next 4 days so can leave plain water time if I do.
- Watering with Enzymes @ 2ml…….clean up the roots and help them get more of the ppm out of the media.
- 100ppm and 5.9pH……..missed the pH but not adding both up and down, ran with this.
- Light power pulled back down 480 watts
Mar 19/21, Day 42
- Dry out day today. Will be letting the pots get dryer now before adding more moisture.
- Leaving them for today though. Give flushing agent in next 2 days if going to.
- Work down the light intensity more in next couple of days as well.
- UV lights going now for 3 hours per day on both fixtures at the middle of the light schedule.


Likes
25
Share
@Paul_on
Follow
Last feeding gave last wk ive just been given them rain water, and green tea 4 days ago just to give some antioxidants, i gave 1 and a half litres of plain cooled kettle water to each pot today, no more water now until harvest 4 days for Mimosa x Orange Punch to be harvested, and 8 to 10 days on the kush n cookies CBD, and on the Funky Skunk, i getting good results on every grow the last year and a half, im 💯grateful 🙏🍀 Biscotti mintz, and water mellon Zkittles from @Barney's Farm.com coming up in march 2023.

Processing
Likes
5
Share
@Ensign420
Follow
Week 02 Introduction
This week has been a bit of a struggle. Had my first experience dealing with slime and brown algae. But I think adding enzymes and increasing the beneficial bacteria helped to fix the issue. Also experienced nutrient burn for the first time. My nutrient solution strength got as high as 671 PPMs. So backed it down to about 430 PPMs during the end-of-week reservoir change. Also cut Hydroguard (expired?), CaliMagic, and Superthrive from this grow. Now she's still stunted, but is starting to recover. Hopefully...
[START OF WEEK 02]
Day 01 - Monday - 08/10/20 - Total Days: 008
-----------------------------------
- [0830]: Still looks a bit yellow. But getting larger!
--- Solution strength was at 248 PPMs.
--- Just topped off with a bit of distilled water
--- PH went up to 6.1 so PH'd down to 5.8
--- Ran the top feed for a bit to wet the hydroton.
- [2130]: She's looking even more yellow now.
--- Even the new leaves are really yellow.
--- Decided to add more base nutes.
--- Added 4ml of Sensi A
--- Added 4ml of Sensi B
--- Now at about
--- Solution Strength went up to 304 PPM.
--- PH was at 6,
--- Also raised the water level a bit more.
--- I really hope it's a nutrient deficiency and not an over-watering issue.
--- Please live!
Day 02 - Tuesday - 08/11/20 - Total Days: 009
-----------------------------------
- [0830]: Looking less droopy. But still yellow.
--- Decided to do a reservoir change.
--- 4.5gal of distilled water
--- 8ml of Sensi Grow A
--- 8ml of Sensi Grow B
--- 8ml of Voodoo Juice
--- 4ml of B-52
--- 4ml of CaliMagic
--- 4ml of Hydroguard
--- 4 drops of Superthrive
--- PH'd down to 5.8
--- Solution strength: 302 PPM
--- Since I didn't want to risk over-watering the rockwool, I did not to do a top feed, may do one tonight after the sleep cycle (lights are still set to go off at 10am and back on at 4pm).
--- As I was doing a reservoir change, I noticed that the tubes and bucket were a bit slimy. Didn't really stink or anything. Is this normal? Maybe due to the Hydroguard and Voodoo Juice?
--- I hope she gets better soon!
- [2215]: Getting larger! But still yellow.
--- Also can see a root growing through the net pot! Tiny little thing but it's there! Will have to start dropping water once more appear.
--- After looking over a few DWC diaries using AN nutes, seems like my solution strength is still too low. Most around this stage average around 500 PPMs with about 4ml per gallon.
--- Top fed for a minute to wet the top of the hydroton.
--- Solution strength went down to 263 PPM.
--- Added 8ml more of Sensi A
--- Added 8ml more of Sensi B
--- Now base nutes are at 16ml for 4.5 gal of water.
--- PPMs went up to 411.
--- Still lower than 500 PPMs, but that's okay.
--- PH was at 6. Not sure if I should adjust PH using AN nutes. So going to not ajdust unless PH goes above 6.1.
Day 03 - Wednesday - 08/12/20 - Total Days: 010
-----------------------------------
- [0830]: Looks like more root growth!
--- She still looks yellow. But leaves are perky.
--- PH was at 6.2 so lowered down to 5.8.
--- Solution strength was at 394 PPMs
--- Since roots are still growing, I decide to lower the water level a bit. Now water level is a bit below the net pot.
- [2200]: Root is getting longer!
--- Slime is returning. Not sure why.
--- Solution strength: 357 PPMs
--- PH: 6.1
--- Decided to add an enzyme along with more beneficial bacteria to hopefully cure the slime.
--- Added 16ml of Sensizym
--- Added 5ml of Hydroguard
--- Added 8ml of Voodoo Juice
--- New solution strength: 430 PPMs
--- New PH: 6.1
--- Top fed for a minute.
--- This slimy residue is really freaking me out! I hope the added enzymes will help eliminate the slime.
--- Going to do a full reservoir sterilization/nutrient change over the weekend. Please survive until then girl!
Day 04 - Thursday - 08/13/20 - Total Days: 011
-----------------------------------
- [0930]: I think the enzymes worked! There is little to no slime now!
--- Although I think the root was also dissolved in the process. It's now just a little stub sticking just below the net pot. The enzyme is also suppose to dissolved dead roots too but guess that root was too weak? Not sure what happened there. But I think the slime is cured!
--- Solution strength went down to 395 PPMs. Decided to add more base nutrients.
--- Added 8ml of Sensi A
--- Added 8ml of Sensi B
--- Added 4ml of B-52
--- Solution strength went up to 598 PPMs.
--- PH was at 6.1
--- As long as the PH is between 5.5 and 6.3, I'm not going to use PH Up or Down. But still will monitor PH levels.
- [1715]: Checked up on her after her nap and shes looking alive but stunted. But no slime!
--- Decided to add some sugars to help maintain the enzymes and beneficial bacteria.
--- Solution strength was at 587 PPMs.
--- PH was at 6.2
--- Added 8ml of Bud Candy
--- Solution strength went up to 671 PPMs.
--- PH also went up to 6.3
--- Lowered water level a bit to hopefully promote more root growth.
--- Top fed for a minute.
--- She is getting bigger, but still looks yellow.
Day 05 - Friday - 08/14/20 - Total Days: 012
-----------------------------------
- [0915]: Leaves look a little burnt on the tips. Still no slime.
--- Going to back off on the PPMs to hopefully fix the nutrient toxicity.
--- Solution strength was at 632 PPMs
--- PH was at 6.3
--- Added/Removed water until PPMs were at 536.
--- PH was still at 6.3
--- Raised water up a bit, then top fed for a minute.
- [2200]: Looking better. Still yellow though.
--- Solution strength: 514 PPMs
--- PH: 6.5
--- Added PH down.
--- New solution strength: 518 PPMs
--- New PH: 5.2
--- PH was kind of high. So decided to PH down. Had to use quite a bit to bring it down. But eventually got it to drop down to 5.3. A little low, but so far, the PH has always gone up so wanted to start it really low.
--- Ran the top feed for a minute to re-saturate the top of the hydroton.
Day 06 - Saturday - 08/15/20 - Total Days: 013
-----------------------------------
- [0830]: She looks stunted. leaves are still yellow.
--- Solution strength: 514 PPMs
--- PH: 5.6
--- Top fed for a minute.
--- Not sure what to do at this point. Going to do another reservoir change soon. Hoping she lives until then.
- [2145]: Looking pretty much the same.
--- A bit of slime has returned. Since I've been diluting the nutrient solution, the enzyme ratio has dropped. So I guess this is expected.
--- Also noticed that slime build up was on the air-stones. Never really checked the stones so not sure how long that has been there. Looks brown too, which can't be good.
--- Going to do an H202 sterilization of the system (minus the net pot) tomorrow so did not add anything.
--- Lowered the water level to below the net pot.
--- Then top fed for a minute.
Day 07 - Sunday - 08/16/20 - Total Days: 014
-----------------------------------
- [0900]: STERILIZATION DAY!
--- Decided to skip today's night cycle for a deep clean.
--- I'm hoping that skipping a night cycle won't be too stressful.
--- Temporarily moved her to a new bucket.
--- Used about a half of gallon of straight distilled water to flush out the net pot.
--- Drained the system and wiped up all the brown sludge. Also removed the air stones and cleaned up all the goo.
--- Filled the system with 2 gallons of distilled water and at least 30ml of food grade hydrogen peroxide (35% strength).
--- Yea its a lot, but since I'm not going to sterilize the system overnight, I went with a really high doseage. Basically I kept adding until I started to see little bubbles start to form.
--- Then I ran the water pump.
- [0915]: Boiled the air stones in tap water for about 10 min. Then reconnected them to the airlines.
--- I let the air stones and hose soak in the sterilization solution for about 5 minutes so the peroxide can absorb into the stones. Then ran the air stone to help mix and agitate the solution.
--- Occasionally, I'd repeat the process of turning the air pump off for a few minutes to let the stones soak.
- [1000]: Covered the top two row of holes of the net pot with some aluminum tape. Hopefully this solves the light leaking in through the hydroton.
- [1200]: Used an old toothbrush and scrubbed the pump clean. Then drained the system.
--- Refilled with more distilled water and peroxide. Again added a lot.
--- Ran system again to sterilize even more.
- [1530]: Drained the system and refilled with distilled water to rinse.
--- Ran the system for a few minutes, then drained and rinsed again.
--- Did this a few more times over about an hour.
- [1630]: Added 4 gallons of fresh distilled water.
--- Added 15ml Sensi Grow A
--- Added 15ml Sensi Grow B
--- Added 12ml of B-52
--- Added 16ml of Voodoo Juice
--- Added 16ml Sensizym
--- Solution strength was at 430 PPMs
--- PH was at 5.6
--- I was going to add Hydroguard, but I think the bottle is expired. Since 2017 or 2018!? I think Hydroguard is good for up to 2 years from the date on the bottle or 6 months after opening. So not going to use from now on. I wonder if this could have contributed to the slime build up.
--- Also removed the CaliMagic and Superthrive too. Going to only use AN products to eliminate the chance of incompatible nutrients.
--- Placed her back in the bucket and top fed for a minute.
--- Here's hoping for the best. Going to let it ride until morning! Please feel better!
[END OF WEEK 02]
