The Grow Awards 2026 🏆 


Likes
Comments
Share
@Stickygreens420
Follow
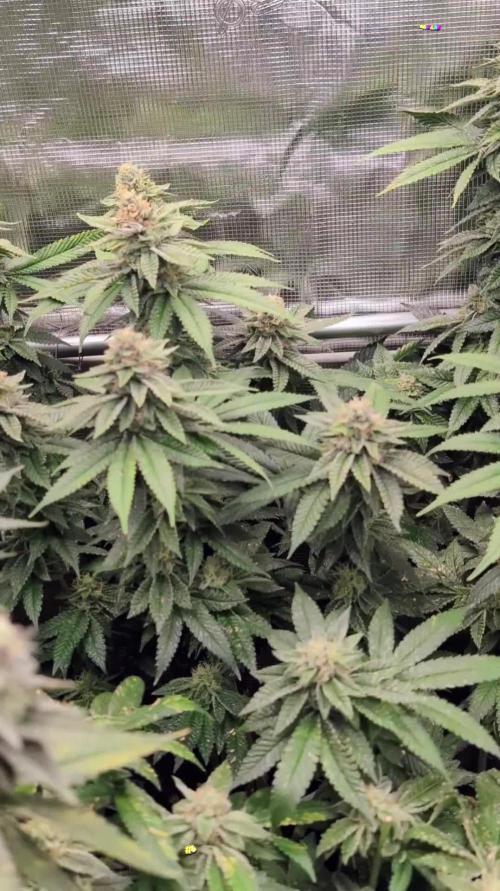
12/6/2022: Strawberry Gushers is really starting to fade. Some nice purple showing up on some of the leaves. She has some droopy leaves, so I think she is a bit over watered. I skipped watering her today, other than a light mist to keep the soil on top moist. Orange Bubblegum is looking good. Still showing some fading on the lowers, so I hit her with a compost tea today. About 1 liter. The Newberry is also showing some fading on the lowers, but her leaves are slightly drooping too, so I only gave her .5 liters of the tea.
12/7/2022: watered in the 2nd dose of nematodes today, even though there are only a couple fungas gnats left. Gave each plant 1 liter, mixed with the ThermX-70 and some FishShit. The big update today is with the Strawberry Gushers. I found a few nanners. Caught them real early and plucked them, but if more show up I may have to harvest earlier than expected. Used my Bluetooth microscope today to look at the tricomes and Orange Bubblegum is mainly all foggy, with very little amber. I hope I can give her at least another week or two. The Orange Bubblegum and Newberry are a mix of cloudy and clear, with no amber, other than on the leaves, which doesn't count in my book. I'd still say another 3 to 4 weeks.
12/9/2022: The Strawberry Gushers is really fading, and the other two are starting to fade more as well. The Strawberry Gushers is not taking up water as fast anymore, so I just misted the top soil. For the Orange Bubblegum and Newberry I watered 1.3 liters at 6.6 ph, mixed with BuildABloom, coconut powder, and ThermX-70. Also added some fresh aloa juice I made for a new 3x3 bed I'm starting. Did not see any other naners, and the fungas gnats are almost completely gone!!!
12/10/2022: (Day 75) had about 2 liters of leftover water from by 3x3 bed I'm making soil for, so I split that between the 3 plants, mainly just to wet the top soil. Realized after the fact that the water had some Rootwise Micro Complete in it, which the plants don't need at this point, but it won't hurt. Ph was about 6.5 and it also had some FishShit and ThermX-70 as always. Also, reduced the light intensity down again to 600 PPFD, which is a DLI of about 39.
Avg. VPD:1.5
PPFD: 600
DLI: 39


Likes
35
Share
@ISCA_Abi_In_Da_HOoD
Follow
Hello
Very satisfied with the sweet seed.
Planted them she likes my soil prepare yourself.
I'm going into flowering today.
If you have any advice to give me I'm interested
Thank you and good luck to all of you

Processing
Likes
6
Share
@Tommy716
Follow
This week was the best week so far. My ladies doubled in size. They are now in full flowering and all my lol lovely ladies are doing Great we have switched to flowering nutrients and cranked up the lights. The new 4000 LED light is a monster as well .I can't wait to see how these autos do. So surprised at the results I'm getting from these lovely ladies. Still astonish to see autos at 3 ft tall. I will recommend a quality seed. Makes the grow so much easier. Each week is like watching a baby grow into an adult. Stay tuned. As always, I have a couple tricks up my sleeve to go ahead and fatten up the buds and really packing on the turps. Happy budding and as always, stay high

Likes
18
Share
@Diips
Follow
d.50 a few spots appeared on the leafs.
gave a 10 ml dose of bio p k and waiting a week before giving a dose of orgatrex and bactrex
edit: d.50 i also gave 0.5 ml of calmag from Biobizz
edit d.53 will i be giving her the orgatrex and bactrex treatment ✌️🌞
d.53 she got 20 ml orgatrex, 1g of bactrex and 0.5 ml of biobizz calmag
d.54 added scrog and did lst with clips to even out the height and space… still need to adjust it.

Likes
3
Share
@Lilze
Follow
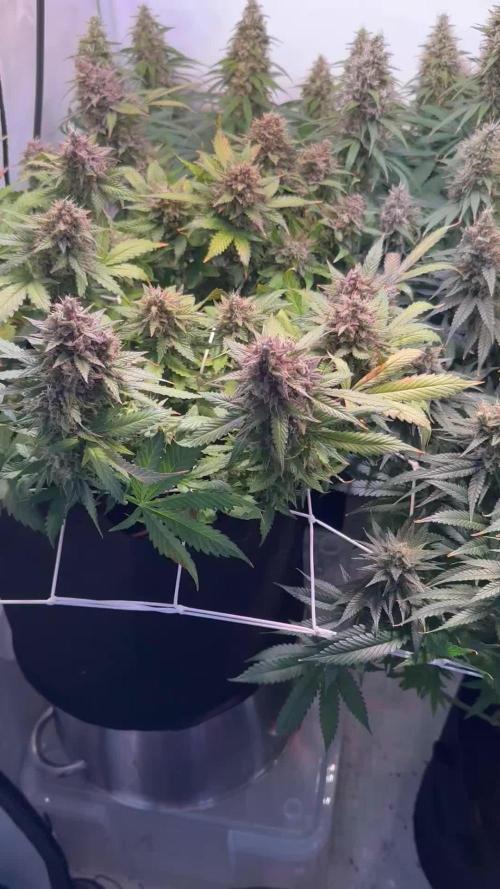
It’s finally getting a nice green colour
This week I changed the scrog net , it’s about 7” above the top of the pots .
upped the nutes to 1.8-2 ec.
Sprayed with canna cure
Watering every morning to about 10% run off
Lollipoped an defoliated ,Waiting to fill the net a bit more but will be switching to 12/12 very soon.
Likes
20
Share
@Dunk_Junk
Follow
Wow.......... 33cm vertical growth this week! She over doubled in height!!!!!!!
I'm getting a bit excited to see how she turns out 😍

Likes
225
Share
@yan402
Follow
🌸🍭✨🍬🌈🍭✨🍬🌸🍭✨🍬🌈
Hi and welcome to a first @KanOrganics
run!
This time I’m running Fantasy Feast (6x regular seeds). Gonna veg them under 24hr light with a mix of LST and topping — might let one go wild for fun.
Still prepping the tent, need to transplant all my tomatoe and paprika plants to free up some pots, gonna sow tomorrow (14.04.25)
🌸🍭✨🍬🌈🍭✨🍬🌸🍭✨🍬🌈
💭❗💭❗💭❗💭❗💭❗💭❗💭
❗Events & thoughts worth noting❗
💭❗💭❗💭❗💭❗💭❗💭❗💭
12.04.25 (GW1) Cleaning old coco coir & prepping pots. Might need to hydrate extra bricks.
This is how I recycle my coco coir — fast, cheap, no BS.
🌿 Harvest plant
✂️ Chop roots small — they stay in for structure (organic perlite)
💦 Hot water rinse — remove salts & dust
🍶 Pre-soak with light feed: Micro 10ml Grow 0ml Bloom 0ml GreenBuzz 10ml Cal-Mag 60ml FPJ 10ml pH down (citric acid)
♻️ Media stays — Roots stay — Back in service.
14.04.25 (GW1) Sow 6x Fantasy Feast ✅
16.04.25 (GW1) did final tent clean up and all set up now ✅📸📸📸
18.04 25 (GW1) All 6 germinated 🎉👌♥️📸
🙏@resi_max
26.04.25 (VW1) using the new Batch of FPJ/FFJ
https://growdiaries.com/diaries/266849-grow-journal-by-yan402
00.04.25 (?W?) Transplant to...WIP, ✅
04.05.25 (VW3) Topped all of them to the same size except #4 which probably won’t make it. #5 is showing classic small pot symptoms, all 6 are droopy so left them to dry a bit,I overwatered them apparently, I'll be repoting tomorrow in bigger pots probably 9l, *repoted in 11l pots✅
30.04.25 (VW2) – Increased TriPartMicro & GreenBuzzBloom 10ml → 15ml
03.05.25 (VW2) – Increased TriPartMicro again 15ml → 20ml
13.05.25 VW4 Increased TriPartMicro to 30ml and GreenBuzzBloom to 20ml.
24.05.25 VW6 increased GreenBuzzBloom to 30ml
01.06.25 VW7 At least 4 are female 🎉🥂
by next week I'll be choosing 2 or 4 to finish off.
05.06.25 VW7 Did a cleanup 📸📸
10.06.25 VW8 kept #1-4, #5 and #6 are going to the balcony with a new diary📸📸
14.06.25 VW8 did a cleanup HST session 📸📸
(VW9)
21.06.25 VW9 Switched lighting to 12 hours.
28.06.25 VW10 Girls a stretching nicely and are eager to show their pistils.
29.06.25 VW11 increased GreenBuzzBloom 30→ 60ml
06.07.25 FW1 TriPart Micro: 50→ 30ml
TriPart Bloom: 0 → 20ml
Home-made FFJ/FPJ (Watermelon + Pumpkin): 10 → 30ml
12.07.25 FW1 GreenBuzzBloom 60 →40ml, TriPart Bloom: 20 → 40ml, fpj 30→60ml
22.07.25 FW3 TriPartMicro 30→20ml , TriPartBloom 60→80ml , GreenBuzzBloom 40→50ml
24.07.25 FW3 Cal-Mag 60→40ml
26.07.25 got thrips but handled them with extra airflow and defoliation.
29.07.25 FW4 GreenBuzzBloom 50→20ml, Home-made FFJ/FPJ (new batch) 60→120ml
04.08.25 FW5 Fantasy Feast #3+4 are showing signs of maturity so I created nutrient schedule #2 just for those two.
05.08.25 FW5 decided to harvest the tops of Fantasy Feast #3+4 for two reasons: no1 I want a "speedy" high, no2 I have thrips in the tent and even though they are under control it doesn't harm to get the tent dryer with more airflow and 2 "half" plants less, 📹
Fantasy Feast #1 wet trimmed: dry trimmed
Fantasy Feast #2 wet trimmed: dry trimmed
Fantasy Feast #3 wet trimmed:104.3g, dry trimmed:
Fantasy Feast #4 wet trimmed:, dry trimmed :
🌱💦🌱💦🌱💦🌱💦🌱💦🌱
🌿 Day to day tasks & actions 🌿
🌱💦🌱💦🌱💦🌱💦🌱💦🌱
02.08.25 FW4 – Fed 3l of #1 → 1.5l runoff
03.08.25 FW5 – Fed 3l of #1 → 1.5l runoff
04.08.25 FW5 – Fed 3l of #1 → FF#1+2, – Fed 3l of #2→ FF3+4→ 1.5l runoff
05.08.25 FW5 – Fed 3l of #1 → FF#1+2, – Fed 3l of #2→ FF3+4→ 1.5l runoff
06.08.25 FW5 – Fed 3l of #1 → FF#1+2, – Fed 3l of #2→ FF3+4→ 1.5l runoff
07.08.25 FW5 – Fed 3l of #1 → FF#1+2, – Fed 3l of #2→ FF3+4→ 1.5l runoff
08.08.25 FW5 – Fed 3l of #1 → FF#1+2, – Fed 3l of #2→ FF3+4→ 1.5l runoff
09.08.25 FW5 – Fed 3l of #1 → FF#1+2, – Fed 3l of #2→ FF3+4→ 1.5l runoff
(*RUNOFF reused for tomato plants)
🍶💧🍶💧🍶💧🍶💧🍶
💧 Nutrients in 30L #1 only for FF #1+2
🍶💧🍶💧🍶💧🍶💧🍶
💧 TriPart Micro:
10 → 15 → 20 → 30 → 40 → 50 → 30 → 20ml
= 0.67ml/L
🍶 TriPart Grow:
0ml
= 0.00ml/L
💧 TriPart Bloom:
0 → 20 → 60 → 80ml
= 2.67ml/L
🍶 GreenBuzz Bloom:
10 → 15 → 20 → 30 → 60 → 40 → 50 → 20ml
= 0.67ml/L
💧 Cal-Mag:
60 → 40ml
= 1.33ml/L
🍶 Home-made FFJ/FPJ (new batch):
10 → 30 → 60 → 120ml
= 4.00ml/L
💧 pH Down:
Citric acid (BuxXtrade) — adjust to ~pH 6.0
📦 TOTAL:
280ml per 30L
🔬 9.33ml/L
🍶💧🍶💧🍶💧🍶💧🍶
🍶💧🍶💧🍶💧🍶💧🍶
💧 Nutrients in 30L #2 only for FF #3+4
🍶💧🍶💧🍶💧🍶💧🍶
💧 TriPart Micro:
10 → 15 → 20 → 30 → 40 → 50 → 30 → 20ml
= 0.67ml/L
🍶T.A FinalPartRipen 20ml
= 0.67ml/L
💧 TriPart Bloom:
0 → 20 → 60 → 80→ 0ml
= 0.00ml/L
🍶 GreenBuzz Bloom:
10 → 15 → 20 → 30 → 60 → 40 → 50 → 20ml
= 0.67ml/L
💧 Cal-Mag:
60 → 40ml
= 1.33ml/L
🍶 Home-made FFJ/FPJ (new batch):
10 → 30 → 60 → 120→ 200→ 100ml
= 3.33ml/L
💧 pH Down:
Citric acid (BuxXtrade) — adjust to ~pH 6.0
📦 TOTAL:
200ml per 30L
🔬 6.67ml/L
🍶💧🍶💧🍶💧🍶💧🍶
⚙️✂️⚙️✂️⚙️✂️⚙️✂️⚙️
✂️Tools & equipment✂️
⚙️✂️⚙️✂️⚙️✂️⚙️✂️⚙️
✂️ 2× MarsHydro SP3000
⚙️ MarsHydro 150mm ACF Ventilator
✂️ Trotec dehumidifier (big unit)
⚙️ Mini no-name dehumidifier
✂️ Kebab skewers (LST – stainless)
⚙️ Wire + roast skewers (LST assist)
✂️ Scissors (HST)
⚙️ Vacuum (for spills & cleanup)
⚙️✂️⚙️✂️⚙️✂️⚙️✂️⚙️
🌈🍒🍭🍬🌈🍒🍭🍬🌈🍒🍭🍬🌈🍒
🦄Fantasy Feast(@resi_max Seeds)🦄
🌈🍒🍭🍬🌈🍒🍭🍬🌈🍒🍭🍬🌈🍒
Species: Hybrid (Regular)
Genetics: The mother is Unicorn Whip by Dirty Bird Genetics. The father is Charcuterie by Cannarado Genetics.
Effect: Unknown WIP
Flavor: Unknown WIP
Flowering: Estimated 8–10 weeks
Resistance: Unknown — Testing phase
Notes: Expect weird phenos, candy terps, possible outliers
Likes
34
Share
@J4kpvp
Follow
Hello:)
The plants are progressing nicely. The wasabi is almost ready but the sangrias need at least one more week. Let‘s hope the wasabi won‘t be too much overripe by then:)
Sadly the red/purple buds don‘t seem to spread more to the top buds, I suspect that the temperature difference between day and night is not enough, let‘s see if they get more color this week.
I plan to harvest between the 18.11-22.11 if the sangrias are ready, the wasabi will have to hang in there:)

Likes
17
Share
@Comfrey
Follow
Leider musste ich auf einer unteren Blüte Kot von irgend einem Tier entfernen. Ich vermute dass es eine Weinbergschnecke war. Oder hat von euch jemand eine Idee? Nicht das am Ende jemand Rattengift darauf verteilt hat. Ich bin mir nicht sicher was das sein könnte.
Ansonsten entwickelt sie sich sehr schön weiter. Der Duft ist wirklich sehr angenehm.

Likes
15
Share
@HeavyHead
Follow
Last week for these ladies. Kept the soil moisture levels very low leading up and did a final heavy de leaf of pretty much anything that doesn’t have trichomes growing on it and will be shutting the lights and turning the heat off for the last 48 hours.
Keeping a lot of the sweet leaf on to keep the moisture throughout drying and will do a dry trim.
Will be aiming to have a long slow drying period (12-15 days hanging) before I jar them up for curing.
Won’t be adding many quality pictures this week since half the time they’re in the dark but will post harvest pictures as they come down :)
Likes
119
Share
@Roberts
Follow
I harvested this plant about a week ago. Gd was suffering some update issues still, but appears to be resolved. The plant grew great. I am impressed with the results myself. Nice big colas of frosty goodness. She bounced around a bit in growing under different lights. The results were great. I was even running the flowering light lower since she stretched a little too close to it. That was probably my biggest issue during the grow. I am anxious to try it once I get it processed. Thank you Spider Farmer, and Divine Seeds. 🤜🏻🤛🏻🌱❄️

Likes
26
Share
@Mr_weed_pt
Follow
One more week and they look really nice , very healthy.very happy with this grow..


Likes
29
Share
@nonick123
Follow
Dia de la cosecha (63) para Lemon Cherry Cookies Auto
Una mezcla de emociones entre la alegría de cosechar estos grandes cogollos y la "tristeza" de que ya no formará parte de mi jardín
Una increíble pieza genética desarrollada por @fastbuds_official , ejemplo de como el cutting-edge development de las Autoflower modernas nos puede dar una planta lista para ser cosechada en menos de 60 días (recogida a 63 días por el gusto personal de los tricomas más ámbar) con un perfil terpénico impresionante.
Ella ha desarrollado cogollos duros como piedras y con un olor que se mueve entre bol de frutas, cerezas en su punto justo de maduración y un toque de leche cremosa.
Una cepa que todo el mundo debería cultivar alguna vez en su vida, y que sigue elevando a @fastbuds_official al olimpo de los breeders modernos de autoflorecientes.
Gracias por esta oportunidad de cultivarla FastBuds!
💦Nutrients by Aptus Holland - www.aptus-holland.com
🌱Substrate PRO-MIX HP BACILLUS + MYCORRHIZAE - www.pthorticulture.com/en/products/pro-mix-hp-biostimulant-plus-mycorrhizae
Likes
50
Share
@DogDoctorOfficial
Follow
Week 8 Vegetation Report – Eternity Grow Cup
Welcome back, everyone! We’re diving into another exciting update for our Eternity Grow Cup journey. This week marks week 8 of vegetation, and our girls are thriving! Let’s break it down:
Growth & Structure
All five phenos continue to impress, with strong, bushy growth and uniform structure across the board. They’re praying to the ThinGrowLED Model Ones, which have been running on channel one only, and they’re absolutely loving it. The leaf development is lush and vibrant, a sign that they’re thriving under the current conditions.
Environmental Conditions
We’re keeping things dialed in with stable environmental parameters:
Temperature: 20.7°C
Humidity: 57.2%
CO2 Levels: 1569 PPM (a bit high but manageable)
VPD: 1.05 kPa
PPFD: 355 µmol/m²/s
Each of these factors plays a crucial role in maximizing plant efficiency, and we’ll go deeper into why these values are set as they are.
Featured Grow Gear – WCS2 Substrate Sensor
This week, we’re also highlighting part of the grow gear in use—specifically, the WCS2 substrate sensor. This sensor measures:
Soil temperature
EC levels
Water moisture
It's currently placed in the Autopots, which are not yet connected. For now, we’re still top-feeding to encourage root expansion. By allowing the roots to reach the bottom of the pots before activating the Autopot system, we ensure they establish a strong foundation for optimal nutrient uptake. We’ll go deeper into this method and why it’s an essential step in the process.
The Bigger Picture
As always, this journey wouldn’t be possible without the support of some incredible people and brands. Big shoutout to:
Zamnesia, Plagron, and GrowDiaries for making this competition a reality.
Aptus Holland, TrolMaster, CannaKan, Grove Bags, and Ziggi Papers for their continued support.
The entire community—supporters, followers, lovers, and haters alike—because everyone plays a role in making this grow series truly special!
Stay Tuned & Get Involved!
Don’t forget to follow along on YouTube and Instagram for exclusive content, behind-the-scenes insights, and in-depth discussions. Like, comment, and subscribe so you don’t miss the next updates—it’s only getting better from here!
Let’s keep pushing forward, and best of luck to all the competitors—we’re all growing something incredible together. Until next time!
Genetics - Runtz https://www.zamnesia.com/6000-zamnesia-seeds-runtz-feminized.html
Nutrients - Plagron https://plagron.com/en/hobby
- Aptus Holland https://aptus-holland.com/
Controls - Trol MAster https://www.trolmaster.eu/
LED - https://www.futureofgrow.com/en
LED - https://www.thinkgrowled.com
Soil - https://www.promixgardening.com/en
Germination - Cannakan https://cannakan.com/?srsltid=AfmBOopXr-inLXajXu3QFgKXCXXos4F1oEvScjMKIB5MR5dk8-GJ-F49
DOGDOCTOR 15% off
Smoking Papers - https://ziggioriginal.com/
Terpene saver - https://grovebags.com/
As always thank you all for stopping by, for the love and for it all , this journey of mine wold just not be the same without you guys, the love and support is very much appreciloved and i fell honored with you all in my life
With true love comes happiness Always believe in your self and always do things expecting nothing and with an open heart , be a giver and the universe will give back to you in ways you could not even imagine so
As always, this is shared for educational purposes, aiming to spread understanding and appreciation for this plant. The journey with nature is one of discovery, creativity, and respect. Let’s celebrate it responsibly and continue to learn and grow together!
Growers Love To you All 💚
#EternityGrowCup #RuntzHunt #GrowersLove #CannabisCommunity #AptusHolland #ProMixSoil #TrolMaster #Zamnesia #Plagron #ZiggiPapers #Grovebags
Episode 10 week 8 veg UPDATED
Likes
92
Share
@DogDoctorOfficial
Follow
🌸 Week 3 Flower – Growing Strong, Tall, and Vibrant! 🌱
Hey Grow Fam! It’s already Week 3 in flower, and I’m thrilled to bring you this update because these plants are doing phenomenally well! Some are stretching up so tall that I might have to get creative in the coming weeks! Fruit production is well underway, and it’s absolutely amazing to watch the canopy fill out as these girls reach their potential.
Aptus Holland Pack Unboxing & New Additions
This week kicked off with a big arrival: the Aptus Holland nutrient pack! 🙌 I couldn’t wait to share the unboxing with you all; there’s a video up where I go through all the goodies, so check it out if you haven’t yet! Between the photos and videos, you’ll be able to see just how well these nutrients are already feeding these green beauties. Having a blast sharing more content lately—I’m in the zone with editing and creating, so get ready for even more shares!
🌡️ Environmental Control and Fine-Tuning the Reservoir pH
Temps this week have been holding around 27.2°C with RH at 65.2% and CO2 at 800 ppm, creating a VPD of 1.26 for ideal flower development. The lighting intensity is at 833 PPFD, and the solution in the reservoir is fine-tuned to a pH of 6.22, EC of 475, with a temp of 21.8°C.
Let’s talk pH in the reservoir: it’s a dynamic process, and I’m constantly adjusting it to keep everything at the right level. The pH tends to rise throughout the week, and each day, I work it back down, fine-tuning it to keep those plants happy and balanced. Managing pH is truly a hands-on job, and it’s worth every moment. I love staying on top of it for optimal nutrient uptake—it’s all about consistent effort and keeping that perfect range dialed in.
Leaf Maintenance & Selective Defoliation
These leaves are HUGE and gorgeous, creating a lush canopy that’s nearly too perfect! I’ve been taking a few leaves here and there, focusing on leaves that may be blocking light from reaching lower parts of the plant. Selective defoliation at this stage is key because it opens up airflow and allows light to penetrate deep, boosting energy distribution across the whole plant.
Big, healthy leaves mean we’re getting excellent photosynthesis, but a gentle, strategic defoliation can guide that energy toward those developing buds. Leaf removal is all about balance, giving the plant space to breathe and thrive while still maximizing growth in flower!
🌐 TrolMaster + App – Real-Time Precision
Huge shoutout to the TrolMaster system and the app—keeping everything in sync and at peak performance is honestly effortless with this ecosystem. The app provides a full overview of each environmental parameter, allowing me to make real-time adjustments as needed and track trends over time. The precision here is unbeatable, giving me complete control over temps, humidity, CO2, and VPD, ensuring my girls are in a controlled paradise 24/7.
What I love most is how the app records everything automatically, so I always know exactly where things stand without having to keep separate records. If you haven’t tried TrolMaster yet, it’s a total game-changer for any grow setup!
💥 Shoutouts & Gratitude
Massive shoutout to TrolMaster and Aptus Holland for powering this grow with tech and nutrition that’s second to none. And, of course, gratitude to Pro-Mix for the superb growing medium and to the seed banks behind the genetics. We’re running strong thanks to each of you.
And to the whole community—thank you, everyone, from new friends to seasoned followers, lovers to haters. Your energy, whatever form it comes in, is all part of this journey, and I’m so grateful for it all. Special shoutout this week to my brother Daggadna—head over to IG and give him a follow! And if you’re loving the journey, remember to like, comment, and subscribe—it really helps the channel grow and reach others who may also dig this content!
Discount Codes so you can save big on your next check out 💚💚💚
Kannabia - DOGDOCTOR 30% off
SeedsmanSeeds - DOGDOCTOR 10% off
CannaKan- DOGDOCTOR 15% off
terpyz.eu - DOCTOR 15% off
The Neutralizer - PORKIT5-DOG 15% off
As always thank you all for stopping by, for the love and for it all , this journey of mine wold just not be the same without you guys, the love and support is very much appreciated and i fell honored and so joyful with you all in my life 🙏
With true love comes happiness 💚🙏 Always believe in your self and always do things expecting nothing and with an open heart , be a giver and the universe will give back to you in ways you could not even imagine so 💚
Friendly reminder all you see here is pure research and for educational purposes only
Growers Love to you all 💚💚💚


Likes
32
Share
@MadeInGermany
Follow
Unfortunately, I had to find out that my account is used for fake pages in social media.
I am only active here on growdiaries.
I am not on facebook instagram twitter etc All accounts except this one are fake.
Flowering day 20
since time change
to 12/12.
Hi everyone 😃.
The lady continues to develop very nicely :-).
The buds get thicker and look tastier 😅.
This week it was poured 2 times with 1.2 l each time.
The tent was cleaned and everything checked for functionality.
Have fun and stay healthy 🙏🏻
You can buy this Strain at :
www.Zamnesia.com
Type:
Runtz
☝️🏼
Genetics:
Zkittlez x Gelato
👍
Vega lamp: 2 x Todogrow Led
Quantum Board 100 W
💡
Bloom Lamp : 2 x Todogrow Led
Cxb 3590 COB 3500 K 205 W
💡💡☝️🏼
Soil : Bio Bizz Coco
☝️🏼
Nutrients : Green House Seeds Company Powder Feeding Bio
☝️🏼🌱
Water: Osmosis water mixed with normal water (24 hours stale that the chlorine evaporates) to 0.2 EC. Add Cal / Mag to 0.4 Ec Ph with Organic Ph - to 5.8
Likes
13
Share
@Aguitadelavanda
Follow
11 dias de floración, han colonizado todo el espacio, ya ambas variedades presentan preflor, hice la ultima poda de flores para darle potencia a las flores superiores, alimentadas con quemanta, se nota gran cantidad de flores y con mucha potencia, los tallos hasta el momento son muy débiles asique instale tutores y amarre ramas principales.

Likes
9
Share
@Esoteric_growing
Follow
Fantastic result, super super stinky. Potency totally exceeded my expectations. This rainbow candy cut of marmalade is soooo much better than I imagined it would be.

