The Grow Awards 2026 🏆 


Likes
Comments
Share
@FirstTime97
Follow
Week 7 seems to be going fine from my house and then I go to the grow 🤣 well fukc me I’ve ran into few problems let um get abit too dey for their liking the week leading up to Christmas / gave um a good feeding with week 7s nutes and peeled back abit of the fan leaves to get more light around , humidifier broke on us didn’t notice for 2 days so tent was 70 percent humid when gone to check , new humidifier replaced and back on track as I said earlier peeled back a few fan leaves think maybe a few too many plants started showing signs of stress soon after again these are autos and I think it could of stunted if not heavily affected the end product also we noticed about 3 weeks into this grow we had way too many plants in the tent starting to see the effects off that now a lot of nonsense on the lower branches and only really the top Lola’s getting the light and the mass , all the same seed bar 4 plants and very differnt plants all in all , definitely not a strain that’s been mastered about half are tall and spaced out and the others are short and very stacked from my own eye I’d say the shorter and more stacked buds will be the ones bearing more fruit the taller ones look very skinny and airy still

Likes
31
Share
@MadeInGermany
Follow
Info:
Unfortunately, I had to find out that my account is used for fake pages in social media.
I am only active here on growdiaries.
I am not on facebook instagram twitter etc All accounts except this one are fake.
Flowering day 24
since time change
to 12/12 h.
Hi everyone .
The lady is developing beautifully :-).
The buds start to get thicker and it smells better and better :-).
I added 2 g GHSC Bio Bloom per l coco.
That should be enough for the remaining weeks.
Otherwise everything was checked and cleaned as usual.
Have fun with the update and stay healthy 🙏🏻
You can buy this Strain at :
https://www.royalqueenseeds.de/feminisierte-hanfsamen/220-pineapple-kush.html
Type:
Pineapple Kush
☝️🏼
Genetics:
Pineapple x O.G. Kush
👍
Vega lamp:
2 x Todogrow Led
Quantum Board 100 W
💡
Bloom Lamp :
2 x Todogrow Led
Cxb 3590 COB 3500 K 205W
💡💡☝️🏼
Soil :
Canna Coco Professional +
☝️🏼
Fertilizer:
GHSC Powder Feeding Bio
☝️🏼🌱
Water:
Osmosis water mixed with normal water (24 hours stale that the chlorine evaporates) to 0.2 EC. Add Cal / Mag to 0.4 Ec Ph with Organic Ph - to 5.5 - 5.8 .

Likes
15
Share
@birdmountain
Follow
Nun, in der letzten Woche ist Einiges passiert: Beide Pflanzen wurden in ihre 11 l. Stofftöpfe umgepflanzt und in der Mitte der Woche getoppt. Sie haben es sehr gut vertragen und erfreuen mich mit ihrem Wachstum. Überhaupt sind es sehr schöne Pflanzen mit ihren violetten Blattstielen und den hellgrün- und dunkelgrünen Blättern. Gedüngt wurde nicht, da die neue Pflanzenerde erst einmal genügend Dünger bereit hält. Aber dann habe ich die Blumat Tropfer für die automatische Bewässerung in Betrieb genommen und nun sammelt sich überschüssiges Wasser in der Bodenwanne, was den anderen Stecklingen sehr zugute kommt. So war es aber nicht gedacht. Die genaue Einstellung der automatischen Blumat-Bewässerung ist etwas, dass ich zum ersten Male durchführe, habe also noch keinerlei Erfahrung darin und das Ergebnis sehe ich nun. Immerhin habe ich in den Stofftöpfen eine Drainage eingebaut, sodass die Wurzeln nicht geschädigt werden. Die Stecklinge scheinen das überschüssige Wasser zu lieben. die beiden großen hinteren Pflanzen, sind Mutterpflanzen, die ich seit August am Leben gehalten habe, darunter eine Divine-Seeds Fractal-Mutter, für die immer noch kein Ergebnis im Wettbewerb zur Verfügung steht 😒.
Meine automatische Steuerung sieht etwas chaotisch aus, ich hoffe das noch in den Griff zu bekommen.😜 Leider kann ich keinen genauen Wasserverbrauch angeben, da das Wasser direkt aus der Wasserleitung kommt und nicht aus einem höhergestellten Behälter, ich vermute der Wasserverbrauch liegt z.Zt. bei 50-100 ml, ist aber nur eine Schätzung.
Ich wünsche euch eine weitere erfolgreiche Grow-Woche und bedanke mich dafür, dass ihr meinen Report besucht habt. Ich nehme sehr gerne Tips zur Blumat Steuerung entgegen....

Likes
Comments
Share
@TolaMcFly
Follow
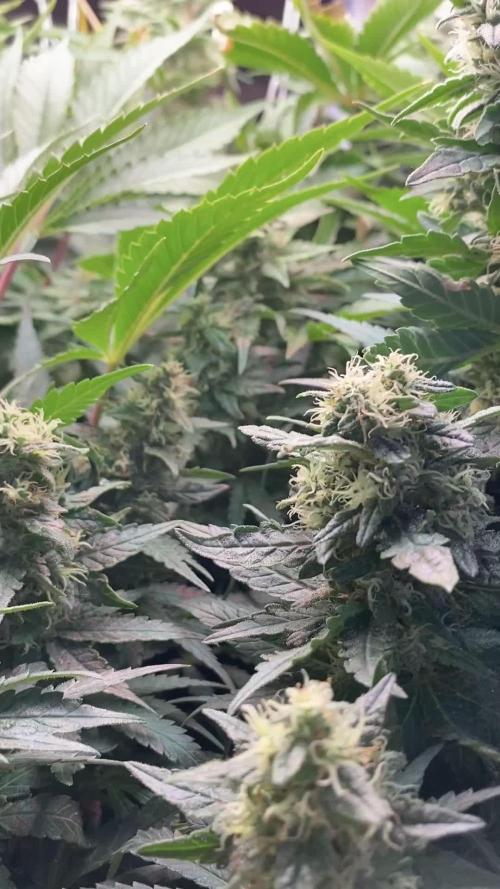
Las plantas están en plena floración , con un leve amarillamiento en la mayoría de las hojas , creo que es exeso de intensidad lumínica o el ultravioleta debe estar afectando , en fin , el crecimiento no se ha visto comprometido y las plantas están comenzando a emanar un olor fuerte dulce , muy dulce con toques de golosina de manzana a mi parecer, vigor increíble de la cepa desde la germinación hasta ahora.

Processing
Likes
14
Share
@Dunk_Junk
Follow
She's growing well this week. Her flowers are fattening up nicely! I was a bit worried that they will be airy not dense, but I was being too impetuous 😬😅

Likes
1
Share
@HoneyBlunt42
Follow
Колы набухают. Кормлю CalMag с базой, убрал PK booster. Иногда поливал не каждый день - увидел красные стебли на лопухах. Поставил на автополив, замешал 2 ml/l порцию для последних 2 недель цветения. Два других куста прошли половину сушки и усохли вполовину

Likes
167
Share
@PapaNugs
Follow
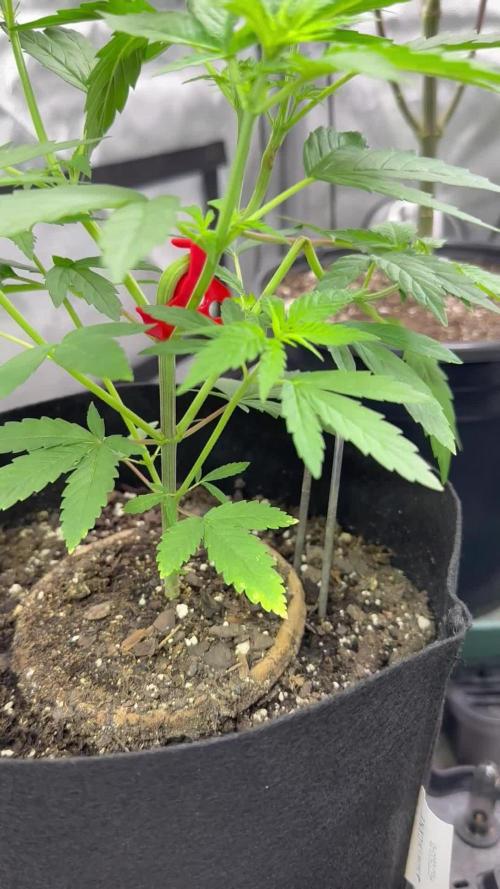
An exciting week again training this girl. Was spacing her out throughout the week using the low stress ties. As you can tell did a lot of defoliation and some minor lollipopping. Getting rid of the lower growth that'll be larf.
Watering every day right now. Added the AC Infinity self watering device to this girl. Because of that and how much she stretched, I'm a little close to my lights. I've spaced out the clips as far as I can to raise it up but I'm just outta room. It shouldn't negatively effect the plants with this much space but still not ideal. If I run into any issues I'll turn the lights down to 80%.
At 100% power
Here are the lights details:
Medic Grow Mini Sun-2 150W LED
Model: MN150-022
Spectrum mode: V1
Efficacy: 2.8 umol/J
Thanks for stopping by!
You can find the light on Grow Diaries:
https://growdiaries.com/grow-lights/medic-grow/mini-sun-2-150-watts
You can find the light on Medic Grow's website:
https://medicgrow.com/

Processing
Likes
5
Share
@Highdro
Follow
I had a busy week moving the plants into NFT once roots started to show, put them into a tent give them a fan.
Freebie seed shown slow recovery but decided to use it anyway.

Likes
Comments
Share


Likes
6
Share
@STINKINCROPS
Follow
Enjoyed growing this strain, easy to grow and needed little attention :)


Processing
Likes
12
Share
@Therbalist
Follow
Busy week indoors and outdoors apologies for the slow updates! Kalini Asia's are looking good can't wait to see them flower!
Likes
26
Share
@OGbros
Follow
ciao a tutti,
le piante sembrano stare bene. Da quando ho tolto lo scrog non mi sembra ci siano state molte differenze nella struttura generale delle piante, sembrano stare su anche senza l'aiuto della rete. I fiori hanno iniziato a formarsi, ma ho alzato la lampada di qualche cm perché la punta dei fiori della purple punch stavano diventando albini per la troppa luce (che stava causando il problema), mentre nessun problema nella glookies. Le piante sono alte all'incirca 40 cm e sono molto simili per superficie occupata, tuttavia la glookies ha una settimana in meno di vegetativa rispetto alla purple punch, la quale essendo a forte predominanza indica (10%-90%) si è allungata meno nelle prime settimane di fioritura rispetto alla glookies (30%-70%). La purple punch rimane comunque a mio avviso più compatta e ramificata rispetto all'altra pianta. Ho aggiunto 20 litri d'acqua con la quantità di fertilizzanti scritta sopra e ho aggiunto infine direttamente nella soluzione circolante 15 ml di pH- poichè il pH aveva raggiunto un valore di 6.6.
edit giorno 25: si inizia a sentire un certo odore super dolce. Il pH si è assestato sui 5.9 prima di versare 10l d'acqua con l'aggiunta di
0,8ml/l di floragrow
1,6ml/l di floramicro
2,4ml/l di flrabloom
1ml/l di calmag
Le piante sembrano stare molto bene👌
Likes
5
Share
@Selkot
Follow
.
FIRST DAYS
-------------
This week is off to a good start; the girls are growing up to 35 cm, the pistils are developing, and there are no abnormalities to report.
I waited a little too long before starting the CalMag (I live in the countryside, so I have to order everything online...), which resulted in a few yellow and brown spots on some leaves at the end of last week, but the deficiency has already been contained.
I removed the “bandage” from the injured plant; it has healed perfectly.
The plant affected by an infection has recovered well: the two branches trained to replace the main branches have grown well. They will undoubtedly each bear a respectable bud.
One of the scars curiously resembles a half-lion, half-gorilla face: I see this as a sign of robustness😊
Finally, there is no doubt: all the girls are indeed girls, with no signs of hermaphroditism.
Honestly, Fastbuds' White Widows are very resilient! 💪
MIDWEEK
-----------
7cm more in half a week; 2cm per day, good cruising speed
Nothing to do today, they are recovering from lollipopping without any problems, they seem to appreciate the watering schedule, as well as the temperature and humidity.
I can only watch them grow and resist the urge to manipulate them 😉
Oh, and one thing: frost is coming. 😍
Likes
46
Share
@Squirrel_Master
Follow
Overall a great growing experience with FastBuds Gorilla Glue Auto from start to finish. She went 65 days and hit 27". Lots of big beefy colas. She always took to changes in nutes/environment well. End result is a bunch of smelly, sticky goodness. 380.8g wet weight.
I'll update more once she's had a chance to dry... check back soon for dry weight and smoke report.
Harvest Update:
Ended up losing a lot more during my dry time than expected. Just barely hit two ounces of bud and about 17g of trim and popcorn. My wet weight did include a lot of stem whereas my dry weight reflects trimmed bag ready bud. But still... that's a huge difference! Still very happy with the results! The buds smell amazing, hints of pine and citrus in the smoke. Gonna let her cure up a bit and we'll be off to the races.
I will definitely be popping another one of these off in the near future.


Likes
47
Share
@MadeInGermany
Follow
Info:
Unfortunately, I had to find out that my account is used for fake pages in social media.
I am only active here on growdiaries.
I am not on facebook instagram twitter etc All accounts except this one are fake.
Flower Day 65
since time change
to 12/12 hrs.
Hey everyone 😀.
We arrived last week.
The lady developed very well to the end 👍.
I am very curious how it will be.
As always, it is left in the dark for 48 hours before the harvest.
The harvest update is coming next week.
Until then, I wish you a lot of fun and all the best ☺️
You can buy this Strain at :
https://www.exoticseed.eu/
Type:
Herz Og
☝️🏼
Genetics:
Larry OG X Kosher Kush
Indica 60 % / Sativa 40 %
👍
Vega lamp:
2 x Todogrow Led
Quantum Board 100 W
💡
Bloom Lamp :
2 x Todogrow Led
Cxb 3590 COB 3500 K 205W
💡💡☝️🏼
Soil :
Canna Coco Professional +
☝️🏼
Fertilizer:
Green House Powder Feeding
☝️🏼🌱
Water:
Osmosis water mixed with normal water (24 hours stale that the chlorine evaporates) to 0.2 EC. Add Cal / Mag to 0.4 Ec Ph with Organic Ph - to 5.5 - 5.8 .

Likes
10
Share
@DeltaEye
Follow
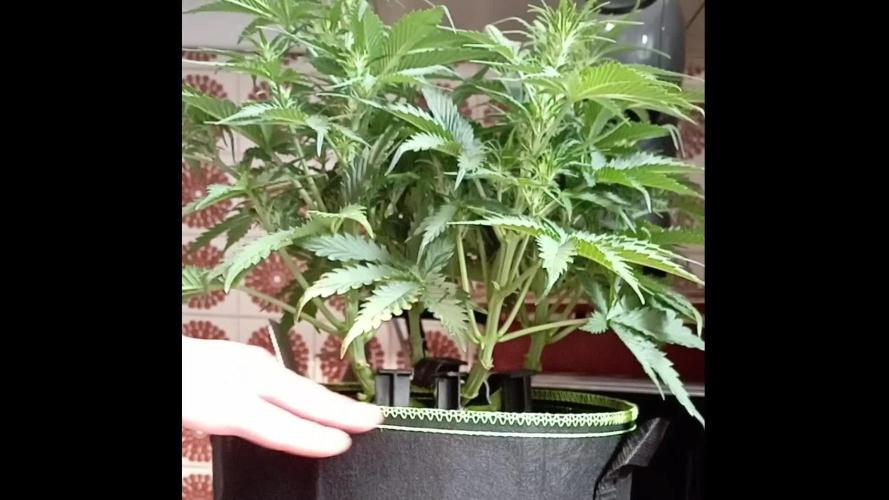
I put the plants into an NFT system couple weeks ago. I could have waited a bit longer for the plants to develop a stronger root system before placing the rockwool cubes into NFT but I was being impatient because of the slow start and wanted to get the plants under proper light. Now two weeks later they are growing well with good root development.
I switched the lights to flowering cycle about a week ago so they should start stretching soon. No preflowers yet.
Likes
8
Share
@Herbangardener671
Follow
Put a lot of love into this grow. She grew for 4 months from seeds to harvest. About 5 weeks and 56 days of flower. Overall great strain to grow and great site @growdiaries for giving the platform and help from other growers. I’ve learned so much about growing and especially about this strain.

Likes
10
Share
@Canadian_Steelheader
Follow
Well it’s been 2 weeks now and the girls are doing nicely, they have been lightly fed twice a day and have outgrown their Solo cups. I flushed the Coco 3 times to a reading of 10ppm out the bottom. It took 2.5 gallons of pH’d RO water.. I transferred them to 5.7 litre smart pots tonight and gave them about 500ml of nutes. I also prepped the CoCo with Myko before transplanting. So far I’m liking the CoCo and so are the girls. Wish me luck on this grow. Any comments and suggestions welcome.