The Grow Awards 2026 🏆 


Likes
Comments
Share
@GR0WER
Follow
New week starts.
__________________
🌞12.04
Today is the first day after a transplantation. My girls looks fine and I think they wouldn't need any nutrients
for some time, because there is new soil in the pots. I do not want to overfeed them. They were watered with a clean water yesterday and the next time I'll give them minimum nutrients concentration (0.2ml/l of all three 'flora's).
But today they've got nothing except clean water spraying.
🌞13.04
'G.O.SeaWeed' spraying today and nothing more.
It looks like all went good after the transplantation, so I ordered a SCROG net. One or two weeks more and I will change a light schedule to 12/12 and turn one more 100w lamp.
🌞14.04
Clean water spraying.
Upd: I made defoliation on evening. Cutted most of green mass - old leaves and lowest brunches. That was made because the SCROG net will come to me on monday and I'll tighten all four plants on their places. I want to avoid strong stress (making defoliation and LST together, putting in some new soil).
Now my girls will rest till monday morning.
🌞15.04
Today I spotted a few yellow tips on the upper leaves of my plants. It means it's time for nutrients already. I gave them 80% dose of 'GHE Tripart + Fulvic acid' solution. Only 7.5 liters per four pots, so there was no drainage. I'll water them with more volume of a clean water next time to outwash saults surplus.
I've spraiyed them with a clean water as usual.
🌞16.04
'GHE SeaWeed' spraying.
I'm waiting for tomorrow morning to make light defoliation of 'RG'#1 and to install the SCROG netting. It should come to me tomorrow.
🌞17.04
I installed SCROG, made LST and huge final defoliation. I filled pots with soil+perlite+'RQS Mycorrhiza'. Watered my flowers with 60% concentration of 'GHE TriPart'+'GHE Diamond Nectar' nutrients. Spraiyed them with 'GHE Sea Weed' 2ml/l.
🌞18.04
Healing.

Likes
25
Share
@pifflestikkz
Follow
Day 22
25/07/24 Thursday
Still no Feed/water since Tuesday.
Been a humid and overcast two days so not as much evaporation as normal.
All plants happy and healthy 💚
Video updates
Day 23
26/07/24 Friday
De-chlorinated watering pH 6 with 5ml calmag to 5L water.
Watered each with 250ml and had small run off.
I will continue to feed/water with small run offs to help prevent salt build ups.
Video update.
Day 26
29/07/24 Monday
Nice feed today, using de-chlorinated tap water pH 6.
They each had 300ml with small run off.
All looks incredibly happy and healthy!
The Auto Kabul that was mutated and twisted has pulled herself through and is just a bit shorter than the others.
Day 28
31/07/24 Wednesday
End of week😁
De-chlorinated water pH 6 today with Plagron pk13-14 5ml to 5L
Plagron power buds 5ml to 5L
Used 300ml of the 5L solution.
I will be using these on water days from now on as they are advised to be used every irrigation.
We'll see how they perform 💪💚


Likes
1
Share
@GERGrowDesigns
Follow
Welcome to Flower week 3 of Sweet Seeds Mental Rainbow F1
I'm excited to share my grow journey with you from my
Sweet Seeds Project . It's going to be an incredible ride, full of learning, growing, and connecting with fellow growers from all around the world!
For this Project , I’ve chosen the Feminized Photo strain Mental Rainbow F1 :
Here’s what I’m working with:
• 🌱 Tent: 120x60x80
• 🧑🌾 Breeder Company: Sweet Seeds
• 💧 Humidity Range: 50
• ⏳ Flowering Time: 7-8weeks
• Strain Info: 22-30%THC
• 🌡️ Temperature: 26
• 🍵 Pot Size: 16
• Nutrient Brand: Narcos
• ⚡ Lights : 600W x 2
A huge thank you to Sweet Seeds for allowing me to try my Best with this amazing collection from Photo Strains they managed to Sponsore . Big thanks for supporting the grower community worldwide! Your genetics and passion speak for themselves!
I would truly appreciate every bit of feedback, help, questions, or discussions – and of course, your likes and interactions mean the world to me as I try to stand out in this exciting competition!
Let’s grow together – and don’t forget to stop by again to see the latest updates!
Happy growing!
Stay lifted and stay curious!
Peace & Buds!

Likes
15
Share
@Trueorganics84
Follow
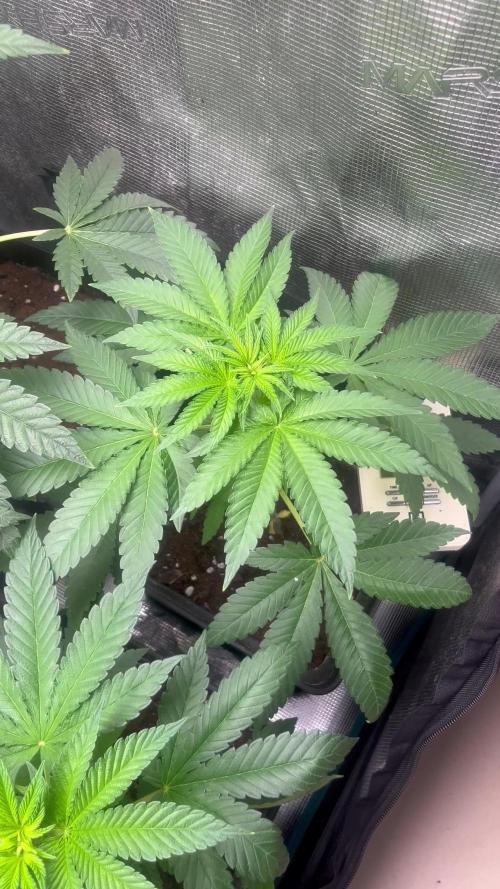
I love this girl. She grows tall and fast. Super easy grow so far. Just starting to lst her a little bit more.
Posted 4 videos on how I make my tea. I use this When I start seeing hairs until the last 2 weeks.
Then I flush
Just a compost tea you see here.

Likes
8
Share
@SpawN
Follow
This concludes the vegetative phase, I've set the timer to 12-12 and the flowering will begin tomorrow

Likes
55
Share
@Belverde
Follow
Welcome growers
And also the tirth week of life is finished for this three ladyes, three phenos of SORBET#4 🌿🌿🌿🍧
I have decided to show you the all family, so , in this way we can see if they show some differences 😉
For now I have two pretty similar, with a large leafs and internodes very close to each one..
And another one a little different , more Sativa in aspect, with a large structure that increase the lights penetration, which means more growing for the lower branches 💯
Anyway..
In the begining of the week I transplanted into a 3l plastic pot..
Usually my choice of pot is the smartpot or the airpot 💯
And therefore, considering that the soil will obviously remain less aerated than usual, I have chosen to use a greater quantity of coco coir in the substrate
I roughly prepared a mix of 50% light-mix (Canna professional and Biobizz), a 30% of coco coir (Atami), 10% worm-cast or humus (Atami) and around a 5% perlite wich it's already present in the light -mix..
I have also put a few micorizzae (Micosat F), like 10 grams, in direct contact with the roots and around 4 grams of Microlife (Bionova) in pellet form
I will use this last one also for making an areated Tea, but during flowering..
About nutrients 👇
In this week i have giving their always organic/veganic nutrients..
Root-Juice (Biobizz) and Rizostimo (Biomagno) for the last time, plus a little bit of silicium (Bionova) and then Activator (Biomagno) / Crescita (Biomagno) / The Missing Link (Bionova) / X-Cell (Bionova) {This last two i have used in a foliar spray solution}
Simply a little bit of everything at any watering 💧
About the lights 💡
I currently using for the first time, two Mars-Hydro SP3000, running at 25% of the power for now..
Next week im going to increase at least to 50% ⬆️
Onestly this lights looks pretty solid, definetly intense, with a spectrum really close ro the sun light
One of the cool things about it it's that you can connected each one toghter with a cable and so you can controll the intensity of the lights very easy, in a precis way 👌
We will see in this months how they works
And that's all..
See you in week n°4 📆
Thanks a lot for stopping by 😎👍
FC ✌️
🇮🇹


Likes
Comments
Share
@eldruida_lamota
Follow
Que pasa familia, vamos con la quinta y última semana de crecimiento de estas Pink Sunset feminizadas de silentseeds.
Vamos al lío ,se trasplantaron en macetas de 7 litros definitivamente.
El ph se controla en 6.0 , la temperatura la tenemos entre 24/20 grados y la humedad ronda el 50%.
El ciclo de crecimiento puse 16h de luz, el foco está al 50% de potencia.
De momento van creciendo a buen ritmo y tienen un buen color, aplique de manera foliar el tetra 9 ahora cara a la floración.
Agradecer Agrobeta por el envío de un kit para la temporada, son unos jefes.
- os dejo por aquí un CÓDIGO: Eldruida
Descuento para la tienda de MARS HYDRO.
https://www.mars-hydro.com
Hasta aquí todo, Buenos humos 💨💨💨

Likes
Comments
Share
@Spookytooth1974
Follow
Papaya and Aurora Indica grown in scrog. Were big enough to almost cover canapy in first few days.

Likes
105
Share
@BioBuds
Follow
Another week has passed. An eventful week in our lives, but the plants came back on track. Some regular water and defoliating made them happy again.
I see lots of similarities between the two strains. Where the XL Runtz ae a true XL and sees to adapt a little better to the conditions than the Forbidden Runtz.
But the fight isn't over yet. We still have weeks to go and the forbidden Runtz might recover, my two cents is this: Fastbuds are just a little bit less heat resistant and temps went up last weeks with the SP -3000 on high.
Also the XL Runz are closer to the intake of cooler air. So it would be fair to trade places what I do coming week.
Thanks again, see you next week!

Likes
14
Share


Likes
16
Share
@GrowerGaz
Follow
Just water till the end now , last feed was just water and Hesi boost .


Likes
35
Share
@hotdamnitman
Follow
Going very slow! I don't think she likes the LST I'm going to put them into flower at the end of this week.


Likes
21
Share
@cheetah844
Follow
They are still growing nicely, continuing to bush out since LST. A healthy green & what will be a bunch of future bud sites keep showing up daily.

Likes
11
Share
@Chubbs
Follow
Weekly update on these beautiful ladies. They're progressing nicely and definitely starting to get close. The stacking they've done is crazy on the main colas. All in all Happy Growing.
Likes
11
Share

Processing
Likes
98
Share
@OutForReal
Follow
SONG OF THE WEEK : Isaiah Rashad - 4r Da Squaw
-------
Day 32 - That week is a bit hard to manage as the weather is clearly against me, after the hard sun it is time for the heavy rain to shows up 😧. But it's outdoor rules.
But the ladies are doing good :
-SSW#3 were topped + suppercroped thanks to Tazard & Lumberjack advices I think she's doing right ( many thanks guys 😍). She's 20 cm tall now
-SSW#1 Will not be topped , I'm just doing a light LST on her by bending each secondary stems with my fingers everyday and you can see a "good" result on the pictures. She's 34 cm tall
-SSW#2 is late on the secondary stems but tall , I still don't know if I'm gonna train her. She's the tallest with 39cm
Likes
59
Share
@TheCannaProphet
Follow
~ AirCube Active Oxygen Ebb/Flow System sponsored by GrowAce, featuring Tropicana Cookies by FastBuds ~
Well guy's and gal's here we go again on another exciting Autoflower run together! This time will be different as I will be doing a 'Hydroponic' run utilizing the AirCube Active Oxygen Ebb/Flow System by GrowAce, who were kind enough to sponsor me for this run, so it should be interesting to see what results I get and have some fun along the way!
•Let me first tell you about this 6 Pot Ebb/Flow system from GrowAce:
"The AirCube system is the one and only Ebb & Flow grow system on the market that combines the benefits of air pruning with a fully automated Ebb+Flow system! With the AirCube's proprietary fabric pot in bucket design, this system is guaranteed to outgrow any other Ebb + Flow system on the market. The results speak for themselves- grow MASSIVE roots that result in MASSIVE fruits!
Air Pruning- Air Pruning only happens with fabric pots. As the roots reach the fabric walls of the pot, they penetrate and grow into the breathable fabric. Once penetrated, the roots are exposed to air, which causes the tips of the root to dehydrate and naturally prune themselves. This natural pruning process forces the roots to grow tons of lateral fibrous feeder roots. This results in a plant that utilizes the entire root zone and fills the entire pot with tons of roots. These fibrous feeder roots are incredibly effective in uptaking water and nutrients, resulting in a plant that grows healthier and more vigorously!
Oxygen Benefits- Without oxygen, nutrient absorption cannot occur. On a molecular level, oxygen is needed to transmit nutrients across the cell walls and into the roots of a plant. With the AirCube's proprietary bottom lifted draining design, the system actively draws all of the water out of the bucket pulls vital oxygen into the root zone.
Maximum Versatility with Any Grow Medium: The AirCube System is the only system on the market that allows you to use any growing medium you like. Use coco coir, soil, peat moss, perlite, vermiculite, hydroton, rockwool or any other medium you wish! This system is the most versatile Ebb and Flow bucket system in today's hydroponics industry.
Temperature Control- with the fabric pots constructed with highly porous polypropylene fabric, heat dissipates easily and effectively. Unlike standard plastic pots, heat isn't trapped in the root zone. Heat in standard plastic containers can reach temperatures of up to 125 degrees. When this type of heat is trapped and unable to escape, it can damage your plant's health and limit the potential of your harvest. Growing in the AirCube System, plant roots grow cooler, healthier, and more vigorous.
Largest Pots in its Class- this system features 5 Gallon grow buckets, the largest pot size of any other ebb and flow hydroponic system in the market.
Modular and Expandable- start with 6 grow buckets and expand up to 36 grow buckets with the optional 105 gallons PopTank reservoir!"
For my medium and nutrients I decided to also switch things up from my regular Organic runs, going with Plagron Nutrients and Root Royale 70/30 Coco/Perlite. When filling the fabric pots with medium, I first added just under a gallon of horticulture perlite from Nor-Cal as a base layer to ensure good drainage and then filled the remainder with the Root Royale.
•Now for the outstanding, award winning strain from my friends at FastBuds... Tropicana Cookies Auto:
I'll be running Tropicana Cookies Autoflower which is a 60/40 Indica/Sativa Hybrid. "Tropicana Cookies Auto is the perfect variety for growers of all levels, especially beginners as this strain performs very well outdoors and indoors, and can produce up to 500 gr/m2 in 56-63 days without needing extra maintenance. Reaching up to 110 cm, this strain grows fairly tall with medium-sized branching, showing its mixed heritage. Definitely the right choice for those with a high tolerance looking to get their hands on the strongest autoflowers out there. You can expect an extremely powerful and long-lasting high that’ll boost your mood and give you that extra push you need to start your days on the right foot. This variety offers the whole range of citrus and woody flavors with a strong candy-sweet background that will keep you coming back for more and more."*
*References: GrowAce.com, 2fast4buds.com
______________________________________________________________________________________________________________________________________________________________________________________________________________________________________________________________________________________________________________________________________
The Setup:
• AC Infinity 4x4 tent
•AC Infinity Cloudline T6 Exhaust Fan w/ Controller 67
•HLG 650R w/UVA Bar *** For some reason GD does NOT have a listing for the USA version of the 650R so I selected the closest match to it.
•AirCube Active Oxygen Ebb/Flow 6 pot System
•DL Wholesale Root Royale Coco Lite 70/30 coco/perlite
•TrolMaster Hydro-X Controller for light
•AutoPilot APC8200 co2 controller fed by a 50# tank
•16" Hurricane oscillating fan and 8" floor fan
•Tent cooling via filtered outside air delivered by AC Infinity Cloudline T6 fan
•BlueLab instruments: PH Pen and Truncheon Nutrient Meter
______________________________________________________________________________________________________________________________________________________________________________________________________________________________________________________________________________________________________________________________________
Weekly Updates:
11/26- My oh my! Week 5 of flower's here and these ladies are looking sexy as hell!🔥🤪
11/28- All three Tropicana Cookies are getting to the point that it's time to begin flushing them. My dilemma is that, with six pots in the closed loop system and three of them occupied by a different strain that is 10+ days behind the Tropicana Cookies, I can't run straight water through the system to flush without negatively affecting the other strain that is right in the middle of flower.
My solution that I've come up with is to pull the Tropicana Cookies from the AirCubes and put them on drip trays so that I can flush them without affecting the flowering of the three plants from the other strain.
*Note to self: When starting a run with this system, MAKE SURE ALL six plants break ground together! Also growing a single strain would be way better than mixing strains with this system as you can only give one strength of nutrients regardless of what each particular plant needs for optimum growth.
11/30- Today was the LAST day that these ladies have to sit in the AirCubes. This evening, right after 'lights on', I pulled all three plants from the AirCubes and placed them on plastic drip trays that hold a little over 2L. When I pulled them the first thing I noticed (besides the odor) was the amount of roots that were growing outside of the fabric pot (I thought they were supposed to 'air prune' the roots) and the copious brown slime coating the inside of the bucket and the bottom of the fabric pot...smh.
So, from here on out I'll be manually flushing all three with 2L each of straight well water that has a 150ppm base, to which I add 1/64th teaspoon of NPK Yucca Extract, then I ph it to 6.0 @ 68℉. After flushing, I wait around 15min, then I use a wet vac to remove the runoff from the drip tray.
12/2- I'm continuing to flush all three at an interval of 3 times daily with 2L of water and they all are doing fantastic! The #3 is starting to fade, and the pistils on both the #1 and #2 are turning color from snow white to a darker tan or red, and I anticipate their fade to begin sometime soon.
Well Fam, there's five weeks of flower on the books and these ladies are just about ready to finish up! See you next week for what could be the finish for the FastBuds Tropicana Cookies! 😎🙏💖
💚 Thank you for checking out my passion in life! Please visit as often as you wish and I hope you enjoy this journey as much as I know I will! Grow what you love, Love what you grow!💚
Likes
3
Share
@DoctorD
Follow
Week 3 Grow Diary Report: Days 15-21
As we progress into the third week each of our strains—Tropicana Cookies, Gorilla Zkittlez, and Apple Strudel—continues to showcase impressive growth and resilience. This week, particular attention was given to optimizing environmental conditions, including an increase in CO2 levels (Growbag), adjustments in lighting (PPFD increase) to support the vegetative growth phase and introducing some light LST.
Tropicana Cookies:
Significant growth was observed, with plant height increasing from 12.5 cm to 18.5 cm. This rapid growth spurt, referred to locally as "stretching," was noticeable mid-week.
The plants have maintained their health with no major issues, responding well to environmental adjustments. Continued nutrient regimen with Alfa Boost. Since the soil is preamendet with nutrients, I just use PH-balanced water. Lighting intensity was increased progressively from 350 PPFD to 380 PPFD and then to 400 PPFD and CO2 supplementation was implemented to support enhanced photosynthesis.
Environmental Conditions maintained stable with temperatures ranging from 27°C during the day to 21-25°C at night, with relative humidity around 64-68%.
Gorilla Zkittlez:
Growth was steady, increasing from 10.2 cm to 15 cm. The plant has responded well to environmental controls and nutrient supply.
Gorilla Zkittlez remains in good health, with no signs of nutrient burn or deficiencies.
Apple Strudel:
This strain showed a healthy increase from 9.5 cm to 14 cm. Growth rates are slightly behind Tropicana Cookies but on par with expected metrics for the strain.
She continues to exhibit good health, benefiting from the stable grow conditions and targeted nutrient applications.
Week 3 has shown promising developments with all strains demonstrating robust growth and good health. The environmental adjustments, particularly the increased CO2 supplementation and lighting, appear to be positively impacting the plants' growth dynamics. As we move forward, it will be important to continue monitoring these conditions closely to ensure that they remain optimal for each stage of plant development.
Cheers,
D.