The Grow Awards 2026 🏆 


Likes
69
Share
@Grow4Releaf
Follow
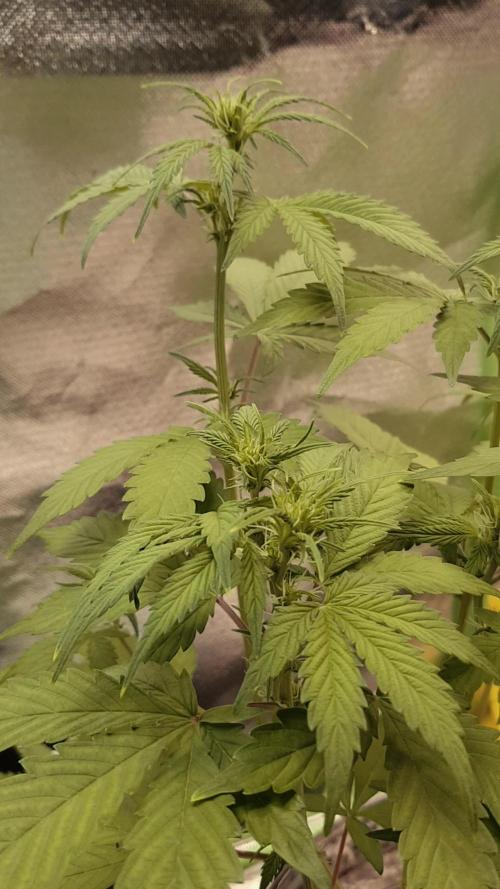
*Jan26th-#plant2 was ready to cut Tuesday she's In the dry tent goon for a few days then will jar up. *
Plant 1 is goin strong still. But they both are on a tap water diet till the end.
We're at week 14 from seed and 8th week flower so should be done growing and filling out from here on hopefully..
Just glad the tents set up fully now with exhaust and dehumidifier so no more crazy spikes (would get up to 80% rh and 55°f .. cold and humid had me freaking out lol. But that's all sorted)
All in all I'm happy with the lil test run on these, seeing how they did with minimal nutrients and light gives me hope for the next go.
Still debating on running these with growdots , my next set will be with ganja farmer seeds and growdots. Should be fun may throw in a plat jelly or two aswell. We shall see once the beans get here..
As always tho. Appreciate anyone thst may leave suggestions or feedback. Always like gearing what u see or don't see . Helps get better so its mainly why I'm here .
And thanks to anyone goin thru my rambles ,videos and photos.
Hope everyone's grows are doing well, I'll be skipping around checking out what is going on .! Till next update take care gang !
Likes
4
Share
@eldruida_lamota
Follow
Que hay familia, vamos con la cuarta semana de crecimiento de estas Runtz de Zamnesia.
Se germinaron las 5 semillas de Runtz y en 48 horas 100% ratio , 7 días en tierra.
Por supuesto vamos a utilizar la tierra de plagron lightmix que siempre utilizo, y como este proyecto es para concurso voy a ceñirme a los productos de plagron. controlando siempre el Ph, que ahora mismo lo dejamos en 6.
Seleccioné de las 5 plantas, 3 , que creo que son los mejores ejemplares que por el momento están creciendo bien y tener tienen un buen color, se ven bien sanas.
Aplique Tetra 9 vía foliar.
Vamos viendo cómo progresan. Hasta aquí todo, buenos humos 💨💨💨.

Likes
16
Share
@Chocolopeison
Follow
Comenzando semana 7 de estás nenas, aun las mantengo en 1L y hoy le hicimos su primera defoliación masiva, ahora a esperar que se recuperen para hacerle trasplante a maceta de 3,5L.
La verdad no eh tenido muchos problema, todo sigue igual siguiendo el mismo orden de nutrientes, bacterias y hongos benéficos una vez por semana, enzimas ahora se las estoy dando día por medio o cada 3 día.
Ya logramos sacar los primeros clones de la watermelon, punch y cookie y la thc bomb. la dss aun la tenemos tirando fuerza que no va mal pero no tenia espacio para más clones.
Saludos


Likes
3
Share
@DrewZenRox
Follow
Into 2nd day of week 3.
Jealousy/Green Poison inside the Epic Attic Tent 1.2x1.2x1.6. Growing Under 'Karma EVO 3'
SkyWalker OG Inside unbranded 60x60x120 Tent. Growing under 'Karma Stealth 1000'


Processing
Likes
14
Share
@mrekansh
Follow
3 ml npk in 2 l water
And given half of it! Plant seems to like it
And pruning worked wonder! Leaves are healthy and getting much bigger in size! 15 cms+ excited!!
Likes
10
Share

Likes
11
Share
@NidoR420
Follow
Starting to get some nice purple colours on #4 buds and Ozz leaves! Not super visible on the video but looking really good.
Also had an unpleasant surprise the other morning, due to wind gusts the support went out the pot and #4 straight bent to 90 degrees. Looks like it happened around 3/4am and I only saw it around 9am, so she got pretty roughened up but no actual damage to report. Same for Dorel, a brush fell on a lower branch but didn’t break anything.
The learning here as it is the second time it happens, both time just before I water them: I suspect drier medium is less efficient in holding the plant when there is a lot of wind.
Well well! In just 2 days she went from little purple to actually the whole plant changing color. Curious to see where it’ll go!
Likes
88
Share
@Kitties_and_Colas
Follow
~_~_~_~_~_~_~_~_~_~_~_~_~_~_~_~_~_~_~_~_~_~_~_~_~_~_~_~_~_~_~_~_~_~_~_~_~_~_~_~_~_~_~_~_~_~_~_~_~_~_~_~_~_~_~_~_~_~_~_~_~_~_~_~_~_~_~_~_~_~_~_~_~_~_~_~_~_~_~_~_~_~_
❤️💡🌱😽💨
Just a quick update, we've been moving tents again and haven't got too many pics however we did get some trichome shots..buds are swelling fast and the smell is extremely strong now..the lemon smell is overpowering the cheese from our "Kiss" strain.. we hope to have our 5x5 up soon to give these girls some breathing room.. thanks for plopping by and happy harvest friends! ❤️🌱
~_~_~_~_~_~_~_~_~_~_~_~_~_~_~_~_~_~_~_~_~_~_~_~_~_~_~_~_~_~_~_~_~_~_~_~_~_~_~_~_~_~_~_~_~_~_~_~_~_~_~_~_~_~_~_~_~_~_~_~_~_~_~_~_~_~_~_~_~_~_~_~_~_~_~_~_~_~_~_~_~_~_

Processing
Likes
5
Share
@PETEROG
Follow
Hey everyone at week 4 know and wow have these girls grown early this week I applied some LST and all took really well to say it was my first time trying this

Likes
Comments
Share
@En_Eff_Tee
Follow
Ignition is amazing. The budsite development after just one week was incredible. First time I’ve used it and it is now a permanent addition. FIrst major de-leafing and lollipopping.

Likes
117
Share
@AsNoriu
Follow
Day 115 since seed touched soil. Twins are done. Was very nice plants to grow, waiting for results ...
Happy Growing !!!


Processing
Likes
12
Share
@BloodBath
Follow
I will be focusing this diary on the smoothie strain but you’ll be seeing some other plants in the tent that are not the same strain. I only have room in this tent so bare with me. There are 2 Smoothie, 1 CNC, and 1 Stardawg (dog). The smoothie are the two bigger ones in the back of the tent.
Now, the Smoothie from FastBuds is just killin it right now. Since I popped the beans they have done nothing but show signs of greatness. I don’t think this one is gonna slow down much either.
I’m going to push these plants harder than my last harvest. I had a really really amazing harvest last time. I was even able to pull sap out of all 4 plants. 2 Zkittles and 2 LSD-25. This was all done by feeding at the right times and keeping a “moist” soil. Also I want add that I ran pretty much the entire line of Nectar for the Gods at a little less then the recommended ratios. This time I plan on going a tiny bit over the recommended ratios just to see what these plants will do. Trust me, if the plants have a bad response I will go back to the recommended ratios.
The reason I want to do this is because I really think these auto strains can handle a lot more than a regular flowering cycle plant would. They can handle more stress, that’s for sure.
When do you think I should add a compost tea into my regimen? Soon or wait till the plant is a little larger?
Likes
7
Share
@Grisly
Follow
Harvest 2024
Total Hash: 102g
Total Kief: 95g
Total Flower: 3868g/138oz/8.6lb
Total Yield: 4065g/145oz/9lb/4kilo
———-/-////////—vs———-/////————/
Sugar Diesel #1: 117g
Sugar Diesel #2: 313g
White widow Clone: 14g
Dual OG:
112g
LA Affie North Field: 248g
Granddaddy Purple N: 63g
Black Raspberry Kush N: 210g
————————————————-
Total North: 1077g/38oz/2.5lb
————————///——/—————-/
Fruity Pebbles: 184g
Granddaddy Purp S H2: 54g
Granddaddy Purp S H1: 275g
Granddaddy Purp Total: 329g/12oz
Black Rasp Kush S H1: 160g
Black RaspKush S H3: 70g
Black Rasp Kush S H2: 511g
Black Rasp Kush S H4: 17g
Black Rasp Kush S: 758g/27oz
Blue Cheese S H1: 281g
Blue Cheese S H3: 83g
Blue Cheese S H2: 285g
Blue Cheese Total: 649g/23oz
Dr Grinspoon S H1: 485g
—————————————————-
Total South: 2405g/85oz/5.3lb
————————///——/—————-/
North Popcorn: 148g
BC Popcorn: 100g
GP Popcorn: 73g
BRK Popcorn: 65g
—————————————————-
Total Popcorn : 386g/14oz/0.9lb
————————///——/—————-/
Trim: 8lb
—————————————————
————————///——/—————-/


Likes
5
Share
@GERGrowDesigns
Follow
GERGrowDesigns Welcome to Veg Week 4 of Divine Seeds Auto AK-47 XL
I'm excited to share my grow journey with you all as part of the Divine Seeds Autoflowering Competition 2025. It's going to be an incredible ride, full of learning, growing, and connecting with fellow growers from all around the world!
For this competition, I’ve chosen the Feminized Automatic strain: Auto AK-47 XL
Here’s what I’m working with:
• 🌱 Tent: 120x60x80
• 🧑🌾 Breeder Company: Divine Seeds
• 💧 Humidity Range: 60
• ⏳ Flowering Time: 59Days
• Strain Info: 21-24%THC
• 🌡️ Temperature: 26
• 🍵 Pot Size: 0.5l
• Nutrient Brand: Narcos
• ⚡ Lights : 200W x 2
A huge thank you to Divine Seeds for allowing me to be a part of this amazing competition and Sponsoring the Strains. Big thanks for supporting the grower community worldwide! Your genetics and passion speak for themselves!
I would truly appreciate every bit of feedback, help, questions, or discussions – and of course, your likes and interactions mean the world to me as I try to stand out in this exciting competition!
Let’s grow together – and don’t forget to stop by again to see the latest updates!
Happy growing!
Stay lifted and stay curious!
Peace & Buds!
Likes
9
Share
@BigDripFelgo
Follow
I’m glad I replaced the first Jet Fuel Gelato I planted which was slow and very behind from the rest, this one caught up to the others rapidly. JFG is growing fast and healthy and I’m already thinking of topping it but also want clones so I’m not sure what route to go?!

Likes
3
Share
@LonelyStonerz
Follow
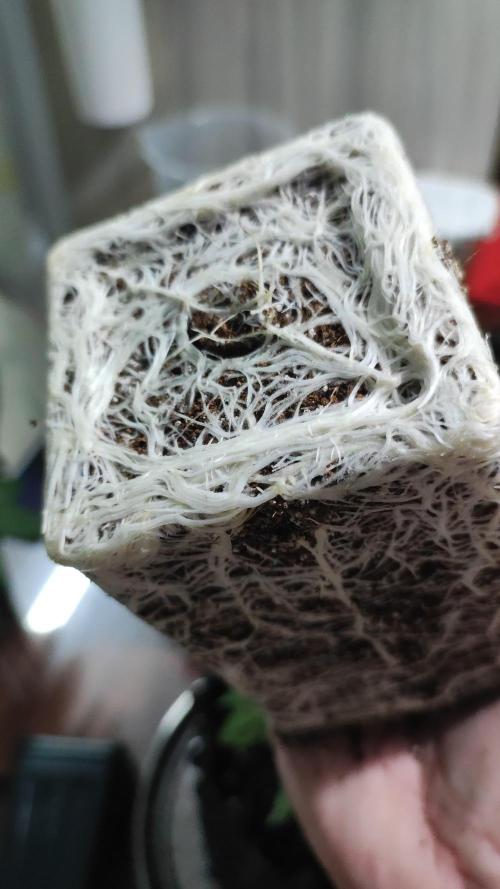
Transplanted two more of these blueberry autos into 5gal buckets. Did some training on one and am going to leave the rest. I took that video yesterday check out the REBOUND one day later, clearly NO transplant stress whatsoever!

Likes
13
Share
@Bncgrower
Follow
One more week completed, transplanted on the last day of week to a 7l..
Likes
35
Share
@Bud_Koenig
Follow
Hey, fellow growers! Week 4 is complete, and as you can see, the ladies are thriving beautifully! ‘Sleepy Joe’ is already developing a lovely purple hue, and the terpenes are giving off a delicious minty, orange aroma. So far, everything has gone smoothly—Living Soil is doing its job perfectly, and I’m definitely sticking with it for all my future grows. If you have any questions about the products I use, feel free to reach out!

