The Grow Awards 2026 🏆 


Likes
Comments
Share
@TgOgFaRms
Follow
I recently had the opportunity to grow the Toof Decay x Walter White strain from Mephisto Genetics, and it was my first experience with this particular strain. While I'm still in the process of forming a solid opinion, I can share my initial observations.
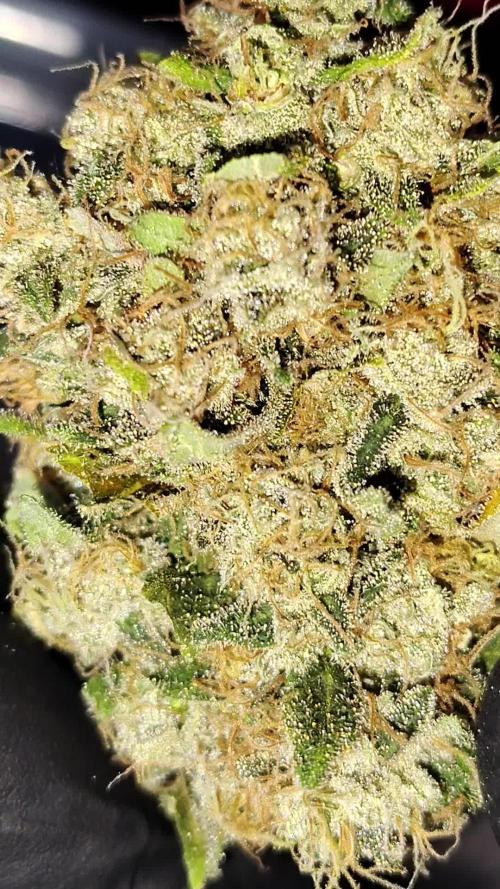
The bud structure of this hybrid strain didn't feel as dense as I had hoped during the trimming process. 😕 However, I was impressed by the beautiful purple hues displayed by the buds. The colors were certainly visually appealing. 💜
Although I haven't had the chance to test it yet, I'm eagerly looking forward to experiencing the effects of Toof Decay x Walter White. 🌬️💨 At this point, I would rate it a 7.5 out of 10.
As my journey with this strain continues, I'm excited to see how it develops and how its effects unfold. Stay tuned for more updates! 🌱🔜
Happy growing and exploring new strains! 🌿✨


Likes
18
Share
@Papastroumf
Follow
Day 40 : Watering today community after 3 days. They were too thirsty and drank 2.5L per plant. I added a lot of food to the water. But it finished with 800ppm only. I think Biobizz decreased the density of nutrients. I added 1 co2 tab / 5L as every time. Also made small defoliation to the bottom for all ladies. She have reached 63cm.

Likes
13
Share
@PopsFarm
Follow
Last few days - Day 65
Here you can see the Runtz Auto from @kannabiaglobal / @kannabiaseedsfr / @kannabiaseedsde / @kannabiaseedsint @kannabiaseedsus
Nutrients: @atami_deutschland / @atami.international / @stefan_atami / @daniel_atami
Soil: @promixgrowers_eur / @promixgrowers_global / @promixgrowers_unfiltered / @promixmitch
LED: @powerlux_spain
Tent: @secretjardin_
Thank you to everyone who follows and supports my work 🙏🏻💚
This means a lot to me and you should know you are a part of it and only with you all this is possible, you are the best community 😎
Growers love, love for everyone

Likes
72
Share
@Stinkfox
Follow
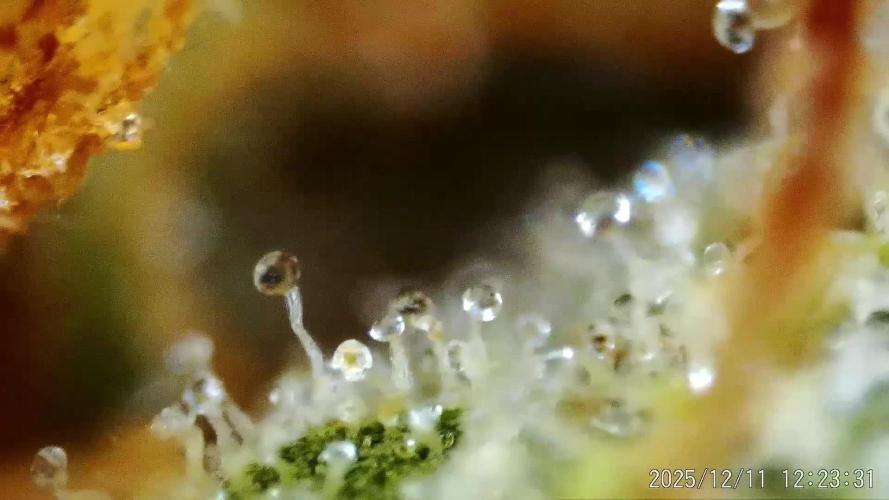
This is the final week. I checked trichomes today. THey are about 75% cloudy. I’ll be harvesting by next week. I gave a teaspoon of Cha-Ching. The smell is heavenly! I Had to support a few branches.

Likes
16
Share
@CDNCannaCole
Follow
Nice easy week just added some Bud Start by future harvest to the mix of nutrients. Little buds are stating now! Can not wait to see how they start looking over the next few weeks!


Likes
20
Share
@SmokyPinball
Follow
10/29/2023. Defoliated on Flowering Day 21. Nutes at full strength, CalMag at full strength. Given every other watering for next few weeks. Flowers looking pretty cool.
11/02. Posted vid showing massive trichome production.

Likes
13
Share
@DeepRootsGrowTrees
Follow
DIVINE OG KUSH / DIVINE SEEDS
WEEK#18 OVERALL
WEEK #5 FLOWER
This week she's doing good no issues. She's looking healthy her buds are growing and getting frosty. Stay Growing!!
Thank you for stopping by and taking a look it's much appreciated!!
THANK YOU DIVINE SEEDS!!
.
DIVINE SEEDS / DIVINE OG KUSH

Likes
77
Share
@BipolarHellas
Follow
Hello world,
🇬🇷
the previous week had a lot of growth for the ladies...meanwhile Michelle has been switched to 12/12...the switch was made 9 days ago and she is showing her first pistils...this diary however will follow Angie and Lucy who are growing outdoors and will be in vegetative stage for a lot more weeks...So, let's begin this new week...
=====================================
WEEK 8:"DON'T FEAR THE NIGHT"
☠️Day 50...I stand and stare at Michelle trying to see those tiny first pistils...It is still windy so I have to move them around all day...I have a safe spot but its not sunny...Angie and Lucy are OK,still getting taller...this week I will be using Enhancer again as well...I have a small fear every time I use it because of the ph issue...what I have to admit is that Green House Feeding until now has been perfect...I have been giving only water and some top dressing of it and I don't have any deficiencies till now...the plants are vigorous with a very healthy green colour...
☠️Day 51💧today I watered with 3 L each...they drink like beasts...I top dressed Michelle with Bio Bloom from GHF...eat my girl,eat...I have already put Bio Bloom when transplanted but a little more will not harm her...
☠️Day 53...💧I thought giving them 3 L of water would keep the coco wet for long,but they drink like beasts...had to water again today...
☠️Day 54...Michelle is having a tough time for 12 hours in the closet...I can feel the heat and the CO2 when opening it in the morning...however she looks fine and flowering...
☠️Day 55...💧watered again...the outdoor girs will not be on time for the contest and that makes me nervous...I hope they extend the deadline for all of us who grow outdoors...and those who got the seeds late...please GHSC...give us some time😄
🌸🌸Today Michelle is completing the second week since the light flip...she is growing pistils everywhere and I love watching her...
Day 56...Michelle has reached 77 cm in height and Lucy is 70...they will become beasts...
Another week has passed,thanx for watching,happy growing and be safe...☠️

Likes
6
Share
@SecretC8keSociety
Follow
Today will marked 7 weeks in flower. I believe I am going to take these girls up to 10 weeks due to being out of town for the weekend probably will flush them out for 1 week only before chopping them down.

Likes
47
Share
@Northern_Ent
Follow
May 11: plant looks good and the bad colour in the pic is due to wildfire smoke. Seems happy in the final 5 gallon grow bag.
Today was overcast and smoky after two beautiful sunny spring days. First smoke of the season arrived at about 7 am this morning. This smoke is likely due to fires in northeast BC about 1000 km (600 miles) from here. Hopefully it won’t be as bad as last year.
May 13: air quality is better again. Plant is doing fine. Watered with Monster Maxx during afternoon.
May 16: cool and rainy today. There was some sun in the late afternoon. She’s looking good and off to a better start than most of my previous starts.
May 17: very cool and rainy again which is just as well for forest fires. We’ll take the rain, thanks.
#seedsman420growoff
#seedsmanseeds


Likes
66
Share
@LoveGrowWeed
Follow
Well, here is the harvest.
I looked through a jeweler's magnifier, saw yellow trichomes and cut down the plants. 2 days trimmil, tired. Cool groove turned out.
I'll post the weight later when it's dry.
Let's try to pull the diary of the month?
So what did we get.
In the general photo, dense buds - 720 grams. (3 cans and a container).
There were still small buds , did not weigh.
And sugar trim - in the photo, with small small cones.
Likes
15
Share
@Messypies
Follow
will post some drying pics here and do a full summary when trimmed and fully harvested
Peanut butter cookies has been flipped into flower. Lightly defoliated and lst'd for the stretch. Haven't done as much training as I would have liked but the plant is more of an experiment than anything else.


Likes
43
Share
@Wicked_Stix
Follow
Not much to report. Just chugging along. Been on 12/12 for a week but I consider it veg until I see pistils on the tops. Waiting for them to start popping pistils.
Nutrients per gallon
.5 tsp maxigro
.25 tsp maxibloom
.25 tsp armor si
.5 tsp calimagic
.1 tsp 90/10 humic/fulvic acid
Ph to 6.0
Pumping nutrients 24 hours

Likes
17
Share
@RakonGrow
Follow
Harter ritt diese Dame , alles viel zu schwer das es gleich umknickte beim defolieren .
Hab mal ein getrockneten Bud aus der mitte genommen und Trichom analyse (Videos und Bilder) gemacht . ja viel klar wenig milchig und einige rot . Ergo , zuviel Licht an der Spitze (abstand zum licht viel zu gering) und im Boden zu kalt ist keine gute Kombination .
dry + trimm after 4 Days result in 120g Cannabis F1 Wurlz price 1.08€ / 1g , Total Tent : 200W on 1m² with total 280g = 1.4g/W

Likes
3
Share
@Bubble_Budz
Follow
Week 4
Happy New Year everyone!
Got an explosion of growth between the previous week and now. She must like that top dressing I did last week... closer to 2 weeks ago actually now that I think of it. Any who... she's branching out nicely and I'm just trynna train an even-ish canopy before flipping to flower. She's already showing signs that she's ready. I wanna take a few clones from her in about 2 weeks and let her rock a while longer to recover before we flip the lights so until then, our routine is train, water, and top dress every 2 weeks. Water with recharge every other watering. Watering occurs currently about every 4-5 days.
That's all for this week's report 🙌🏾
As always...
Stay Highly Medicated & Highly Dedicated folks 🔥🎄😎🌬️🤙🏾

Likes
124
Share
@CBD_Sweden
Follow
2018-04-03. Week 22, day 3.
Remo Nr 1 is doing fantastic and she is a big and massive beauty.
The flowers/buds is growing bigger and bigger and smells strong of summer and earth.
I think she will yield a lot by the look of her right now.
Nr1 have grown 3 cm in height last week.
Nr 2 is still recovering and she is getting better but still dont look that good, but the flowers grows and you can start smelling her more and more.
I have faith in this girl and that she will produce some nice medicine.
Strain information.
Remo Chemo cannabis seeds by Dinafem Seeds belong to a feminised Indica-dominant marijuana plant born from a collaboration with the legendary Canadian cannabis grower Urban Remo, a real high-flyer within the international cannabis field. Remo Chemo, created by Urban Remo after crossing a UBC Chemo with a regular Bubba Kush male, is the genetics selected for developing this project. The results obtained when testing a cutting of such magnificent cross were so amazing that we backcrossed her to ensure the genetics was not diluted but remained pure and intact.
With this creation, we’ve managed to make Urban Remo’s favourite cannabis strain accessible to all: a potent and stable strain, with major therapeutic properties and high THC content.
One of the strains within this marijuana seed's genetic structure, UBC Chemo, is a really potent strain that, according to legend, was developed by some researchers from the University of British Columbia with the objective of alleviating the side effects of chemotherapy in cancer patients. Her extremely high THC levels not only make her a must for cannabis gourmets with a liking for mind-blowing genetics but they also confer a myriad of therapeutic properties on her. In fact, her effectiveness in relieving the back pain he is in contributes to her being Urban Remo’s favourite marijuana strain.
His YouTube channel has lots of subscribers and his strain reviews have become indispensable for most marijuana users. At Dinafem, we had long been itching to work with him. Therefore, we didn’t hesitate when the opportunity came up. When travelling to Europe, this world-renowned cannabis activist was surprised by the lack of Canadian cannabis genetics at international fairs. That’s why we decided to join forces with Remo and create a Canadian feminised strain that bears his name.
Morphology
Remo Chemo is a dense and sturdy Indica-dominant plant that must be evenly pruned, low branches included. At the end of the flowering, her dark-green leaves tend to acquire purplish hues which are sometimes so dark as to seem almost black. A real sight to behold.
Yielding capacity
Without her being particularly heavy-yielding, Remo Chemo’s crops are really potent, which balances the final outcome. Her buds are round, uniform and compact, noted for their remarkable density and amazing resin count. On top of that, the THC levels are high, easily exceeding the 20 %.
Cultivation
Remo Chemo thrives when grown in dry environments and provided with intense light. Thanks to the legacy of Bubba Kush, the lack of water is not a problem for her. However, if we want to boost her yielding properties, she’d better be well hydrated. As for the right amount of nutrients, we must ensure our plants are not overfed since this could be detrimental to the flavour’s intensity.
Aromas and flavours
The predominant scent is that of a classic Kush, i.e., strong and intense, lingering long in the palate and bringing to mind the typical classic Californian flavours. If we’re to be more precise, she also delivers hints of earth, petrol and black pepper. Her taste and aroma are simply delicious, almost instantly captivating those who smell her.
Results
Remo Chemo delivers a potent effect that, thanks to her high THC levels, helps alleviate the side effects of cancer treatment (vomiting and nausea), boosts the appetite and reduces pain. But Remo Chemo can be used for recreational purposes as well, with a really intense physical high. No doubt her effect being so amazingly psychoactive will delight THC-lovers.
1st prize −Indica category− at the 2017 Expogrow Cup.
1st prize −Indica category− at the 2017 Karma Cup (Canada).
Suitable for Indoors and outdoors
Sex Feminized
Genotype 35% Sativa/ 65% Indica
Cross Remo Chemo x Remo Chemo
Indoor flowering period 65-70 days
Outdoor harvest time Mid-October
Indoor yield 500 g/m2
Outdoor yield 1000 g/plant
Outdoor height Up to 250 cm
THC 24%
CBD 0.1%
-------------------------------------------------------------------------------------------------------------------------------------------
https://www.youtube.com/watch?v=Xc0tAt2nd3M
https://www.youtube.com/watch?v=Nrsq8_gK_Oo
https://www.youtube.com/watch?v=jmv8i106lZc
https://www.youtube.com/watch?v=IUiUIR_Wxqo
--------------------------------------------------------------------------------------


