The Grow Awards 2026 🏆 


Likes
Comments
Share
@Canna96
Follow
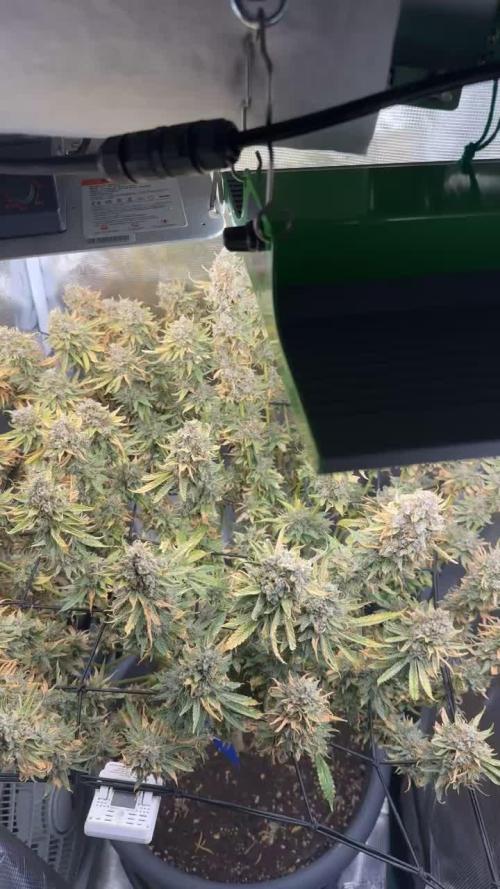
Hey now, hope everyone is having a great weekend and staying safe. Another great week for the ladies, as they are now about 2 weeks into flower, and the stretch is winding down. I am still feeding them silica, cal mag, and flower nutrients maxi bloom by GHE. I will start to add a PK booster this week. I also will be switching to light from V1 to F1 sometime this week, and also integrating the UV/IR bar into the light cycle later this week. I will run the UV/IR bar for approximately 30 minutes prior to lights off to get started.
The 5X5 is really starting to fill up nicely, I am running two dehumidifiers outside of the tent and I am able to maintain around 50% RH in the tent during lights on, and around 55% RH with lights off.
Still very happy with the Spectrum X from Medic Grow. I am running her at 90% in the V1 cycle and will be transitioning to the F1 cycle later this week. Overall, the plants seem very happy and healthy. The temperature and humidity is significantly dropping so that helps keeping the tent cool and not overly humid. This is by far the best time of year to be flowering plants in my region.
I hope everyone has a great weekend, Thanks for stopping by, Stay Safe and Blaze On!!! 💪
Website: https://medicgrow.com/
https://growdiaries.com/grower/medicgrowled

Likes
2
Share
@Saintvicious
Follow
Keeps going. Etsy seeds coming through. I think soon in the grow a cal mag problem comes up. Chime in when you see it.
Likes
42
Share
@Jackweed77
Follow
beginning of the fourth week🌻 everything is going well. made another small defoliation🍁 where it was needed. girls 🌱keep eating all the nutrition that my diet is good for them!👍 I'm waiting for the flowers to explode!💚👽
Day 25👍🌻👊

Likes
37
Share
@RFarm21
Follow
Boas growmies! Esta semana apareceram mais folhas amarelas mas penso que seja normal, penso eu, visto que já estão caminho da 10ª semana.
O cheiro delas é fantástico!
17 Agosto - O gráfico representa a nutrição misturada em 2,5L de água da Royal Gorilla 1. EC = 1,55; pH 6,4
17 Agosto - Alimentaçao da Royal Cheese (2L): CE = 1,5mS; pH 6,3
-BioGrow - 3ml; BioBloom - 4ml; TopMax - 2ml; BioHeaven - 5ml; Activera - 5ml; Calmag - 1ml
17 Agosto - Alimentação Royal Gorilla2 e royal cheese 2 = Só água . ph 6.3)
-----------------------------------------------------------------------------------------------------------------------------------------------------------
21/08 - Alimentação Royal Gorilla #1 (2,5L): CE = 1,64; pH = 6,3
-BioGrow - 4ml; BioBloom - 6ml; TopMax - 2,5ml; BioHeaven - 7ml; Activera - 6ml; Calmag - 1,5ml
21/08 - Alimentação Royal Gorilla #2 (2,5L): CE = 1,33; pH = 6,1
-BioGrow - 3ml; BioBloom - 5,5ml; TopMax - 2ml; BioHeaven - 5ml; Activera - 5ml; Calmag - 1,5ml
21/08 - Alimentação Royal Cheese #1 (2L): CE = 1,36; pH = 6,1
-BioGrow - 3ml; BioBloom - 5ml; TopMax - 2ml; BioHeaven - 6ml; Activera - 5ml; Calmag - 1ml
21/08 - Alimentação Royal Cheese #2 (2L) - EC = 1,38; pH = 6,3
-BioGrow - 3ml; BioBloom - 4ml; TopMax - 2ml; BioHeaven - 5ml; Activera - 5ml; Calmag - 1ml
Likes
3
Share
@6020grower
Follow
In 13 day is harvest. Startet now to flush. Yesterday i gave her a last time a nutrient bomb


Likes
12
Share
@NewNewbie
Follow
Chop Day! After recovering, i noticed she had the leaves closest to the fan drying up. I think since she lost most of her leaves, it was too windy and she got windburned. Considering her over all bad shape i decided to go for an earlyer chop then usual, but all trichomes seem to be milky, with just a few brown ones. Over all, this grow was filled with problems and fuckups. Many things were learned :) May the next one be better!

Likes
38
Share


Likes
10
Share
@tokesly
Follow
This pheno was certainly on roids. The strain being from an autoflower just outpaced every other plant by at least 2 weeks. It produced a whopping 8 ounces.
The colors gave an alien reddish purple glow as if it were from mars. The aroma was that of blueberry cacao, a totally unique chocolatey profile.
Likes
20
Share
@TechDCo
Follow
23/10/2024
Lights On!
I opened the tent this evening but it's her morning 🌄 however you like to picture it!
Strong smell of gas that' smells bitter like lemons, when it hits the back ya sinuses.
After a few minutes taking pictures, the undertones of the nutty earthy leaves prevails and lingers around the room it seems for much longer than the lemons.
24/10/2024
Lights On!
25/10/2024
Lights On!
26/10/2024
Lights On!
Deffo smelling very sharp lemon 🍋
27/10/2024
Lights On!
Yep, there deffo lemons I'm smelling its a Strong Lemon Toilet Fresher kinda' thing!
I'm not saying 'Lemon Toilet Freshers' are my thang! But hey, its a sharp lemon smell!
Reminds me of the smell of apple car Freshers but lemon instead! I do say; it's the kind of fresh sharp citrus smell when you open ya car door with fresh Freshers hanging! 😈 👿
Slite nute burn from the Holland nutes!
"Note to self: next time time add 0.6ml/l instead of 1ml as a low dose!
You'll get it perfect eventually 😌 I'm sure!
"Not all fat hairy girls are dumb and smelly: some maybe the lazyones, but this time of year the crazy ones and lazyones have to go shopping, nowonder its bussy this time of year: cues cues cues, like Jesus Christ put a folk in it or two! 😉KFC should do trollies for a family pack! deffo at x-mas time because the halloween treats have vanished, the snow then falls, the prices go up the portions go down (more recycled junk) you gotta blame "global warming" on some fat b!tch taking up the space!. Jokes aside: Mrs.Clause like playing with Santa's snowballs!
Sorry folks 😞 that's a backwards sexes Mrs.Santa joke 😃
.....Baha well biite mee for spreading laughs this time of year! - Like her egg yolks!
28/10/2024
Lights On!
Sorry uploaded 😔 all the photos from today! Will sort them out later! Cba one of those dayz!
I just wanted to get them off my phone!
I felt like I was going to say "get them off my chest" reading that over again quickly! - Poor English when I'm not running everything through Ai 😕 or is this actually Ai prompted to make mistakes and appear normal! Aye! Makes you question my whole existence within these entries of folklore and mystic magical characters! Baha
I think it's my eyes - I'm seeing purple 💜 👀 on her pistils!
Blink twice though and the purple hues is definitely there! Oh boy, this is going to be awesome colour show!
I reckon 10-11z give or take!
Counting time ⏲️ is a forever losing battle!
In ones mind it's a peaceful shuffle rattle!
We are just in "Crusing Shuttles"
the brain is a bubble
29/10/2024
Lights On!
Had to supercrop some branches!
Now drinking just over 8.5L/24h.
5L = Day
3.5L = Night
The last 4 days i topped up only with water to balance the nutes out; i clearly forgot to mention this! She seems a lot more relaxed and the NPKs have leveled out!
BG41 indica tent is doing okay she's drinking 4.5L/24h.
"Time for a advocaat!
I could be Dutch at heart! Well, I sure do
speak it 😏 on the double!"
"Reversed Black Joke to a WhiteWoman:
She got smacked of a black guy and never went back 😅"
You ever wonder why hospital lights frequencies make you feel sick! 😬 😫 deffo the street lamps 🔦 now! Too bright! The sun is more blue with its halos 😇


Likes
14
Share
@GODSGIFT_2005_JM
Follow
For LIQUIDS & Nutes ******GREEN BUZZ NUTRIENTS***** organic.
Also i’m using their LIVING SOIL CULTURE in powder form!
MARSHYDRO ⛺️ has large openings on the sides which is useful for mid section groom room work. 🤩
☀️ MARSHYDRO FC 3000 LED 300W
💨MARSHYDRO 6” in-line EXTRACTOR with speed-variation knob, comes complete with ducting and carbon filter.

Likes
2
Share
@igrowcan
Follow
[Week 9 - Yellow Leaf Removal]
Some leaves may turn yellow as the plant directs nutrients to the buds. Within the minigrow box, we carefully remove these leaves to prioritize bud growth.


Likes
29
Share
@Rangaku
Follow
The BM has stretched hard the last week putting on some incredible size , just keeping up the defol and minor lollipop to her as she starts fully going in to bud . Already getting a faint fruity smell , the leaves are tasty as we actually had some in a salad the other night 😂

Likes
23
Share
@Horseluisweed
Follow
Básicamente lo mismo, aunque está semana pilló bastante más horas de luz(tuve que irme fuera de casa dos findes seguidos, en los cuales la dejé con la luz encendida full 24/7 en la caja)
Como experiencia utilicé café reposado 48h para "alimentarla" e intentar bajar el Ph de la tierra (coco ph6+hummus ph7+vermiculita ph8= ph total 7)
El otro experimento fue cubrir la tierra con coco para que el tallo eche raíces y aprovechar su espigamento!
Las horas de luz solía dejarla 8h en bombilla mientras duermo, y el día la pongo en la ventana a que tome el fresco, pero apenas tiene luz directa, me da la sensación que crece más rapido cuando vuelvo del finde, estoy replanteandome tenerla más tiempo en la caja con luz, porque la veo aún pequeña, y quizá ponerle un ventilador de pc o algo🤔..veremos, aún tengo el papel de aluminio al lado de la caja y ni se lo he puesto, con eso os lo digo todo☝️🎃
Likes
47
Share
@DankeyeBeaverjuice
Follow
It was a great call to defoliate I'm already seeing the benefits. The only unfortunate parts is the added time, she seems to be progressing at a steady rate none the less and it will be harvest time before I know it. The smells coming off the stem rubs are very enticing and have this seasoned grower super excited for the smoke report!
Processing
Likes
45
Share
@SupaDank
Follow
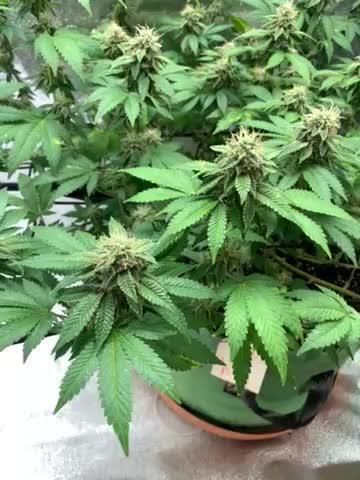
End of day 35 flower
Had an issue with cal/mag deficiency with the White Widow so I had to flush her and increase cal/mag to 5ml/gal. So she should be back on track to produce fatter buds.
Royal Gorilla isn't fattening up so hopefully she will this coming week. Also gave her a good flush with some florakleen.
Defloiated so the buds on the bottom can get more light. Thanks for taking the time to check on my grow. Peace out!!

Likes
25
Share
@XperencdGmanXG
Follow
what can I say over 7 ft tall now which is impressive in this drought with only the pittance of water I've been giving them once a week. Just goes to show you that my water conservation techniques work. They are both starting to smell like a hint of chocolate and peanut butter. Can't wait to see how these ones smoke. They are also into full pre flower and should be in full flower by next weekend.