The Grow Awards 2026 🏆 


Likes
Comments
Share


Likes
41
Share


Likes
7
Share
@Danger90946
Follow
Here we are in week six of flower and not a lot has happen this week other than the usual watering and letting her do her thing. Only trouble this week was updating GoPro had to try a few times. Other than that we got some rain in my home town and collected about 60 gallons that I'm going to use to finish the rest of the grow. Also, got my new AC Infinity CLOUDLINE T4, Quiet Inline Duct Fan System with Temperature and Humidity Controller, 4-Inch. I was really hoping this two plants would finish before the year ended, however, it looks like they got others plans. See you guys next week.
Likes
19
Share
@Naujas
Follow
the girl is growing perfectly :) although there were several really strong storms, it didn't hurt her:) from today I'm leaving her alone for 6-7 weeks :( I'm going on vacation, so only her and nature will be left :) there will be an update, you'll just have to wait for it :) good luck to everyone: )

Likes
18
Share
@BudMunchies
Follow
09/03: Im pleased with their progress this week. They did indeed start growing nicely after their slow recovery adjusting to the removal of the humidity domes.
I have my light at 60% and still about 18 inches away.
My humidifier is never getting the humidity pas 59 when i want it to be in the mid 60s. And so i ordered the big AC Infinity humidifier and hoping it will do a better job.
I was low of my typical nutrients and so i decided to try something new and bought an Advanced Nutrients stack. Going with the three part and B-52 and will mix in Big Bud, Overdrive, and Bud Candy later in the grow. Excited to see how this works out as i have seen a lot of great grows on here with these nutrients. I am just following their feeding chart recommendations until I dial in what i like.
I plan to transplant them to their large 7 gallon auto pots sometime this week. Maybe as soon as tomorrow.
09/05: Transplant day! Today I transplanted them to their final 6.9 gallon pots. They all had great root systems that had not reached a root lock yet. I added some dynomyco to the transplant holes to help with root production.
I will continue to water from the top for about a week before turning on the autopot drip system.
09/08: Decided to do an aggressive topping today, this was done at the 2nd to 3rd node, depending on the plant. I have not yet decided how i want to train them, but this will leave me with options while i decide over the next week. I know it looks like i took down half the plant, but trust me, we good. I may actually go with a form of main-lining that ive wanted to do for a couple years now.
Likes
16
Share
@Plantinator
Follow
So far everything is going smoothly.
Last week I installed a 10L reservoir which supplies enough feed for 3 days approximately. It helps a lot.
Processing
Likes
3
Share
@Mr_nugs_lover_David
Follow
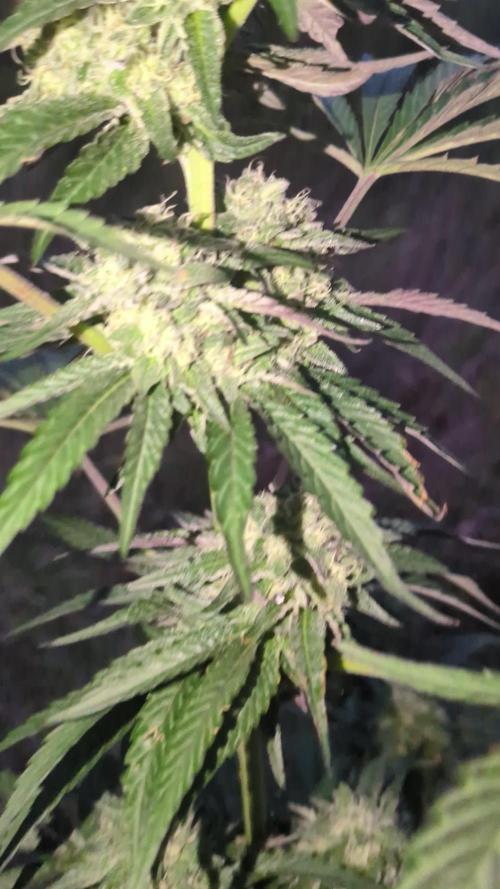
Beautiful purple buds there are only 2 out of 5 phenos of bslck cherry punch 🍒 👊 that have purple flowers. The aroma just like her sisters is ver very sweet for real. Very nice fruity sroma, it gives you very good vibes man. I'm in love with this strain, basically because the 5 bslck cherry punch have the exact same aroma, and that's awesome because obviously these are not clones as you can see,all of them started from seed, and I think I've found a very good híbrid to my favorite list. She's been grown 100% organically without any sinthetic nutrients, no bottle nutrients. Just 100% organic living soil with very rich in beneficial bacteria and fungus thanks to the use of Florganics FLO, Silicium flash by biotabs that contains bug shit very rich in life. And also bat guano and seaweed powder by guanokalong. Peace everybody! 💚✌️❤️👨🌾


Likes
6
Share
@SelfmadeRu
Follow
week 3, the whole family is here
3-gal: Runtz from un-feminized seed - showing female!
3 - gal: Grape Stomper from un-feminized bagseed - showing female!
1 gals:
two are black ice gelato from un-feminized bagseed - hoping female!
remaining are all fem from SeedSupreme
5 gorilla zkittlez
2 amnesia haze
1 bubblegum
last two photos show our 720W Ion LED from Grow Gen that came in yesterday! Note that if you purchase this beasty light you should get S-HOOKS from Amazon or wherever for the tallest hanging option.
We are on our way.
my 10ml dosing syringes just came in as well as my pH calibration kit.
I am running a hybrid philosophy when it comes to Medium and feeding.
70/30 Coco/perlite with the following added in for a "living coco" environment: worm castings, bat guano, kelp meal, alfalfa meal, mycorrizhae, and then I'm giving keyword LOWDOSE GENERAL HYDROPONICS FloraGro,FloraMicro,FloraBloom to supplement any nutrients the amended coco can't or isn't providing. Anyone with experience with this?


Likes
17
Share
@Hempface86
Follow
So as you can see, she is building bud pretty quickly which I am happy about.. this plant has been very easy to grow and by looking at it, I don't even think i'm gonna need scissors to trim it lol ... this is gonna be a nice change of pace as far as that goes... My guess is she's probably in her third week of flower by the looks of it... Time to start bulking.. God bless and happy growing 🙏

Likes
104
Share
@Schnabeldino
Follow
_____ Week 11 | Day 78 - 84 | 4th week of Flower ______
Day 78 & 79🌞
- What should I write... Not much has happened, I leave the plants alone.
- I put my dehumidifier in the tent this week, it starts as soon as the LF rises above 60%. At the moment it is winter with me and the humidity is very low anyway, saves energy
Day 80 🌞💧
- each plant 3 liter
Day 83 🌞💧
- at the end of week 4 I provided them with nutrients again. They have become thirstier and now drink 3 liters every 3 days
____________________________________________________________________________________________
Light - 12/12 h - 560 Watt
- 2x 200 Watt Toplight
- 4 x 40 Watt Lightbars
PPFD - 900 - 1000 µmol
Temp. avg. - 24,4°
Hum. avg. - 58 % RLH

Likes
4
Share
@Guerrilla_grower777
Follow
16/10/2025
18:25
15°C 64%RH
Here i am,man these plants smells a lot,super Fire🔥🔥
When every tree in the forest have yellow and brown falling leaves two hidden in plain sight marijuana plants stays green and keeps bumping juicy buds especially Coco fresh
Days are now shorter,colder and the wettest days of the year are now officially beginning
30 minutes after we went out of the forest an heavy rain started and didn't stop until 18/10 morning,i'm honestly worried about my plants,😭
#1 Coco Milk 89 days from seed
Buds are now putting on some weight ,i don't expect a big yield from her but the quality Is here better than any expectation
Keep smelling like milk and coconut simply stronger than 5 days ago
At 1:50 you could see a strange calix formation,that thing Is enormous and it's the only one in both plants
I'm not worried about this,i find It funny and i'm intersted if someone can explain It scientifically
#2 Coco fresh 77 days from seed
Bigger bigger and bigger!!!
This one doesn't give a fuck if nights are longer and colder,the buds have a totally different dimension in less than a week,smell is now coming through pretty similar to her sister Coco Milk with a funky candy twist not so potent right now
According to the moon phases theory i will harvest probably 4/5 november when the moon will be full again
Apricot and part of the gorilla z was harvested during the so called super moon and the difference on the smell and crystal coverage are pretty impressive being honest
That's why i will push until the next full moon even with impossible climate
#3 Coco Milk sample,simply sticky as a glue stick😂😂
Pictures and #4 Coco milk sample wet trimmed,have to say hard to trim,but the final result looks and smells AMAZING
I know that Is better to wait but i have to try this ASAP,i have to know how It tastes

Likes
15
Share
@MTSCannabisTH
Follow
Day 5 12-11-23 LED 24 Hours + Co2 500-600 Ppm
Day 6 13-11-23 LED 20 Hours


Processing
Likes
10
Share
@zombikush81
Follow
they grow healthy and strong, after the stress caused by the repotting has started to grow very quickly, it has really excellent genetics no problem encountered. It has an excellent structure with well distributed branches. But we will see all its potential in bloom as it explodes. After all, the gorilla and a very beautiful bitch.

Likes
28
Share
@Felloffthegrid420
Follow
This week is amazing they have took a growth rate 📈 unbelievable how much they have grown I find myself sitting back here for hours at a time just enjoying life happy growing everyone caring growing loving life

Likes
11
Share
@Chimney_Chief
Follow
Another strong week, opted to do some last minute defoliation just to help afew bud sites get light.
Shes frosting beautifully ;)
Likes
11
Share
@pifflestikkz
Follow
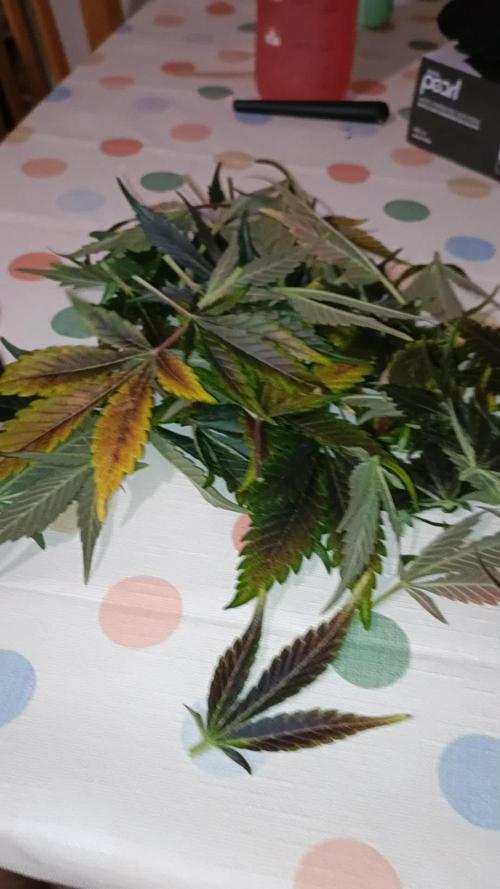
Day 142
11/06/25 Wednesday
Harvested the Red Gorilla Girl XL today!
This run of autos I haven't done any dark period before harvest except, I managed to catch them just as lights were coming on.
She has performed amazingly in consideration that she was only in a 2.5L pot.
In hindsight, I now know I am able to do a SOG with small auto pots. Making for an exciting next run.
Upon harvesting the Red GG XL,
The pungent smell of berry, diesel and sweet scents is intoxicating.
The buds are dense and compact, with formed calyx's boasting with trichomes.
Wet weight on this was 376g of buds.
(All wet trim gets dried in hangers and used for making butter later)
To my suprise a super easer one to trim, nice size buds with not alot of sugar leaves.
She is now hanging drying in a 80x80 tent , with a small fan on low @ netted window entrance, facing down to circulate air from bottom to top.
An exhausting fan with carbon filter also runs 2x a day for 1 hour.
Again This lasted for 8days before humidity dropped to 49%.
I have now put into containers to allow inner moisture to pull through now.
After 3-4 more days she will have final trim and placed into Terp Loc Grove Bags to cure.
Once curing I shall do a smoke report, dry bud weight, and update journal.
Thank you to everyone who followed along for this one, the comments and support!
GROWERS LOVE TO APOLLO @ SWEET SEEDS, for allowing us to play with these fun genetics 💚🤜🤛


Processing
Likes
7
Share
@420keef
Follow
Weather is fucked up again, i hope i don’t run into any issues with mold once they gain some weight :(