The Grow Awards 2026 🏆 


Likes
Comments
Share
@Jays_Not_Here_Man
Follow
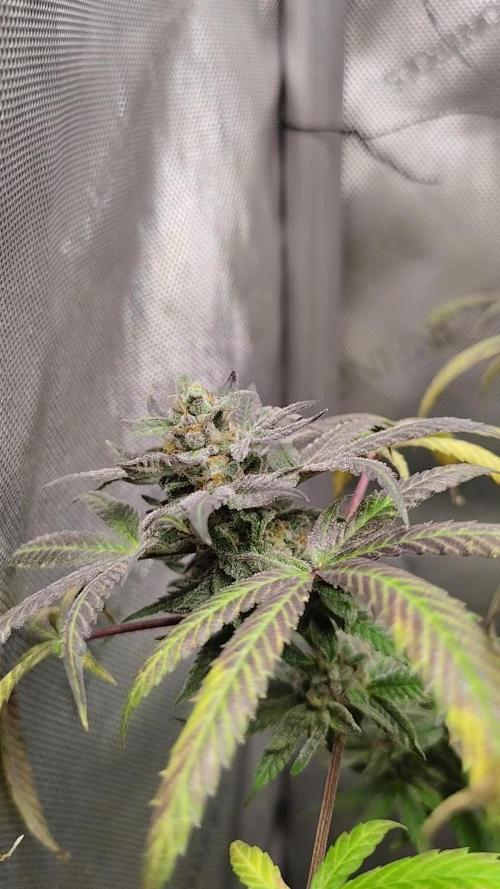
This was the girls last week! I decided to call them finished on day 63 the tricomes are almost all cloudy, with a small amount of amber. I’ve learned that they continue to degrade as you dry and cure your flower, so I’m trying something new for me, and pull them a little earlier than I usually would.
In addition, after watching a podcast (Dude Grows Show) if you don’t know, check it out… I decided to run the lights for 18 hours instead of 12/12 for the last 5 days before harvest. The idea behind this, is to stress the plant enough to increase its natural sunblock/protections, which would be terpenes and tricomes just before you harvest, while also possibly quickening the finishing time for your plant. The group was discussing the benefits of this (listed above) while some already had implemented these practices when finishing plants. The recommended time to run extra light time would be around the last 5-9 days of the plant, without having any nanners or weirdness happening with your plants.
Anyways, they finished amazing, sticky, stinky and heavy ❤️ the Terps are crazy on these strains….Harvest details to come. Thanks for stopping by 💚🇨🇦👊

Likes
Comments
Share
@JolliGrowz27
Follow
Last week of flush. Week 10 going to run last few days or week. Depending on trichomes. I think it's done now, but my older grow bro told me, when u think it's done, give it one more week. It does work to push it 1 more week. Smoother smoke and terps peak out.
Likes
34
Share
@ClubRiot
Follow
BCN Power Plant
Week 16
11L Pot
LED: SP250 (245W) for Flow. Stage
Canna COCO
Mineral Nutrients:
👇
Flawless Finish: 2 ml/L

Likes
8
Share
@EBPbyEVD
Follow
Summing up, I can say that sativa is really not mine.The next diary will be related to breeding, I will test and gain experience in this matter.Further more, success is inevitable.


Likes
73
Share
@Andres
Follow
she is almost ready ... she has 141 days in the outdoor ... I think she will cut it at the end of the month when she has 100 days just of flowering ... she has already started 10% amber in her ... with a typical smell of .a indica ... mint ... to earthy wood ... under a little temperature and a little cloudy ... but patience.and there is little left ... if I would cultivate it again it is obvious that if .. She will be very generous in her buds ... and she continues to feed herself organically ... and these are her results ... I am happy


Likes
10
Share
@Mr_Ewell
Follow
The strain was easy to grow. The autos were topped and suppercropped. Along with lst. Amazing yeild for my first grow. Almost a pound with 300w led. Trichomes were hard to read and took forever to turn. Went for 17 weeks from sprout. Didnt flush as long as a wanted so curing is my focus rn.

Likes
9
Share
@ctm_dzagi
Follow
123.46
of them:
9.2 grams of branches
13.4 grams of hashish repulsed through a sieve for flour - the press broke on the first run, the thread was torn off, just one tablet and 17 cubes in the syringe
95 grams of staff is tightly pressed into a 0.8 liter vacuum container from which air is pumped out, 5 grams left to smoke
of course, there was an excess of light, but daily workouts and defoliation of more than 250 leaves (last week, 50 pieces at a time, every weekend), IMHO was even more affected
the temperature is always within 30 ° C, I kept it at around 27 ° C at 65 ° humidity directing cold air from air washing, I did not do it at flowering because I was afraid of excessive humidity at a room temperature of 25-26 ° C
That i get from my first grow:
1. light is certainly important, but no less important, the substrate, water, fertilizers and devices are the basis
2. branded coconut, good fertilizers and devices give you the power, control and predictability of each step, and therefore the predicted result
3. you can not consider the lighting in isolation from the cooling and humidity control
4. coconut helps increase humidity and reduce temperature
5. all in you hands. you can get you goals even if you make some mistakes0
Likes
48
Share
@710_Squish
Follow
Harvest has went well. I will be hanging in a temt with a controlled environment at 50-55% rh to dry for 5-7 days. I hung the entire plant and didn't do any wet trimming. The cure went well, she maintained that sweet berry haze aroma. I would definitely recommend this high yielding strain.


Likes
4
Share
@Dmars
Follow
1/15 Day 85 from flip, which is about day 71 of flower. I think both are ready for the chop finally. Looking around the tent today I noticed most leaves up at the top were crispy and falling apart, so I went and trimmed all those off. Looking at trichomes for pheno 1, its pretty close to 50/50 clear and cloudy, but I’ve noticed the amber is really starting to come in. Pheno 2 is more cloudy than clear, and also with a decent amount of amber showing up. I don’t want a large amount of amber trichomes and think it’s about perfect right where it is, so even though both still have some clear I think it’s time to call it. Tomorrow will be chop.

Processing
Likes
21
Share
@LittleBigTrees
Follow
Fed once this week with a weak feed including top max.
I use kombucha vinegar as pH down. Water from my tap is ph6.8-7.0 and 38-42ppm so I might start using calmag supliment as the ppm at my old house used to come out of the tap at ph7. 2 and 200-220ppm.
I had 2 plants that didn't like the light at 30000 lux and started bleaching so I took them out.
I've defoliated today day 35 as humidity was getting over 80% and also to let light to the lower bud sights.
Pre flower pistils showed on some plants around day 33 (some still have none) so I'll consider this the end of veg start of flower. The kalimist indica pheno is still not showing pre flower pistils but is always hard to force flowering when it's not mature for some reason. It's always 7-14 days behind everything else 🤔
Likes
49
Share
@FoTwenny
Follow
🗓️ Week 17: 3/23 - 3/29
📆 Week 7 of 12/12
🌄 The plant is starting to go into senescence and presenting some beautiful colors as she begins to fade.
💡 Received new lighting courtesy of Growers Choice. They sent me the ROI-E420 with the Master Controller. First impression is amazing. Looks and feels like very high quality build. The spectrum seems more blue than the 3000k lm301H Kingbrite bars I have been using. The bars are thinner and packed with a lot of diodes, so they do run a little hotter than the KB at full power. I adjusted and now running them at 90%. For now the Kingbrite bars are being used as side lighting dimmed to about 30-35% depending on Grow room temps.

Likes
69
Share
@Crazyweedpt
Follow
Hello!
For this setup i´ll use Optic 1 XL in a 80cmx80cm tent, (indoor grow), with temperature, humidity and air flow controled... Have heard great things about Real Cookies and now it´s time to grow it!
Have successfully germinated 2 seeds out of 2 using the easy start kit from RQS, 100 % rate! (made a DIY box and used the wireless router to keep it warm) Notice this seeds have sprouted in less than 48h it´s a personal record to me!
I´m using Janeco light mix and prepared the soil with the the easy boost organic nutrition before reporting the seedlings... It´s time to turn on the lights and let the mother nature do the magic!
Likes
37
Share
@masterofsmeagol
Follow
8/19 Rained again last night. No damage but medium is drenched. The 9lb kush I've been struggling with seems to be improving. I spent a lot of time on her yesterday and at least an hour this morning defoliating and pruning her. New growth and flowers look promising. I'm cautiously optimistic. I defoliated what needed it. I needcto qpplyvorganocide again. I can see random signs of septoria leaf spot. I really have been off my fame lately. I'm back on it now. This week the garden will be rearranged and I'll pull that big GDP back and better support the blueberry for flower. That NYCSA is a beast. It's resilient as all hell and just continues getting bigger and fuller. Despite pr9blems in the garden this girl seems absolutely fine. At least I don't have that defeated feeling anymore. I've got flowers on a few different plants. I'll try to get a couple pictures. I may take rapacaps advice and add a cheap plastic roof for later flower. I'm not sure if the explosive flower growth is due to the liquid kool bloom but I think I'm going to switch back to tiger bloom as it works better with the other nutes. I'll jeep this updated but I've got work to do.
8/20 Well it Rained again last night. This is getting discouraging. Now my other 9lb kush has the bottom branch all droopy like there's a borer or something. Realistically with the temp swings and the weather I think it's a firm of root rot or pythiym damage which isn't good. I posted pictures of the stalks and would be grateful if anyone has any advice. I'm go8ng back down to look again for a borer hole but i didn't see one. What it looks like to me is that the petroleum jelly I put on the stalks (to battle ear wigs) seems to keep them moist or something inviting mold or fungus. I'm kind of at a loss. I don't really know where to go from here. I don't know if I should just replant the severely damaged plant away from the rest of the grow, bag it and get rid of it or leave it be and hope for the best. I certainly don't want anything spreading. I'm getting tigerbloom today as my plants still need to eat and I'm nervous about the liquid kool bloom. It's probably fine but still. I'll update after I put in more work and research more today. Any advice helps. UPDATE: No borer holes. The stalk looks fucking horrible. It's supposed to rain today. I'm going to give it one more day then I'll amputate that branch and get rid of the other plant if I don't see an improvement. Perhaps I'll plant it in the ground. Don't really know what to do. Family bar b que today so my options are limited.
8/21 FED TWO GALLONS TO THE GARDEN. ONLY USED .5TSP/GAL OF LIQUID KOOL BLOOM. Did not feed dieing plant. Back to super hot weather 80° at 9am. Did a lot of research last night. I also went to several commercial growers and asked advice. What I came up with was a fusarium infection of pythiym infection
(Crown rot). I looked at all my stalks and they all have bark and are darker where I applied the petroleum jelly. I'm also NEVER using DE again. It fucking ridiculous amounts of water. Everyone swears by it bit it's not going in my garden again. Since use I can just watch water sit right on the GD soil. I tried to get some examples of what I'm talking about with the stems. I amputated that lowest bottom branch I trained (which was huge). I didn't have time to dispose of the other plant before my wife's doctor's appointment. I'll update when I go back over. I'm sure this won't help and may hurt but I used Bee Safe 3 in 1 on the wound and around the stalks of the plants I saw discoloration on. I didn't touch the NYCSA even though I see some discoloration. I may just be seeing things. That plant I'd super healthy and I don't want to risk losing it. It doesn't seem to have the stem rot like the others. At least I'm not the only one having problems. I hears some pretty bad stories. Still. I'm heart broken. I'll keep this updated after I go back over. FUCK. I MAY just go back to indoor. UPDATE: Got back from the appointment and the rest of the plant was all droopy just like the other 9lb kush (and the branch amputated). I wondered about that because other branches looked worse. I got the totally dead 9lb kush out and found some root rot. AFTER wheeling the bag out I found earwigs and other insects where the bag had been. Awesome. I used h202 to try to wipe down anything that looked Fingal in the stem. It sucks because it seems like that liquid kool bloom pushed them over the edge into flower. Cotton balls where there was nothing. So that's both my 9lb kush plants and the largest plant of the year the GDP that have all bit the dust. If you grow cannabis you know how I'm feeling. I KEEP TRY8NGVTO UPLOAD THE MINUTE VIDEO I TOOK BUT I CLICK ON SOMETHING ELSE AND IT DISAPPEARS. WIFI SLOW. HAVE TO WAIT FOR 5G
8/22 What do I say? Fusarium? Pythium? Stem rot? I'm going to have to get a tent to do some indoor to get the medicine I need for me and my wife. I took the last 9lb kush out and disposed of it. Well it's still in the bag. I'm hoping maybe it might come out of it (beyond hope and far away from the others (but I'm going to toss it today). This blows so hard. Flowers are just starting to develop. I like the liquid kool bloom. It seems to make flowers explode when there was none before. At least on the plants I have left. Actually even the dieing ones started flowering. I'm really concerned considering that one plant (at least) has septoria and every plant has that petroleum jelly on it. Cautio to people that use that. It seems thats where the rot started or is. In spots I spread the petroleum jelly. Anyway my NYCSA has the smallest amount of "funky looking stuff on the stem" so I'm hoping it will make it. Cotton balls starting to appear. If I lose the whole fucking crop I'm gonna go ape shit. UPDATE: Spoke with a few others and did more research. I removed my braces on the bottom of all the plants. It looks like the pjelly and the brace allowed for some type of contaminate. Other growers think I'm being too bleak. They think things will turn out okay. They are more knowledgeable about cannabis than me but I'm with these particular plants everyday. They're probably right and my anxiety is just getting g to me. It's scary seeing a healthy plant completely die in such a short time. After removing the other 9lb kush I could easily see extreme rootbound roots still too the size of the 1 gallon they came in. The bag was PACKED FULL of tight roots so they definitely made it down. The plant however just fell over when I pushed it. I had roughed it up a big before. Anyway I'm praying to the cannabis gods to not take what I have left.
8/23 Fucking pouring again. This sucks. I've gotten loads of advice and made another friend on here. I forgot my phone so I couldn't take pictures this morning. My spirits are up a little seeing that others are at least attempting to help. I'm headed to the grow shop after a night of research to grab supplies to battle this. I'll update later. EDIT: I picked up plant doctor at the grow shop. It was 50% off and I couldn't find anything with trichodermia. However, I've heard good things about this plant doctor. It's systemic and can be used as a root drench and a foliar spray. BIGGEST selling point for me is that it SPECIFICALLY lists fusarium, grey mold. Pythiym crown rot, black mold and all kinds of other shit. The thing that sucks is it's raining and it's not supposed to stop for a few days. That's going to make application more difficult. Oh well. I think I may do a root drench on the one plant that has a wilted bottom branch. I'll keep this updated. Thank you everyone who reached out. Especially growing grannies and my commercial buddy who is always here for me. However he has no experience with this so I'm kinda on my own here. EDIT: I couldn't find trichodermia and I don't have time to wait around and order. I found plant doctor which literally lists it treats all the possibly pathogens my issue could be. Even has a section for medical Marijuana. I did a root drench on the plant up front in the middle AND I did a foliar spray. Might as well get the septoria too. It's systemic but it gets in faster through the leaves I guess. It started sprinkling and I want to test this stuff out before I go ham with it. I did give some to the to other plants bit left my best AND THE TWO SMALLER ONES alone for now. I'm not seeing those issues on the NYCSA and I don't want to risk damaging it. I chose tge root drench as it's raining and the instructions for fusarium WAS a root drench. Thank you all for your help. I will close out tge question once I know it's figured out. Wish me luck. DID A SHORT VIDEO BUT WIFI IS SUPER SLOW SO I NEED TO WAIT TO UPLOAD IT. Went back over. Finished foliar spraying the other two and left the NYCSA and two Littles alone. Hopefully this works. I did I short video. Who knows if it uploads. UPDATE: Went back over and finished foliar spraying. Took a bunch of pictures and did a video but it didn't upload. I'm hoping this will do it. Plants actually look good. And they're flowering nicely! It's too bad I had to do a foliar bug this us supposed to combat PM and septoria as well.
8/24 It Rained last night but hasn't Rained today yet. It's supposed to and uts overcast. I'm really considering putting a roof on my grow (like rapacap suggested) for flower to decrease mold chances. Plants looked happy. I saw no negative effects from the Plant Doctor. I even sprayed a branch of the NYCSA and the stem and a little around tge roots. I finally feel like I can take a breath. I've been working so hard and worrying about losing g everything. I may have been able to save that 9lbkush but I don't think bit was worth taking the chance. The sun is peaking out now. My buddy at the grow shop called and set a side general hydroponics armor si 0-0-4 silica supplement cause it was 90% off. I pad like a buck sixty lol. I'll incorporate that next feed or water. Whatever comes first but it will be good to get it in the regimen. I was worried plant doctor might hurt but the girls seemed to kike it and I went ham on the worst plant. I mixed according to medical Marijuana guidelines on the label
(Theres another label on the internet, it's not on this one, it's at the very bottom and just recommdations from commercial growers. I hope this stuff works. Things look better already though. That liquid kool bloom is the bees knees. That's making flowers pop up like crazy! I think I'll stick with it. I was going to use beastie bloom and cha ching later on (and still might) but I hate the lockout bullshit. I've done a bunch of videos but most don't get uploaded as i forget to upload when I leave and wifi is slow here. Anyway at least I've got a few good ones left and pleating the words of my commercial poll buddy, "barring anything catastrophic you should be fine. I know your anxiety gets the better of you sometimes." Couldn't be a truer statement. I'm still getting a tent and doing indoor though. I'm going to need to.
8/25 Did some slight defoliation. I think today I'm going to reorganize my grow space. Things are looking better though. Plants look healthier. Flower is on and they are going to beat hell. I'm glad I took a cutting from NY 9lb kush. I also took one from the NYCSA. THose are tge little ones. The 9lb kush is flowering pretty good. Too bad it's just on a 3 gal. The NYCSA us in a 10 gal grow bag though and is doing amazing. I still see septoria on the leaves. I'm sure I'll need to reapply plant doctor but thus far I'm impressed. Things LOOK better. I don't even remember the last time I watered. It Rained last night. Looks sunny today. I'm going to feed tomorrow. I want the soil to dry out though. We usually don't get consistent rain like this. It's a first for me. I'll update later if I get stuff done.still wondering if I should amputate that wilted branch or give it a bit. It's still attached right now. I'll get some sealant and do some more research.


Likes
17
Share
@VegHead_Lou
Follow
Most definitely a great strain to have in your garden if you want some color. Yield isn’t much but the flowers make up for that. I wish this strain had some more funk to it. My last Devil Cream lady smells straight like citrus. Stay tuned for its harvest. Thank you all for following my first grow dairy. Make sure you follow my future grows and follow me on Instagram.

Likes
37
Share
@Aleks555
Follow
🏆 Eternity Grow Cup 2025 with Plagron and Zamnesia 🏆
Zamnesia – Runtz
93 days from seed | 62 days in flower
The time has come — harvest day is here, and our incredible journey with this beautiful Runtz from Zamnesia has come to a fragrant, frosty end. For the past two weeks, she’s been enjoying pure, clean water as we prepared her for the finish line. Her leaves gently faded to gold, signaling her maturity, while the trichomes turned from cloudy to amber — with about 15% showing that deep golden hue we were waiting for.
She grew strong and vibrant thanks to the outstanding genetics from Zamnesia Seeds, and we’re beyond grateful for this opportunity to cultivate such a top-tier strain. Her structure, aroma, and resin production were truly impressive.
A massive thank you to Plagron as well — your nutrients have once again proven to be the perfect fuel for our grow. Easy to use, reliable, and effective — we couldn’t ask for better support for our plant’s development.
Stay tuned — soon we’ll share the dry weight and a full smoke report. But for now, it’s time to celebrate the harvest!

Likes
30
Share
@Plihan
Follow
Hi.вторую неделю поливаю водой.передоз был.много листвы сгорело.главное шишки целые.не много осталось по времени🙏

Likes
18
Share
@eldruida_lamota
Follow
Que pasa familia, vamos con la novena y última semana de floración de estas Tropicana Cookies Fast Flowering, de FastBuds.
Los ejemplares tienen muy buen color han crecido muy uniformes y las flores han acabado de madurar.
El ph se controla en 6.2 , la temperatura la tenemos entre 21/24 grados y la humedad ronda el 50%.
Se quitó la alimentación hace 2 semanas solo estuvieron agua y poco más , ya cuando coseche diré resultados finales.
Mars hydro:
Code discount: EL420
https://www.mars-hydro.com/
Agrobeta:
https://www.agrobeta.com/agrobetatiendaonline/36-abonos-canamo
Hasta aquí todo, Buenos humos 💨💨💨
