The Grow Awards 2026 🏆 


Likes
Comments
Share
@Salokin
Follow
Hello Growmies,
As we step into week 15 of flowering with our Northern Lights by Zamnesia, the journey gets more intricate and exciting. Let's delve into this week's updates:
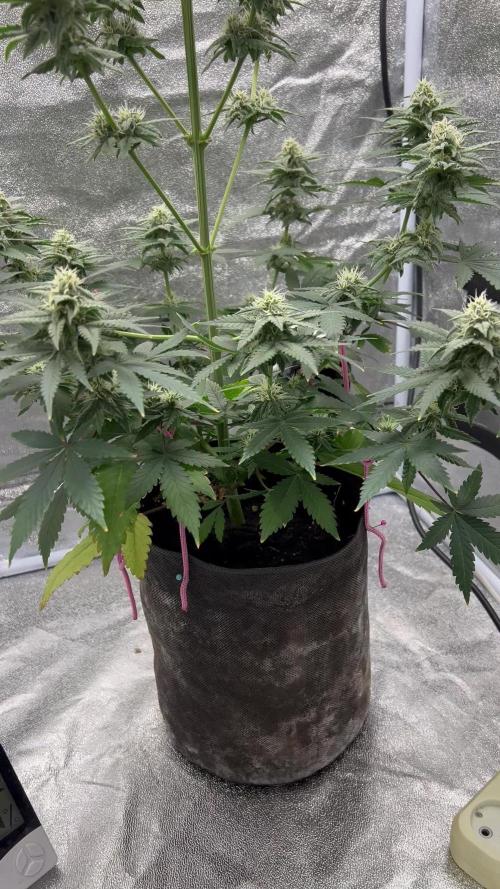
Our Northern Lights star is proving to be quite finicky, especially with nutrient uptake. I've observed signs of lockout whenever the EC (Electrical Conductivity) level rises above 1.7. Thankfully, the pH levels are stable, so no concerns there. After some experimentation, I believe we've found her sweet spot at an EC of 1.5. This delicate balance is key to maintaining her health and vigor.
Despite the challenges, she continues to develop beautifully. The buds are light yet densely packed with trichomes, creating a spectacular frosty appearance. It's truly a sight to behold as they cake up all around, showcasing the plant's remarkable genetic potential.
One consequence of the recent nutrient lockouts is chlorosis, leading to a significant loss of leaves. It's a delicate phase where careful monitoring and adjustments are crucial to minimize further stress on the plant.
The tent is now filled with a very sweet aroma, a delightful sign of the maturing buds. This scent not only signifies the quality of the buds but also adds an extra layer of enjoyment to our growing experience.
Your continuous engagement and feedback are what make this journey so special. I look forward to reading your insights, questions, and tips. Your shared passion and knowledge are invaluable in navigating these complex stages of growth.
Don't forget about the special discount code ZAMMIGD2023 at Zamnesia's online store. It's a great way to connect with fellow growers and enjoy quality products.
Thank you for being with me on this adventure. Your support is a huge part of what makes this experience so rewarding. Stay tuned for more updates as we carefully guide our Northern Lights towards a successful harvest. Here's to healthy growth and aromatic buds!

Likes
12
Share
@GREENPHOENIX6262
Follow
* Week 6 Flower Mimosa (1 -2) - 10/8*
Both Mimosa's are near harvest about a week left, Lotus CarboFlush will begin this week.
Mimosa (1) - 38 Inches - Mimosa (2) - 28 Inches.
Trichomes have set in - Pulled off trellis net this week
* Pre-Harvest set-up - 10/15*
Both plants have been cut down and are drying out accordingly (Day -1)
Dry time will be 9-14 days - Dry temps are 60% Humidity - 62 degrees F.

Processing
Likes
37
Share
@TheIceCreamParlour
Follow
Right then 7 weeks of flower complete. I'll dive right in to the juicy bits as this week has been predominantly about deciding weather to chop or keep one of my girls going. In the end I chose to do both! As the photos and videos show the plant wasn't recovering so I checked the trichomes and it was actually pretty ripe. A few Amber's on the upper buds. Lowers still undeveloped so I decided to take the biggest and leave the smallest for another week or while ever the plant is healthy. I estimate I've taken around 7oz once dry. Depending how they swell up I'm hoping for a further 5oz of solid bag worthy nugs.
Looking nice and frosty, smell is that typical sweet haze with some sour diesel/fruit kick in there. You can see how the photos progress my hands getting covered in resin.
Got to give my other 3 some love as they are getting healthier and fatter. I'm thinking another week on one of them and 2 on the others. I'll more than likely stagger the harvest like tonight if it proves worth while. I will update mid week.


Likes
30
Share
@PEAKYPLANTERS
Follow
Hi guys, what's up ?
Peaky's work is endless and today we meet again to share our experiences with all of you
I hope you always enjoy it ! Our little girls are growing up without deficiencies and are coping with good greenery
Stay updated that they will soon flourish 🤗😋

Likes
6
Share
@bioaccessory
Follow
Hello colleagues!
Finally I am standing at the finish line, you are probably familiar with this pleasant feeling - the euphoria of the upcoming harvest. Due to the difference in phenotypes, I have a slight desynchronization in ripening (the pink one is definitely ready), but I decided to harvest on the same day. This is planned for next week, come and see the result.
Thank you for stopping by, and be healthy! 🙏
To be continued... 😶
Likes
2
Share
@Alexgrow
Follow
Всё отлично! Рост практически остановился. Некоторые стигмы начали желтеть


Likes
16
Share
@BongRip
Follow
UPDATE AFTER A LONG TIME, i'll post more often.
I only recovered a few videos from last couple years to share.
Mango is dense, but doesn't give out much trichome as I expected. So, I took a risk and poke a hole in the stem to gave a lot of stress to the plant, so the plant gave out a lot of trichomes and the bud becomes a bit bigger.

Likes
7
Share
@OwlGang_Uk
Follow
Week 14 - Week 2 Of Flush - It’s Week 2 Of Flush For The Bigger GG And Week 1 For The Other. I Apologise For Not Having Proper Pics And Vids From Week 1 Flush Or Week 2 Is Just That Forgot My Phone On One Of Those Arriva Bus So I’ve Been Phoneless And This Was The Only Video I Use My Partners Phone To Take And I Apologize For Having Other Plants In The Video Is Just That I Have To Carry These Plants Upstairs In My Tub Every 2-3 Days And Flush Them And I Been Feeling A Bit Down About the Whole Phone Situation But I Still Would Like For You Guys To Get To See Week 2 Flush. I Will Be Getting Another Phone Next week So I Will Make Sure To Upload Proper Pics And Vids. I will let the Bigger Gorilla Glue Flush Out For Another Week Or Few Days Because The Trichomes Are mostly Cloudy With A Few Clear And I Want To Catch It Right When It’s Mostly Cloudy. Also The Aroma Is Still At It’s Peak!


Likes
31
Share
@Mrs_Larimar
Follow
2024-07-13
Indoor
The Indoor Lady is fading, chrystals are building and well
i think the longest Time for her is over
and we are slowly coming to an end.
OUTDOOR
Despite the bad outdoor conditions, the Tangerine Snow stands brave and strong
i was feeding her today, and i think i have seen some Preflowers?
this week i made Videos from Both, In and- Outdoor Plants
BREEDER INFO
Tangerine Snow F1 Fast Feminised is a 75% sativa, four-way cross of (Boost x Tangelo) with (Lavender x Power Plant).
This Fast F1 hybrid is bred from Cali genetics and boasts great citrus terps, high resin production for extracts,
high levels of THC, very good yields and excellent mould resistance.
Tangerine Snow F1 Fast can be grown indoors as well as outdoors. Indoor flowering times are between 8 - 10 weeks
while harvest time in northern latitudes is during September while in the southern hemisphere growers will be harvesting during March.
Recommended climate regions are hot, dry, humid and warm. These are tall, semi-branched plants that grow in excess of 200cm
and display a high degree of vigour with very good uniformity.
In common with many other heavily sativa-dominant strains, Tangerine Snow F1 Fast offers excellent resistance to mould
as well as to plant pests and diseases. The combination of citrus terps and plenty of resin makes thi
a very good extract strain with the 'washing' method delivering very good yields of hash.
The citrus terpene profile is reminiscent of mandarins and tangerines and also has sweet candy notes.
THC production has been lab-verified at a strong 24% while CBD is low. The effect is uplifting and energising,
perfect for use during the day and early evening.

Likes
3
Share
@Probation2Propagation
Follow
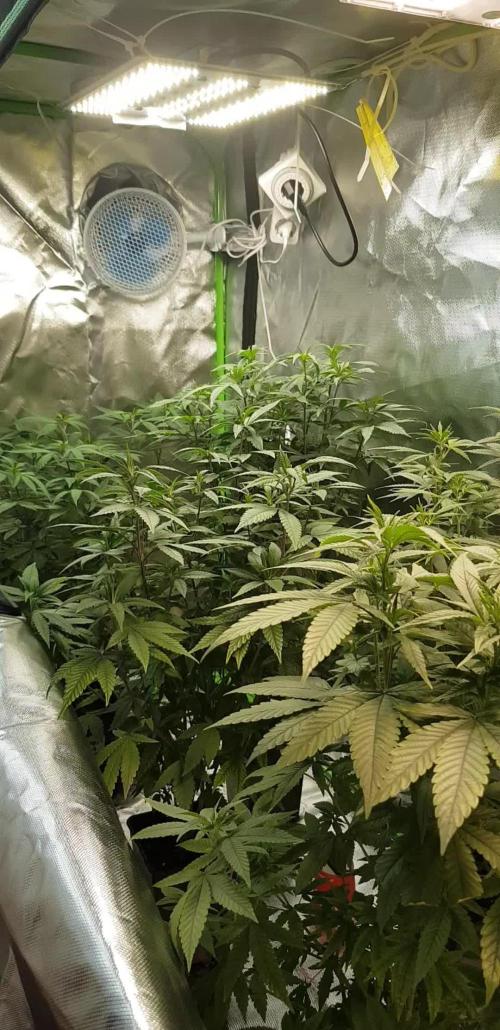
Day 21 of Veg and we have started our LST! We are just bending down the tallest branches and encouraging lateral growth. We have topped and we will top once more before flower. We are about to put these 10 ladies in the 4x4

Likes
67
Share
@DoDrugs420
Follow
NOTE: THE COUNTING OF DAYS STARTS FROM THE DAY THE SEED STARTS ITS PROCESS, IN THIS GROW DAY 1 WAS THE MOMENT THE SEED GOT INSERTED INTO THE EASY START (i do not recomend this method for experienced growers, but higly recomend it to unexperienced growers that might accidentally damage their seedling's new root as they move them from the germination zone into their next or final pot, with easy start you can just pick up the small cube of soil and place it inside the next pot GENTLY).
NOTE: For strain informations, soil recipe and nutrient's stock please do check "Germination Week" as you will find all the information there. (Do not replicate nutrient dosages as these are higly variable depending on the conditions within the grow room or tent, so you may end up damaging or killing your plants even if they are the same strain from the same breeder).
--------------------------------------------------------------------___________________________________________________________-----------------------------------------------------------------------_____________________________________________________________________----------------------------------------------------------------
03/11- All watered with 950ml of water per plant with dilluted nutrients in the rates specified above.
Light schedules changed to 19/5 and will be further extended to 20/4 to allow for more hours of heat from the lights as we progress into winter.
06/11- All watered with 1,4l of water with 2ml/l Bio Rhizhotonic + 0.45ml/l of Ancient Earth.
LP1- Topped + Removed first set of leaves as those were not in use anymore completely covered from light.
LP2- Removed first set of leaves as those were not in use anymore completely covered from light.
Likes
15
Share
@Waveform
Follow
Day 17 (starting Aug. 2nd afternoon): Will water them with a lightly enhanced RO water that was imprinted with frequencies via a PEMF coli for about one day when their day starts.
After being away over the extended weekend, on day 20 ladies have grown very nicely. I topped nr# 1 and #2 after I took the photos and will give them a bit of water with Root Complex to compensate for the shock later. Sadly my brilliant control equipment has crashed completely and will not even take a photo currently. Yikes. Hope I can get it back alive this week again. Also turned the left light up by another 20%, now running at 40 W, and lifted it a bit. Eye inspection told me lights were lower here and ladies can get a bit more.
At the end of their day 20, they seem to have survived the topping well. I managed to cut right above the new nodes which are already growing. Ladies are at 20 cm height before going to sleep.
Day 21 shows great growth again, with lady #1 being at 22 cm now and lady #2, while being a bit less tall, extremely good side branch development. I hope that the rearranged lighting on the left side of the tent will make #1 grow a bit bushier too.
Besides from that, I am really happy I tested Hesi HPE. I had such enormous success with room plants that made me want to see how Cannabis plants react to it. It will not add much to salinity, so I dared to add it quite early. While the photos are processed to compensate the lighting, I did not add much to saturation, so leaves are indeed of a very vivid, luscious green and ladies looking extremely healthy. Speed of growth has increased too as the added video shows. It also tells me lighting is enough – they are turning their leaves away right at the end of their day. I am really uncertain if I will change to usual Hesi grow fertiliser at all …
Did a bit of LST to the lowest branches of lady #2 which spread almost to the border of her pot.
Both temporary girls will leave the tent soon, so that the competitors will have maximum space to develop.
Day 22, end of week 3:
Outside girl went to get fresh air from now on. Wishing her luck, good weather and not a single male in the vicinity.
I rearranged the lights and positioned them a bit higher. First preflower signs appeared on the ladies, so I will change the lighting phase when I return next week. Currently, I have them at 18/6, 45 cm above heads, with 80% running to a total of 80 W.
I wasn’t so lucky topping #2. She has only one "top side" branch now … But grows extremely well, so ok!

Processing
Likes
18
Share
@Manic
Follow
One of ap colas fell and bent overnight due to the weight on her stem lol. Fixed the problem by using some tape and a support beam for her. Other than that they r both starting to stink up a lil bit and are growing healthy. Completely flushed them at the beginning of the week to wash last week's nutes out for fear of rootrot. Will give them nutes for there next feeding.
Likes
2
Share
@PINUFLA
Follow
Día: 58
Riego: 800ml x Pl.
- SoloTek Bloom 2mlxL
- HeavyBud 2mlxL
- Vitamax 1mlxL
- MonsterBloom 0,3gxL
Día: 62
Riego: 1L x Pl.
- ProSilicate 1mlxL


Likes
60
Share
@Professor_Chaos
Follow
Beginning of week..
I went ahead and bumped the TDS to 1000 PPM this week. I don't think I'm going to go much higher than that. Usually don't have to.. Hopefully that's not too much.. I also started adding a bloom booster from Advanced Nutrients called Kushie Kush.. It works great for all strains tho lol. So the runoff is still acting up.. But it is getting better... Slowly. I emailed General Hydroponics on the issue a few days ago and they have not gotten back to me yet... Ugh. But going in: 1000 PPM.. Runoff: 700 PPM.. That was this morning.. Still have not given her plain water yet.. Just been feeding every watering.. Not really any signs of issues right now. A couple leaves are a little yellow (literally 2).. Another couple have some spots (maybe 4 or 5 leaves).. But other than that she is happy, healthy and smelling like a fucking champion! Seriously fucking delicious.. And to think the smell is supposed to warn off predators.. Hah! Good luck with that!!! Barely 8 days of flowering and she is already stacking so fucking nicely! I can't wait to see what kinda magic this gal is gonna do! So happy and excited!!! The light sits about 18 inches from the canopy right now at 100% power. She is still stretching a little but seems like she may be done with that pretty soon.. Maybe even before this week is over. Clones didn't make it.. I think it was too cold. They all sprouted roots but just stopped and they all yellowed out like a mf'r.. Looked like shit so I took them out back Ol' Yeller style and put them out of their misery 😭.. But it's ok.. The mama needs all the focus on her right now! Lol.. Oh yeah.. I went ahead and pulled a couple of the tallest branches down.. Just a tad.. Brought the ties up a node or so on each and pulled it tight.. Spread her out a little but I was nervous of snapping one off so I didnt try to push it too much.. These branches are tough af!
Later that day..
General Hydroponics finally got back to me.. They said that I'm an idiot for using FloraKleen during transition like that.. Lol jk.. They did say that I should have NOT done that.. And that my runoff should ALWAYS be lower than it is going in due to the ppant taking up the nutrients.. But that just doesn't seem right to me.. Ive ALWAYS had my runoff higher.. Literally ALWAYS.. but without issues. They said that if the runoff PPM is higher, then there's a problem.. Maybe if I was doing frequent fertigation.. But I'm not.. And never will because that just sounds like a waste of nutrients.. But whatever.. Today I learned that FloraKleen is ONLY for pre-harveat flushing.. Or hydroponic reservoir cleaning in between nutrient changes.. But definately not the way I used it lol.. Thankfully she is still doing good 👍... Buuuut whoops lol
Mid week..
Still doing magical things! Lol.. I didn't think she was gonna fill out this tent so nicely! Trichomes are forming nicely.. The purpling is looking amazing also! Some spots on SOME leaves.. But not alot.. Not sure what that is about.. No pests.. No deficiencies as far as I can tell.. Maybe just a mutation? Nothing to worry about tho.. This girl is so fucking gorgeous! I love it!.. Back to feed, water, feed, water, etc. schedule now.. I'm hoping that 1000 PPM isnt going to be too high for her.. But if it is, I will adjust accordingly.
End of week..
Seems to me like the stretching has stopped.. So I'm going to cut out the FloraGro.. Double up on the FloraBloom and later into flower I will bump up the Kushie Kush Bloom Booster. She's doing great! Smells fucking amazing! I thought my ETHOS Early Lemon Berry R1 was gonna be the best strain ever.. Then I grew this girlie! Not just a lemony scent.. But like a very sweetened lemonade.. Incredible! Trichomes are EVERYWHERE! Such an awesome, beautiful strain! Good job FastBuds.. Can't wait to try more of your strains! Too bad you wont even acknowledge my grow journal like you do everyone elses.. But whatev.. Lol.. On to the next week!!!...
Likes
152
Share
@EBxAH
Follow
Again, such an amazing experience!!!!! I love this smoke for night, it's definitely helped my insomnia! The taste is out of this world! I pick up more Mazar than the blueberry or thai.

Processing
Likes
18
Share
@710_Squish
Follow
She is going all out right now. Nothing slows her down. I did a heavy defoliation and she just kept going balls to the wall. The silica blast has really toughened her up.
