The Grow Awards 2026 🏆 


Processing
Likes
12
Share
@GrowGuy97
Follow
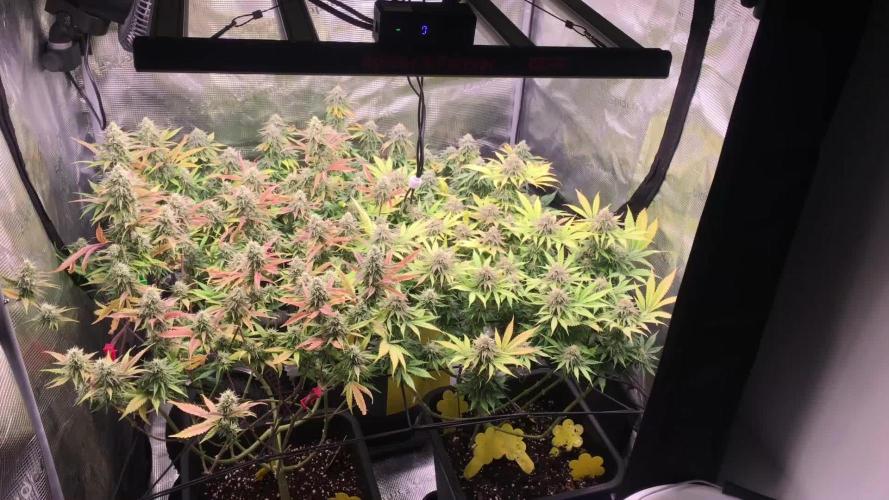
Day 28 - These ladies are growing like crazy! 2 of them are already almost as tall as my white widow autos that are about 2 weeks ahead!
Day 30 - Still stretching like crazy, starting to look much better though I have to say!
Day 32 - Ladies are starting to get nice & purple!

Likes
8
Share
@Thedibber
Follow
Bottom left I forgot I mixed with coco as I didnt have enough livingsoil left to fill the pot. Showing some signs of fading but giving it a dose of biobizz tonight and 50g 2 8 10 amendment to each. Watering 2L each every 2days still. Weekly microben feed at 5ml per L
25/10/25 - Added 55g of 2 8 10 amendment to each pot and mixed then watered 2L 5ml per L microben Ph6.8
27/10/25 - Watered 2.5L each Ph6.8
Likes
16
Share
@OrganicBuds030
Follow
All time Klassiker Strain. Man muss sagen dass es sich hier aber auch um einen selektierten Phenotyp handelt. Unglaublich intiensive Terps und 29,4% THC

Likes
3
Share
@LandFarm420
Follow
Questa settimana la pianta a iniziato a tirar fuori i nuovi rami, e abbiamo iniziato con i fertilizzanti 1 ml per parte grow bloom micro della adv nutrients

Likes
4
Share
@Dankgrowz786
Follow
Fire 🔥 she smoked nice. Smooth and got a sexy taste. Overall a easy grown and will try again

Likes
71
Share
@Unkraut
Follow
10.02 • watered all plants with 0.8L
12.02 • watered all plants with 0.8L
14.02 • watered all plants with 1L
14.02 • i flushed the yellowing Black Domina with clear water with EC of 0.8 and checked the EC of the drain, it was 1.8...so i assume EC in the pot was like 2+, perhaps it was too high and nutrients had a lockout....PH was perfect (6.8)....perhaps the cause of yellowing was a lockout or N deficency...i have no clue...
16.02 • 3 of 5 White Ice are turning red/brownish...must be their genetics...


Likes
17
Share
@JonnyKush
Follow
hello growmies! day 51 finally the pre-flowers begin to appear. I apologize for the few photos but unfortunately they really filled the box and I find it difficult. overall I have to say they look in perfect shape! I will keep you updated thanks for passing by. like and comment! good day and beautiful growth to you 🌳🌱


Likes
15
Share
@MrJones
Follow
Mr. Jones Fast Buds Moby Dick
╰⊰´🌿 ╰⊰´🌿 ╰⊰´🌿 ╰⊰´🌿 ╰⊰´🌿 ╰⊰´🌿 ╰⊰´🌿
🏡Indoor - 3"x4"x8" Custom Built Grow Closet
🌾This strain likes to stretch, so a heavy training regiment will be needed.
🗓️Germenation - Soaking in Water Strait into Amended Soil.
⚱️3-Gallon Pots 📊6.4 / 6.8 PH
💧 Feeding - Gaia Green Grow / Bloom
🕷️ IPM - We will be using Green Cleaner" 1 OZ per Gallon, and CannControl from Mammoth alternating between products each month for Integrated Pest Management.
🌿╰⊰´🌿╰⊰´🌿 PLANT UPDATES 🌿╰⊰´🌿╰⊰´🌿
🗓️Saturday - 11.18.23 These girls are just blowing up, always like the flower stretch of FastBuds strains, the smells are nice and they are starting to drink more, the closet is filling up, did another PPM treatment with CanControl.
╰⊰´🌿 ╰⊰´🌿 ╰⊰´🌿 ╰⊰´🌿 ╰⊰´🌿 ╰⊰´🌿 ╰⊰´🌿
📝 Notes - Original Moby Dick Auto is a world-renowned Sativa-dominant giant created from two of the most popular strains ever, the White Widow and Haze cannabis strains which are known for the huge delicious aroma, huge size and yields; It’s an extremely easy-to-grow variety highly recommended for growers of all levels seeking for maximum yields with minimum effort as this strain grows up to 150cm and yields up to 650 g/m2 in 10 weeks without extra maintenance. Thanks to its 23% THC, this marvelous hybrid is all about happiness as it will melt your worries away while boosting your mood, leaving you with a big fat smile on your face and ready to get things done as soon as you take the first hit, making it an excellent choice for social scenarios and busy workdays. The Sativa effect comes hand-in-hand with a mix of lemony, piney, and woody terpenes that translate into that classic aroma every stoner loves.
╰⊰´🌿 ╰⊰´🌿 ╰⊰´🌿 ╰⊰´🌿 ╰⊰´🌿 ╰⊰´🌿 ╰⊰´🌿
Likes
55
Share
@Natrona
Follow
Blue Cheese F1 automatic
Week 5 2/2-2-8
The Cheese gals are in full flower and are stretching like crazy. At the beginning of the week, they were 7 inches tall, Wed 10 and today 2/7 they are 14 & 15 inches tall. They have doubled in height.
I’ve moved the pins out to the edge of the pot. For future training, I must add some wires thru the pot holes to keep the branches lower as the outer rim is taller than the center.
I reduced nutrients in the feed solution since Runtz and Pink Rozay are showing some purples/blues in the leaves. These gals are vigorous and don’t seem to mind the full strength feedings. Hopefully they won’t start showing deficiencies.
I added Green Sensation this week then read the instructions said add in 4th week flower.
Blue Cheese is supposed to be a 10 week flower from seed to harvest. If I wait till the 4th week, it will only be used for 2 maybe 3 weeks. Would that actually benefit the plant. So I think I will add some each time but a 25% strength. Calls for 4ml/g I will use 1ml. They are autos and I should be lowering the nutes anyway. Pinned more branches. I add 2 gallons of water to the T700 humidifier daily to keep the VPD in line.
2/5 4 gal fed 2 liter each nutrients added at ½ of recommended amount. Making 4 gallons since I have 2 pots of carrots and Dill in the back.
Bloom Juice 60ml
Plant Juice 60 ml
Royal Rush 15 ml
power bud 15ml
green sensation 7.5ml
Recharge 2.5ml/gal
7.5 ml
Ppm 333
Ph 7.02
Temp 66
2/7 3 ltr each
Bloom Juice 60ml
Plant Juice 60 ml
Royal Rush 15 ml
Power bud 15ml
Green sensation not added
Ppm 298
Ph 6.5
Temp 65
Your likes and comments are appreciated. Thanks for stopping by.
Growers love 💚🌿
💫Natrona💫

Likes
4
Share
@Skillgrower
Follow
Começamos a 3° semana no domingo está agora com 18 dias a correr bem, vou dar continuidade ao lst ate à 5 ou 6 semana e mudar o ciclo pra floração
As mais pequenas no vídeo uma tem agora 12 dias e a outra está com 15 no fim da segunda semana começou hj o lst


Likes
13
Share
@MissionPossible
Follow
Nel terreno ci sono le Big Bomb, invece nei vasi ho inserito le Bcn Critical XXL che trovate a questo indirizzo https://growdiaries.com/diaries/111995-grow-journal-by-missionpossible#

Likes
38
Share
@B4niTa
Follow
Rapid germination, time for rapid growth.
I will try to share photos from each day to see the progress.
Happy Growing!
Day 2 cover the perlite with coco to prevent the appearance of algae
Likes
2
Share
@LittleBigTrees
Follow
Picking the odd leaf off but it's pretty much just doing its own thing other than having to feed her . She smells really nice with lots of bud sites and has some visable trichome production now .
Likes
11
Share
@WeedM8
Follow
The way flowers are pumping is beautiful 🤩 starting to make some sirius progre

Likes
470
Share
@PurpleWorship
Follow
BIG UPDATE THIS WEEK !!!
----------------------------------
FEEDING MISTAKE / TRANSPLANTING THE PLANT
-------------------------------------------------------
Last week, the plant was showing some feeding issue (some burned tips).
After discussing with another grower ( @Asnoriu ) and carefully listening his advices, I decided to transplant the queen to a bigger pot.
16L can be ok, but I had a long veg (10 weeks), and this was getting too small for the lady. So starting from now, I will always transplant before flowering, since I understood & learned how it help the plant to develop good roots network.
The plant probably suffered from too much feeding with Fish-mix. Asnoriu told me He was using it at 50% of the recommend dose, and not at each watering.
This totally make sense, especially when i look back at my first grow : I used no fish-mix during almost all the veg, and she grow verry well. My gardening soil was probably rich enough for my plants!
I transplanted the plant to a bigger pot (16L -> 30L) and filled the new pot with Biobizz All-Mix soil.
I took the plant from the old fabric pot like if it was a sock : what a niiiice and easy technic ! (Thanks again Asnoriu).
Watered with pure water (ph at 6.2-6.5), without any nutrients (All-mix is already rich enough). I will feed again in 1-2 weeks.
BIG ERROR WHEN APPLYING LST BACK IN THE NEW POT
---------------------------------------------------------------
I had to remove my strings (LST) to switch to the new Pot. When I was applying the LST again in the new pot, I went too far with tension... And the main-lining broke 😟
So I fixed it verrry quickly by releasing LST tension, and using a string to tight the stem where it broke. In less than 5 minutes it was fixed.
I was verry worried that it may have killed my queen.... But she didn't shown any sign of stunt, and 48h hours later, I can say that she look verry good. This doesn't slowed her.
She seems to grow faster since transplant, so all good :) So, note to myself : never try to LST when flowering started, or only verry carefully, with just littles adjustements.
SPONSORSHIP ANNOUNCEMENT & LIGHT + TENT UPGRADE
--------------------------------------------------------------------
I'm verry proud to announce that Mars Hydro ( @MarsHydroLED ) decided to sponsor me :)
So I received a TSW2000 (basically 2X the output of a TS1000), and a Mars Hydro tent (100cm x 100cm x 180cm)
That's PER-FECT, since I was already using a TS1000, which I bought because it was the best deal (price/quality) for me.
I'm verrrrry happy about it, and I feel verry lucky to be selected by Mars Hydro 🙌 This mean a lot to me. I still have a lot to learn, but I'm doing my best to improve myself and learn. Learning from the other, and sharing my experience, and being rewarded for that...
Damn, so cool 😍
MENTION
-----------
Once again, thanks a lot @Asnoriu
You are MY grower of the month, for sharing your ideas, opinions, and advices with me :)
WEEK DETAILS
----------------
- Day 79 : Watering 1L (ph 6.2 - 6.5) with feeding (as detailed in the week details)
- Day 82 : Transplanting from 16L pot to 30L pot. Broke stem, and repared it. Upgraded from Mars Hydro TS1000 to TSW2000 (2x more powerfull). Watered with pure water.
- Day 84 : Plant look verry great, and seems to stretch & flower faster :)
Likes
23
Share
@SmokingBrownAndTalkingBrown
Follow
I'm just giving them water until finish now.
Not long left, I am checking the trichomes daily!