The Grow Awards 2026 🏆
Likes
Comments
Share
@Terp1
Follow
04.01.2024 Tag 65 - Woche 10 / Tag 2 Licht: 40cm – 90% Lichtzyklus: 12/12 Luftfeuchte: 65% Temperatur: 27°C VPD: 1,3 kPa Höhe: Apple Fritter - 45cm Purple Punch - 65cm Gelato - 75cm Bemerkungen: 
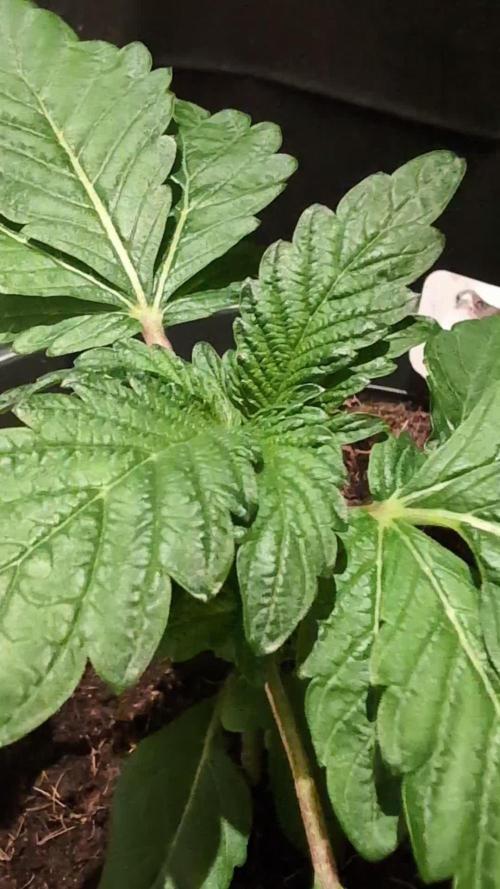
Die Apple Fritter sieht perfekt aus. Die Purple Punch sieht aus, als hätte sie einen leichten Brand UND einen leichten Mangel. Allerdings werden die oberen Zuckerblätter auch schon langsam lila... muss ich beobachten. Die Gelato hat auf jeden Fall was. Ich sehe einen leichten Kaliummangel und einen Calcium-Überschuss. Zusätzlich verdrehte Blätter, was auf PH-Schwankungen deutet - aber bei Living Soil eigentlich nicht von Bedeutung sein sollte. Ich lasse das CalMag erst einmal weg. Und pegel den PH die nächsten Gießvorgänge ein. Mal sehen, wie sie darauf reagiert. Ich denke insgesamt ist der VPD zu hoch. Ich wollte die Pflanzen ein wenig pushen aber das ist zu viel. Ich gehe wieder runter auf 1.2 kPa Terp 💪😎 ############################################################################################################################################################## www.zamnesia.com Gelato - abgefahrene Qualität hat noch nie so köstlich geschmeckt. Zamnesia Seeds präsentiert Gelato, eine stattliche indicadominierte Sorte, die im Grow Room eine tolle Figur macht und ein episches High hervorruft, das perfekt ausgeglichen ist. Im Unterschied zu anderen Gelato-Varianten auf dem Markt, wurde die ultra-potente Wedding Cake in unsere Version eingekreut, die Gelato das gewisse Etwas verleiht. Apple Fritter - wird Deine Laune heben, Deinen Körper entspannen und Deinen Geist aktivieren. Oh, und haben wir erwähnt, dass sie wie warmer, selbst gebackener Apfelkuchen duftet? Falls Du nach einer potenten, ertragreichen Sorte mit solider US-Genetik suchst, solltest Du in Deinem Grow Room Platz für Apple Fritter schaffen. Purple Punch - von Zamnesia Seeds ist eine traumhafte Indica, die mit einem exquisiten Geschmack und einem unglaublich entspannenden Effekt glänzt. Trotz ihrer kompakten Größe steht diese pure Indica für einen einfachen Anbau und großartigen Ertrag.
Likes
48
Share
Feb. 17 Ph 7.5 Moist - plucked all the bad leaves that were ready - Removed all the dead leaves - 3 gal of water ph of 6.4 + 15 ml big bloom + 20 ml tiger bloom + 9ml apple cider vinegar + 30ml blackstrap molasses unsulphured - Light burn seems to be the #1 problem, then ph fluctuations and nutrient burn - I think i held the measuring cup a little awkward most feedings instead of having it on a level surface and I probably overfed by 5ml each time - Most of the bottom leaves are green but have burnt tips, they are usually pretty attached - the middle section has lots of dead leaves but they are tiny little ones that have burnt and fallen off - the top leaves are all yellow on plant 1, with burnt tips, clawing up, very red stems, and are fairly easy to pluck off, not much effort on most - the most green areas are semi-shaded and off on the edges of the tent, and all the shaded areas remained green - Therefore, I would say my #1 problem was light burn, which made the ph fluctuations worse, nutrient deficiencies worse, and i over compensated and did not measure precisely causing nutrient burn - there is also some wind burn on the bottom areas - all in all the buds are developing nicely and bulking up decent amounts on plant 1, especially with all the topping - good trichomes coming out - plant 2 has different light burn but the leaves are praying up, and pointing up much more, more rusting also but they are not easy at all to pull off - the buds on plant 2 are also not growing nearly as well but the trichomes seem nicer and it seems to have more - the buds hopefully are more dense despite being small, they do look compact though - roughly 100 bud sites visible from the top of the canopy feb. 18 - ph. 7.2 - the clawing up and yellowing and burning of the tips has continued, likely past problems continuing to persist - these problems really only exist on the top set of leaves, which always brings me back to light burn - plucked another 10-15 clawed and burnt leaves from plant 1 - the buds got bigger, and the trichomes continue to pack on - seeing more promising growth/ recovery from plant 2 - trichomes appear to be quite clear, no signs of amber - The crop king seeds guide suggests 8 weeks of flowering time, we are a couple days into week 7 right now but the pistils are still about 60% white and somewhat straight, and the trichomes are quite clear. This would lead me to believe about 2 full weeks is left and likely closer to 2.5 weeks. - Trying to plan out my flush, leaving me a full 7-10 days to have the plants finish their nutrients, that flush would best occur at the mid point next week - I am expecting the trichomes to be cloudy by mid week 8, around feb. 25, I would flush them, and look to harvest 7-10 days later, around mar. 4-8 feb. 19 - ph 6.8 - moist - definitely bulked up more, plant 2 is back and growing strong, damage on top canopy continues to burn and curl, yellowing a growing splotchy brown spots, but I am very confident that this is past damage from light burn which has since been fixed by dropping the watts down by 140 - more pistils are going orange feb. 20 - buds fatting up really nice Feb. 21 - Daytime temps reduced to low 70s feb.22 - ph. 7.5 - moist - will water tomorrow - trichomes not yet fully cloudy - mostly orange pistils - mostly curled inward pistils, lower down popcorn still white and straight - excellent trichomes on plant 2 - will feed tomorrow then I expect the next thing will be to flush so this will likely be the last feed - daytime temps now 70-77 - nightime 65 +/-1F feb. 23 - plants look very thirsty, leave shriveling from before but hanging down and not perky at all - Dirt is very dry, moisture meter reads moist 5/10 - Ph: 7.6 - The plant is very hungry - Some noticeable stretching or just more visible now - Buds look to continue getting fatter and look really nice - 4 gal of water ph = + 22ml of big bloom + 30ml of tiger bloom + 30ml of blackstrap molasses + 9ml of apple cider vinegar - plucked more super dead leaves - Expected dates: - feb. 25 (week 8) - expected cloudy trichomes: - feb. 25 (week 8) - expected flush date: - feb. 25 - expected harvest date - mar. 4-8 Specifications:😎👇 Seeds: - 2x White Widow feminized seeds from Crop King Seed Tent: - 4x4x6 Mammoth Grow tent LED: - 2x Spider Farmer SF1000 LED for veg - 4x Spider Farmer SF1000 LED for flower (190 watts - 50-40-50-50 back left, back right, front left, front right) Pots: - 2x 0.5 L starter pots - 2x 5 gal smart pots after transplant Soil: - Pro-mix containing mycorrhizae and perlite, used for starter pots and mixed at roughly 1:3 ratio with Ocean Forest - Fox Farm Ocean Forest soil, used in the 5 gallon pots and mixed with roughly 3:1 ratio with pro-mix - note: pro mix was mixed thoroughly with ocean forest in the 5 gal pot, then pro-mix was used on the top layer, in and around where the transplant will be to help the early veg stage avoid getting too "hot" via nutrients. Nutrients: - Fox Farm Big Bloom - Fox Farm Big Grow - Fox Farm Tiger Bloom - Wholesome - Blackstrap organic unsulphured molasses Inline Fans: - AC Infinity CLOUDLINE T6 6" (exhaust) - AC infinity CLOUDLINE S6 6" (active intake) - AC infinity 6" ducting Mini fans: - 2x Wind Devil 6" fans Carbon Filter: - 2x iPower Carbon Filter on both inline fans - note: carbon filter on intake fan as basement had mold issues in furnace room far removed but same floor, some mold issue in other room, cat litter in basement, thus, avoiding all risks and sleeping sound at night :) all mold was killed, scrubbed, cleaned, sprayed, painted, and sprayed again before setting up. Humidifier: - TaoTronics Cool Mist Humidifier Dehumidifier: - Frigidaire 30-Pint 3-Speed Dehumidifier Timers: - 2x VIVOSUN dual Digital Timer - 2x Kuman Digital Timer
Likes
6
Share
She looks extremely healthy and happy let's see how she performs at the end,she's 100% organic grown without any chemicals from bottles. Starting to show the first pistils on August 24th
Processing
Likes
22
Share
* ***************** Week 1 of Growth From Seed, April 11 to 17, 2020 - Days 1 to 7 from germination ********************** * Okay, we are off running now. Through germination and was delighted to experience 100% success rate👍 Two girls this run and now have a GSC and a GSC2 this run. GSC was chosen for the first to break the surface and while the second GSC to come up is now GSC2, she was actually the third to break the surface. Excited to run this strain from Fast Buds.......there are newer strains but sometimes a classic is good😃 Greater focus on VPD this run. Already pushing the humidity higher than I ever have with having controller set at 72% with temperature at 79 degrees. I have been reviewing the numbers and I have normally been close but it looks like I have to raise everything by about 10% and for a few weeks long😬😬😬😬😬😬 Trust the science and lets learn some more from this grow!!! *****Daily Detail: Apr 11, Day 1: - VPD - 1.2 - 500ml first watering given with nutrients as listed. (minus Velokelp) - pH water to 5.6 - Girls up and looking like they are ready to go. Apr 12, Day 2: - VPD - 1.0 - 500ml feeding with VeloKelp @ 2ml/L, Piranha & Voodoo @ 2ml/L. pH to 5.6 - lowered light intensity a bit more. - Both girls are doing very well. Nice leaf colour and tips are turning up now!! Apr 13, Day 3 - VPD - 1.2 - 500ml water with 0.5ml/L each of Piranha & Voodoo, Dual Fuel. - 300ppm with 5.4pH. Apr 14, Day 4 - VPD - 1.1 - 500ml water with Virtathrive and Piranha & Voodoo Juice @ 1ml/L, VeloKelp @ 2ml/L, and SensiCal @ 0.5ml/L. - 210ppm with 5.5pH. - the girls are very happy and colour looking good. Tips are pointed way up on GSC and GSC2 seems happy but may have a little more going on below the soil right now so a little slower looking. Apr 15, Day 5 - VPD 1.0 - 250ml water with VeloKelp @ 1ml/L. - 95ppm with 5.4pH - GSC really looks happy and hope she is pushing out some serious roots below:) - GSC2 is holding her own looks fine. Apr 16, Day 6 - VPD 1.0 - 500ml water with Piranha & Voodoo @ 1ml/L, Vitathrive @ 0.5ml/L, Dual Fuel @ 0.5ml/L. - 300ppm with 5.8pH - GSC still looking pretty happy and continues to point tips up. - GSC2 is standing up a little more and over looking like a nice. - Moved all the girls today one spot in a clockwise rotation. - Noticed more residual moisture on the bottom of the pots than anticipated. Apr 17, Day 7 - VPD 1.1 - Turned on flower light on UnitFarm this afternoon and they are happier. - Both ladies up and proud to be alive this afternoon. - Dry out day today and no added water/feed, just misting. - Let the medium dry out a bit and give a nice week 2 feed tomorrow.....they are ready for a little more nutrients now.
Likes
269
Share
Day 92 Day 30 Bloom 42ish days remaining. Pour some SUGAR on meeeee.........wowzers the sugar is really starting to cake the sugar leaves now. Got tons of healthy bud sites forming and the smell is just delightful. Did another decent defoliation to keep all the buds site in the light. Keeps it nice and clean with great air flow. Speaking of air flow I added an oscillating fan to keep the air moving under the canopy better. There is a problem forming that I'll need to take care of this week. Another purchase?? 😡 lol De-humidifier......the humidity is very slow starting to raise. I started with 2 humidifiers on full, then 1 on full, then 1 on min for a bit then no humidifier and now its starting to raise with no humidifier so I'm gonna need to deal with this asap as it will become a very big issue in the future if I let my girls get moldy, but no chance I would let that happen! so i'll be on the search for a decent used one this week or purchase a new one unless I learn something new here, which I probably will. A question this week too. about Harvest. mayb 2 questions. So I hear alot of tricks regarding harvest. 24-48-72 hours of darkness before harvest then cut them in the "dark" meaning dont let the bloom lights come on again before harvest. different flush times and so on. what works best for you guys?! I'm thinking 7 day flush since thats why my nute sched says and it hasnt led me astray yet. I'm considering doing a tiny mid bloom flush reccomended by a friend, i like the idea to give just pure water for 1-2 days and kind of give the plants a break from the massive ppms i'm putting them through although I might skip this step if not needed either. 2nd part of the question, if the flower time for this strain is 70-75 days, I realize I should harvest when most of the tricones are milky and some clear with very little to no amber ones. but if I flush for a week before harvest, how do I know when to start the flush, how long is my harvest time frame for maximized potency. I'm guessing with experience I'll be able to know my girls and say yup harvest is x days out but for this one not too sure. 40ish days til harvest is bittersweet, feels so long but part of me loves it, how big can/will these buds get with another 42 days! Thanks again friends for following, this week the sugar came now I wanna see the weight really start being packed on.
Likes
14
Share
D71/F27 - 10/06/23 - Added Nutes and water, EC 1 and pH 5.0 D72/F28 - 11/06/23 - Nothing to report D73/F29 - 12/06/23 - Added Nutes and water, EC 0.8 and pH 5.3 D74/F30 - 13/06/23 - Nothing to report D75/F31 - 14/06/23 - Added Nutes and water, EC 0.9 and pH 5.3 D76/F32 - 15/06/23 - 👉Changed Water. Some signals on the leafes. I think it is because of heat but I0m going to ask to the community. D77/F33 - 16/06/23 - I've asked to the community and is heat stress, so I'm going to change the light hours to 12/24 (4 only red ligh and 8 red-white)
Likes
226
Share
@HighTV
Follow
| 📅 Week 2 | Days 8 - 14 | 💡 562w 📏38' | | 🌡️️🌞 81 - 84 | | 🌡️️🌑 77 - 80 | 11/16 Reservoir swap with a fresh batch of nutrients with Hydro-guard+Cali-mag PH'ed at 5.7. Raised the wattage to 562w and the light by a few inches. 11/17 PHed reservoir water to 5.8 PH and readjusted the air-tubes to make access easier. 11/18 Water added and PHed at 5.6. More Hydro-ton was added to the net-pots of plants that are ready. 11/19 Reservoir PHed at 5.8 for each plant. The temperatures are a little high from the wattage increase in the light so I raised the light more to reduce it. 11/20 Plants are looking healthy! Reservoirs PHed to 5.6 and water was added. Back right plant has genetic instability's but we're going to give her a chance for science. 11/21 PHed the water targeting 5.9. Started pulling the intake to reduce temperatures outside as the weather gets colder outside. 11/22 Added water the reservoir and PH adjusted to 5.8. Added the upper fans to the tent for increased air circulation. Overall this week was fantastic and I'm looking forward to the lapse going on from here! The plants are healthy despite one plant showing genetic issues the rest are looking great so far. The growth this week was explosive and I suspect this next week is going to be just as so. Hopefully I will find a solution to the lines in the time-lapse caused by increasing the wattage such as a lens or something. Please feel free to leave any questions below 😎
Processing
Likes
26
Share
7/19 everything's looking good. It's a start to a new week. These babys are gonna be huge when they flower. So far 16 weeks of vegging, that's 4 months🤘💚 7/22 watered and took pics
Likes
4
Share
@m0use
Follow
***Sponsored Grow*** = Medic || https://medicgrow.com || Grow = ***Sponsored Grow*** Made the call to chop this plant as it was only going to make nanners if I left it to long. Overall a giant disappointment, the Fast Flower FF was an Autoflower AF, Its put me off fast flowers and really whats one week when you grow indoors for an early harvest. Not something that's in my list of things I need. The smell of the plant is nice, basic weed scents, nice and sticky and full of crystals. Will see what happens in cure once it finishes drying. It made a weird nub of plant at the base of its stalk. have not seen that before, IDK what it was/means. Will provide more details in smoke report week. ***Sponsored Grow*** Official Website: https://medicgrow.com/ Facebook: https://www.facebook.com/medicgrowled Twitter: https://twitter.com/medicgrow Instagram: https://www.instagram.com/medicgrow420/ YouTube: https://www.youtube.com/channel/UCNmiY4F9z94u-8eGj7R1CSQ Growdiaries: https://growdiaries.com/grower/medicgrowled https://growdiaries.com/grow-lights/medic-grow
Likes
98
Share
@Fatnastyz
Follow
Day 120- Day 72- 11/11 - Still just giving that liter of plain, non pH'd RO water every morning. - Again, not checking ppms in or out anymore, she's ready Day 121- Day 73- 11/12 - Gave 1 liter of water Day 122- Day 74- 11/13 - Gave her last liter of water this morning - Tis her last day! Will cut this evening.
Likes
76
Share
They were growing a little bit laggy because they didn't geht enough light. I planted them so deep in the ground that they're not laggy anymore. Now my ladies getting enough light to grow strong ;) Hopefully the temperatures stay above 32 °F/ 0°C. If you want to see my second side and more go and visit my YouTube channel: Grow Before Hoe! (link: https://m.youtube.com/channel/UCtbdEJVLLj94qNQbOmxGR1g/feed ) 😉 Keep Growing! 👍
Likes
35
Share
Bonjour à tous les padawans et les maîtres jedis Pour cette semaine je prévoit de pratiquer comme technique spéciale le LST et juste un arrosage. Pour cela comme à mon habitude j'attend le cinquième noeud ou que je juge la plante robuste. Je profite que cette semaine qui va être relativement calme pour faire un LST appliqué et vous faire un rappel de ce qui est pour moi la meilleure technique pour arroser une autofloraison et la façon dont je pratique le LST. En suivant ces quelques simples conseils vous obtiendrez un résultat optimal tout au long de votre culture : Le cannabis est une plante qui n’aime pas recevoir un léger arrosage en continu. Il est impératif de l’arroser en grosse quantité, puis d’attendre que la terre soit bien sèche avant d’arroser à nouveau! Pour calculer la quantité d’eau nécessaire à chaque plante, suivez cette règle : Le volume d’eau à donner lors de chaque arrosage doit représenter au moins environ un quart du volume du pot !! Exemples : pour un pot d’1L, donnez 0,25L d’eau à chaque arrosage pour un pot de 4L, donnez 1L d’eau à chaque arrosage pour un pot de 12L, donnez 3L d’eau à chaque arrosage pour un pot de 30L, donnez 7,5L d’eau à chaque arrosage !etc… Pour donner un tel volume d’eau, il est souvent nécessaire d’arroser en deux (voir trois) fois, lentement et uniformément sur toute la surface. Disposez de bonnes coupelles sous les pots, celles ci se rempliront d’eau qui remontera dans le pot par capillarité en moins d’une journée. Il est également très important d’utiliser un bon terreau de qualité, avec une bonne capacité de rétention d’eau mais qui assure également un bon drainage (celui ci doit contenir de la perlite, et/ou de la coco, etc..) Il vous faut alors maintenant attendre quelques jours en sous-pesant régulièrement les pot avec vos bras. Quand ils seront redevenus très légers, vous pourrez arroser à nouveau !! En effet, comme l’eau pèse beaucoup plus lourd que la terre, un pot gorgé d’eau pèse plusieurs fois le poids d’un pot d’une plante prête à être arrosée. Avec un peu d’entraînement, vous apprendrez donc très rapidement à sous-peser vos pots pour savoir quand une plante a soif. C’est une technique à la fois très facile et très efficace, et qui peut être appliquée à toutes les plantes en pots ! En arrosant de cette façon, en général vous devrez arroser vos plantes tous les 3 à 6 jours. Pour cette semaine 3 au jour 17 ma plante fais 12 centimètres et son cinquième noeud apparaît je décide donc de pratiquer un LST sur ma plante. Pour ce j'utilise du fil de fer galvanisé que je plante directement dans le substrat en faisant attention de ne pas endommagé les racines car n'oublions pas que ce qui pousse dessus pousse aussi dessous. Jour 17 je pulvérise du une solution composé d'une cuillère à café de savon noir mou dilué dans un litre d'eau en prévention d'éventuels nuisibles. Je corrige mon LST suivant la pousse de ma plante ... Pour ma par c'est la manière dont je procède. Comme promis petit rapel de: Quand commencer à appliquer la technique LST De nombreux cultivateurs commencent la manipulation dés que les plantes possèdent entre 3 et 6 nœuds ou une paire de feuilles. Durant cette première étape de la croissance, le tronc encore flexible est pliable sans risque qu’il ne se casse, même si au fur et à mesure du développement de la plante il sera de plus en plus difficile de le plier. Nous pouvons continuer à guider la croissance des branches durant toute la culture, même durant la floraison, ce qui pour cette étape représente un grand avantage face à la taille, qui n’est pas du tout recommandé une fois que la formation des têtes commence, cela stressera en effet la plante, ce qui aura pour effet de retarder la récolte. Comment appliquer la technique de guidage LST Si nous sommes prudents, la flexibilité naturelle des fibres du cannabis permet de plier leur tronc et branches avec une relative facilitée, même durant la floraison des plantes. En utilisant une corde fine, nous pouvons accrocher la pointe de la plante à la base du pot par exemple ou à un tuteur que nous aurons planté dans le substrat. Nous plierons le tronc avec précaution et nous le fixerons avec la corde, à partir de là, nous pouvons augmenter progressivement la tension de la corde, chaque jour un peu plus, jusqu’à obtenir la position souhaitée. Soyez attentif à la réaction de la plante, essayez de ne pas appliquer trop de pression sur la corde et rappelez-vous que la flexibilité des branches peut varier d’une plante à l’autre. Pour obtenir de meilleurs résultats, il suffit de suivre quelques règles simples. Pour commencer, nous devons choisir une corde fine mais pas trop pour ne pas blesser les troncs au fur et à mesure qu’ils grandissent et qu’ils deviennent plus gros. Nous pouvons utiliser des crochets en plastique souple ou de n’importe quelle autre matière flexible pour éviter d’endommager les plantes. Spécialement en intérieur, utiliser des cordons en plastique de couleur (voir les diaries de @Silky) est très pratique pour voir facilement les accroches et faciliter le travail au milieu du réseau formés par les cordes, les tuteurs, les mailles ou les supports que nous aurons dans la culture. Bien entendu, en culture extérieure et surtout en guerilla nous ferons juste le contraire et nous utiliserons des matériaux de couleur qui n’attirent pas l’attention pour que notre jardin reste discret. Pour stresser les plantes au minimum, la mieux est de réaliser ces manipulations le soir ou juste après que les lampes en intérieur s’éteignent, ce qui leur permettra de se remettre durant la nuit. Normalement, le jour suivant nous pourrons observer comme les pointes des branches que nous avons pliées se dressent de nouveau vers le haut à la recherche d’une source de lumière. Que la force soit avec vous
Likes
23
Share
Plants took a tumble while I was at work and came home to everything laying on the ground like a robbery. I also learned that my plants wasn't burning but in fact when the tree hit the deck the 33C heat and the roof torched the leaves. The vertical growth is slowing as it only grew 4" in the week so far, next summer hopefully I will use 20 gallons and not 12. Just solid knowledge for next year as I wanted all 3 tree to hit around 6ft after the stretch and all the training. Lost a few main branches on this plant so idk how realistic 1.5lbs is at this point
Likes
11
Share
@Farmer1
Follow
High quality flowers, Very dense and aromatic,it smells like candy in my house.A very easy plant to grow, it has gone through multiple bad weather without losing either vigor or production. I recommend it to everyone, Expert or not.thank you fast buds for your Work and the Contest.
Likes
13
Share
@NoVC01
Follow
Moochie's Garden 7/7/2025 Big bluster - "Miracle-Gro/10 gallon, no ph, right out of the well" Wife said phuck Fox farm we are using NPK RAW, using ph watering cans to feed @ 4 gallons each and 5-gallon buckets of ph. watering. Once a week per feed/water. Following NPK feeding schedule. AzaMax soil drench .4%, 2 gallons each plant. Still spraying neem. Next, mixing Azamax for foliar spray. If I had not taken steps to prevent pests initially, I'd be completely overwhelmed.
Likes
72
Share
_____ Week 7 | Day 49 - 56 ______ Day 49 🌞 - Install 2 LED BARS from Spider-Farmer. Day 50 🌞💧 💧- 2 Liter each Plant....gluck, gluck, gluck.... Day 53 🌞✂️🌤️ 🌤️ - light switch to 12/12 ✂️- defoliation all leafs under the net Day 55 🌞💧 💧- 2,5 Liter each plant ____________________________________________________________________________________________ Light - 18/6 h - 400 Watt 60% Dim. PPFD - 600 - 650 µmol Temp. avg. - 22,1° Hum. avg. - 72 % RLH
Likes
2
Share
@Abreuvoir
Follow
28 august 2022 RECAP: **photoperiod northen light** ** started from a seed, then made 4 clones in single pot, then removed 3 plants for outside** ** seed: 22-march-22, clones on 15-may-22, flower 20-july-22** UPDATE: Some buds have started to show sign of brown pistils Main nodes are very close from the 240w led (8''/20cm) but no sign of burns Starting to think I will have a decent harvest considering it's my fist grow
Likes
35
Share
25/06/2021 (F DAY 28) Se agregó unos 5L de comida en modo top dress. Se agregó harina de todo tipo, humus, compost, microkashi, bokashi, guano, etc. La flora viene muy bien y los olores son muy intensos y sabrosos. Sweet Cheese: Posee el desarrollo de flora mas rápido, lleno de tricomas y con un aroma intenso a queso. Black Afghalien: Posee un característica muy particular de pistilos super finos, el olor a incienso con resinas es increíble. El color característico negro de la black está apareciendo al mes de flora con el descenso de la temperatura. Pomelo Haze: Es la flora más lenta pero sin duda alguna es uno de los mejores terrenos que poseo en esta carpa. Tiene bastante distancia internodal y muy poca ramificación.
Likes
18
Share
@Rinna
Follow
Still doing fine, not much to say yet. Will be receiving the Amsterdam Genetics Logo shape to bend her around. Should be fun, it's gonna be risky, but I'm prepared to fail 💪