The Grow Awards 2026 🏆 


Likes
30
Share
@SolitudeCorners
Follow
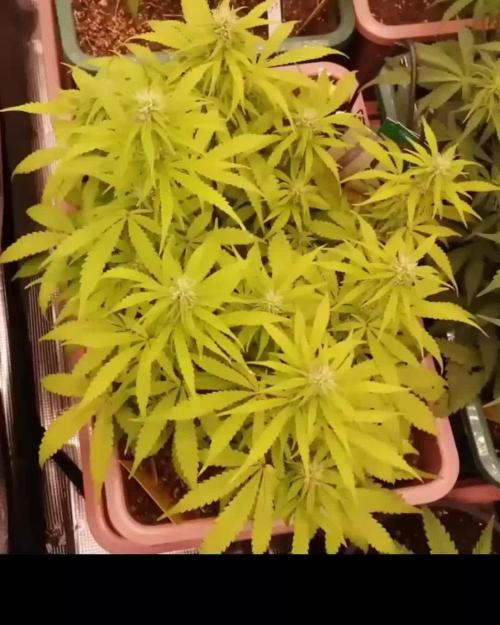
Last week of flowering (72days from the light switch) Gonna cut soon when the dirt is dry. A quite late harvest. Many buds denser more, and stem can’t longer resist.
This season so satisfy. Thank for all mentor and comment. You all are my inspiration for grows.
Feeding
23/1 Water 13.5L+Flawless 20ml ppm80 ph6.2
MDR 3L 2Lx5
Runoff
MDR 1400 /1155
Zkittle 1600/1300/1150
Pineapp 900/600
Purp 1300 /1200
Sapp 2000/1100
Dozdos 1100/1000
25/1 10.42 6L ppm9 ph6 1L per pot
3L+Flawless6ml ppm116 ph5.9 1.5/1.5 Purp, Zkittle
4.5L+ Flawless7ml ppm119 ph6 1.5/3 Sapp,MDR
Runoff
Purp 1300
Zkittle 1500/1200
Dozdos 1400
Sapp1300
Pineapp850
MDR950
27/1 runoff
Pineapp 500
Purp 900
MDR 600
Zkittle 400
Sapp 300
Dozdos 400


Likes
11
Share
@DixTheReal
Follow
Ho iniziato a fare LST presto, già dal giorno 15, i fertilizzanti li ho iniziati giorno 18. Alla fine della settimana si sono visti i primi peletti, sta entrando in fioritura.
Likes
9
Share
@Drtomb
Follow
Starting week 2 of flower. Been slowly trimming any sucker branches that reach away from the main stem by greater than 2".
I have moved branches into positions in the scrog screen to efficiently fill the whole net.


Likes
7
Share
@Lucifers_Nursery
Follow
Last week of feeding before flush. Worked out perfectly for the amount of nutrients I have left of nectar for the gods. Once the aphrodite extraction runs dry, nothing but water after that. She looks happy and healthy. Frosty like snowman! Cant wait to harvest her.
4 11 21
Flush continues. Happy healthy girl. Another successful week in the bag

Likes
9
Share
@masterofsmeagol
Follow
6/22 Some pictures didn't upload but that's probably a good thing. As long as the video went up its good. I need to take less pictures. I'm glad I watered the plants in the back with a premixed gallon last night as we didnt get nearly the rain I thought we would. It's small showers throughout the day. The plants are getting enormous. A couple have revegged. Mostly the 10th planet. The others aren't anywhere near as impacted. Boy are some of these stalks thick. I chose to keep a couple plants that could be grown naturally without topping or fimming. I like to see the structure of the tree bit with humidity like this 98%rh it's easy to get botrytis. That's why it's good sometimes to have multiple bid sites so your proverbial eggs aren't all in one basket. But you do end up with a massive cola. I think that mk ultra with the big fan leavescis just going to be one giant bud. That's what it's looking like. Oh and today is the summer solstice. Longest day of the year.
6/23 WATERED EVERYTHING. USED FIVE AND A HALF GALLONS. EVERYTHING GOT AT LEAST A HALF GALLON. Despite the rain we got and the bags still having some heft I decided to water. It's 80 at 9am. It's supposed to he in the upper 90's today and coukd break 100° tomorrow. I hate that the grow bags are black. That's way to hot for the plants. I should find some empty soil bags and wrap the black fabric for a couple days. A sunscreen might help but I doubt much. We'll see how it goes.
6/24 It's 90° at 9am. It's supposed to break 100° amd stay there a while. Up to 106°. Plants looked awesome this morning. I wasn't sure what I'd find. Today is the worst of the days. If it didn't break 100 yesterday it was damn close all day and the girls look GREAT. I WATERED AGAIN TODAY. I USED 6.5 GALLONS TO WATER THE GARDEN. It was nice cool well water too so they should like that. Branches are getting longer and I'm training as the get bigger. I need to put up the trellis but I'm not doing it in this heat.
EDIT: 90° @ 6PM WENT OVER AND AS PREDICTED THE TWO TENS WERE DROOPING. IM WONDERING IF THEY WILL BE ABLE TO FINISH IM THOSE TENS. LAST YEAR I HAD ONE THAT WAS HUGE IN A TEN BUT IT JUST DEVELOPED INDIVIDUAL CALYXS WITHPUT CONNECTING. CHECK IT OUT ON LAST YEARS DIARY. IF THATS THE CASE I SHOULD KIGHT DEP THEM BECAUSE THEYRE GETTING BIG. I WATERED THE TWO TENS WITH ABOUT A HALF GALLON AND I USED WHAT WAS LEFT OF THAT COLD WELL WATER ON THE 10TH PLANET IN THE 30. SHITS LIGHTER THAN USUAL BUT LOOKING PRETTY GOOD. THE REST CAN WAIT UNTIL THE MORNING FOR THEIR WATERING. TOMORROW TOPS OUT AT 85° WHICH WILL BE MUCH BETTER. IM LOVING MY STRAIN CHOICES RIGHT NOW.
6/25 It's super humid out but much cooler. I think it's like 80 at noon time. I had to water the two tens this morning. I didn't really HAVE to but I did. I filled up my watering can that says it holds 1.5 gallons (but it seems like more) and watered the two tens at least a half gallon and focused the rest on the 10th planet in the 30 and the other one up front that gets lighter than the rest. I was fully planning on watering EVERYTHING this morning but I could feel moisture in the soil and they had weight. I'm pretty sure I made the right decision. Especially with humidity so high. Either way I'll check tonight.
EDIT: WENT TO THE GROW AT APPROX 2:30PM. I HAD BO IDEA HOW HOT IT WAD OUTSIDE. IT WAS 87° BUT THE HUMIDITY IS DAMN NEAR 100%! I HAD WATERED SHIT A KOT LATELY AMD WANTED TO WAIT UNTIL THE MORNING. THE TWO 10'S (WITH GIANT PLANTS THAT IM NOT SURE CAN FINISH IN TENS) WERE DRY AND LIGHT. A COUPLE SPECIFIC PLANTS WETE A "LITTLE" LIGHTER THAN THE REST. I MIXED UP THE WATERING CAN WHICHVIS 2.5 AND ANOTHER GALLON. I USED THE WATERING CAN ON THE PLANTS IN THE FRONT. THE CHEMDOG #4 WAS SIGNIFICANTLY LIGHTER THAN THE REST SO I GAVE IT MOST OF A GALLON. THE PLANTS THAT ARE STILL HEAVY ARE GOING TO HAVE TO WAIT LONGER BEFORE I WATER THEM.
6/26 This morning I came over to substantially lighter bags. I watered everything but the 50 with 5.5 gallons of water. Plants amd roots are getting heavier. My intuition told me to water that 10th planet but it was still wasn't TOTALLY dry. This happens a few times a year during hot stretches. It will be fine by the time I'm back. I've also noticed that the pink kush in the 50 (the only one that didn't use ALL new soil) is a substantially lighter green than every other plant in the garden. Boy I'm glad that heat wave is over. It's 67° at 9:30 that's much better. I'll update as I go. I'm still thinking about light depping the 10s.
EDIT: HASN'T BROKE 70 YET AS OF NOONTIME. I THINK I MAY HAVE GONE A LITTLE OVERBOARD WITH THE WATER. TH8NGS LOOK ALRIGHT AMD THERE'S A GOOD BREEZE SO EVEN IF I DID THEY'LL DRY OUT QUICK. SO MUCH GROWTH SO FAST! THE MK ULTRA WITH THE BIG FAN LEAVES LOOKS A LITTLE SAGGY BIT IT WILL COME OUT OF IT. THE 10TH PLANET THAT WAS DROOPING LOOKS A LITTLE BETTER. IT DID REVEG AND IS STEAIGHTENING OUT TROM THAT. I DEFOLIATED SOME SPOTS TJAT LOOKED LIKE SEPTORIA. BUT THERE WERE BURNS AND DISTORTED LEAVES FROM BEFORE SO ITS HARD TO TELL. JUST A COUPLE LEAVES WITH THAT DOT. TIME WILL TELL. ITS PAST TIME TO GET MY IPM GOING ANYWAY. DURING ONE OF THESE COOLER DAYS IM GOING TO HAVE TO PREEMPTIVELY TREAT MY PLANTS. EITHER BT, CAPTAIN JACK OR PLANT DOCTOR IS WHAT I HAVE ON HAND AT LEAST. I HAVE CITRIC ACID AND K BICARB BUT HOPFULLY NONE OF THAT WILL BE NECESSARY. THE WIND IS FAR TO STRONG FOR A MITE POPULATION TO GET OUT OF CONTROL WHICH IS AWESOME. IM MAINLY WORRIED ABOUT THE PATHOGENS.
6/27 Rained last night but I don't think very much. Its much cooler. Went from 100 to 70 in a day. Plants did good to take those fluctuations. They are still SLIGHTLY overwatered with the mk ultra with the big fan leaves being the MOST over watered. There's a breeze today though and it's sunny blue skies. I think showers ate possible tomorrow at 4a.m. and it says showers throughout tomorrow to which sucks. I was hoping to get a couple nice days to dry the plants out. The 10s are light again but the soil is still moist. It's hard when it's so hot to water the correct amount. At least it is for me. Killed a couole moths and a pillar. I noticed the first sign of pest damage so it's time to get out and start the IPM. I'm hoping for no pathogens. I'll update as I go along.
EDIT: IT'S 75° AT 11:30. That mk ultra with the massive leaves still looks overwatered. One of the plants in the 10s looks the same but that one is light but the soil is moist. The MK ULTRA is still holding some weight and the soil is still damp. It's not the AMOUNT of water I've given them that's the problem it's the FREQUENCY that ive HAD to water that messed me up. Going from 70° to 100° overnight for several days kinda messed me up. It's improving though. I lifted it and it doesn't seem TO heavy. The soil is still slightly moist. I hope that I don't get so involved with thinking the plants are overwatered that they are actually under watered. I think I need to increase volume when watering and treat each vacant differently (which I have for the most part). I'm usually very measured and careful but it is what it is. No more water for a little while. Other than thecshowers at 4a.m. and the showers expected tomorrow. Surprisingly the small time I was away allowed the plants to show a pretty drastic improvement.
EDIT #2 WENT BACK DOWN AT FOUR TO CHECK THINGS OUT. THE MK ULTRA I WAS WORRIED ABOUT IS DOING MUCH BETTER. EVERYTHING (SANS ONE IN 10) IS LOOKING MUCH BETTER. I DUG DOWN AND CAN TELL THERES MOISTURE IN THAT SOIL IN THE TEN THATS A LITTLE DROOPY. THATS WHY ID RATHER UNDER WATER TGAN OVER WATER. UNDERWATER AND YOU JUST GIVE THEM A DRINK AND THEY PIP RIGHT BACK. WE ARE SUPPOSED TO GET SHOWERS TOMORROW EARLY MORNING. HOPFULLY NOT MUCH. MY INTUITION TOLD ME TO HOLD OFF ON WATERING THAT PLANT IN THE TEN. THE OTJER IS THE SAME WEIGHT AND LOOKS GREAT. WASNT PLANNING ON GOING DOWN SO UNFORTUNATELY I DIDNT HAVE MY PHONE ON ME.
6/28 Rained hard last nightcand showers all day. Plants don't look to bad off though. I think I wad watering to frequently with not enough volume. That AND the fact that we are having 35° temp swings. That has made it hard for me to keep the plants on any k9nd of a schedule for watering. I believed that plants were overwatered but since we've gotten all this rain some seem to have slightly improved. These are resilient strains and will probably be alright. I took a quick video. I'm REALLY CONSIDERING light depping the two tens.


Likes
13
Share
@All_our_small_plants
Follow
Bewässerung: 1000 ml alle 2 Tage
pH-Wert: 6,1
EC-Wert: 1,2
Temperatur: 22ºC
Luftfeuchtigkeit 62%
Schädlingsbekämpfung:
PPFD: 500 µmol/m²/s
DLI: 33
Düngemittel: Mineralischer Dünger 3.5-6-6 PK 13/14
Besonderheiten: Wurden direkt in die erde gepflanzt in einer Kokos-Quelltabletten.
-Tag 51 Heute haben wir sie wieder gegossen und Dünger gegeben
-Tag 53 Heute haben wir mit effektiven Mikroorganismen und mit Plagron Power Buds gegossen 😜
-Tag 55 Heute haben wir sie mit Wasser und Dünger gegossen, sie entwickelt so langsam ihre Blüten und sieht sehr gut bis jetzt aus 😍

Likes
4
Share
@Backyardnewbie
Follow
Auto pots are on. Reservoir is at EC 2.2 and ph 5.5 SF2000 light 24 inches above plants 100% added 1ml of calmag per litre on day 19
Day 13 - raised lights to 36 inches. At 100% PPFD of around 600. Plants started reacting very well.

Likes
43
Share
@Lukush
Follow
Hey growmies its flower time Finnaly
Sweet ZZ looking good , she is hungry.
This week it's time to start giving her some good nutrition for the flower cycle.
Bud candy : 6 ml
Tarantula : 6 ml
Bud ignitor: 6 ml
Voodoo juice: 6ml
Giving them for the first 2 weeks of flower!
Hope you all enjoy mi diarie and if you do hit that like button or leave a comment below thanks very much for the support 😃Check out the new Video in the diarie 😃😀😃😄
Likes
93
Share
@Natrona
Follow
FBA2502 Plants 1-6
Week 7 May 11– 17
FLOWER 3
Nutrients :
Micro 25 ml
Gro 10 ml
Bloom 30ml
CalMag 30 ml
Recharge 10ml
Green sensation 16.5ml
Power buds 7.5 ml
5/11 PH 6.56, PPM 1560, temp 69
2ltr each
5/12 PH 6.31, PPM 1120, temp 68
1 ltr each
5/14 PH 6.66, PPM 1280, temp 70 1 ltr each
5/15 PH 6.66, PPM 850, temp 72 1 ltr each
5/11 Defoliation, feed, pics & videos
I made 4 gallons, used 3 to water then poured the runoff back into the rest in the bucket. The next feeding, I added a gallon of tap water to residual and ph to 6,31 temp 69 & PPm 1120. Did the same on 5/14 and 15 using up the remainder of the feed solution.
I must monitor and control the tent environment manually. For the past month, the humidifier has been an issue putting out way too much humidity; often leaving water in the bottom of the tent. In addition, the temperatures are also out of control. I added an AC last week to keep the temperature below 80. I finally determined the exhaust vent is also broken and has been for some time.
I have been giving good reviews on the AC infinity system. However, during the time I’ve owned this tent (2 yrs), I had to replace the lights twice, fans, humidifier and now the vent twice also. Everything but the tent containment has been replaced. AC infinity does stand by their products, but they are in California, and it takes at least 2 weeks to receive the replacement. This is extremely frustrating at the critical transition to flower for my equipment to fail again. For the time being until a replacement arrives, I pulled the 4” exhaust vent from my 3x3 and hooked it up. I have the AC pushing air in and the exhaust pulling air out. This should create a neutral pressure tent environment-neither positive nor negative. I do have 3 circulating fans in the tent to move air around the plants.
It looks like growth spurts have slowed and plant height has been reached. Now is the time for buds to fatten and frost up. All of them (6) are short remaining less than 3 ft. They range from 15 to 31 inches. The tallest #4 &5 and #6 have very light leaves and appear nutrient deficient compared to the shorter phenotypes. Pictures taken later in the week show fading on a few the older leaves. All are receiving the same solution and are in the same soil blend. Moving the gals in and out of the tent for their glamor shots, I bent one limb and snapped another. The bent one I taped with a splint and the snapped one I medicated manuka honey and wired it back to the main stalk.
Leaves look like sativa leaning. I hope FBA2502-2 is a good daytime. I’m getting excited to see what develops in the next month or so. News Break: I’ve been informed that 2502 is FastBuds New Frostbanger and is indica for nighttime. I’m disappointed that I didn’t get a sativa to test because I really need a daytime strain. The 2 Blue Cheese plants I just grew are also nighttime.
Upon opening the tent, a faint odor was detected, and some stickiness was observed during the process of defoliation. Pictures of the puffy buds even show differences. #4 &5 buds hairs are different from the others being crinklier and the others are straighter. Some like #2 &5 are showing frost on the leaves. Wow at the beginning of flower to have that much frost. They are living up to the new strain’s name.
I’ve noticed that when I water, sometimes water shoots out of the side holes I the air pots. I will pack the soil firmly into the sides for future runs.
Measurements:
#1 15”
#2 20”
#3 17”
#4 30”
#5 31”
#6 24”
Your likes and comments are appreciated. Thanks for stopping by.
Growers love 💚🌿
💫Natrona💫
Likes
4
Share
@QixxGrows
Follow
Day29: New sets of leaves. I'll repot and switch to proper Veg Lights on the weekend.
Day30: I'll repot tomorrow.
Day31: Repotting done. She had a crazy amount of roots in the seedling pot. MUCH more than I expected. I switched to Veg lights at 90% power.
Day32: Settling in new pot
Day33 & 34: I had to perform some maintenance on the tent. Lost some hours due to that.
Day35: Growth really looking healthy. Although she's not really stretching high, she does look rather happy. I do like them thicc ;)
General: I need to put the camera somewhere else so that the growth can be better seen. Right at the end I'll edit out the white flashes. They're caused by the humidifier running and will be really easy to cut out without losing the gist of the grow :)
Likes
18
Share
@Khalmenace
Follow
Start of week 9. Buds are filling out nicely, but trichomes are still mostly clear. Breeder says 8-10 weeks so im hoping they are ready in the next week. Both are starting to show a little bit of the leaves fading, not sure if its normal or the start of some sort of deficiency. Super strong smell on both phenos. I was expecting alot more in terms of weight but the quality dies look great. Cant wait! 💨💨


Processing
Likes
23
Share
@eldruida_lamota
Follow
Ya en la recta final familia, están apuntito, solo unos días más.
Nuestras lemon kush ya recibieron su lavado de raíces , están sin productos ya solo AGUA.
Controlamos de todas formas el Ph igual y que no baje por debajo de 6,2.
Bestiales estás flores , un olor muy característico con tonalidades cítricas que recuerdan al limón.
Todo un clásico en verdad.
Estos ejemplares carecen de brazos laterales, son óptimas para un SOG desde semilla, pudiendo llenar 16 plantas en metro cuadrado.

Likes
36
Share
@DogDoctorOfficial
Follow
Get ready for another thrilling update on our magnificent Triton Biscotto Lime in Week 6 of veg. This girl is on fire, and we're taking her journey to new heights. Buckle up and prepare for some green-thumb adventures!
This week, we embarked on an important mission: Integrated Pest Management, or IPM for short. Now, before you imagine tiny superhero capes on mites and nematodes, let me explain. We introduced beneficial nematodes into the soil to combat unwanted pests and keep our garden in tip-top shape. These microscopic warriors wage a battle against harmful critters, defending our beloved Triton Biscotto Lime like true heroes.
But that's not all! We called in reinforcements in the form of Spical Ulti Mite and Swirskii. These beneficial mites are like our garden's own special forces, launching a full-scale assault on any unwanted pests that dare to enter our domain. It's like a botanical warfare with a twist of camaraderie and a sprinkle of microscopic excitement.
Now, picture this: Triton Biscotto Lime, surrounded by her nematode army and mite squad, ready to defend her green kingdom. It's a battle of epic proportions, where our fierce defenders work tirelessly to protect our plant from any unwanted intruders. And hey, who knew mites and nematodes could be such amazing allies in the quest for a thriving garden?
In addition to our IPM efforts, we continued to pamper Triton Biscotto Lime with love and care. We ensured she received the optimal lighting she deserves, with a mighty 500 PPFd (Photosynthetic Photon Flux Density). It's like giving her a VIP pass to a cosmic light show, fueling her growth and setting the stage for botanical greatness.
As we revel in the wonders of IPM and provide Triton Biscotto Lime with the best possible care, we can't help but marvel at the magic unfolding before our eyes. The harmony between our plant and these tiny defenders is like a cosmic dance, showcasing the power of nature's intricate balance.
And here's a fun little joke for you: Why did the mites and nematodes form a rock band? Because they knew how to harmonize and strike a chord with their garden audience!
In summary, Week 6 of veg has been a week of pest-fighting heroics and cosmic collaborations. Our Triton Biscotto Lime stands strong, backed by her nematode army and mite squad. Together, they create a force to be reckoned with, ensuring a healthy and thriving garden environment.
As we continue this green-thumb journey, let's celebrate the power of beneficial allies, the wonders of IPM, and the magic that happens when we join forces with nature. May Triton Biscotto Lime grow stronger with each passing day, and may our garden be a haven of harmony and botanical bliss.
Stay tuned for more thrilling updates, my fellow gardeners. Until next time, keep those mites and nematodes rocking and rolling, and may your green thumbs continue to flourish!
As always thank you all for stopping by for the love and for it all, hope you all surrounded with love , health and blessing of all kinds <3 <3 <3
Genetics :
TRITON BISCOTTO LIME - @SeedstockersOfficial
All info and full product details can be find in can find @
https://aptus-holland.com/
https://seedstockers.com
https://autopot.co.uk/
https://lumatek-lighting.com/
#aptus #aptusplanttech #aptusgang #aptusfamily #aptustrueplantscience #inbalancewithnature #trueplantscience #growerslove #dogdoctoofficial
With true love comes happiness <3 <3 <3 Always believe in your self and always do things expecting nothing in return and with an open heart , be a giver and the universe will give back to you in ways you could not even imagine so <3 <3 <3
More info and updates @
https://growdiaries.com/grower/dogdoctor/official
https://instagram.com/dogdoctorofficial
https://youtube.com/channel/UCR7ta4DKLFMg2xxTMr2cpIg
<3 <3 <3 Growers love to you all <3 <3 <3
<3<3<3 have a bunch of other journey going on, fell free to stop by and say hi, don be shy <3<3<3
Strain info :
Triton Biscotto Lime Fem seeds
You are standing before a feminised weed seed that comes blessed from the cradle, as she’s born from the cross of two genetics that are all the craze in the current cannabis scene. On the one hand, Oreoz Mintz, one of the winning horses of the new generation of the Girl Scout Cookies family; on the other, Lemon Tree.
This is an epic parental lineage that results in a hybrid with a slight sativa dominance and dazzling qualities, with a short flowering of just 8 weeks and THC levels that can reach up to 22%, causing a very energetic and euphoric effect which is perfect for social events or if you’re looking for top creativity.
Triton Biscotto Lime is a feminised strain that’s very easy to grow indoors, although she reaches her maximum potential when grown outdoors bathed by the sun of warm climates like the Mediterranean. She loves light and an aerated substrate, which allows for good oxygenation of the roots and helps the plant absorb the maximum number of nutrients. In return you will get dense and compact marijuana buds in a neon green colour which are sprinkled with amber pistils and covered in a glaze of beautifully crystallised trichomes.
As her name suggests, her aroma and flavour are a subtle mix of earthy sweetness with a citrus touch, calling to mind a tasty cookie dessert with a lemon base and some hints of Diesel. A highly addictive flavour that you’ll be happy to taste free of any guilt for wanting to repeat the experience over and over again.
So if you’re looking for a feminised marijuana seed that represents the best of the current cannabis scene, with high-calibre properties that contribute to her excellent reputation, then Triton Biscotto Lime has arrived on the market to meet your expectations. Try her now and become hopelessly devoted to her
- Friendly reminder all you see here is pure research and for educational purposes only -

Likes
37
Share
@XperencdGmanXG
Follow
week 4 and she is filling out nicely. bud growth is on par with a synthetic grow. Smell is wonderful! There is something in the organic soil that makes the weed smell divine. I'll never go back to synthetic nutrients. 4 weeks to go can't wait.