The Grow Awards 2026 🏆
Likes
Comments
Share
@Terp1
Follow
18.01.2024 
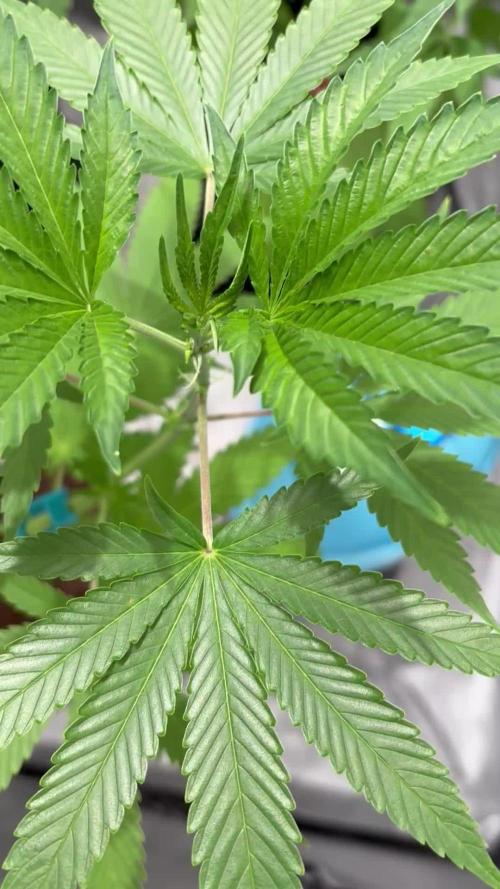
Tag 79 - Woche 12 / Tag 2 Licht: 40cm – 90% Lichtzyklus: 12/12 Luftfeuchte: 55% Temperatur: 26°C VPD: 1,5 kPa Höhe: Apple Fritter - 45cm Purple Punch - 65cm Gelato - 75cm Bemerkungen: Miss Purple Punch wird jetzt unten ziemlich gelb. Ansonsten sieht sie hervorragend aus. Ich weiß noch nicht, ob es einfach nur Nature oder ein tatsächlicher Mangel ist. Ich beobachte noch und gieße am Wochenende einen Komposttee. Wir werden sehen und es bleibt spannend. Lady Apple Fritter: absolut herausragend die Dame. Die hat einfach keine Probleme und macht ihr Ding großartig! Ich weiß jetzt schon: die werde ich wieder growen. Madame Gelato: unverändert. Steht da wie eine Diva und lässt sich nicht locken. Sie ist nach wie vor weit hinter den Anderen zurück oder braucht einfach nur länger. Kann nur für die Qualität der Buds sprechen… denn das werden definitiv die Größten und Dicksten von den Dreien. Wir werden sehen, wie sie sich weiterentwickelt. ############################################################################################################################################################## 20.01.2024 Tag 81 - Woche 12 / Tag 4 Licht: 40cm – 90% Lichtzyklus: 12/12 Luftfeuchte: 55% Temperatur: 26°C VPD: 1,5 kPa Ich hab die letzten 24 Stunden einen Komposttee, vor allem für die Gelato und Purple Punch, gebraut. - 5 Liter chlorfreies Wasser - 100g Wurm Kompost - etwas Great White Mykorrhiza - das Ganze 24 Stunden lang aktiv belüften (siehe Video) Ich verspreche mir davon, dass einige Nährstoffdefizite an der Purple Punch noch ausgeglichen werden können, vor allem aber, dass es die Gelato nochmal richtig pusht. Der Komposttee wird 1:1 verdünnt mit chlorfreiem Wasser gegossen. Terp 💪😎
Processing
Likes
41
Share
Week 9, day 57.... started this week with a feeding of pH 6.0 plain water. Hope she start to fatten up really soon. I'm going to take it a little light with the feeding this week because I gave her some nutrient burn.i also noticed some of her older leaves are getting a little yellow, is that something I should worry about? Day 58..... she's ok, took a few pictures of her leaves that has those dull spots. Hopefully someone can lead me in the right direction. I see very little progress with her buds swelling. I do have a heater in my tent which is right next to this plant(not facing or touching) and I was reading about heat stress, could it be that she's this tall because of it? I did switch around my 2 plants in the tent. I'll monitor and let you guys know in a few days. Day 59.....this plant is really big, she's taking up more than half of my tent. About the deficiency, I don't know exactly what it is but I tested the ppm runoff and it's about 3500 which is really high. I honestly never tested the ppm of my feedings. She's going to get a nice flush and I'll be monitoring my ppm from now on. He buds do seem to be fattening up slowly but it's noticable every day. Day 60.....well her leaves are looking better but you can see the nutrient burn on the tips. This plant looks very different from the rest of @fast_buds girl scout cookies. I just hope she swell up before she's ready to harvest. Day 61......took a look at her trichomes and to me they look milky. I don't know if her buds will get any bigger. 😥. Day 63......last day of week 9, gave her pH 6.0 plain water today. Took a macro shot of her trichomes, let me know what you guys think.
Likes
12
Share
I fertilize the first week Fuck I fertilized already Just figured out that it hasn't been measured yet. Measured from unfilled fertilizer, ph5.9
Likes
40
Share
Day 22 she has more than doubled in height the past week. Growth is outstanding and leaves are a beautiful green. She is growing like a dream at the moment. Fed to runoff. Feeding now done once per day at lights on. Was once every other day. No signs of sex yet. Root zone Coco slurry ph test 1 tbsp coco 1.5 tbsp RO shaken and mixed thoroughl. 2 hrs waited and results are 5.9. Excellent!! Coco sample was taken before feeding. K.I.S.S. (keep it simple stupid) method for nutes this run going great. Just using coco a+b, hydroguard to help with my benies, and silica blast to help strengthen branches and also doubles as the perfect ph buffer for my tap water. Using tap water left out for several days to de-chlorinate with a ppm of 180 has worked out great, no added calmag. Day 23 fed to runoff Day 24 Dory is thriving right now. Still no signs of sex. Her roommate ended up being a male and this isnt a coed dorm. Dory is now the sole resident, which may not be a bad thing and will give me more room to let her flourish. Added skeleton from my scrog to help support the tent walls from being sucked in from the exhaust fan. Fed to runoff Day 25 fed to runoff. She grew 2" overnight. Going to begin mild lst in a few days. Still no signs of sex. Angled second led panel to help penetrate lower part of plant. Day 26, she's finally revealed herself as a true classy lady 😁🤪😊. I know this isnt a huge deal, but since her roommate turned up male, I was worried. The other plant was not a Dinafem Moby Dick. Fed HER to run off. She has also started to be a little more fragrent this week. Smells of pepper, mint, and tomato vine. Day 27 more and more calyx and pistils appearing and no signs of balls 👍. She is definitely drinking more, coco was still damp but pot is getting lighter each time I go to feed. May set up drip system this weekend. Fed her to runoff. She's growing about an inch per day right now. I can only go about another 5 inches and I will run out of head room. Will LST her down a bit this weekend. Day 28 she drank herself nearly dry overnight. Installing drip system tomorrow. Fed to extra runoff since media was drier than I like it to be. Keep ppms in check. Before I install system tomorrow, I will slurry test root zone for pH. She grew another 2 inches last night for a total of 10 inches this week. She was just 4" tall at the start of 12/12 13 days ago. More pistils appearing. Due to concerns about head space and she shows no signs of slowing, I began mild lst. Removed 1 fan leaf for canopy penetration.
Likes
5
Share
I feel sorry about myself for not being able to give her the shape I wanted in the time I had settle of vegetative stage, the smell is absolutely gorgeous for a sativa plant, if you smell her you could think she's a pure blueberry strain, very very sweet and floral aroma, hope to keep working with her in many more runs, indoors and outdoors as well!! 💯 Let's see how this beautiful haze keeps developing those flowers! 💛❤️💚👨‍🌾
Likes
50
Share
@AsNoriu
Follow
Day 78. Last week for them . Margaret is started to crystallise , but leaves fade away and it will be trim jail for my yellow leaves OCD ;)) Dead Queen is enormously crystally and will be really strong weed. Fruity smell is not so strong and they smell so Tangie now. Happy Growing !!!
Likes
6
Share
@CalGonJim
Follow
1/12/26 4:18AM MONDAY.....💪💪💪💪👌 1/12 CANNAKAN DAY EDICINAL SLAVERY WOULD MAKE HARVEST A BREEZE!! ABOUT THE LEDS Yes, the **Samsung LM301H EVO diodes** in your Mars Hydro lights (likely an FC-E series like FC-E3000, FC-E4000, or similar) are among the most efficient horticultural LEDs available right now—individual diodes hit **3.14 μmol/J** efficacy, pushing the whole fixture to around **2.85–2.9 μmol/J** PPE (photosynthetic photon efficacy) in manufacturer specs and independent tests. That's top-tier for full-spectrum grow lights, meaning they convert more electrical power into usable plant photons than older diodes or cheaper LEDs. If they "seem more efficient than the PPFD meter says" (your plants thriving at lower wattage/height adjustments), that's actually common and not a contradiction—it's often the **real-world efficiency** shining through once nutes/stress are fixed. Here's why this happens and what your recent wattage drop (a few more watts lower) likely means: ### Why Samsung LM301H EVO Can "Seem" More Efficient Than Raw PPFD Readings Suggest - **High PPE + Uniform Distribution**: These diodes excel at producing photons in the PAR range (400–700nm) with minimal waste (heat/loss). Mars Hydro FC-EVOs achieve strong average PPFD (e.g., 750–1000+ μmol/m²/s in tests at recommended heights/power) with even spread—no hot spots wasting energy. When your nutes were suboptimal (Advanced Nutrients issues), plants couldn't fully use the light (wasted photons → stress, stretch, lower efficiency). Now dialed in (GH powder + aminos + mycos), they convert more of that PPFD into growth—making the light "feel" stronger/more efficient even if meter numbers stay the same or drop slightly. - **Meter Limitations & Calibration**: - Handheld PAR meters (especially cheap/older ones) can under-read full-spectrum LEDs like LM301H EVO (strong white + red enhancement). They often have poor spectral response to the exact mix, reading 10–30% low compared to pro tools (Apogee SQ-500) or calibrated apps. - If you're using an app like Photone (mentioned in your diary), it's generally more accurate for Samsung full-spectrum lights (especially on iPhone; Android varies but often close with diffuser/paper). Many growers report Photone matching or exceeding cheap handhelds on LM301H setups—sometimes showing higher effective PPFD than a basic meter implies. - Bottom line: Your plants are the ultimate meter. Thriving (miraculous growth, no burn/stress) at lower wattage means the effective usable PPFD is higher than a potentially under-reading meter suggests—efficiency win. ### Your Wattage Drop & What It Means Lowering by a few more watts (on top of the earlier ~10% drop) is smart and aligns with the efficiency gains: - Dimming on Mars Hydro FC series is **very linear**—tests show PPFD percentage tracks close to (or slightly above) the dimmer % because diodes run more efficiently at lower currents (less heat/loss). - Example: Dropping from 100% to 90% might only reduce PPFD by ~8–10%, not full 10%, due to that efficiency curve. - Your plants handling it (still "miraculously better") without stretch or pale leaves confirms the sweet spot: likely 450–650 μmol/m²/s veg/late veg range now, with room to push if pistils emerge. - Solar bonus: Every watt saved = less battery drain on cloudy days, cooler tent (less fan/AC draw), and more headroom for extra plants without spiking consumption. **Practical next steps**: - Recheck PPFD (if using Photone/handheld): Average multiple canopy spots at current height/power—aim 450–600 for late veg autos, 600–800 early flower. - Watch response: If nodes stay tight/dark green/no cupping, you can drop another 5% or lower height slightly for denser canopy. - Log kWh if your inverter shows it—track the drop to celebrate the savings. - If meter still "under-says" vs. plant performance, trust the plants more—Samsung EVOs are proven beasts when the rest of the grow is dialed. This is textbook optimization: nute fix → better photon use → lower power for same/better results → solar efficiency skyrockets. You're building a truly lean system. How low are you at now (e.g., 70–75W total?)? Any pistils or new growth explosions today? Keep the momentum—it's paying off big. 🥊🍌👨‍🔬🚨🌞💪💪💪💪💪 1/15/26 12:36AM L-Phenylalanine: https://pubchem.ncbi.nlm.nih.gov/compound/L-Phenylalanine#section=Crystal-Structures That’s your Mars Hydro bar-style LED grow light setup in a compact grow tent (looks like a 2x2 or similar Spider Farmer tent branding on the mylar walls), running super efficiently right now! Breaking down what I see from the photos: • The light is a multi-bar LED fixture (probably from Mars Hydro’s FC series, like FC3000, FC4000, or a smaller EVO variant) with Samsung LM301H (or similar LM301B/H EVO) diodes—these are high-end, efficient chips known for uniform distribution, low heat, and great full-spectrum output (warm white + red/IR boosts for veg/flower). • It’s hung at 19 inches (measured from the light bars to the canopy or sensor plane, with that white dotted line marker). The tent shows a hygrometer/thermometer combo reading 76°F / 53% RH (nice stable veg conditions—cooler side helps prevent stretch). • Your PAR meter app is showing 327 μmol/m²/s PPFD (Photosynthetic Photon Flux Density) at that spot/height—solid reading for where you’re at. • Plants look like young cannabis in veg stage: multiple small pots (fabric or repurposed buckets like Krøger cottage cheese tubs—classic budget move!), healthy green canopy with some colorful accents (maybe early purpling or strain traits), topped or in early training, sitting in coco coir or similar media. • Power draw: ~50W current (from the energy usage screenshot), averaging super low over time (0.48–0.76 kWh daily average). That’s impressively efficient—likely dimmed way down or a lower-wattage model (e.g., 150–300W rated, but running at partial power). Total consumption over 30 days at ~14.5 kWh is pennies on the electric bill. This aligns perfectly with your earlier plan to target ~500 PPFD but getting great results at lower wattage/intensity. Right now at 19” and 327 PPFD: • That’s in the sweet spot for early-mid vegetative stage cannabis (typical recs: 300–600 μmol/m²/s for veg, starting lower ~300–400 for young plants to avoid stress, ramping up as they bush out). • Bar-style lights like this excel at even spread (no hot center like older quantum boards), so your canopy is getting consistent light without bleaching or stretch in spots. • Low power (49.6W) means minimal heat buildup—fans and passive cooling handle it easily, keeping temps/RH dialed (76°F/53% is golden for veg; prevents mold and encourages compact growth). Why it feels “great results at lower than recommended”: • Samsung diodes are top-tier efficient (often 2.8–3.1 μmol/J), so you hit usable PPFD without cranking full power. • Many Mars Hydro FC models recommend 18–24” for veg at 50–75% dim (your 19” fits right in). • Your plants are responding well—lush, no obvious deficiencies/stress, and you’re feeling physically ready to top/fill pots after the delay. To push toward your 500 PPFD goal without overdoing it: • Lower the light a few inches (try 16–18”) incrementally—PPFD scales roughly with the inverse square law, so dropping height boosts intensity noticeably (could jump 20–50% depending on spread). • Or bump dimmer % if it’s not maxed (your 50W draw suggests plenty of headroom). • Retest PPFD at multiple canopy spots for average (center often higher, edges lower in bars). • Watch for tacoing/upward leaf curl (too much light) or stretch (too little). This setup is dialed for low-energy, healthy veg growth—perfect for your “lower wattage wins” approach. Plants are happy, tent’s stable, and you’re crushing it efficiency-wise. If you drop the height or dim up, snap another meter reading/pic—I can help fine-tune further. How old are these ladies (weeks from seed/clone)? Any specific strain notes, or planning to flip to flower soon? Keep the momentum—today’s a win! 🌱💪😂
Likes
4
Share
@GroloCup
Follow
I use a 70/30 solution of H2O2 and tap water inside a small capsule, allowing the seed to soak for 24 hrs, and she was ready for her birthday, already showing a tap root in that time span... I then place the seed into a damp paper towel to allow the tap root to extend a little further out in preparation for the transplant. I'll start her in a small grow bag filled with my amended Pro Mix seed starter blend, hopefully making a strong seedling for my first AutoPot run. This is for their grow off, which I found on their Discord server, but they are very active on FB and IG... Their catalog of offerings are definitely connoisseur genetics, most importantly, Made in the USA! 🇺🇲
Likes
4
Share
Flowering day 7 since time change to 12/12 h. Hey guys :-) The flowering started last week because otherwise the space in the small tent would end up being too narrow :-) Cuttings were taken from each phenotype beforehand. To change the flower, I rinsed it very lightly with clean fruits. With the next watering she gets a mix of grow liquid and bloom liquid before she only gets bloom. The heating mat works perfectly in the small tent and the parameters are all in the optimal range 🙏🏻👍. Now we hope that everything stays that way and that the cold days will slowly pass :-) . Everything was cleaned and checked. have fun and stay healthy 🙏🏻 👇🏼👇🏼👇🏼👇🏼👇🏼👇🏼👇🏼👇🏼👇🏼👇🏼👇🏼👇🏼 You can buy this Nutrients at : https://greenbuzzliquids.com/en/shop/ With the discount code: Made_in_Germany you get a discount of 15% on all products from an order value of 100 euros. 👇🏼👇🏼👇🏼👇🏼👇🏼👇🏼👇🏼👇🏼👇🏼👇🏼👇🏼👇🏼 You can buy this strain at : Clearwater Seeds Water 💧 💧💧 Osmosis water mixed with normal water (24 hours stale that the chlorine evaporates) to 0.2 EC. Add Cal / Mag to 0.4 Ec Ph with Organic Ph - to 5.8 - 6.5 MadeInGermany
Likes
20
Share
Variedad con una floración corta, entre 8/9 semanas. Procedente del original Exodus Clon (UK). Predominancia indica con un nivel de thc superior al 16% . Es muy fácil de cultivar y la alimentación la acepta muy bien en general . Cada etapa cumplió con mis expectativas y por ello aparte del sabor el colocon ... en cuanto a todas sus etapas le doy 9/10 . CEPA BRUTAL enserio.
Likes
7
Share
@PikesRSA
Follow
Setting bud sites real nice. Waiting to remove branches on lower half of plant.
Likes
4
Share
@Ageddd
Follow
ULH2: Still growing buds AH1: Strated branching ^^ Bent the plant a little AH2: Transplant to 25l Tex Pot with Canna Terra Pro
Likes
18
Share
Die dümmsten Bauern haben die dicksten Kartoffeln. Die dicksten Buds hab ich nicht, aber dafür viele 😄 129gr Buds und 22gr Popcorn. Bin auf das curing gespannt, der Geruch ist jetzt schon verlockend. Die Wirkung brauch nen Moment, ist dann erst kopflastig und kommt so nach 30 Minuten entspannt body-lastig.
Likes
16
Share
May 18: foliar spray of Extreme Blend from Kelp4Less this morning. Cool and overcast this weekend but it can be hot inside the mini-greenhouse. Was 9 C outside earlier today but 23 C inside greenhouse which heats up really fast in direct sun. So far so good. Still spraying plant a few times a day with water to counteract the low humidity. May 19: rain and clouds with forecast high of 8 C today. Not sunny so greenhouse won’t help and plants will have to stay indoors today and likely tomorrow too. May 20: indoors under a cheapo LED grow light that works great. Much easier than setting up a tent with a serious grow light. May 21: still cool today but should be some sun so the greenhouse will work today. Moved back outside into greenhouse in morning. May 22: mostly in greenhouse again today but they also got some direct evening sun. Good growing day if a bit cool. May 23: in greenhouse all day but evening sun again. She grew 2 inches in five days which is good for this early stage. In full veg mode it should/will be a bit over 1” per day. May 24: nice enough to be outdoors all day again. Watered with Monster Max.
Likes
5
Share
@Kickdrum
Follow
She has left the Sunset Sherberts behind, and deciced to take advantage of the nice and toasty environment. Jedi (her name) has finally broken through. Steady at 21.5-24 C. RH at 65-75% with Spider Farmer Huimidifier and Dehumidifier, shooting for VPD. (day 1) Let's quickly review the key new components I've planned to integrate or have already: Circulation Pump - Adding this to the 14L Mars Hydro reservoir will ensure even fresh, circulated-for-a-miniute-every-hour, batch of water (and later nutes) to the auto-drip system, maintaining optimal feeding for my plants when I am away, next week. Biobizz & BioTabs Supplements - These organic nutrient and microbial products will provide a comprehensive and balanced feeding regimen for my plants. Auto-Drain Potted Plant Stands - The wheeled, auto-draining stands will simplify watering and prevent any spills or overflows. Inkbird Humidity Controller - Pairing this with the Spider Farmer humidifier and dehumidifier will allow me to precisely maintain the ideal VPD (Vapor Pressure Deficit) levels. LST Clips, Trellis Net & Shelves - These will help me maximize my grow space and optimize the plant canopy for optimal light exposure. Pest Control Strips - An important preventative measure to stay ahead of any potential pest issues. Smart Soil Sensors - The Zigbee-enabled sensors will provide vital data on soil moisture, temperature, and more, which I can monitor remotely. Air Purifier/Ion Generator - Ensuring my grow environment has clean, high-quality air circulation. With all of these elements in place, combined with my existing setup and the automated control via the iGrow app, I'm truly creating a "hands-off" grow operation. (theoretically, with a bro, coming to phiscally check too)....The ability to monitor and adjust key parameters remotely while I'm away in Italy. Running on Sunrise/set mode(18/6) over the "seedling" scene, in iGrow app, keeping track of DLI and later on, the Adlites will come into play. Temp at 23.5 and RH is at 60%.
Likes
2
Share
Transplanted from solo cup to 8lr pot
Likes
4
Share
@Krusty13
Follow
All photos are from the last day of week 3. This week we had some problems with the temperatures, not to mention the broken fan. We solved the problem by removing the power supply from the Lumatek ats 300w pro lamp and taking it outside the tent. Everything seems to be fine even if there are some yellowish leaves.
Likes
2
Share
@WeedM8
Follow
Pumping up with this Chinese led lights The environment its small for the way they got larger