The Grow Awards 2026 🏆 


Likes
Comments
Share
@AlpAge_Cino
Follow
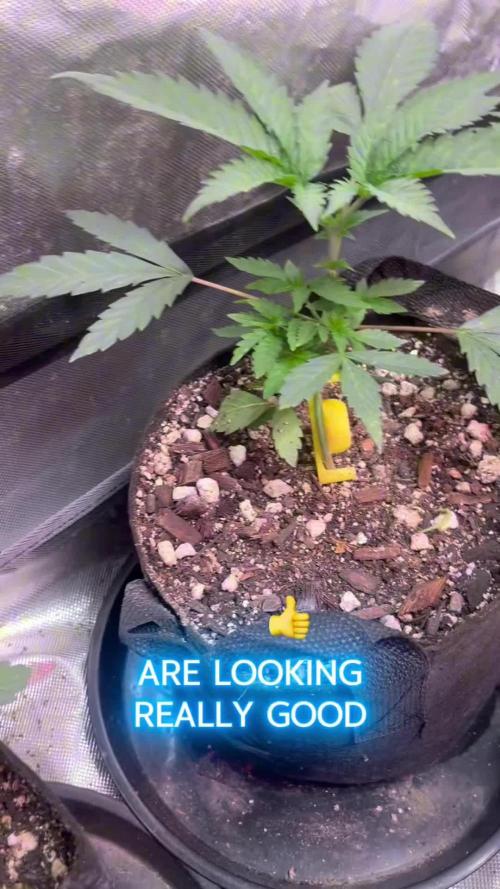
2024/01/20 : as it survived, shiva skunk got a decent pot (1 gallon smartpot 50% canna coco pro / 50% hydroton) and 3 others are going on LST...
3 days growth :
afghani #1 - 19.0 cm (+3.0)
sensi skunk - 17.5 cm (+4.5)
hindu kush - 16.5 cm (+3.0)
shiva skunk - 11.5 cm (+2.0)
2024/01/23 : shiva skunk looks bad, with leaves going down and yellowing... it didn't like its transplant.
The others are looking OK. I may have seen first pistils...
The heights are :
afghani #1 - 22.0 cm (+3.0)
sensi skunk - 18.5 cm (+1.0)
hindu kush - 18.5 cm (+2.0)
shiva skunk - 11.0 cm (-0.5)
2024/01/24 : spayed with Foliar Spray from B.A.C. last night, don't know if it was OK for shiva skunk, we'll see.
3 others are preflowering without a doubt now.
afghani #1 - 24.0 cm (+2.0)
sensi skunk - 20.0 cm (+1.5)
hindu kush - 21.0 cm (+2.5)
shiva skunk - 11.5 cm (+0.5)
2024/01/25 : shiva skunk is struggling but it's not done yet. And I think stretch began for others.

Likes
82
Share
@WhiteEdge
Follow
26.03.2024
Continue into week 4
Update firmware on TrolMaster Tent-X (3.6)
Replace all filters, remove and clean drain buckets and tubing.
Mix new batch with 56ml AN connoisseur AB + 4.5g Big Bud Powder + 7.5ml Silica - total 30l @ 1.34EC. NPK Ratio is 1-2-3 , Cal/Mg ratio is 4-1.5
Target EC for this week is 1.2 start and end week with 1.3. Checking plants will determine timing of strength
Donne one pass off long misting (3min) with diluted solution @ 0.84@C
Set Day/Night misting cycle @ 60s ON time
Finally have time for managing canopy, pull down taller branches and position all tops to fit under screen without touching. Try ro spread them evenly across the net, top per square of net
Defoliating all girls, remove all fan leaves and prune lots of smaller branches from middle. Lot of foliage is removed!
After stripping humidity drop significantly (41%) , need to install humidifier again to keep RH @ 50-52%
Set dehumidifier thermostat to work @ 50% RH. Reduced light intensity for this day, let girls recover from stress
PAR map 1150max/650min PPFD, VPD -1.2-1.3, DRH 50-54%, NRH 45-49%, NT-20-21c, DT-24/25.5c, Leaf temperature 22-23c, Light distance 45-55cm, CO2 700+ppm
HLG Scorpion Diablo @ 65-75% - 45-55cm distance
60s ON time 20min OFF time @ Day Time
60s Off time 30min OFF time @ Night Time
NT-Nutrient Tank - PH -5.90-, EC -1.32, Temp-20-21
27-28.03.2024
All girl looking great after defoliation,)
Clean benches and floor in box
Replace all filters
Set dehumidifier thermostat to work @ 47% during night times, 50% @ day. Humidifier is also connected and set @ 49% Day and 45% @ night, if needed
Inkbird humidity controller stop executing's automation for day/night settings. Start manually to change day/night values for now
Next several days, until weekend, temperatures outside will be high , 29c max. Hope it will not raise temperature in box to much.
Light is set on TrolMaster Tent-X controller to dimmed at 28c
AC Infinity fans are set to AUTO mode with height temp set at 26c and high RH set at 54%
Top up tank with 25ml AN connoisseur AB + 4.5g Big Bud Powder + 7.5ml Silica - total 75l @ 1.34EC
PAR map 1180max/680min PPFD, VPD -1.2-1.3, DRH 50-52%, NRH 45-48%, NT-21-22c, DT-24/25.5c, Leaf temperature 22-23c, Light distance 45-55cm, CO2 700+ppm
HLG Scorpion Diablo @ 80% - 45-55cm distance
60s ON time 20min OFF time @ Day Time
60s Off time 30min OFF time @ Night Time
NT-Nutrient Tank - PH -5.90-, EC -1.26, Temp-21-22
29-30.03.2024
Refilled the tanks with 20l of fresh mixture. 25ml AN connoisseur A+B + 3g Big Bud Powder + 7.5ml Silica - total 20l @ 1.21EC
Refilling is done in two passes, one time before light up, and second time early in morning, two hours before night time.
This give additional nutrient cooling without running water chillier. Refill solution is @ 18c
Checking EC and PH 2-3 times a day. The electroconductivity values are around 1.24EC.
I maintain the strength until it drops or rises. For now, I’ve caught the perfect strength, the liquid is almost static with very small oscillations in electroconductivity and PH.
Replaced all filters in the system, replaced on washing… Every other day is enough, during daily cleaning there is no dirt on the filters.
The girls are handling the environment well, leaves are raised as they should be, they seem like very happy plants.
Formation and enlargement of flowers can be noticed with the naked eye.
The wave of warm weather continues all this week. Expected temperatures for the next seven days range from 25-29c. Need to pay attention to that
Raise light 10cm, top of canopy now is around 50-55cm
PAR map 1180max/650min PPFD, VPD -1.2-1.3, DRH 50-52%, NRH 45-48%, NT-21-22c, DT-24/25.5c, Leaf temperature 22-23c, Light distance 50-55cm, CO2 700+ppm
HLG Scorpion Diablo @ 80% - 50-55cm distance
60s ON time 20min OFF time @ Day Time
60s Off time 30min OFF time @ Night Time
NT-Nutrient Tank - PH -5.95-, EC -1.24, Temp-21-22
31.03.2024
Girls totally recovered from defoliation. Almost all gig leaves grow again on all girls.
Tropicana Cookies have most apparent bud development, in size as well
Purple Lemonade is going to be a biggest in height in this grow . They already around 85+cm with SCROG branches.
Tropical condition continue. Temperatures going from 26-29c, night temperatures still colder and stay around 16c
Outside temperatures affected water temp in nutrient tank, will se if i need for a water chiller or i will cool with adding cooler nutrient solution.
Lower wattage on light , set Diablo @ 75%
Replaced all filters in the system, replaced on washing…
Refilled the tanks with 15l of fresh mixture. 25ml AN connoisseur A+B + 3g Big Bud Powder + 7.5ml Silica - total 15l @ 1.21EC
PAR map 1180max/680min PPFD, VPD -1.2-1.3, DRH 48-52%, NRH 42-48%, NT-22c, DT-25/25.5c, Leaf temperature 22-23c, Light distance 50-55cm, CO2 700+ppm
HLG Scorpion Diablo @ 80% - 50-55cm distance
60s ON time 20min OFF time @ Day Time
60s Off time 30min OFF time @ Night Time
NT-Nutrient Tank - PH -5.95-, EC -1.21, Temp-22-24
01 04.2024
Outdoor Climate: It’s hotter outside. I’ve set the Diablo at 73% to maintain temperatures in the box within the 25-26°C range.
Humidity: After defoliation, the humidity is low, which is great! The dehumidifier hardly worked this week.
Misting Routine: I start the day with a 3-minute misting session; this will be the routine for now.
Nutrient Solution Temperature: I’m keeping the nutrient solution temperature between 20-23°C. I refill the tank twice a day to cool down the solution.
Light Parameters:
PAR Map: Maximum PPFD is 1080, minimum PPFD is 650.
VPD: Ranges from -1.2 to -1.3.
Daytime Temperature (DT): 25-26°C.
Nighttime Temperature (NT): 22°C.
Leaf Temperature: 22-23°C.
Light Distance: 50-55 cm from the plants.
CO2 Levels: 700+ ppm.
HLG Scorpion Diablo: Set at 73%, positioned at a 50-55 cm distance.
Lighting Schedule:
Daytime: ON for 60 seconds, followed by 20 minutes OFF.
Nighttime: OFF for 60 seconds, followed by 30 minutes OFF.
Nutrient Tank (NT):
pH: Maintained between 5.9 and 6.1.
EC: 1.18.
Temperature: 20-23°C.
Week 4 off Flowering in Summary
120 litter off RO water,
210ml+210ml AN connoisseur A+B, 18g Big Bud Powder, 45ml Growth Technology Liquid Silica
70kW electricity in total for light, Pumps and AC Infinity Fans. 63kW for Light + 2kW Dehumidification + AC Infinity ventilation
Week start @ 1.31EC, nutrient strength., keep strength @ 1.24 till the end of the week
Girls look superb all time, Wedding Cheesecake have two pheno, realy like buds on one girl
Tropicana Cookies fill bud sites this week a lot, Purple Lemonade is going to be talles from all three stains. Nice bud formation also.
PH was stabile and move from 5.90 min to 6.2 max.
Light distance for this week - 50-55cm from tallest top , PPFD levels around 1100 in center, trough whole week. Lowest reading 680 @ corner
Temperature are from 23c at start off day to 26c max at some points. AC Infinity T6 extracting fan program in AUTO to kick in @ 26c
Night temps around 21-23c, dehumidifier work less this week. Outside humidity is low this week
Water temperatures in middle off week start to rise, reffiling solution is cooled to bring temp back from 23-24 to 20c
Defoliate girls on first day off ths week, pruning off smaler branches, lots off foliage is removed
After defoliation humidity drop inmediately in box. Need to bring back humidifier for couple of days. RH was low trough whole week
Day RH is moved from 45% to 50% max, at night times drop to 40-45%
Next week outside temperatures continue above average for this time of the year.
Continue in next week, starting probably with one more light defoliation, bigger fan leaves only

Likes
7
Share
@Unpluggy
Follow
Hi there Friends🕊️
I sadly dont have much footage of This week.
The left main branch did snap :‘(
So i quickly covered it in tape. I thought its not able to be safed and of i should cut off the 2 sidebranches After the Snap to leave only 1 but… you‘ll see in week 5 diary😁
Processing
Likes
6
Share
@maverik713
Follow
If I didn't have the pictures from each week, I'd have a hard time believing they are growing so fast! Pistils have formed on almost all the plants, with Gelat.OG being the furthest along.


Likes
10
Share
@KinoBudz74
Follow
Week 3 lookin good 🤟🏾 She stopped stretching and now starting to focus on buds 🌳 imma get a new co2 packet and have her get big. Also for the main stem I’m just going to buy electric tape or a plant tie around it. She’s getting to big 💪🏾 And my clones are doing good and growing real fast imma put them ladies outside 🔥🌳

Likes
3
Share
@StickyFingah420
Follow
Semana 9 y estimo que la próxima será la de cosecha, ojalá en el día 75 o algo así. Ya veo los tricomas lechosos y en menor cantidad ámbar, por lo que estimo esa fecha para el corte puesto que luego de cosechada la planta sigue madurando debido al proceso de secado/curado, huele muy bien y luce genial // Week 9 and I estimate that the next will be the harvest, hopefully on day 75 or something like that. I already see the milky trichomes and in less amber, so I estimate that date for the cut since after harvesting the plant continues to mature due to the drying / curing process, it smells very good and looks great
Processing
Likes
1
Share
@lawnichak
Follow
gained 10" in the last 7 days. 19" in the last 2 weeks. doing extremely light stress training. just enough to get the light evenly to the leaves. there are multiple colas coming up together. hoping for a decent amount from these plants. im doing a light defoliation each week. changed the way the lights hang in the 3rd tent to give more room to grow and light covers more of the plant now
Processing
Likes
26
Share
@Hawkbo
Follow
Got these transplanted to the rain science 3 gal bags and moved to a 4x4 in the basement where it's a little better environment in terms of vpd. I had a full bag of roots organic soil so I decided to do a soil/coco blend like I did with the current autoflower crop. I also topped every single one of em mid week. Once I get the flower tent all cleaned out and everything I'll be throwing these in there for bloom. Hoping this will be an even better grow than the last since I have both my arms back. I'm doing the update a little early since I was late on it last week, today (tuesday 9.10.19) is day 43 from germination and about day 39 from full sprout. Before this week they were under only about 185w in a 4x4 area so it's been slow growth so far.
These are doing solid, some are a little small and bushy like the purple candy paint and the rocstar breath but not that they have some room to grow maybe theyll pick it up.
Likes
30
Share
@SAC87
Follow
Day 49 Flower
Hey Growers. I did a flush last week to get my runoff closer to 1050. I’m not sure why this happens that I get tip burn doing FFW. Maybe I start ramping up flower nutes too much too quickly. I have tip burn on my Blue Dream too. I’ve gotta come up with a solution as it buggers everything up. Flushing and Dealing with tip burn instead of packing on size.
This is a 10 wk strain so I’m not as concerned cuz there’s lots of time and I think I got ahead of it. The nugs are smaller, marble to golf ball sized but hard as a rock already. The smell is of over ripe lemon when it get that sweet and Hazey earthy woody characteristic. I’m going to feed 2 more weeks and try the Advanced Nutrient Overdrive that I have kicking around. Then flush heavy for 1 ish weeks and hopefully get a nice fade.
The Vipar spectra XS2000 is doing a great job, it has me wondering if I could use it to flower a 4x4 of autos. Its super strong. My poor man’s light mover has the plants getting a ton of light every other day with a nice rest in between. There is no light burn or yellowing, a tiny bit of leaf edge curl that goes away during its rest day. I am very happy with this light and know it’ll blow up whatever I run in here next.
Happy 420 &
Happy Growing 🌱

Likes
62
Share
@Tubington9
Follow
Day 50 Both plants received their first feeding of Future Harvest Holland Secret 3 part combo and in less than 12 hours have perked up and look very energetic! If all goes well I will hopefully flipping to bloom in week 9 or 10

Likes
9
Share
@GrowerBaal
Follow
She growes nice. Additionaly shereacts good to the Lst. I further bend her down and erased some leaves.
The light runs at 75%. I increased the humidity.

Likes
Comments
Share
@Alejangrow
Follow
Moved these girls in to the flower room so now they are under 600 watts of hps. towering above every other strain I've grown so far these girls loved vegging for 8 weeks. I did a light defoliation of lower most branches because light wasnt reaching through the canopy well & these girls shouldnt mind it at all. Really looking forward to seeing how these ladies fill up a room. 😉🌿


Likes
209
Share
@Rock_n_Roll_Randy
Follow
Day 80 for the 54 plant grow. 42 different strains of photoperiods and 12 different autoflower strains in the:
8X8 GROW TENT WITH THE NEW FC-E6500, FC4800 AND TSW2000 and green buzz all organic/vegan fertilizers🤘.
I only pinched the tops on 2 or 3 plants but I defoliated every plant ALOT. it slowed the vertical growth alot but it's exactly what I wanted. I can keep track of the plant sizes, how they grew, how healthy they were, how easy they were to grow and how good the final product is👍
The girls are loving their MARS MANSION and everything is doing good and looking nice and getting bigger👍 lots of hairs clumping up now and they are all getting nice and frosty and starting to stink ALOT. MARS HYDRO ALWAYS GETS EM FROSTY👍.I AM NEVER DISAPPOINTED With how awesome these lights are🤘. KEEP KILLING IT MARS🤘👏👏
BREEDERS AND SEEDS:
DIVINE SEEDS:
MAZAR, OPIUM, WHITE WIDOW, OG KUSH, PABLO ESCOBAR, DIVINE INDICA.
AUTO WHITE WIDOW
AUTO PABLO ESCOBAR
AUTO WHITE RUSSIAN
AUTO FRACTAL
AUTO MONTREAL
AUTO OPIUM
AUTO KABUL
AUTO MAZAR.
WEEDSEED EXPRESS:
GREEN CRACK, GHOST TRAIN HAZE, LITHIUM OG, CHEESE.
DOCTORS CHOICE:
DC KUSH, AUTO NIAGARA, AUTO ROCK MACHINE.
EXOTIC SEEDS:
HIPPIE BERRY, MALASANA GELATO, EXOTIC ANIMAL.
GENE/MEME SEEDS:
BLACK HELL.
ORIGINAL SENSIBLE SEEDS:
PURPLE PUNCH COOKIES, WEDDING CAKE, PURE KUSH, GORILLA COOKIES.
SWEET SEEDS:
BLACK JACK, GORILLA GIRL, SWEET ZKITTLES.
EMERALD TRIANGLE SEEDS:
GORILLA GLUE, MASTODON KUSH.
SEEDSMAN SEEDS:
BLACK SUGAR, PEYOTE FORUM, PEYOTE WIFI, BADAZZ COOKIES OG, PURPLE GHOST CANDY, STRAWBERRY BANANA GRAPE, L.A. PEYOTE KUSH, PEYOTE WIFI CBD, FUEL DOG, CRITICAL PURPLE KUSH.
AMSTERDAM MARIJUANA SEEDS:
GIRL SCOUT COOKIES EXTREME, GREEN CRACK.
QUEBEC CANNABIS SEEDS:
BRUCE BANNER, GREEN CRACK, QUEBEC CBD 20:1.
I 💚 GROWING MARIJUANA:
SKYWALKER OG, BANANA KUSH, BLUEBERRY CBD.
FOR EVERYTHING MARS HYDRO VISIT:
www.mars-hydro.com
www.marshydroled.ca
PROMO CODE: rocknroll
VISIT THE ALIEXPRESS STORE:
@marshydro_aliexpress
Instagram: @marshydropenny
https://youtube.com/channel/UChU5ZWwNi-DvnO3oWVU3ceA
https://greenbuzzliquids.com/
#greenbuzzliquids
@GreenBuzzLiquids
https://greenbuzzliquids.com/en/shop/
PROMO CODE: rocknroll
https://www.youtube.com/watch?v=8hEqyS1jPpI
https://growdiaries.com/diaries/112437-grow-journal-by-rock-n-roll-randy/week/593118
Thanks for taking the time to read and check out my diary🤜🤛
FC-E6500 LED GROW LIGHT:
FC-E6500 grow light with 3978pcs OSRAM BridgeLux Diodes & Moso Driver, market-leading PPF 2.7 µmol/J, Max 2.5g yield/watt with 30% higher Average PPE, more cost-effective when compared to same style type lights. Only consumes 650W, perfectly cover 5x5ft (personal), 4x4ft (commercial) grow space. Innovative Precise Uniform Lighting-Built-in removable bars interval & dimmability enable the exact & dynamic PPFD control over each of the plant growing stages, FC-E6500 detachable bars deliverSuperior Heat Dissipation: Real Aluminum heatsink together with 6 slim profile passive cooled bars (THINNER & LARGER surface) and detachable Meanwell Driver, create less heat. save 50% hydro than other old grow lights! Driver can be mounted remotely on the side of a grow tent/rack or on an adjacent wall to remove heat from grow space. Full Spectrum UV IR LED: With Yield Max spectrum (660nm Osram enhanced Deep Red,2800k-5000k,730-740nm IR,380-410nm UV LEDs), Average PPFD the FC-E6500 LED grow lamp enables cultivators to produce BIG FAT Dense Buds, perfect for full-cycle hydroponic, soil, grow tent/grow room.
Dimmable Commercial Grow Light: Cost-efficient, easy dimming & daisy chain With a max up to 20 lights, IP65 Waterproof, master light easily controls the rest. Perfect for commercial & home horticulture.
FC4800 LED GROW LIGHT:
GET THE MAX FROM MARS👍: Welcome one of the newest members of the Mars Hydro family🤜🤛🤘. The Mars Hydro FC 4800 480W LED Grow Light can accommodate up to a 4' x 4' area for flowering. It has OVER 2000 LED chips consisting of the best selling Samsung LM301B diodes which has a Luminous Efficacy of: 220 lm/W
0.2 W, 3 V mid power,
Osram 660nm Diodes, Infrared light and UV LIGHT👍. It boasts the incredible efficiency of 2.8 µmol/J, maximum 2.5gram yield per watt with 30% higher Average PPFD. This High-intensity spectrum is beneficial for plants at all stages - from veg to bloom, and creates Big dense Buds👍. achieve 50% higher yields & quality compared with the old lights! Only consumes 480W for 4x4ft personal grows, and 3x3ft for commerical grow. It comes with a dimmer and daisy chain function with a maximum of up to 15 lights, the master light controls the rest👍. Wide 6-bar design offers even & wide canopy coverage and can maximizes your grow space. slim 180° FOLDABLE DESIGN... YES I SAID FOLDABLE🤘🤣 , making it compact and easy to install, it's IP65 WATERPROOF and will give you no worries while growing in a humid environment and makes it a flexible high performance commercial grow light for enormous SUPER FROSTY yields.😛😛😛. MARS GETS EM FROSTY BOYS👍
AWESOME HEAT DISSIPATION: The Low energy consumption FC4800 growing light has 6 passive-cooled bars and an aluminum heat-sink a removable driver you can upgrade later or have it outside your tent. with zero noise you can save up to 50% in your electricity bill compared to HID's or HPS lights!
It also has a removable driver so you can upgrade it in the future or have it outside your grow space for better heat control in your growroom👍
UPGRADED FULL SPECTRUM: Yield Max Spectrum with enhanced red (Top-Bin Samsung 3000k-5000knm, Osram 660nm Deep Red), speed up blooming & fruiting, perfectly suited for full-cycle growing. The FC4800 LED grow lamp was born for Big Buds, perfect for commercial, grow tent, grow room, hydroponics, and all soil grows.👍
THE BEST SAMSUNG DIODES: THE FC4800 has Top Bin genuine Samsung Osram Diodes, combined with remarkable 2.8 µmol/J Efficacy, 30% higher Average PPFD, 50% less energy consumption, to maximize your yields. They give you a TRUSTED 3 years warranty 100% Satisfactory guaranteed!!!
TSW2000 LED GROW LIGHT:
INCREASE YIELD AND CROP QUALITY WITH MARS HYDRO LED GROW LIGHTS: NEWEST SMD LED technology provides the highest PAR/LUMEN output (1122umol@18") and can make you get 30% higher yield compared to OLD blurple led lights. Max 2.5g yield per wattage and achieve maximum quality and quantity, much better than traditional HPS grow systems
LOW ENERGY CONSUMPTION LED GROW LIGHT: Consuming only 300W true output with 684 LEDS! It saves up to 50% energy than other led grow lights. Perfect for 3.5x3.5ft bloom stage, 4x4ft veg stage. Over 90% light energy can be absorbed by plants, it will have higher intensity in a MARS HYDRO grow tent with diamond design mylar, or by crossing over using multiple TSW2000
HIGH EFFICIENCY FULL SPECTRUM INDOOR GROW: 3000K 5000K and IR 660nm 760nm RED, makes it close to natural light, highly engineered to provide improved growing performance for plants at all stages of growing, rapid plant response from seed to flower; Uniform and wide-beam light distribution for your plant's optimal growth
8x8 GROW TENT:
The MARS HYDRO 8x8 Grow Tent interior is made of a unique diamond design mylar which is highly reflective. (Other companies mylar and reflective rate is as low as 50%, and it won't provide efficient light. They use thick 1680D oxford canvas, and being double stitched, it is tear proof and perfect for locking in the light. Their grow tent keeps 100% of the light inside the tent and helps your plants absorb more light. EXTRA-THICK material means No light leaks or rips at all.👍
Strong Stable metal corner adapters and poles are the trustful supporters of the tent. It's very sturdy, neither rusting or paint flaking off. quick and easy tool-free setup. They use heavy-duty metal zippers, with double layer black lining, by far the best on the market which creates a light-proof seal.
The Easy observation windows are made by double layers of cloth. Observe the growing conditions of your plants without opening the tent and avoid disturbing your plants. The observation windows also serves to dissipate heat and ventilate the air.
Likes
4
Share
@TerpyOG
Follow
Lilac Diesel RBX2
Both plants smell diesely but the pheno
with sativa like bud structure smells way
stronger and has sweet pineapple notes
along with a strong musky scent, I dried
a small amount of it and i gotta say that
this is the strongest tasting flower I've ever
smoked in my life! Sweet pineapple inhale with a sharp diesely exhale.
ALL ORGANIC NUTRIENTS USED!! GAIA GREEN 4-4-4 AND 2-8-4 WITH SOME ORGANIC SEAWEED EXTRACT WATER AND MOLASESS!
ENDED UP BEING BETTER THAN ALL THE STUFF I GET FROM THE DISPO HERE IN MA! STRONGEST TASTING BUD IVE EVER SMOKED/VAPED AND IVE BEEN SMOKING SINCE I WAS 14!


Likes
2
Share
@PapasGrow
Follow
CBD Compassion Lime Auto 🏥🍋
Your passion, Our Passion, Dutch Passion... 😸
Growing in Mars Hydro tent (3x3) ⛺
with Mars Hydro FC 3000 🚀
Week 7 ✅

Likes
28
Share
@Trickybis82
Follow
Will grow again for sure shout out to @420fastbuds for the strain what a all round great plant!!!!

Likes
11
Share
@Vegasgrowermx
Follow
Well one month of life for this hopefully female i was supposed to top thos weekend but got busy so im gonna have to top next weekend she already has 5 nodes and still getting natural sun light with no vegetative nutrients yet only pest prevention SNS 209
Likes
8
Share
@lasonda
Follow
Another week without fertilizers, flowering seems to have stopped :/ The trichomes seem quite ripe, I'll wait another week and then harvest.
