The Grow Awards 2026 🏆 


Likes
Comments
Share
@EaRtH
Follow
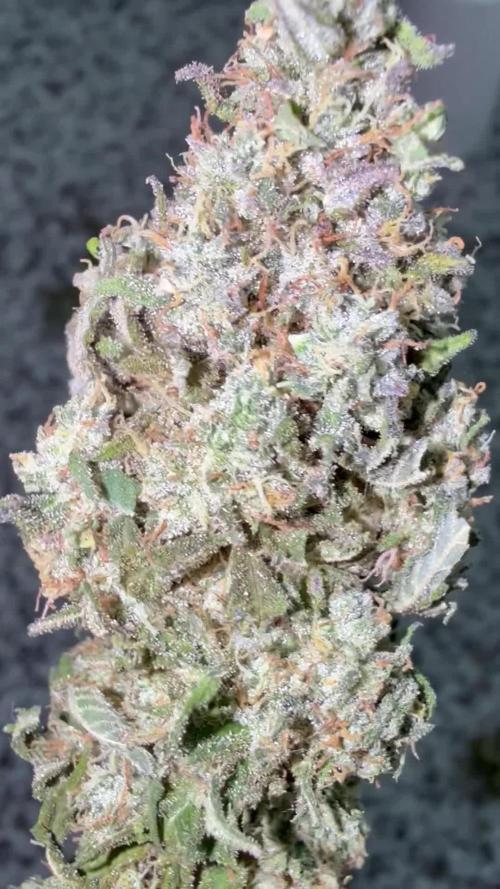
26.1. - I've added some wires back to spread the branches as much as possible. I think that plants look very nice and buds are getting bigger each day 😎
27.1. - Added more Cal-Mag and also some Epsom salt to the nutrient mix. I think the plants are starting to show signs of deficiency. Same thing happened on last run at the same time, so I hope I will catch it in time. Watered 💧
30.1. - I've decided to remove Bio Grow from my mix completely and upped the Cal-Mag. However, yellowing is still present 😩 Watered 💧
1.2. - Week wrap-up: I'm happy to say that this was another successful week as plants gained a lot of new growth and existing buds are gaining and becoming fat and frosty. ❄️ Also, I think I've managed to stop the yellowing.

Likes
12
Share
@RoyColt
Follow
Day115 25/03
4lt ro water -8ml BloomA -8ml BloomB -6ml FinalPart terra,
Total 790 ppm, ph 6,1
Drain 500 ml, 950 ppm.
Day117 27/03
4lt ro water -8ml BloomA -8ml BloomB -6ml FinalPart terra,
Total 790 ppm, ph 6,1
Drain 1100 ml, 1150 ppm.
Day119 29/03 RinseOut Day
4lt ro water -4ml sensi cal mag extra,
Total 200 ppm, ph 6,0
Drain 1000 ml, 1040 ppm.


Likes
1
Share
@InsideAz
Follow
Not much growin on this week just watering and letting them grow.
No smell yet
Increasing light to 80%
Nutrients in previous week and next week

Likes
16
Share
@bsplayerone
Follow
Between the recent temps and the lack of light I think she having issues taking off. I’m going to hold off on nutes until I see a little more progress. The humidity has been up, so at least there’s that. Looks like I’m in for a fight with this one

Likes
20
Share
@BigBudWolf
Follow
STRAWBERRY PIE AUTO (FASTBUDS)
WEEK 5
My first solocup grow, so it's a new experience. Good color! I had hoped for some branching atleast.
(Though my other plants currently in 3gal pots are branching just fine)
Likes
34
Share
@Southwest_budders21
Follow
Not much to say apart from they are getting bigger and all three seem to be girls now 11 days until I flip!
Edit: I'm happy with the training and keeping them low, so the aim is to flip this week
Likes
45
Share
@masterofsmeagol
Follow
8/14 Everything looked beautiful this morning. Seems like I've got the watering schedule down better. I do have one gmo that looks hungry so I need to increase nutes. At least on that plant. Toasted toffy has little spits that could be water marks, pests or septoria. I don't think it's septoria. In the pastvi lost far more leaves when I had septoria. I've been crazy busy. I'm surprised things are going this well. I need to put up the final supports so I can add to them once I've got big heavy buds. I was really stoked to see everything doing so well. The plant in the 50gallon is the furthest in flower. I'm so grateful to have the ability to grow high quality cannabis for myself amd my wife. There's nothing quite like it. That hash I made turned out great. I think I'll press it today. Supports will be done this week. Saw a few aphids on the plant I cut down. Earwigs aren't here this summer or there would be NO aphids. Plus when I cleaned out the insides this morning I found some dead leaves WAY in the middle by the stalk. They would've eaten that shit if they were here. Birds and other predators seem to be keeping pillars at bay. I'm not seeing the damage and when I do sfind one it's absolutely tiny like a newborn. I'll think about whether I need to spray BT.
8/15 That fucking cancel button always fucks everything out. I was done no I need to start over. Didn't water last night. Found pm on my gmo in the 30. Interior of the plant. Should've defoliated better and earlier. Oh well. I'll treat with k bicarb or plant doctor. I'll have to think about it. Other plants are looking good. Well they all are. I just hate pm. I can't isolate it due to local laws so it is what it is. Nothing I haven't dealt with before. Watered today. The middle gmo in the 30 got 1.5 gallons. The other plants each got a gallon. Including the one in the 10gal and 50 gal. Its supposed to rain but only like .1. I also chose to feed today. All plants got a gallon. I DID NOT WATER THE EVENT HORIZON IN THE MIDDLE AND THE SHERB PIE AS THEY WERE PRAYING AND HEAVY. I need to get these supports up. I'll update as I go.
Oh and one thing I remembered is that, I didn't properly sanitize the trellis nets I installed on the plant that has pm (non visible today but still). I harvested the plant that used that bet last year was harvested in two stages. The bottom I let go way later and ended up with a little pm on the stuff I left for hash material and it got some pm. I wonder if that's whete this came from.
8/16 Death in the family this morning. I couldn't decide if I should use organocide plant doctor or not. It's a systemic It's been discontinued and reformulated. It's a systemic fungicide. Instead I mixed two tsp potassium bicarbonate with a little dawn in a half gallon mister. I used gloves and defoliated everything that had pm on it. I checked the plants next to it and luckily it hasn't spread yet....but it will. I feel safer using the k bicarb. I'll do more research and try to find the best way to tackle this. I don't want to get rid of the plant and due to local ordinance I can't isolate it. If I can keep it to this one plantvthat would be fine. I'd just use it for extracts. So glad I didn't use all that netting and put up tjosr supports. I'll need to disinfect them if I decide to use them. We'll see. Plants are coming right along flowering.
WENT BACK OVER AND DEFOLIATED A BUNCH OF fan leaves and interior stuff to promote airflow. Still saw pm on that plant u had treated earlier with k bicarb. I can't isolate due to laws and I'm not willing to discard this massive monster cropped plant. So I'm going to treat it. I started by removing everything infected and improving airflow on that plant and all the others. I didn't make it to one event horizon. I plan to treat the infected plant with Organocide Plant Doctor since its what I have on hand and I've had good luck. It's a systemic. After I treat the one plant and see that it didn't hurt the plant I'll use a preventative dosage on the other plants. I've battled wpm several times. This is something I'm very familiar with. What sucks is it's totally my fault it happened due to grower error. This has set back me puttingvup my supports as well. Plants look good woth a haircut. Also the toasted toffy had some leaves removed with spots that looked like septoria. I think nutes havecreally kicked things in gear. Now there are little buds on plants.
8/17 BAGS still seemed heavy so I didn't water. It's been MUCH cooler. It's 63 at 9am. It would normally be 80 by now so maybe they aren't using as much water. I watered the the toasted toffy I missed last round but the Sherb Pie still had weight to it. I also watered the GMO on the far side and the one in the 30 as the seemed a little lighter. I looked in and I couldn't find a SPOT of powder mildew on the plant! I know it will come back but on this 100% rh day there isn't a spot I can find! I'm going to go check on them later today. Do some more defoliation and treat the plants with Plant Doctor to try to mitigate the spread of the P.M. Very suprised the k bicarb worked like that.
WENT BACK OVER AROUND 11. I WATERED THE TWO THAT DIDNT GET WATERED LAST TIME. THE EVENT HORIZON AND THE SHERB PIE. IT WAS COLD AND OVERCAST. TEMPS HAVE BEEN MUCH COOLER. SOON AS I WATERED THE SUN CAME OHT AND THE TEMP WENT UP. I WENT THROUGH THE PLANTS I MISSED AND SEFOLIATED LEAVES AND INTERIOR BRANCHES TO INCREASE AIRFLOW. SURPRISED TO STILL SEE NO PM WITH 100% HUMIDITY. I WENT THROUGH EVERY PLANT. ILL NEED TO GO TJROUGH AGAIN BUT TJIS IS MUCH BETTER. THE TOASTED TOFFY THAT MAY HAVE SEPTORIA I WILL TREAT TONOGHT WITH PLANT DOCTOR. I REMOVED ANYTHING LOOKING INFECTED. I LSTed THE BIGGEST BRANCHES WITH CLIPS TO THE BAG AMD TWINE. SO AIRFLOW IS MUCH BETTER. I THEN REMOVED A BU CH OF THE MIDDLE. I COULD TAKE MORE BUT ON OUTDOOR HARVESTS THAT LITTLE STUFF GOES IN EXTRACTS. I PUT A FEW HOURS IN TODAY. IM GOING BACK AND ILL TEST THE PLANT DOCTOR ON THE TOASTED TOFFY. BUT IF THE K BICARB WORKS THIS GOOD ILL JUST KEEP USING THAT.
8/18 It started sprinkling when I left this morning. I did more defoliation on a few different plants. Including the healthiest GMO. It seems like things should be further in flower but it is what it is. I'm not doing clones again. Only reason I did is because I lost my 72 seedlings and depleted my seed supply. I hate treating pm. Lost Coast Plant Therapy I'd really whete its at when it comes to treating pm. I might just order that. My commercial buddy told me that he wouldn't use the plant doctor and not to "spray shot all over my plants". He's probably right. I see something small and try to overcurrent. I dont see any more septoria looking leaves on the toasted toffy since I lsted it and removed damaged leaves. I was going to use the fungicide plant doctor on that and then use it ad a preventative. He's probably right. I've put a lot of work in defoliation and such. It WILL spread but it hasn't yet. I removed what I saw. I was going to hit it again with k bicarb but it said it should be weekly treatments.i hope I'm doing things right. I shouldn't be this worried about pm but I've got am anxiety disorder. I'll fully sterilize (AGAIN) my posts and trellis netting before I instal it. I'll probably go check on them later. It's hard to avoid pm with 100% humidity and 30° temp swings. I've got a few lights so maybe this winter I'll do indoor. I'll try to keep this updated. LOOKING BACK AT PRIOR DIARIES I GUESS IM RIGHT WHERE I SHOULD BE FLOWERING WISE. I JUST HAD A COUPLE REALLY EARLY PHENOS A COUPLE TIMES.
8/19 Defoliated some more stuff amd tried to improve airflow. Humidity is high and it was sprinkling earlier. I think we'll have showers. Not seeing much pm. MAYBE a little in the middle of that middle gmo but it could just be residue. I'll treat it again with potassium bicarbonate soon. If that doesn't work I'll switch up treatments. I've got citric acid amd some other stuff too. I almost ordered lost coast last night but decided I'd wait to try it out. The toasted toffy has SOME spots that look like septoria. It's the second furthest in flower and very indica leaning. It seems to be flowering vigorously so I don't want to fuck with it too much. I could use plant doctor on it and see what happens but I'm going to monitor for a few days after defoliating.
WENT BACK OVER AROUND 4 AND SHOOK OFFCTHE PLANTS. HADNT RAINED MUCH. BAGS ARE STILL HEAVY. THE TEN WAS LIGHT AND THE EVENT HORIZON BESIDE IT SEEMED A LITTLE LGHT AS WELL. I THINK IT MIGHT BE ME COMPARING THEM TO OTHER PLANTS THAT ARE SATURATED. SEEING HOW THEY BOTH LOOKED THE BEST IVE EVER SEEN THEM I HELD OFF WATERING. ITS ALSO SPRINKL9NG AMD GOING TO RAIN TONIGHT. ILL REASSESS IN THE MORNING. PLANNED ON USING PLANT DOCTOR ON TOASTED TOFFY BUT DECIDED AGAINST IT PARTIALLY DUE TO THE RAIN. PARTIALLY BECAUSE I PUSSED OUT. I WANTED TO FEED. IVE NOTICED SOME FADE AND PLANTS PUSHING AND TRYING TO GET OVER THE FENXE INTO FLOWER. THE TOASTED TOFFY AND THE UNKNOWN IN THE 50 ATE THE FURTHEST ALONG AND DEVELOPING ROCK HARD BUDS. GMO HAS A MASSIVE STRETCH. THINGS CHANGE DAILY. I WANTED TO GET A GOOD DOSE OF NUTES IN SO AFTER THIS LITTLE BIT OF RAIN WHEN WE GET THAT NICE SUNSHINE MY PLANTS WILL TAKE OFF!! THEY'VE BEEN PROGRESSING FAST DESPITE THE SHITTY WEATHER.
8/20 It's still sprinkling. It SAYS WE got zero rain yesterday but that's just not true. Today is supposed to be light showers with like .02 in 9f rain. I mixed up some water to check the plants. I figured a few would he light. The event horizon on the back SEEMED a little light. So did the one invthe ten. I realized it was just comparing it to the bags that were saturated. Still I ended up giving the event horizon in the back a half gallon and split the other half with the one in the 10 that dries out super fast. It's crazy. The weather just abruptly changed one day and I go from watering twice a day to hardly at all! Everything but the sherb pie and the seedling in the 10gal are vigorously flowering. Upping the nutes was a smart move. The seemed to like it. I'm gonna check later and as soon as I can I'll hit that toasted toffy with plant doctor. That's tied for furthest along in flower. I've done a bunch of research and I think this is the right move. I'll keep this updated. After this small patch of shitty weather we are goingvto get some sun amd these girls will EXPLODE!
WENT BACK OVER A FEW TIMES. LAST AT SIX. I DID SOME DEFOLIATION AND PRUNING OF PLANT INTERIORS. ITS ABOUT TIME TO TREAT THE TOASTED TOFFY AGAIN WITH PLANT DOCTOR. I CAN SEE SOME SEPTORIA SPOTS. I TREATED THE EVENT HORIZON THIS MORNING. IT GOT A FEW HOURS BEFORE A LITTPE RAIN WND THEN SUNNY AND 80. I USED BETWEEN A QUARTER AND HALF GALLON ON THE INE PLANT. I MAY NOT HAVE USED ENOUGH OF THE MIXED UP SOLUTION ONVTHE TOASTED TOFFY. IT HAD BEEN WORKING AWESOME AND NOW THAT ITS TIME TO REAPPLY I NOTICE A FEW LEAVES THAT LOOK INFECTED. OVER THE NEXT WEEK ILL BE MONITORING THE RESPONS FROM THE PLANT DOCTOR. I'M CONSIDERING APPLYING PLANT DOCTOR TO THE REST OF THE GARDEN. I THIBJ THE K BICARB HAS BEEN DOING GOOD KEEPING THE PM DOWN ON THE MIDDLE GMO. I HATE THAT I HAVE TO FIGHT DISEASES. IM NOT DOING CLONES AGAIN. AND IM GOING TO BE MUCH CLEANER. THE SHERB PIE LOOKS A LITTLE OVERWATERED AND HAS SOME YELLOW LEAVES BUT MANY HAVE TURNED PURPLE AND OTHER FALL COLORS. THE PLANTS ARE AGGRESSIVELY FLOWERING AND TEMPS ARE CHANGING. STILL IN EARLY FLOWER. IVE GOT A GOOD FEELING. IVE DEALT WITH MUCH WORSE AND CAME OUT GOOD.


Processing
Likes
33
Share
@BADKUSS
Follow
Hello everyone,
here after 1 week of 12/12, the plants are doing well, the stretch is easily manageable for now and apart from 2 small latecomers the filling of the net is done perfectly ...
As for the fertilizer I count as usual divided by 2 fertilizer grow and bloom to avoid the nitrogen deficiency, and the appearance of bloom fertilizer buds ... I also change the MH for HPS because personally I find the stretch more manageable with mh during 1 week of pre-flowering ...
here is now room for photos ...
Likes
4
Share
@ShambhalaGardens
Follow
Everything is looking good. Gave these girls a shot of recharge and fish shit. Prepping there new homes and getting ready to transplant.

Likes
12
Share
@InTheSmallSpace
Follow
29/6 sorry for the absence, the plant has continued to strech, I added as integrazone the regulator because of the heat, in general the plant seems to be very good
2/7 I did some defoliation. tomorrow I lower the lamp to 30/40 cm temperatures allowing


Likes
20
Share
@Basementganja
Follow
Day 35 - Light defoliation for this girl!
I'm thinking i'll put a bucket under her pot, to get the canopy closer to the light!
She's trained out nice and flat, and won't be getting much taller... I think she will benefit from being closer to the 1000PAR mark at this stage of flower!

Likes
Comments
Share
@Nony_grows
Follow
Biscotti had a sweet nutty Teri’s with plenty of frost. Not as dense as I wanted but I also had nutrient issues during flower
Likes
1
Share
@StartGrowingShxt
Follow
Week 6!
September 9
-Yo! Everything was all good just a week ago smh. Been battling what I think is a magnesium deficiency as I waited for dry back 3 days just in case and it’s gotten worse.
-Since it’s early flower I’m thing Mag deficiency so CalMag every watering or every other until I see this stop affecting my fan leaves
-Other than an obvious deficiency ladies are still producing trichomes and the flowerings are still growing. Will continue to pH the water and monitor the health of these two ladies this week


Likes
14
Share
@damianfef
Follow
Wednesday 1/10 start of week 4
haven't watered/fed since 1/6, and plants show no sign of needing water or food, I will be watering them with just pH-balanced water the moment the leaves show signs of thirst(leaves/stems drooping)and hopefully get rid of the yellowing and browning.
the yellowing/browning seems to have stopped spreading since last week too, I thought it was nute deficiency but a couple of people on here told me it was nute burn/toxicity, and seems like they were right since it hasn't spread since.
the 40 ppm measurement is my water before adding anything to it, some people were confused and thought it was way too low.
I'll be measuring the ppm of the water after everything is mixed in the next time I feed them, I'll also be measuring the ppm and pH of the run-off water when the time comes
all the plants are growing slow and steady
Likes
5
Share
@SgtDoofy
Follow
Feb 27
Swapped over to an 18/6 light schedule a couple days back. Getting some really good perking-up during sleep.
Not quite ready for LST yet.
Likes
28
Share
@MadeInGermany
Follow
Flowering day 19
since the time
change to 12/12.
Hey all together 😀.
This week she has developed beautifully ☺️.
I poured it 3 times with 1.2 l this week.
Tomorrow I will add the 2 g GHSC Powder Feeding Bio Bloom because the first blossoms are coming :-).
I checked all the leaves thoroughly for pests or diseases and everything is fine ☺️.
Next week I'll look at your roots as soon as the coconut is completely rooted.
As every week, the tent was cleaned and the entire technology checked.
The humidifier was also refilled every day 👍.
In the next few days I will remove the bottom shoots so that the energy doesn't end up being wasted in the small popcorn buds.
I wish you a lot of fun with the update.
Stay healthy 🙏🏻 and let it grow 🍀
You can buy this Strain at :
https://www.royalqueenseeds.de/feminisierte-hanfsamen/115-amnesia-haze.html
Type:
Amnesia Haze
☝️🏼
Genetics:
Original Amnesia Haze
👍
Vega lamp:
2 x Todogrow Led
Quantum Board 100 W
💡
Bloom Lamp :
2 x Todogrow Led
Cxb 3590 COB 3500 K 205W
💡💡☝️🏼
Soil :
Canna Coco Professional +
☝️🏼
Fertilizer:
Green House Powder Feeding
☝️🏼🌱
Water:
Osmosis water mixed with normal water (24 hours stale that the chlorine evaporates) to 0.2 EC. Add Cal / Mag to 0.4 Ec Ph with Organic Ph - to 5.5 - 5.8 .