The Grow Awards 2026 🏆 


Likes
Comments
Share
@Xpie77
Follow
From the leftovers and plant cutting Ive managed to make some bubble hash. Its easy and fun to do. Thnx Seeds Genetics Co for the nice genetics and see you next time

Likes
58
Share
@Natrona
Follow
Auto Purple Hulk Auto by MSNL Outside
👉Sponsored Grow👈
W4V4
7/6- 12
Auto Purple Hulk, stretched about 6 inches and is now 18 inches tall.
We have returned to heat in the 90s with heat index at or above 100f with not as much rain this week. So far she is doing well with the heat and humidity.
I am giving water only for this grow since I have Supersoil as part of the base and will add Green Sensation during flower.
As always, thank you all for stopping by, for the likes and most of all growers’ love and support.
Stay green, growers love 💚🌿
💫Natrona💫

Processing
Likes
21
Share
@LittleBigTrees
Follow
Switched from 24/0 to 12/12 at the end of day 14, also switched the 730nm Led's on. Its been 7 days the plants have started growing a lot faster but there's still no pistils showing.
I started feeding biobizz grow @ 2ml/l
At the moment there getting watered every 3-4 days.
The light is showing 25000lux on a lux meter app.
Likes
9
Share
@Muffinboy92
Follow
Moved them inside last week and then chopped one down. Rot was taking over quickly. Buds hadn’t fully formed underneath but the main colas and tops were ok. Bit disappointing but the weather has just been terrible where I am this autumn 😂 what can you do.
Likes
25
Share
@pifflestikkz
Follow
(END OF QUARANTINE)
Now I have put them to finish underground a 600w hps under 12/12 schedule with the Divine Black opium.
Luckily no more mould has spread, and all plants look happy healthy and still developing.
Day 72
12/09/24 Thursday
De-chlorinated tap water pH 6 today with Plagron products.
Finally a video and pictures update
✌️💚
Day 74
14/09/24 Saturday
De-chlorinated tap water pH 6 only today
Day 76
16/09/24 Monday
Feed today using de-chlorinated tap water pH 6.
Will update all videos and pics tonight 😁
Day 77
17/09/24 Tuesday
Feed today using de-chlorinated tap water pH 6.
Seeing good developments, buds forming nicely, divines are smaller denser structures but the buds are not lacking!
Damn I'm surprised by 2L pots.


Likes
2
Share
@Saintvicious
Follow
Holy Lst. Getting crazy now for just a few weeks from seed. No stopping it now.
Likes
2
Share
@Marshydrots1000
Follow
No more balls to be found. Have looked and plucked what I did see. There looking quality already this soon in. Not gonna be huge yeilds but quality is there !


Likes
5
Share
@Chucky324
Follow
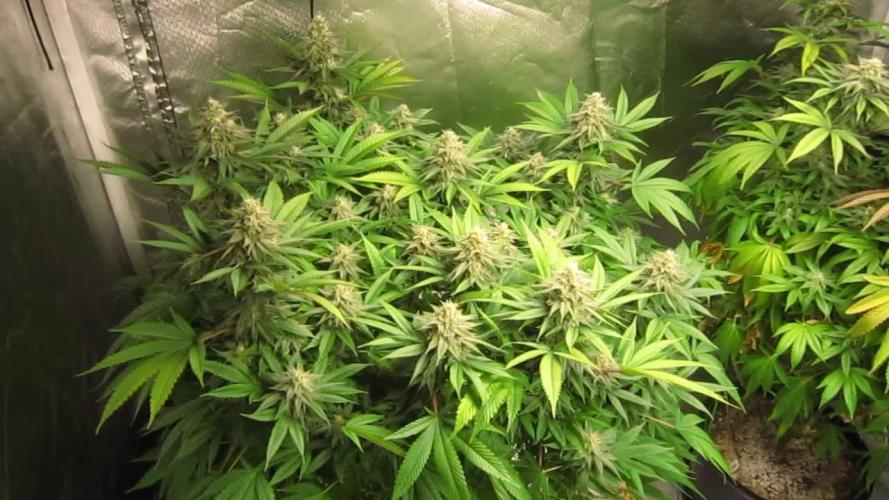
Hello. this is the end of week 7 and the beginning of week 8 of flowering.
Things are going great in here. The tent has a great smell,... of sweet citrus.
Got the thermal camera out to show some not seen heat. The buds under the light are hot.
This is the last week of nutrient. I like to flush for the last 2 weeks.
So expect to see some yellowing of leaves, for the last 2 weeks.
I flush because the smoke tastes better if I do, than if I don't. It take less time to cure too, if I flush.
OK. Be Cool.
Chuck.

Likes
10
Share
@I_Identify_As_A_Dan
Follow
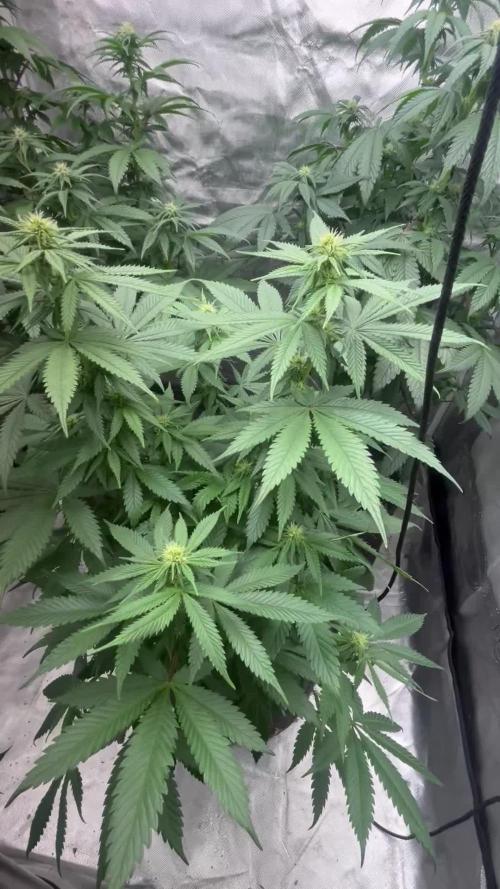
Week 11 for White Widow by greenhouseseedco
Since having the funky light schedule their growth has slowed down a fair amount. But can still see a some slight growth over the last week, they got their first proper watering 2 days ago so should make a difference for this upcoming week.
Still trying my best to keep the canopy flat had to tie up the inside 5 tops to keep them levelled.

Likes
2
Share
@Traver
Follow
Removed ScrOg, I’m too ocd and damaged two colas. Two weeks was enough to space. Wish I put it on two weeks earlier. Currently removing flarf sites.
Likes
19
Share
@FrostyTips92
Follow
I'd like to say. This is prolly the 2nd week into flower. For being what it is, I feel like there doing well. Will feed tomorrow there last feed was about 5 days ago but remember I'm going heavy with feed and letting them drink everything else thru the bottom. I also do have microbs in this soil. And add them after every feed.

Likes
1
Share
@Budnotwar
Follow
Should I defoliate more . Just did a major strip But it doesn’t seem to be getting enough light down into the canopy


Likes
11
Share
@Organic473
Follow
Three of the lower branches have been pollinated. She was fed the last of fox farms grow big...So far I am satisfied with the bud developments after the LST in just two weeks.

Processing
Likes
4
Share


Likes
1
Share
@CannabisKhan
Follow
Plants were watered on day 4 of week 9, as follows:
Lucy: 1 gallon water, pH: 6.27, Height: 22 in.
Herbert: 1.25 gallons water, pH: 5.77, Height: 24.5 in.
***Both fed nutrients - 5 ml/.5 gal BioVega (3% N, 1% Phosphate, 5% Soluble Potash), 7 ml/.5 gal BioBoost (1% Phosphate), and 1 ml/.5 gal BioRhizotonic (0.6% Soluble Potash)
Plants were watered on day 5 of week 9, as follows:
Thin Mint Sr: 1 gallon water, pH: 6.76, Height: 20 in.
Thin Mint Jr: 1 gallon water, pH: 6.50, Height: 19.5 in
Notes: Thin Mint Jr has nutrient burn and so was NOT fed nutrients today. Thin Mint Sr was fed nutrients at 50% strength 2.5 ml/.5 gal BioVega (3% N, 1% Phosphate, 5% Soluble Potash), 4 ml/.5 gal BioBoost (1% Phosphate), and 0.5 ml/.5 gal BioRhizotonic (0.6% Soluble Potash) (both plants still in nutrient distress - in process of recovery but have some new growth that is greener so improvement is being observed; slowly but surely!)
***Plants ideally would have been transitioned to the flowering phase this week, but due to nutrient deficiencies and nutrient burn on Thin Mint Jr., we are holding off on this transition for 1 week to give the plants a chance to recover from stress.
Likes
70
Share
@Black_Magic
Follow
Hello again ;)
Lady’s doing better (I think)
Last week got big pest problem trips and small flys (veg tent)
Ordered directly nematodes and predator bugs against trips ,
Yesterday did finally feed them with npk
Next few days will water them after then feed them again with npk and powerzyme
Smell is mixed up can’t really tell what is what
Hole room smells cind of meety
Likes
7
Share
@Mr_nugs_lover_David
Follow
Beautiful pair of haze berries, both phenos #1 and #2 showing strong healthy roots and big leafs, can't wait to flower this ladies out, I Transplanted the plants after 17 days of being planted on February 2nd because the roots were super well developed and I considered that it was the right time to do so. So now they are in their new 11l house.
Likes
49
Share
@masterofsmeagol
Follow
5/24 Woke up on payday to find that my father is in the hospital. My house was robbed a few days before so I guess the hits keep coming. The plants are doing good though. I'm glad I kept them in as we had a frost last night. I moved my cage yesterday onto the asphalt and put the big pallet in. I just need to sanitize the others before they go in the cage. I'm being super cautious. I think tomorrow will be the day I make the switch to the garage while they fill out these 3's.OK.
5/25 Plants were all moved to the garage with the door open for indirect light. It's 54 degrees. At night I'll pull them back in and give them a few more hours under the hps which will also help with heat. Knocked a stem sideways but it'll pop back. Feels good to get things moving. HST seems to being going good.
UPDATE: Went back over at one and noticed that the plant I hit with a wire (or something I didn't see what happened) was almost sideways and really loose. I had tied it to a clip with flagging. That didn't work. I asked a friend and I ended up pinching off the first true leaves then mounded happy drug up around it to keep it upright. It LOOKS much happier. Of course that shit happens to your biggest healthiest plants. Oh well all the 10th planet are doing phenomenal. Can't wait to move these girls to there final homes. Plants went under lights at seven. I'm acclimenting them to the right light schedule. I don't want to jump from 18/6 to 15 hours. They did really good in the cold Temps and wind. The big one I had to fix looks like it's doing great. Once they are hardened and fill these pots they go in their final home.
5/26 Plants did great being in direct sunlight for a few hours and staying in the garage at night. They look super healthy. I'm planning on watering tomorrow. Wondering if I should start to add some silica to strengthen the stalks. Also wondering if I should add more soil to some of the pots like I did to the other one as the stretched a little. This is something I may do tomorrow before I water.
Went back over to switch the lights on and pull the plants back and lock up at 7:30. Forgot my phone of course and these girls were looking amazing. I have to water tomorrow. I coukd add more soul to some of the pots but I'm reluctant due to stem rot. They'll get buried much deeper in there final homes. Don't want to mount up soil and then water and promote rot. Anyway plants are adapting amazing. Dialing the light closer to normal here. This is a great transition place for them to he. I've noticed a few wrinkled leaves but thats to be expected. Oh, I got my free pure Michigan seeds from premium cultivars!!!
5/27 WATERED EVERYTHING TODAY WITH HALF A Powerade BOTTLE APPROX. 16OZ. Plants are in direct light in the mornings and I haven't seem any burning yet. I noticed a small spot on one of the first true leaves but I think it's just a bite from an insect. Everything is green as hell. I'm wondering if I should add fresh soil to the pots but I didn't want to do it on a watering day. Plus the plants will be going in there final homes shortly. Very happy with progress this far.
UPDATE Went over at 1230 and everything looked great. I sanitized the cage AND the pallets. Also bought 3 more 30 gallon grow bags. Once they go in there they will explode! I can't wait. I'm considering ordering netting for moths. Depending on price i might get some. If not I'll keep using the BT.
UPDATE: Went and checked around 430. Temps were in the 70's and they had a few hours of direct sun. No burns evident as of yet. Pallets fit in the cage like puzzle pieces. Now I need to sanitize my grade stakes bamboo and trellis and setthat stuff up. I'm going to screw the grade stakes to the pallets and attach garden rods and bamboo with zip ties and I'll have a horizontal trellis. Once branches are a little bigger I'll begin LST. The plants that I topped AND the ones I FIMed are doing great. The FIMed ones with at least three colas some have four. Hoping the plants took that time growing roots.
5/28 Plants are all standing up tall. They loved that water. Haven't noticed any burns and they get direct sunlight in the mornings. Soon I can put them in the cage and start setting up my trellis and supports. Fan leaves on soms are bigger than my hands. These girls are probably the healthiest plants I've grown. I usually do clones and end up starting with problems. This is great starting with seeds and have no problems.
UPDATE: Went back around two because Temps had reached 92f and rh was only 20%. Nights cool off greatly so it's a dramatic temperature shift. Plants looked great. All standing up looking great. Put plants in at 7:30 ,and continue the light until 9 and have it turn on at 4am. Then they are out by sunrise. Did notice some burning on one of my plants a large fan leaf. What can I say? It was extremely hot. I'm surprised they did as well as they did.
5/29 Everything standing up perfectly looking great. Plantscget an extra hour of sun at night and morning and are on 19/7 with the extra added light. Trying to acclimate and finish hardening off this week. I'd love to be able to at least put them in full sunlight for the day. I think they'd be fine. I'm really impressed with how they are growing. Second guessing not HST all of them. However I think I might light dep a couple. We'll see. I've still got work to do.
UPDATE: put the plants in around 7. One of my lights shit the bed. They are just 150 watt hps but I was using them to finish hardening off my plants and slowly adjust them to the natural light. The on/off switch fell off. I'm sure my cousin can fix it bit the one is pe9bably fine as I'm only going fir a few more days. The thing about having this many plants to choose from is that I can pheno hunt and put the VERY best into the final containers and if I decide too I could light dep.
5/30 WATERED EVERYTHING TODAY WITH HALF A POWERADE BOTTLE. My cousin can probably fix the other light but I don't think it will matter. Within a week I'm going to have these girls in their final homes. I just need to sanitize the trellis and posts and then screw them to the pallets. I'll have this all taken care of before the plants go in the hole. I did notice another burn on a leaf. Def glad I'm taking the time to do this right.
UPDATE: I put the girls in the barn around 7:30 and flicked the one 150 watt HPS light I have working on. I added a half hour more of darkness to try to acclimate them quicker. Light stays on until 9 qnd came back on at four but i changed it to 4:30. I'm usually there by 5. I'm looking through my surveillance cameras and it doesn't even look like the light is on. Of course its super bright out but I should be able to see from that image. Luckily the building the go in has massive windows up top to let light in and windows on every side so the light is probably unnecessary. However due to my bullshit luck last year I'm being as cautious as I can. Tomorrow is supposed to be extremely hot again as is the next day. I think I'll leave the door down a little, open the other and move the plants back so they have no direct sunlight and adding a fan. That way they can continue to recover. They seem bigger everything I see them.
5/31 Another hot day. I figure a few more days (under a week) and I can transplant these girls! Supposed to be 85 today and 90 tomm. It was 45 when I got here. These girls are doing well handling this bipolar weather.
UPDATE: IM AN IDIOT AND THIS IS AN 8 DAY WEEK lol. Maybe I'll do a six day week next time to get back on track. Went back over at two and noticed some burns. Sent a video to a friend andcwith the sun we've had and the weather in the 90's he agreed the damage was minimal. However there was someone there working who opened more doors which let a lot more light in. It's supposed to be in the 90s tomorrow too. I may leave the doors shut. There are windows on everyside and an enormous cone at the top so the get plenty of sun. He also grows and I've been careful to not let anyone that grows go around my plants. I'm going to have to talk with family about this. To be honest I'm kinda pissed. Next watering I may add some kelp me kelp you and start a small nute regimen.
UPDATE Went back over at seven after having a panic attack. Half stoned half asleep. Stupidly I was looking at a plant and thought "shit" the FIM must not have took but in reality I was just stoned and tired so I topped a plant that had already been fimmed so we'll see how that goes. Purple punch is so far behind everything else it's not even funny. There might be one that's doing pretty well and that of course is the one with no HST. Branches on the other strains are thick and ready for LST though. What I think I'll do is transplant the 10th planets and the blueberry cheese ones that are ready and hold off on the rest for a while. Hopfully I'll be able to show plants in final homes next week.


