The Grow Awards 2026 🏆 


Likes
Comments
Share
@MyDearDiary
Follow
W12.Day.1(77)
The captivating journey took an unexpected turn when mold was spotted on two buds, prompting me to opt for an emergency harvest to mitigate further spread 🍂.
By skipping both washing and drying (last 24 hours without water) to speed up the harvest, the weight of the large bush, a hefty 2485 grams, included all the water, stems, leaves, and even the bamboo scrog :)
Upon thorough examination, no additional signs of mold were detected. I ensured all the buds were dried under the highest airflow possible, effectively minimizing the impact of the mold 🌬️.
In response to this challenge, I'm planning to enhance the ventilation system and improve data monitoring within the grow box. These adjustments aim to replicate the success of this growing method while preventing mold in future cycles 🛠️.
My heartfelt thanks go out to everyone who has been part of this journey through the diary. Your engagement and encouragement mean the world to me and my plants 🌿.
Huge thanks to @AsNoriu, @MiyaguiOkPolilla, @nonick123, @Archie1337, @JuanHaze_Arg, @deFharo, @Plantinator, @GrowerOG, @GrowInSparta, @Lemonhazelover for following my journey and wishing me success 🌟. Your support means the world to me 🙏💚.
A special shoutout to @chamomile; I'm gearing up for a strong comeback 💪.
Appreciation extends to @SkunkleDamo, @TheUk420Show, @HerbalEdu, and @FNplug6 for their invaluable advice during this critical decision-making process 🙏.
W12.Day.7(83)
Almost a whole week of drying has passed, and I've managed to remove the excess fan leaves and the less trichome-dense parts of the remaining leaves 🍃✂️. Made a little update to the dryer - added an extra section and now all the cleaned colas with buds are comfortably sitting on the drying racks 🌿🔄. No signs of mold anywhere, which is a huge win 🚫🍄✨. I haven’t separated them from the branches yet; I’m planning the final weighing after another week of drying ⏳🌱.
P.S. Dreaming about the yield if I could manage to hold out for two more planned weeks of grow 🌠💭🌳. More smiles, more vibes 🌈😊.
W13.Day.3(86)
I took one of the ready buds off the drying rack to check it out and study it 🧐. There are lots of clear and white trichomes and hardly any amber ones. The smell reminds me of Mimosa Orange Punch Auto from Barney's Farm 🍊. I think the terpene profile must have come from the Mimosa. It could have used more time to flower and mature, rather than this early finish 🌱. But we work with what we've got and move forward from here. This weight of 3.49 grams will be added to the total tally after the final weighing at the end of the two-week drying period ⚖️.
The taste after smoking has a quite strong chemical note. It should diminish after curing. In terms of potency, it's slightly below my previous grow. But again, this is without curing.


Likes
1
Share
@FlowerOasis420
Follow
Das erste und letzte mal getoppt, angestrebt ind 6 Haupttriebe pro Pflanze.
Gelato Kush macht mit Abstand den besten Eindruck.

Likes
4
Share
@Andres
Follow
none of this bank has given me an abundant harvest hopefully it can be commemorated with its taste smell and knock out

Likes
32
Share
@AsNoriu
Follow
Day 78. Only 5 left from first wave and 3 will fall at the begining of next week.
Two biggest Mimosas looks like on week 5 or so and I hope to finish them before June. Such a difference in one strain ... But they will be huge !
Last Smoothie is still pumping, Purple punch started to fade, hope small Mimosa will join fade army too .
Nothing to add, just pure water, watch out for nanners and bud rot daily ...
I added Mars SP150 and SP3000 to the mix, now it's 1400W in dA hOuSe !!! ;)))))
Happy Growing !!!
Likes
9
Share

Likes
10
Share
@Prilyfe13
Follow
10/28/2025
What a day! We have started the Bloom Nutrients, cleaned out the reservoir... To be honest, I don't know what people are talking about with dirty things. My whole bucket was super easy and fast to clean. Frankly it really wasn't dirty at all. Kinda like reusing a cup. Nothing wrong with it. Just had something else in it. Anyway, quick and easy.
I used distilled water. 4 gallons per bucket.
I think my TDS meter is broken. Either it's really that high or these plants love it, but the reading is 1020 ppm and the EC is at 2000. That's really high... I think. I have no idea. I've read that people couldn't get over 300 ppm without burning their plant. While I'm at 1020 ppm. Something is wrong here and I can't figure it out. I've watched them like a hawk for the last 5 hours. And they look super happy and healthy. Not a single sign of toxicity. Just follow the instructions. Lol. So why am I looking at numbers that should burn them? Maybe I'm wrong. But I think they can just handle it. No idea how, but these are tough plants. I'll update with any signs of stress.
Anyway, moving on. Ahem...
So I definitely need to do another clip traing on Papaya Cookies. Not really sure if Lemon Cherry Cookies needs it. I'll see tomorrow.
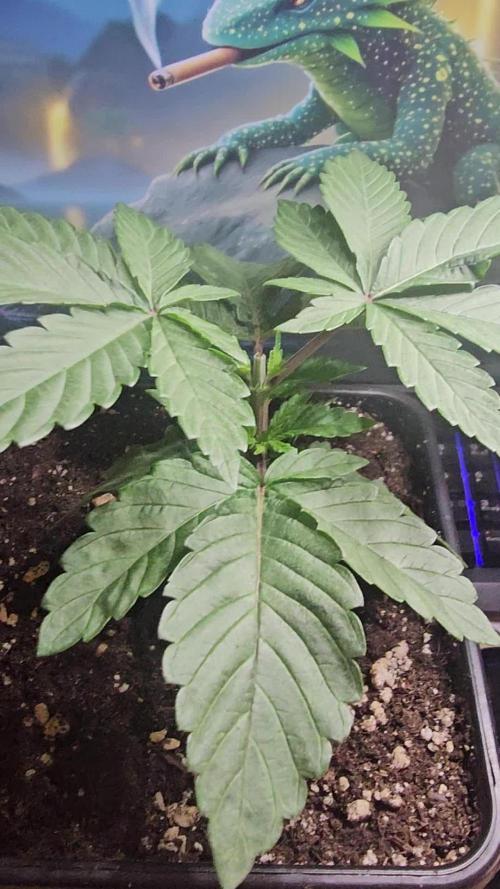
Also, these 2 are finally showing real traits of what they are. Papaya Cookies is definitely sativa as the description says. Like seriously sativa. Thin leaves, skinny branches. At first I thought it was the stem issue, but then I realized that this is what it's supposed to look like. Skinny but strong. Anyway, she is starting to grow too tall in the middle, so I need to pull down some branches with those clips I got.
Lemon Cherry Cookies is certainly showing her indica traits. Wide leaves, bushy stature. Thick strong branches. Beautiful green color. (Papaya Cookies leaves are much lighter.)
Lighting: 27" away from the canopy. Power 90% 278 watts. 615 PPFD I might have to dim the light a little when they grow closer to it. Maybe. It all depends on how much higher I can get the light up. I think there's 8 inches of space between the light and the ceiling. I'll figure it out.
The environment is still perfect. The humidifier and heater barely run. And if they do, it's like level 1 or 2 of power. Not much going on in there to change the environment. But I did get my new exhale 365 bag. It's supposed to take a few days to get going, so we'll see what it looks like in a few days. The CO2 level is around 900 ppm. I'd like it a bit higher, but it's ok.
I don't think I'll record the environmental readings. They are generally all the same. And it's honestly getting a bit redundant. Especially when they are already recorded in the list thing.
See you tomorrow.
10/29/2025
No picture day. I assure you they look wonderful. Both plants are starting to show buds. They should start stretching any day now. Each of them is 12". Very green, very healthy.
I'll have to pull down 2 top branches on Lemon Cherry Cookies after lights on. Just 2. They are sticking up too high above the others. Also, it'll help fill in a hole in the center of the plant. Still looks pretty bushy. That's nice.
Papaya Cookies looks awesome! Even after her little infection. Definitely stunted and I would have expected her to be taller than her counterpart. But she isn't. However. That's not stopping her from producing tons of bud sites. I may have to go with the scrog net after all. Unless she hardens up and can hold the buds. I don't think so. I'm gonna have to use the net as a support.
Lighting:
So I lowered the light to increase the DLI currently it's sitting at about 42.5 mol. The PPFD is around 630. Something like that. I'm going to double check when the light is at full power. I was going to increase the intensity to 100% but I decided I should wait a few days since I lowered the light. I'll get a measurement after the lights turn back on. Honestly, my goal is to have the light as high as it can go with max intensity. I'm not sure I can actually do that with this 300 watt light. I also have the CO2 exhale bag I can consider soon enough. If it works as they say, I can probably increase the DLI to 50 mol. We shall see.
Environment:
There's actually something to talk about. So I live in an apartment converted from a house. There's a total of 3 apartments. Someone, not me, cranked the heat this morning and the tent hit like 78°. I know it's not a lot, but still not within my precision mastered range. Lol. Hell, my AC isn't doing the job. The lowest it's been is 71° in the house. Back up to 72° but yah, in the house it was like 75°.
Anyway, that's it for the day. I'll check in later with any changes.
10/31/2025
I'm sorry everyone. I've been super busy the last couple days and didn't have time to add to my plants adventure tale. So I noticed at light level 9, the plants were praying pretty hard. I thought to myself well then a bit missing light. So I turned up to max level 10. Watt output is 310 watts. I don't remember the DLI, but it's like 44 mol. Anyway, I checked on them about an hour later. They were still slightly praying, but that's good. It just means they needed a bit more light. I'll keep an eye out for light stress. Also, I think I figured out a thing. Cannabis grows trichomes when it is stressed out as a defense mechanism, no? As in a strong aroma coming off in the veg stage. Isn't that a sign of stress. In particular light stress? Obviously when flower hits, it will smell from the flowers. But as a vegging plant, it should smell like a leafy green plant and not strongly of trichomes. It's just a theory, but could be useful if I'm right.
To summarize, veg stage should smell like a plant. Flowering should smell like weed. And as it's known. It builds trichomes to protect against light stress and a few others I can't think of at the moment. Wind burn too I think. More like environmental stresses. Something the plant would have to protect itself against. If you have an idea in regards to this theory, I would be glad to talk about it. Send a comment and we can maybe start a discussion.
Anyway, I let the pH float yesterday. Today it was dangerously close to 6.5. I don't understand why it increases so much. It doesn't swing either. Just spikes. It's seriously annoying not knowing why. I will learn thos somehow.
Back to 10/31/2025
Happy Halloween everyone. 🎃
So today I will be taking some of the training clips off. They are starting to get too small for the bigger branches. I'd like to take them all off now, but I have a lot of small branches that need to be woody and thick. But yah, all of those are coming off. I've also decided to see if the light at 90% will still cause major reaching. And if so, maybe I should let it be. They can stretch right into the light. Or I'll leave it at 100%. I'm not sure yet. Any suggestions? Feel free to comment on that no matter how old this diary is.
The temp seems to be perfectly ok, but the humidy is starting to climb with the plants getting bigger. So it's dehumidifier time. I'm planning on buying the AC Infinity one that connects to the system. But I have as small one for now. Environmentally speaking, everything is going great! Not too much wind, decent air exchange and bouncy CO2. Not sure how to fix that. I was considering routing the end of the exhaust duct back into the tent. I think I will. When I get these vent port caps. They are light proof but also provide air exchange. So I was thinking of taking the duct. Sticking it in the top vent port and letting that air flow through. If it works, I should have plenty of CO2 in the tent, the temp should stay pretty constant as well as the humidity. Well, kinda. The dehumidifier would have to work double time, but the other accessories, like the heater and the humidifier won't need to run as much. And considering this AI is keeping my tent spot on, I'm guessing spot on to spot on would make a perfect mix. We shall see. I have to wait a week or so for the port covers, which sucks. Because this is the very beginning of flower and I would love for the CO2 levels to be in the 1200s. I think.
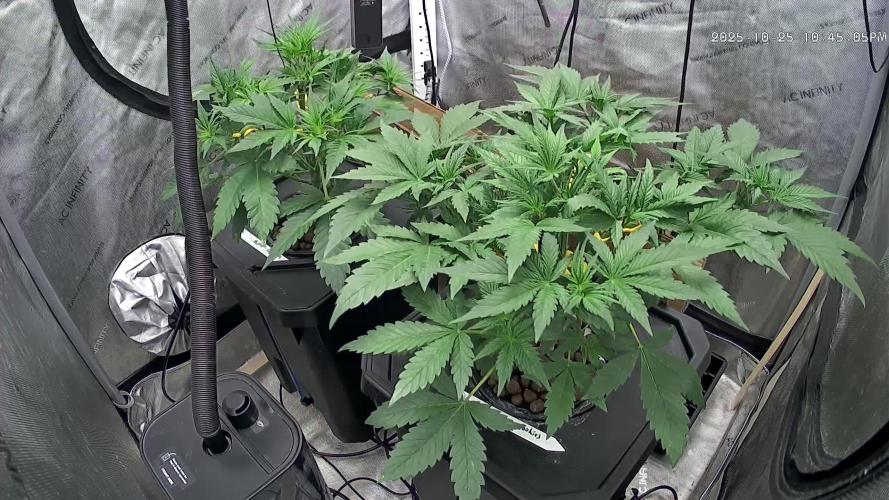
Lemon Cherry Cookies looks absolutely wonderful. Lush broad leaves. She'll definitely need a trim at the end of the stretch. Speaking of stretching, she hasn't done much of it. Like an inch or so. Not sure what I'm doing wrong or if I'm just being impatient. But I have had plants with the greatest care only get to like 18" tall. This Lemon Cherry Cookies looks like it might be one of those plants. Super bushy, but really short. Trimming after the stretch should open up some much needed air space. But as I said the leaves look great! No signs of any issues whatsoever. And the root ball! It's huge! I can't take pictures because I have to hold the lid up. Believe me, it's big.
Papaya Cookies looks pretty good as well. She's actually taller than her counterpart. By a good inch or 2. But that is most likely because she's a sativa. Where Lemon Cherry Cookies is an indica. In that aspect everything is perfect. And! The stem isn't getting big big, but it's definitely expanding. Not like the other one, but still. She still definitely needs to be supported, but I expect good things. Maybe not big things, but good ones. Her root ball isn't all that big either. Kind of expected. However, I do have 1 more seed I think. Maybe I'll pop that after the next run. Hopefully I'll be in a bigger place with space for a 4x4 tent and my 3x3. That would be pretty bad ass. 3x3 for autos and vegging photoperiods. The 4x4 for the flowering phase. Autos stay in the 3x3. An endless supply of weed right there.
That's all for the day.
11/01/2025
So I wake up this morning to a legit bush. Lemon Cherry Cookies seemed to go PUFF and blew up like a balloon. I'll definitely be taking out some leaves after her stretch. I think that's the best time to trim an autoflower. But only once. Small snippets, in my experience, are fine. But like just a few leaves here and there.
Papaya Cookies is starting to stretch more. She's also starting to fill out now. I'm expecting a much larger plant in the coming week or so. She's still a very healthy plant. No idea how, but even her lower stalk is fattening up. She might be a little bit behind, but she's starting to become more active. Honestly, she should be taller and a bit larger than Lemon Cherry Cookies. The way the stalk looks on both of them, Papaya Cookies wins. Up top anyway. But the bottom is small, so less production I think.
The environment is spot on still. I think I'll leave the light at level 9 for now. I might turn it up after the stretch. But for now, level 9 it is.
The CO2 is pretty low in the tent. I forgot to tell you all. The new exhale 365 bag came in and is already in place. That was nearly a week ago. My bad. Anyway, it works, but then it stops. I might route the exhaust duct back into the tent above the canopy after I get the port vent caps. I think that'll work. This is good. Because winter is coming and it gets cold here. So I'll need as much heat as I can get. Well, not really, the heater I have is fantastic. But you get it. The heater also brings in a ton of air. Enough where it balloons the tent.
I'm having trouble getting the pH to stay at 5.8. it jumps to 6.3 daily. So I guess I'll just keep fixing it. Lol.
Anyway, that's all for today. I'll update with any changes.
11/02/2025
Well well well. Look who came out to play! Both ladies are doing quite well. Lemon Cherry Cookies is by far the winner of this run. But you never know. Papaya Cookies might shoot up but I'm pretty sure she won't get that big. Her root ball is kind small. At least compared to Lemon Cherry Cookies. Hers is huge. I can't take a picture because I have to hold the top and the roots. So big.
Anyway, I had to top off both ladies today. They were about a half gallon low. I added a little bit more bloom to help prepare them for the next water change and then bloom goes up. And we add the p/k boost. So I figured exposing them to a very small extra dose would probably do good.
Other than that and the huge root ball, nothing much else to report. The environment is perfect, as usual.
I'll definitely be trimming after the stretch. They are getting really bushy.
That's all for now.
10/03/2025
Good stuff happening today and possible bad stuff as well. Good things first. These 2 plants are getting nice and plump. Well Lemon Cherry Cookies is. Papaya Cookies has a few lower spots. Her canopy isn't very even at all. Thelmouter half just stopped growing. She's also showing signs of nutrient deficiency. She definitely has enough nutes. It's because of her smaller trunk. I could be wrong, but that's the only thing I can think of. I checked for bugs with my microscope. Nothin. Checked everywhere for signs of rot, root rot and anything else that could potentially be causing the yellow spots. They are burning through it looks like.
Likes
22
Share
@m0use
Follow
***Sponsored Grow*** = Medic || https://medicgrow.com || Grow = ***Sponsored Grow***
Plants still looking good from last week, the yellowing has seemed to stop spreading, still some dull green in some leaves, I think I was under feeding them, but runoff says otherwise. Noticed some more pink/purple stems on the plants and decided to increase the phosphorus content in the feed by mixing in half grow and half bloom from the nutrient lineup. I'd use the PK booster I have but its to high in K for my liking. The entire lineup is very high in K. mixing grow and bloom gives a NPK ratio of 7-7-14 then done 1:1 equal parts.
Grow=8-4-15
Bloom=6-10-14
Boost=1-15-30
Run off was a bit high for my liking but only seeing minimal signs of nutrient burn. Still watering once with feed and runoff and then later in the week with water and no/little runoff for my watering cycle.The number in the nutrient section are wrong but the EC and ratio are correct. Also impressed the roots have started popping out the bottom of the container already after only being transplanted for a week. Good root growth on these ones.
Lights doing well. The V1 spectrum is good on the medic grow mini sun-2's 240w. No issues so far, dimmed at 80%
.
Till next week.
***Sponsored Grow***
Official Website:
https://medicgrow.com/
+
https://www.kannabia.com/en
Facebook:
https://www.facebook.com/medicgrowled
+
https://www.facebook.com/kannabiaseed/
Twitter:
https://twitter.com/medicgrow
+
https://twitter.com/kannabiaseeds
Instagram:
https://www.instagram.com/medicgrow420/
+
https://www.instagram.com/kannabiaseedsint
YouTube:
https://www.youtube.com/channel/UCNmiY4F9z94u-8eGj7R1CSQ
+
https://www.youtube.com/c/KannabiaSeedCompany
Growdiaries:
https://growdiaries.com/grower/medicgrowled
https://growdiaries.com/grow-lights/medic-grow
+
https://growdiaries.com/grower/kannabia
https://growdiaries.com/seedbank/kannabia

Likes
5
Share
@Do_it_Dan
Follow
Been mad this week for the runtz, defoliation twice as the amount of vegetation that was covering bud sights, she's getting bigger and I love it 😀 happy growing and stay green ✌️ 💚 👌 😀


Likes
2
Share
@Elcoquigrow
Follow
Última semana de fertilizantes, una semana aprox ahora en lavado de raíces con Fawless Finish ✌️🏾

Likes
9
Share
@Not_a_tutorial1990
Follow
Non eventful week apart from noticing possible potassium difficiency on my Blue Afghan and planet of the grapes started yellowing on the leaves.


Processing
Likes
6
Share
@Thckaos
Follow
03-08-20 No se cambia la solución con nutrientes aún. Empezamos la tercera semana y aún tenemos solución con 1.89 ms y un PH 5 que corregimos a 5.8.
04-08-20 se rectifica el PH de 4.5 a 5.5. Se calibra la sonda de ph.
La conductividad es de 1.95 ms. Cuando suba de 2.1 ms cambiaré la solución.
Se baja la luz a 70 cm
05-08-20 el PH vuelve a bajar a 4.8 y la conductividad llega a 2.1 ms. Se procede hacer un lavado de raíces bajando la conductividad a 0.2 ms PH 6.5 y una nueva solución con nutrientes que pondré en los datos principales.

Likes
4
Share
@adam_pawloski87
Follow
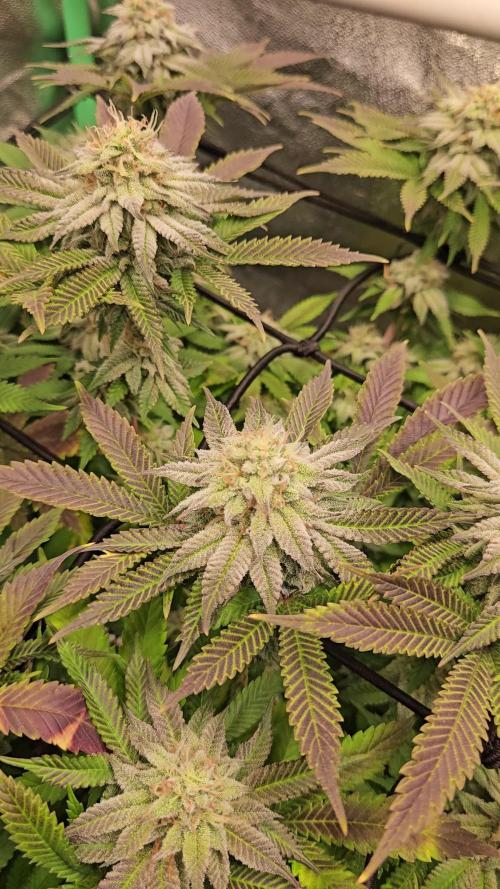
At a total of 79 days this Sangria is a beautiful one! A cross between The GOGO and Ogreberry she is super delightful, Dense resiny heavy covers trichome buds , with the smell of Gassy rotten fruit funk on the nose! She a stanky one ! Other then that she was a pretty easy grow , y’all don’t sleep on it an better get your hands on it , at @Twenty20Mendocino they got you covered

Likes
7
Share
@BushDoctor740
Follow
These girls are taking off like a 🚀.Day 21 I’ve noticed all really healthy strong plants with min stretch as I now have the SE7000 set at 50 percent.So I did some LST and I expect to see some really good growth this week 🔥
Likes
31
Share
@Canna96
Follow
Hey now, I hope everyone is having a great weekend. The Strawberry Banana is doing well, I am just doing some LST every couple of days, and she is just starting to stretch. She is still feeding on silica, cal mag, and maxi grow veg nutes by GHE. She seem to be loving this Medic Grow Spectrum X, which I am now running at 70% and also running the UV/IR bars for 1 hour before lights off. I also did a light defoliation this week to allow some airflow and her to focus more energy on the upper branches.
I will continue to with LST and veg nutrients until the vertical growth stops, then I will transition her to flower nutrients, and change her lighting to the red spectrum. Not much to do this week except watch her stretch and some light LST>
Thanks for stopping by, Stay Safe and Blaze On!!! 💪
Website: https://medicgrow.com/
https://growdiaries.com/grower/medicgrowled
Likes
35
Share
@SmokingTiki
Follow
Trichomes started to get cloudy and some of them have already turned amber. I hope to harvest next week but for now they are still too many clear trichomes.
All the plants are now watered with clear water until the harvest. Some leaves almost turned yellow directly after the nutrient stop, especially on the OG Kush.
The Honey Melon Haze is now mostly standing up thanks to the strings that support it. Hopefully the harvest is coming soon!


Likes
4
Share
@TRPHAUS089
Follow
Plants doing very well but Temperatur and humidity are killing right now. Can't do nit really anything to get better results. Adding now once a week about. 0,7 grams of the NPK from greenhouse


Likes
32
Share
@Bread_n_Buds
Follow
The Zenviations have been processed specifically differently I must say that they are both beautiful but one suffered the attack a little more even if he has very dignished flowers. The low one has a few beasts as you but you seem to end up great, hopefully good


