The Grow Awards 2026 🏆 


Likes
39
Share
@Fronti89
Follow
Wachsen vor sich hin ...
Ab Tag 20 wird gedüngt mit BioBizz Grow und letztmalig mit Root Juice !

Likes
2
Share
@NocturnalGardner44
Follow
This week I pruned and defoliated heavy. Removed every fan leaf and removed everything before the scrog. I didn't get as horizontal as I would have liked but I'm hopeful I won't burn tops bcuz I'm close, lucky I have the light rail moving the light atotal of 3 feet back and forth allowing me to use more intense like but in spurts. Also the co2 bag and co2 bucket really seem to be helping. Topdressed with endgame and loaded up with basilus, activated em1, orca, great white, king crab, mammoth p, ohn, yucca, alow flakes, count powder, root wise poder and enzymes. Also weekly to every other week I make compost tea from boogie brew. All my water is treated with drops of balance and I also collect and use rainwater. I have an irrometer and run from 10 to 15 kps


Likes
20
Share
@Darth_Vaper
Follow
I started out with two plants, well, I still have two plants but I dropped one when I was changing the nutrient solution. It isn't dead, but it hasn't grown any either since I changed to 12/12 light a week ago. Trashed the stunted one. The remaining one looks like it needed the room anyway.


Likes
21
Share
@Jimmy_JazzCabbage
Follow
Planting went well and no sign for 3 days . On day 4 we have our first signs of green. Temp and humidity hold well in the tent and using clear cups as a humidity dome had an unexpected effect of keep Medium too wet as cups were too small.


Likes
10
Share
@Papastroumf
Follow
Day 51 : Watered with 2.5L each lady. I added as always 1 co2 tab per 4.5L . Also i added nutrients. The next one will be pure water. As i predicted she wake and stretched 4cm in main cola and many points the side branches. Also her buds started to fatten.
Edit (Day 56) : Watered 1.5L pure tap water of 7.5ph and 360ppm. No co2 today. Just pure water with 0.5/L Cal-Mag. Buds are fattening nothing else.

Likes
4
Share
@Lilze
Follow
This week I changed the scrog net (2”holes) it’s about 7” above the pots
upped the nutes to 1.8-2 ec .
Watering every morning to about 10% run off
Sprayed with canna cure (350ml per ltr)
They have really started taking off
Lollipop and defoliation
There’s still not sign of sex but they are feminised seeds so I will be flipping to 12/12 by next week hopefully they show signs by then .

Likes
7
Share
@Dargaville_Dukes
Follow
Awesome! Went away for 10 days over Christmas and was not sure what to expect when I got back. Obviously re-potting them and letting them dry out has been effective. I've started adding a little Fish Mix to their water. I don't think they need it but I'll go really slow and try it out on my tomatoes to see what effect it has on them. I'm cautious about drowning them in nutrients as I have no experience with this and don't want to slow the grow down any more than I already have.

Likes
5
Share
@BombBuds
Follow
Also die schauen Mega aus und die buds schwellen jetzt auch schön an und die Pflanzen an sich sind super.
ABER
Die scheiß Viecher gehen nicht weg!
Jetzt sind die Trauermahlen endlich weg und auf einmal sind thripse da. Zwar nicht allzu viele aber sie sind da…..
Daher werd ich nächsten grow als Substrat einen großen Teil cocos benutzen. Das soll steril sein und die Viecher mögen es nicht! Abgesehen davon soll man damit auch bessere Erträge reinholen können und die terpen gehakte sind anscheinend auch höher.
Die terps sind krass! Sowas hätte ich nicht erwartet. Bin sehr erstaunt das riecht richtig nach 10/10 topshelf! Hut ab an Lit farms
Ab jetzt werden ein bisschen weniger Nährstoffe gegeben und ab nächster Woche die Wassermenge leicht reduziert.
Likes
75
Share
@Dedon
Follow
Merry Christmas Everyone !
Flo +50 : I see snow everywhere ^^
small buds have 100% milky trichomes but the big one still have translucid trichomes so i guess i have to wait another week ( or 2 ) before start flushing.

Likes
Comments
Share
@Cannajo
Follow
Started stretching a bit but I understand I’m only using my 1 light for now so I do plan to raise the plants next week but otherwise pretty decent growth
Likes
76
Share
@BB_UK
Follow
She’s almost there! A few days to a week left! I think I’ll give her 24/48hrs darkness like the rest because wow that did make a difference! Smooth deep pungent aromas And flavours! This has both sweet and sour! I am seeing pink and purple fades coming through and so much frosting

Likes
25
Share
@MotherNaturesSon
Follow
Came back on New Years Day to be greeted by plentiful crystal laden flowers and incredibly nice terpene smell. Very glad they did well through the 12 day dry spell, now they can be watered good and well till harvest. One last minor defoliation, then I’ll stick to tying leaves out of the way. Also will begin incorporating the uvb bulbs for about 3 hrs on per light cycle, at about 12” distance from each plant. Cheers all
SideNote: I’ve just obtained a load of new seeds from about a dozen strains I chose for high levels of thc, yield, flavor, and overall quality genetics so expect some good things to come from my page within the next few months. Thanks for looking


Likes
67
Share
@Roberts
Follow
End of week 12 for Cream Mandarine. It is looking like a nice yield of some frosty dense buds. That have a strong pleasant aroma. Thanks again sweet seeds. Was a Wonderful strain to grow. Thanks again for likes, follows, and subscriptions on my YouTube channel. I appreciate the support greatly. Happy growing everyone and be safe.
Likes
5
Share
@WickedWeedQueen440
Follow
We are now in week 7 (today MAY 13 2024 DAY 53) going into week 8 getting ready to turn off our veg stage and turn the flower on!
We have introduced the next stage of nutrition for the plant ( Fox Farm Big Bloom next we start adding Tiger Bloom) we plan on doing our flower flip between May 16th and 17th and we are looking forward to a 8 to 10 week flower time frame for this strain. We are slowly introducing videos for our gross this will be the first strain and grow Journal of ours where we will be introducing a time-lapse video of the flower stage.
This is my current plant running for the Growers Gauntlet 2024. If you have not checked it out I definitely would there's some amazing Growers and they're doing their thing. Follow along and watch us produce an amazing flowers with some pretty cool growing techniques.
Likes
158
Share
@Ezzjaybruh
Follow
Put some extra puppy pics of duke there at the end i found. Glad I took like 20 pics a day of him since we got him in February 2020..
Couple cool videos of Dukie.. one of him jumping as a puppy in slow mo. One playing with a ball

Likes
2
Share
@GrowBro87
Follow
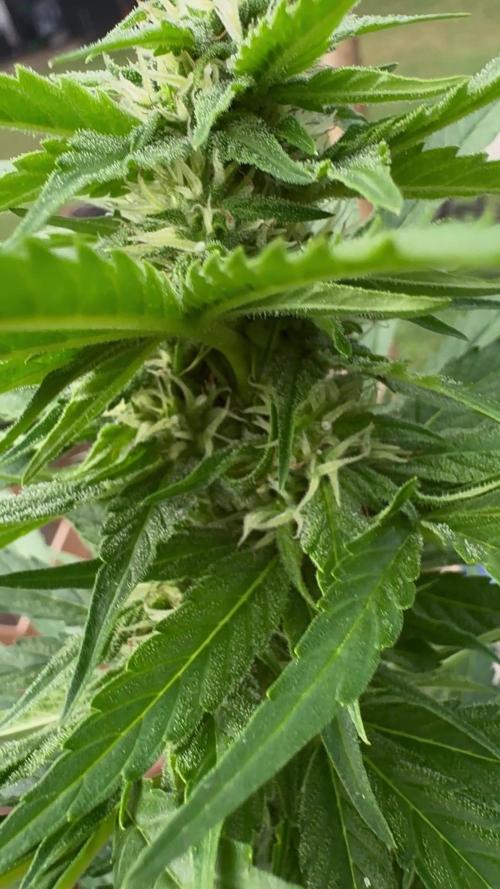
Its my first grow and i think i see some Brown Trichomes. Can you guys help me too say if she is Ready or not? I have no Idea and will Not Harvest too early.