The Grow Awards 2026 🏆 


Likes
Comments
Share
@EaRtH
Follow
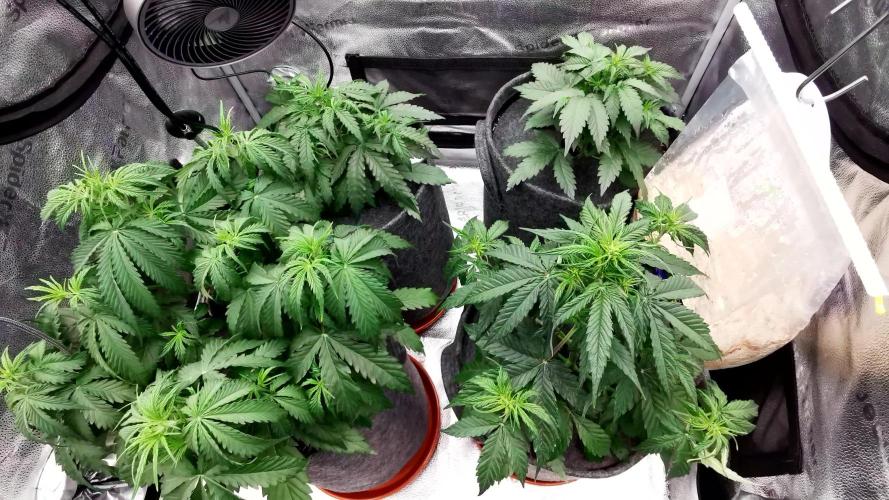
9.2. - I've decided that this is the last week of feeding or maybe last feeding as I'm already considering to flush. Leaves are still yellowing, however the buds are looking fat and frosty. Thankfully, they grow bigger each day with stronger smell. I see more and more amber trichomes. ❄️ Watered 💧
11.2. - Watered 💧
12.2. - Looks like snow blizzard in the tent ❄️ also the smell is getting so strong that my filter is not enough 😁 Buds are swelling and the Gelato plant went totally crazy as you can see...finally, things are going well ❤️
15.2. - Week wrap-up: Today I flushed 4 of 7 plants 🚽 This was very successful week as I got rid of the deficiencies and buds gained a lot of weight and sugar 🍭 Also the Gelato plant is thriving and I'm very excited to see the final results. Next week I'll harvest the flushed plants ✂️
9.2. - 15.2.2024

Likes
8
Share
@frogDUDE
Follow
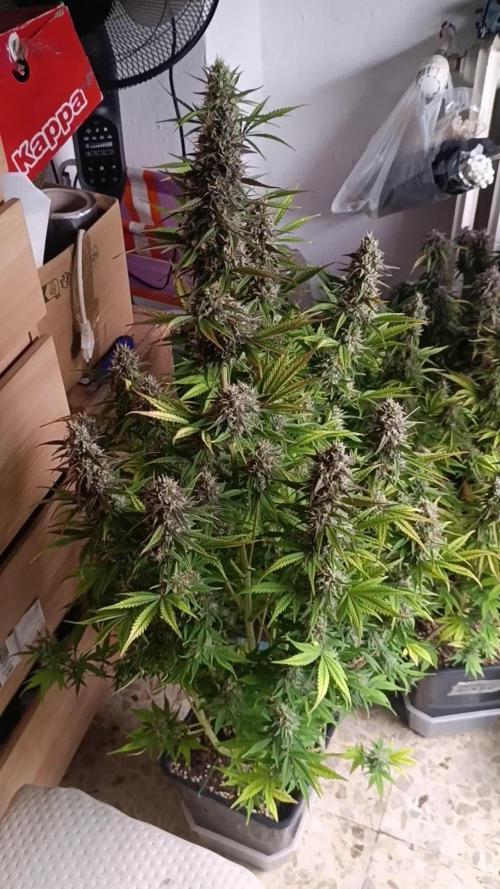
Really looking forward to harvesting this girl. Trichomes and Terps are showing up nicely - very fruity - not detecting pineapple yet but really nice. On the grow - I can definitely see how it is not a nitrogen hog - actually would change the nutrients next time around as she’s darker than I would prefer at this stage so I’ve scaled back the nitrogen.
Anyway - What started off as a really small, runt of a plant has blossomed into this magnificent 2 foot tall solid bud - not really bothered that I didn’t get time to top + LST

Likes
119
Share
@Tropicannibis_Todd
Follow
💩Holy Crap Growmies We Are Back💩
Well growmies we are at 56 days in and everything is going as good as can be 👌
👉 So even with some major issues in the early stages , shes bounced back as good as expected 👍Or better 👈
Lights being readjusted and chart updated .........👍Even with early major issues due to the soil/medium she's come a long way 👈
👉I used NutriNPK for nutrients for my grows and welcome anyone to give them a try .👈
👉 www.nutrinpk.com 👈
NutriNPK Cal MAG 14-0-14
NutriNPK Grow 28-14-14
NutriNPK Bloom 8-20-30
NutriNPK Bloom Booster 0-52-34
I GOT MULTIPLE DIARIES ON THE GO 😱 please check them out 😎
👉THANKS FOR TAKING THE TIME TO GO OVER MY DIARIES 👈
Likes
6
Share
@Shellshocked
Follow
Just noticed as I was putting the gsc away that its got 3 branches coming out at every node ive heard of it but never had it so I'm looking forward to seeing her flower as I assume she will have more/bigger flowers will show in the video next week


Likes
7
Share

Likes
9
Share
@Green4H
Follow
Hello growers, I haven't shown you my plants for three weeks, I'm ashamed, I don't know what they are like, I let one dry and it weighs 5.68g, which is ridiculous... The second is still blooming and I have the impression that nothing will happen to it. .
Likes
59
Share
@Ganjagrandaddy
Follow
Day 55 since planting out: Having messed my weeks up a little and now sorting them correctly, these ladies are on par with how I expect photoperiods to be developing so I feel in my comfort zone again. The Los has been an amazing medium for this strain it seems and she is huge. At present she is the biggest girl in the room and her 2 sisters look set to follow suit when given some more space next week. They look like they could go till mid january before their harvest which is a bonus as they will get 3 weeks under their own lights with a nice spread out to hit all those bud sites with full par for their finish. #2 Has the potential for hugeness too but being cramped in at present is keeping her growing. #3 is plodding along waiting for her neighbours to move out so she can steal their sun lounger spot the minute they leave for harvest.
They are all starting to smell nice and sweet at the slightest disturbing of their buds and I cannot wait to sample this much respected strain for myself.
Likes
8
Share
@Chubbs
Follow
420 Fastbuds Week 2 Veg
FBT2301
The two of these are starting off great. The few rust spots stopped and stayed on the couple leafs it showed up on. I feed 500ml of solution every other day. I did start the General Hydroponics 3 part Flora series as well as the Calimagic. On week one I started 1/4tsp per gal ratio every other feed, so far no burn so will probably bump it up this coming week and see how they respond. All in all Happy Growing.


Likes
9
Share
@Gisbert
Follow
Sie entwickelt sich toll noch 4-5 Wochen bis zur Ernte, Laut Züchter. Das Wetter ist mittlerweile unglaublich gut, Wenn ich in Urlaub fahre muss ich sehen wie ich den 12h Lichtrythmus aufrecht erhalte. Zur Bewässerung habe ich mit Blumat bestellt. Mitte der Woche sind die Trichome zwar schon schön entwickelt, aber von Bernstein sehe ich noch nichts...

Likes
2
Share
@High_Grade_Dadli
Follow
Girls are doing well they are due a cut which will be sometime soon.. G4 is massive the main colar is eye level to me and about 5 nodes down from that are over my

Likes
6
Share
@HowtoBubatz
Follow
The Bruce Banner girls had a strong week! 💪
#1 is still the biggest plant in the tent and looks super happy. She handled the LST perfectly and keeps stretching nicely 🔥.
#2 is catching up and growing more balanced now.
#3 has finally found her rhythm and started growing normally 🙌.
Both #2 and #3 are now showing their first pistils, so they’ve officially entered the flowering stage 🌸.
This week all three received a watering with Green House Bio Enhancer, and aside from that, just RO water + CalMag (Advanced Nutrients) 💧.
No issues or signs of deficiency, leaves are lush green and healthy across the board 🌿.
They’re growing in the 90×90 tent with the AC Infinity AI setup and Spider Farmer SE5000, keeping everything dialed in: 25–26 °C, 60 % RH, and around 500–600 µmol/m²/s PPFD 🌡️.
Overall, #1 remains the queen of the tent 👑, while #2 and #3 are catching up as they ease into early flower. Excited to see them start stacking buds soon! ✨
Likes
36
Share
@nonick123
Follow
Día 44 (15/07) Wow! No hay shock de trasplante! 😍💥😁
Todas las ramas se han estirado hacia arriba tras el ajuste de LST y se están formando nuevos nodos rápidamente
Esta combinación de nutrientes de Lurpe + substrato de PRO-MIX HP es una maravilla 😍
Día 45 (16/07) Ayer tuvimos ola de calor (37 ºC) y han aguantado muy bien!
A última hora de la tarde (cuando ya no había sol directo) les apliqué H2O en spray foliarmente para refrescar los estomas
Hoy parece que vuelven las temperaturas estándar para esta época del año: 29 - 30 ºC en las horas centrales del día
Riego con 1 litro de H20 pH 6,5
Día 46 (17/07) Pequeños ajustes de LST
Hay algunas ramas inferiores que no se han formado / estirado mucho
Lo más probable es que haga una buena limpieza este domingo, 7 días después del trasplante, para dejar solo los brotes por encima del 4º nudo
Día 47 (18/07) Riego con 0,5 litro de H20 pH 6,5
Este domingo (día 50) haré limpieza de partes bajas y tal vez también de nuevo topping en las 4-6 ramas principales 😁
Día 48 (19/07) Día de muchísimo calor con 37 ºC. A ver como lo llevan!
Riego con 0,5 litro de H20 pH 6,5
Día 49 (20/07) Para ayudarles a llevar mejor el calor de las horas centrales del día, coloca una malla de sombreo (70%) sobre el invernadero
Lo cierto es que se nota que baja mucho la temperatura debajo de la malla! Van a estar más fresquitas! 😍
Riego con 0,5 litro de H20 pH 6,5
Día 50 (21/07) Training session!
Hago limpieza del tercio inferior de la planta, de todas las ramas y nudos que no superan la línea del dosel marcada por el 4º nudo (1er topping)
También hago topping (2º) a todas las ramas principales
La idea es tener 12 ó 14 colas principales para que no se hagan muy altas
De paso saco unos cuantos clones de las ramas inferiores eliminadas 😁💥
Para superar el estrés, hago las siguientes aplicaciones y riego:
- Riego con 1 Litro de Té Vegetativo de Lurpe Solutions. Preparación: 24 horas con bomba de aire (oxigenación) con ingredientes:
Green Sunrise 8 ml/L + Insect Frass 16 ml/L + Hummus Lombriz 8 ml/L + Melaza 1 ml/L + Kelp Hidrolizado 0,25 g/L
- Aplicación foliar Kelp hidrolizado de Lurpe Solutions a 0,25 ml/l
💦Nutrients by Lurpe Solutions - www.lurpenaturalsolutions.com
🌱Substrate PRO-MIX HP BACILLUS + MYCORRHIZAE - www.pthorticulture.com/en/products/pro-mix-hp-biostimulant-plus-mycorrhizae

Likes
10
Share
@Shivashamboom1
Follow
Eccoci arrivati all'ottava sett. Ora gli faccio 2 settimane di flush alle radici e Via 💪👍🙏


Likes
5
Share
@zspl0it
Follow
Still trying to maintain the optimal VPD. Unfortunately the summer starts to hit hard and I had to have some AC running. Haven't nailed the numbers and it will be worse in the following weeks.
Likes
9
Share
@AustinRon
Follow
20 Weeks Total
12 Flower Weeks
Harvest
HARVEST - 12 Weeks, 4 Days - 2022-11-21T20:00:00-0600
Today (chop) is the 14th day since moving to 18/6. The Foxtailing of the top flowers indicates 1) light stress, 2) Reveg . . .?
Even with 18/6 and TWO full weeks beyond week 10, I’d have waited another 7-10 days to ripen the Trichomes to my liking (>1/3 w/ vanishing abscission). As is - I know we’ve more mass - they’re both trichome laden - the smoke test will tell.
Phenos
#7 “Broader Leaved” demonstrated moderate inter-nodal spacing, stacking buds put to the terminal flower(s). Flowers started as tiny ‘sunbursts’ of pistols in the common form for broad leaved plants in general. She branched significantly more than I expected - the buds along each mainline cola are on a small stem that’s 1/2” - 3” long, with a 1.5” to 2” bud attached. The buds spiral up the cola, starting (with varying internal spaces)
Ambassador Cartwright
Ambassador Cartwright by IRIE Genetics
Transition to Flower
Afterglow X Arise
(Clementine X Arise) X Arise -> Afterglow BX1?
((Tangie X Lemon Skunk) X Arise) X Arise
______________________________________
Start of Week: Saturday 19 November
AC3Q
120:F:13:1
to Friday
25 November
AC3Q
126:F:13:7
Summary:
Plant HeightBeginningOfWeek: [ 33, in]
Plant HeightEndOfWeek: [ 33 in]
Temp: 74.8
RH: 70.7
VPD: 0.88 kPa # need to get into the 0.9 -> 1.1 Early Flower
LightSchedule: 18/6
amt: [ 1750, ml] #
period: [ 9, hrs]
frequency: [2, day]
times: { first: 2100, second: 0300 } # Auto Only!!! Otherwise 1.3 @ 2100
Environment:
EC Targets: #
rel.
|
abs (rel + source)
ECripen:
[ 0.3, 0.6]
[ 0.6, 0.9]
ECflush:
[ 0.0, 0.2]
Fertigation Daily:
- Times; {2100h, 0600h}
- {pid: 4, amt: 1250 ml, ec: 0.6, pHRange: [ 5.5, 6.5], times: [2030h, 0500h]}
- {pid: 7, amt: 1250 ml, ec: 0.6, pHRange: [ 5.5, 6.5], times: [2030h, 0500h]}
Fertigation: #
Mammoth-P: [ 1.5, ml]
BioAgFullPower: [ 10, ml]
(The Rooted Leaf) Resin Bloom [ 3, ml]; # Potassium & Plant Extracts
_____
Saturday 19 November 2022
AC3Q 120:F:13:1
- [x] AM - EC 0.6
- [x] PM - EC 0.6, 1000 ml (local: sun am)
Sunday 20 November 2022
AC3Q 121:F:13:2
- [ ] PM - EC 0.6
- [x] AM - EC 0.6
Monday 21 November 2022
AC3Q 122:F:13:3 | HARVEST CHOP 87 Flower Days
Tuesday 22 November 2022
AC3Q 123:F:13:4
88 Days in Flower
Wednesday 23 November 2022
AC3Q 124:F:13:5
Thursday 24 November 2022 - Happy Thanksgiving!!!
AC3Q 125:F:13:6
Friday 25 November 2022
AC3Q 126:F:13:7

Likes
8
Share
@Damballa
Follow
Esta semana realizo el corte, la planza empieza a amarillear al llegar el final de la floración. Los tricomas son de color ambar y trasparente.
Likes
20
Share
@GanjagrowingGal
Follow
Get my scope tomorrow to find out finally what is going on with the trichomes!


