The Grow Awards 2026 🏆 


Likes
Comments
Share
@Lastix
Follow
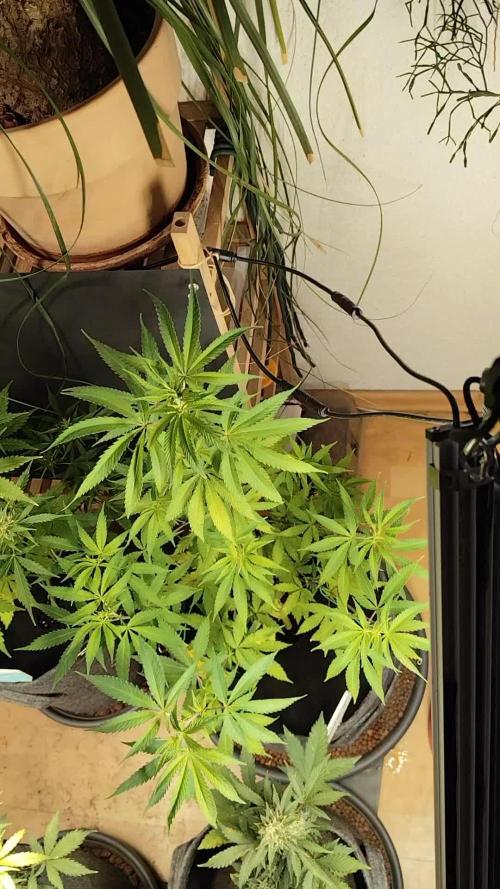
You begin to see the formation of buds in all their beauty.
Performed massive defoliation at the beginning of the week and at the end of the week as if it had never been done, the foliage regeneration is absurd.


Processing
Likes
8
Share
@eldruida_lamota
Follow
Pfff, explicaros que estas green ak xL son una variedad bastante difícil de cultivar, los cambios ambientales le sientan fatal, y hay que tener cuidado con la alimentación ya que se Sobrefertiliza fácilmente así que ojo, eso por un lado.
Por otro si eres un cultivador con varios años de experiencia y todo te sale bien, es probarla, porque el sabor de esta cepa compensa la dificultad de su cultivo.
Thc hasta 18% , sativa predominante.
Genéticas: Afghan x Colombian x Mexican x Thai Landrades.

Likes
17
Share
@ChopperMcOG
Follow
Buds r maturing nicely and loads of colas on her. Tips of leaves r showing nutrient burn so I halved the nutes and will see how it goes. Think that terpinator sent it over the edge with all the other biobizz nutes too. It better make the buds stink!!
Another couple weeks n she might be ready!

Likes
30
Share
@CanadianFillmore
Follow
Another week in the books, one maybe 2 more to go, if the weather holds and humidity doesn't go crazy. Since grow diaries doesn't support more than 32 weeks, it's a bit of a pain to track the rest of this grow. Still I will post updates.


Likes
5
Share
@OttomanEmpire
Follow
18 June 2025
Hot weather arrived 🌡️ . 25-30 deg day time.
I only able water once a week, not Ideal. Still this girls looks pretty healthy.
Most aphids went away, seen just few here and there, give another pesticides spray today, that should kill rest of them.
Feed the girls with compost tea + liquid sea weed + alga grow and sprinkle gypsum powder top dress.

Likes
12
Share
@eldruida_lamota
Follow
Buenas noches familia, sorpresa, jueves noche por aquí , actualizamos las power plant xL.
Es la última semana antes de nuestra cosecha, el tiempo se nos echó encima y las Flores ya están echas, se preparó un lavado de raíces y tijeretazo,para sucesivamente colgarlas.( PRIMERA VEZ que se me echa el tiempo encima con la floración, jurao)
Me habría gustado darles algo de estrés hídrico, pero lo veremos con las lemon kush y las northern light xL.
-power plant xL es una cepa con predominancia sativa, con una corta floración,es un ejemplar fácil de cultivar, fuerte, y vigoroso.
Estos ejemplares se cultivaron en 7L en sustrato light MIX de plagrOn, controlando en todo momento el PH de nuestras plantas, y dándoles de comer una gama advanced nutrients bastante básica.
-PROS: facil cultivar, flores llenas de resina , flores compactas, ramas laterales largas.
-CONTRAS: hay que tutorar por el peso de la flor, floración demasiado rápida a mi gusto (no te das ni cuenta).
*Aquí ya me despido hasta la cosecha familia.
Likes
6
Share
@GuerillaGorilla
Follow
17 sept
Maroc was chopped this week.
The girl suffered from the endles rain we had last 10 days, enevitably she got mould.
Not fully ripe, another week would have been best. Still some nice trichs and i will probably end up making hashish from this one.
As do all off the female seed strains this year. The combination of early flower and the september rain this year took its toll.
Biggest buds were harvested on wednesday and rest of plant saturday.
Drying now in less than ideal conditions. Fingers crossed.
Hoping for better weather for the weeks to come. Lemon kush and the others really needs some more sunshine to finish

Likes
17
Share
@HowtoBubatz
Follow
We’ve now reached the third week of flowering, and I’m thrilled with how well my plant is doing!
I adjusted the nutrients recently, and it’s definitely made a difference. The plant seems to be thriving, and the leaves are showing a vibrant green, indicating that it’s getting exactly what it needs.
Even more exciting, the trichomes are starting to form all over the buds, and there’s no shortage of them!
It’s amazing to see so many trichomes developing this early on, giving the plant a frosty look already.
The overall growth is still going strong, and the buds are getting fuller.
I’m really happy with the progress so far and can’t wait to see how things continue in the coming weeks.
I hope this nutrient adjustment keeps everything on track for a great harvest!💚🌱
Likes
10
Share
@CanadianFillmore
Follow
Start of week 5! Plants are doing great! Still some P & K deficiencies showing, but overall the bud development is phenomenal on the blueberries and is coming along nicely on the super lemon haze. I am still feeding an extra 2 liters to the Slh, this time at full dosage of part A & B, this seems to have helped with this past week (4). The blueberry are super sticky and smell amazing!
Likes
16
Share
@Mopish
Follow
24 Jan - 30 Jan
Started Flushing on Sunday night (23 Jan)
----
25 Jan
A lot of leaves are starting to die, from all of the plants, maybe due to nutrients maybe due to climate, or maybe is just the strain on the end of its life.
Either way, I'm planning to harvest next week.
Likes
60
Share
@julian100614
Follow
Comenzamos su 3° Semana de vegetación donde hemos realizado su primer transplante a una maceta de 7L para después terminar en una de 15L 💪
Tambien hemos empezado a darle la comida correspondiente de vegetación y hemos reducido el enrraizador para ir cambiando su comida 😃
Las raices se ven realmente sanas y fuertes 💪

Likes
9
Share
@Vet4weed
Follow
Plants are doing nicely on their own. I have learned to be more hands-off and let them take their own pace. I check soil dryness every few days and add water/nutrients when dry past my first knuckle. Sticking with the same nutrient mix as it seems to be doing the trick. If you watch the timelapse, you'll see a moment of panic when the reflector fell over onto Cheecha. But, in the long run, what doesn't kill them seems to be making them stronger. Cheecha is now almost the same height as her sister Chonga. We're in Fall now, so the room is getting a little cooler, but above 70 degrees F. Humidity is also starting to drop a bit too.

Likes
1
Share
@Vincentmad
Follow
End of week 3, last week we removed bottom node and this week removed last node from bottom tpp, heavy lollipoping for pre veg for 2/3 weeks then flip to 12/12
Likes
12
Share
@Archieballs
Follow
The nutrient measurements are for week 7 this week they just got PH water at 2 liters. She’s a beautiful plant!!! Her colors are amazing!!! The inner part of the flower is like a deep blackberry color and the inner parts of the sugar leaves are as well. Amazing plant!!! I have 2 more beans of her and want to do one in a 5 gallon and see how she does just don’t have the space at the minute. She will get one more feeding in 3 days time and then on to her flush.
Likes
2
Share
@Clemo
Follow
First in water, then transfered to a paper towel.
2-3 Days in only two opened up , I dropped all into the soil - eventually the last one also germinated.
Eventually, 2 weeks in, they were still not growing much.

Likes
170
Share
@Tropicannibis_Todd
Follow
👉Alrighty Then👈
84 days in flipped at 28 days
we are just now over 8 weeks or flowering so most all strains are between 8 and 9 weeks so ......
👉We are now at the final week so too speak 👈 there a few that are top heavy and smoothered in resin 👌 had to do some tie ups and downs .....
We in full flush mode , water Only 😳
Persian Pie from Greenhouseseeds
Full Gas from Greenhouseseeds
Babba Kush from Greenhouseseeds
Rainbow Melon from Fastbuds
Papaya Sherbet from Fastbuds
Weddingcheesecake FF From Fastbuds
Purple Oreoz F1 From Seedsman
Slurricane From Premium Cultivars
Soil by Promix
Nutrients by Cronks
Well this should be fun 🙃
Thanks to all my growmies out there for stopping by its much appreciated 👈
👉Happy Growing👈


Likes
7
Share
@Growbody
Follow
Herzlich Willkommen zu meinem Growbericht der Membrana Hyper Autofem von VIP Seeds.
Die URL für den Strain findet Ihr hier:
https://www.vip-seeds.com/membrana
Für den Grow verwende ich den großen 15 Liter WideVersion Stofftopf von ROOTIES. Bei meinem ersten Grow mit den ROOTIES kam nur die 9 Liter Version zum Einsatz, da haben die sich gut bewährt.
Auch die Smart Start Plugs von Zamnesia werden wieder verwendet, dieses Mal ohne den Samen vorher einzuweichen.
Und die Erde und der Dünger von BioBizz findet wieder Verwendung.
Tag 67: Die Membrane Hyper Autofem von VIP-Seeds wächst immer noch sehr filigran weiter. Die Blätter sind Hellgrün.
Schön, dass du dir mein Tagebuch angesehen hast. Bis bald. ✋😎

Likes
21
Share
@Insaniac_0
Follow
3/11 to 3/17 Veg Days 22 to 28
Week 3
Transferred to Auto pot base and continue to top feed for another week before setting up and turning it on. Began node strength training by simply pressing down on the branches to encourage water way repairs into the branches since these are the main arms of my mainlines. They more than doubled in size in just 4 days.
Feed this week was 3 cups of 6.3ph RO water once using 100ppm of Veg Mix (recipe Week 2) However, I also added 1ml/gal of CaliMagic (General Hydroponics 1-0-0). Then about 4 days later when I transferred to the auto pot, I added .5gal of plain RO water to top feed over the new soil.
Feed plan next week will be to start using the reservoir and autopot base feed by the end of the week. I expect to use another .5 top feed prior to that tho.
Likes
13
Share
@CanabisLoverHobbyGrower
Follow
Defoliated,.. tips of the big plant going purple and into the leaves, defo going to be a colourful one, little one staying green I think,.. look OK, maybe a little something going on with a little discolouration in some leaves but I think they look healthy,.. start of week 7 let'sss goooo 🤞👌👍