The Grow Awards 2026 🏆 


Likes
Comments
Share
@momothehobo
Follow
Day 76 - Watered her w/8L 6.6PH RO, 3tsp bloom, 1tsp boost, .25tsp bloom booster
Day 77,78,79 - Just sat and admired her
Day 80 - Watered her w/8L 6.6PH RO, 3tsp bloom, 1tsp boost,.25tsp bloom booster
Day 81 - Just sat and admired her
Day 82 - Flushed with 6 gallons of 6.3PH RO
Other Thoughts:
I've got 3 very different-looking girls even though they're all the same strain, stayed in the same tent, and were fed from the same bucket... weird! Super disappointed with the outcome of gamma, gonna use her for bubble hash and BHO (●'◡'●) - The last flush was the final flush, I'm chopping 'em down the second I can tell they're dry. Left the lights on 24x7 to help achieve that goal sooner.

Processing
Likes
19
Share
@NeedOner
Follow
Good vibes.
In this week i tray to make a clon. I hope it goes well.
This is last veg week.
In this seventh I saw considerable improvements I am very enthusiastic and hopeful

Likes
4
Share
@JeyGanesha
Follow
Questa matanuska alla fine è arrivata nel suo posto definitivo
.ha passato qualche stress ma alla fine sé ripresa......adesso ho un altra pianta che non ricordo se era una big Bud o un altra matanuska...in tutti i modi sono sicuro che è un seme di korngarden seeds.
Processing
Likes
7
Share
@Kindbudz
Follow
Took 6 clones from the moonwalker kush this week towards the end of the week. Trying out my hand at Aeroponic cloning. I’m currently using the Viagrow cloner but have been shipped a EZ-Cloner and will run both of them side by side for comparison.

Likes
12
Share
@m0use
Follow
Plant did ok, not the best result and far below my expectations for it. I found that growing them in pots with other plant is a no go from now on for autos. they just don't grow all that well when their root space is being shared, all my autos from a few breeders did poorly when I grew them like this. however the ones I kept in their own pot did much better, the Ganja farmer brand is good, just wish they had some CBD/CBG strains in their catalogue. This will all be for friends and family.
@GanjaFarmerSeeds, If you like the images or videos I can send you raw files that have not been shrunk and contain no watermarks, if you feel I am in the top 3 of your BDOTY Contest that is :D

Likes
422
Share
@Crashoverite
Follow
Hi everyone 😁
Welcome back in another week update!
Thank you all for this amazing support on this bananas journey💚💚💚
Uploading and updating each week content on daily bassis so please revisit this diary if week not over yet.
So far all going great. Girls looking very healthy and happy. Due to my short trip had to leave my 🍌💜👊 girls unsupervised for 3 days. Was stunned when opened my cabinet on the Dec 5th. Athena stretched like crazy. Good 3 inches. She better slow down as not much roof space left for her. May tie some taller branches to netting if necessary. Introducing blooming nutes for the first time this week on December 6th at smaller dosage and on the second watering as listed.
Week 8
Dec 4 - Dec 10
Dec 5
Leaves tucking
Dec 6
Heavier selective defoliation on both girls. Athena fully lolipopped and Xena at 75%. Watered with 8 ltr beetwen both with perfect runoofs PH 6.4. Girls were very thirsty 🤤
Dec 7-8
Just enjoying how my girls developing. Frost has landed and they are start showing colours. All is looking great.
Dec 9
Second watering for this week 7 ltr beetwen both. Runoffs PH 6.4
Even with so much difrence in size of my 🍌💜👊 girls it seems that they are drinking my juice almost equally.
Dec 10
Applied selective defoliation and tied 3 tallest branches of Athena to netting to avoid any potential burns on these beautiful baby colas.
It's the end of the week!
Thank you all again for such a great support, all the likes, dm's, comments and follows 💚💜💚💜
Stay tuned for coming week update 😁✌️💚


Likes
8
Share
@mikearon
Follow
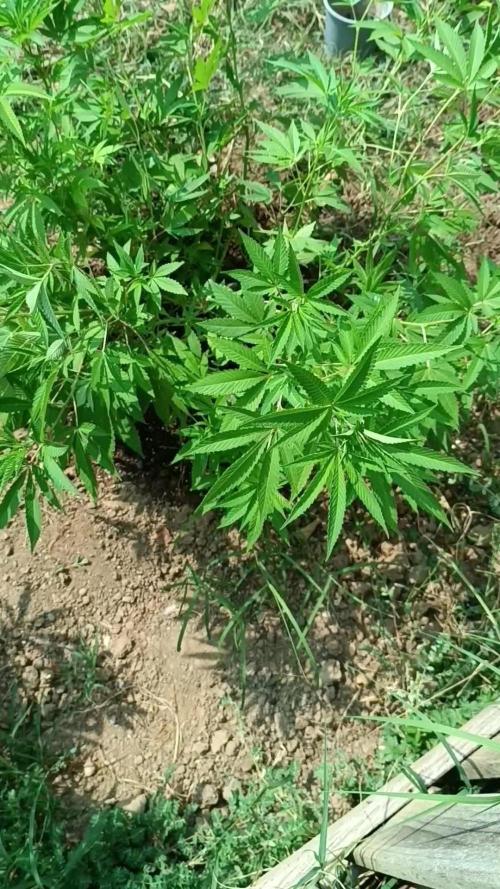
May 31st - Day 104 : I had to take two babies out because of the lack of space in the tent. Didn’t realize they would grow that much.. So I planted them outside and will let them do their thing as I didn’t have the heart to kill them. But besides that, thriving.


Likes
218
Share
@ClubRiot
Follow
Start week 10 , Bio Bloom 4 ml/L + Sensi Cal-Mag Xtra 2 ml/L + CarboLoad 2 ml/L + Top Max 4 ml/L + Overdrive 2 ml/L (Ph 6.7).

Likes
33
Share
@Roberts
Follow
Cali Crasher is doing alright. Solution is a little strong but she should grow into it fast. Things are looking good under the Hortibloom Solux 350. Thank you Hortibloom, and Doctor's Choice. 🤜🏻🤛🏻🌱🌱🌱
Thank you grow diaries community for the 👇likes👇, follows, comments, and subscriptions on my YouTube channel👇. ❄️🌱🍻
Happy Growing 🌱🌱🌱
https://youtube.com/channel/UCAhN7yRzWLpcaRHhMIQ7X4g

Likes
4
Share
@Sternharvest
Follow
they are very sticky smelly and all that good stuff. I did a bit more trimming of the fan leafs so all the flowers that are growing can get maxim light coverage. I also used the microscope a bit and i noticed that the tricomes are mostly transparent. The smell is just amazing, very lemony i would say. I would say this is the last week of feeding before doing some flushing. Will have to see if i can flush 1 or two weeks.
09-01-2023 - I fed PH corrected RO water without nutrients.


Likes
2
Share
@Abreuvoir
Follow
16 august 2022
Given the way the plant is growing, I am a bit overwhelmed.
It has two definite layers.
Top layer has like 9 main nodes.
Bottom layer has many many smaller nodes. But they are evenly distributed and have all the same height.
From the base of the plant to the 2nd layer, I have removed all of the leaves.
But I really have no idea if I should removed all of the second layer in order to really keep only the ~9 biggest nodes.
Oh, let's wait, I guess.

Likes
14
Share


Likes
4
Share
@DaddyPrime2
Follow
11/26/24
11/27/24 this plant is blowing all expectations. this was the least promising looking pheno. these buds are so fucking dense. the trichomes are visibily standing ontop of the buds. the plant is 75% bud with 15% stem and 10% leaf. she is visibly fattening daily. i cant get over how hard these buds are though. the nodes are all growing into eachother and turning into long fat colas. absolutely beautiful genetics and im excited to see what the other phenos
Likes
13
Share
@StickyThumbz94
Follow
Unfortunately I had to harvest early due to personal reasons. I am proud of my harvest though. The buds could have gone another week but that’s fine. The trichomes were to my liking. They’ve been drying for about 5 days now. All in all it was a pretty easy grow, just water every couple days and top dress every 3 to 4 weeks. I did make some very potent canabutter from the trim 😋

Likes
50
Share
@AsNoriu
Follow
Day 43. Light is on max output, heat enormous and they RUN !!!! thought intensity will stop them a bit , but i think i do only worse ... We have +30 heatwave in UK, i live in attic , so for 4 more days everything will be out of control.
Watered today. 6.3 phed water.
I love simple and affordable Mars Hydro products, if you can cope with heat TSL2000 can do magic in your tent !
Will update after heat wave us over. Should be in 4 days back to +20 ;)))
Day 45. They GROW !!!! Distance is insanly small, but i have 30 cm of space left, wont move light for a week, then i will try to have 20 cm at least again.
Planing last top up, need two more waterings before it, so it should be on last day of this or first of next week.
Thinking to take down all LST at that time, need pots to breath better, too thin fabric, they dont keep form.
Day 47. Drink every two days !!! 4 liters goes to nothing !!! Huge, still streching, tops almost rubbing TS2000, heat 30 inside, humidity 65-68 ..... will need heavy clearing again !!! Bomb getting stacked !!!
Happy Growing !!!!

Processing
Likes
3
Share
@Barcelona_Farmers710
Follow
Booommm! Llegó la hora tan esperada Farmers nuestras flores llenas de resina acabandose de formar, la verdad que estas genéticas ayudan mucho al desarollo del cultivo espero que os guste!! Un banco seguro y confiable para una locura de olores y terpenos!!💚

