The Grow Awards 2026 🏆 


Likes
Comments
Share
@Budhunter
Follow
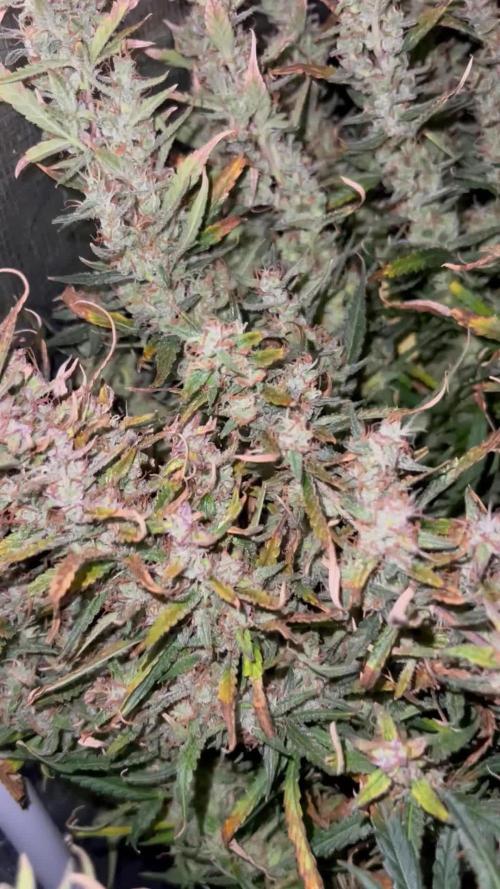
As I did the flushing in day 70 I was watching the trichomes and on day 87 I could see 25-35% amber so I decided to cut it. I cut the whole plant on the base and hang the whole plant to dry. For this reason I will update my findings later when it gets dry and trimmed about yield and numbers. So far really happy with the results. It will probably be the champs of this run yielding nicely 👍🏼.

Likes
20
Share
@Bread_n_Buds
Follow
Here we are again ready to start again, always under the sign of Zamnesia, we make our fantastic plants and we show you what we are capable of. We have 5 autoflowering strains and 5 photoperiodic ones and now we present them to you.
We are faced with a Classic of recent times: Runtz. It certainly does not have the age of Northern Lights but it is a truly magnificent plant and Zamnesia perhaps also has the best version. Truly super I have grown it in all sauces let's see this one. Gelato and Zkittlez are my all-time favorite mums perhaps.
To explain my germination method which is a combination of experiences acquired in the field and readings of the right advisors, I have chosen to divide it into phases so whoever wants can follow them and understand better step by step.
- Preparatory Phase ---- Check the average temperature in the room, humidity status to understand if it is the case to start or wait, I decided for the end of August because the temperatures start to drop towards the 22-25 degrees recommended for germination.
Then another thing more or less credible depending on the sensitivity is the control of the lunar phases. I believe in it a lot, it is a method that ancient farmers used to understand when it was best to plant depending on the attraction of the moon. To make my life easier I use a simple app that advises you on the right time to plant, harvest and put in the jar (depending on the lunar phases).
- Phase 1 --- Soaking in water. There are many authoritative friends who advise against this method due to the risk of drowning, but I have always been fine and I follow the rule if it opens in water the seed is almost certainly healthy and will come out of the ground 90% normally.
- Phase 2 --- Opening the seed in water. As soon as the seed opens and the root comes out a little, you have to be very very careful not to leave the seed in the water open for too long. This is why there is a risk of drowning. So as soon as the root comes out, it must be planted. Do not wait for it to stretch out a lot, you can wait a little longer in the absorbent paper, but not in water.
- Phase 3 --- In the meantime, while I soaked the seeds, I prepared my pots: I use small biodegradable pots (choose the ones with holes underneath for drainage). A few hours before working with the opened seeds, I moistened the soil with water adjusted to the right pH (5.8 - 6.2) and Plagron Power Roots. The small root is now open and we can make a little hole with a toothpick, widen it and insert the seed. Not too deep with the root facing downwards. From Serious Seeds we learned the dome technique: if you put a small dome of soil on the seed the water will settle on the sides avoiding overwatering problems.
- Phase 4 --- The plant emerges from the soil. So far I have not put the light, now I turn it on at minimum after half a day of soil to give direction to the seedlings. The first week the light will be gradually brought from 40% to 60% to go to 70% - 75% in the remaining weeks of veg. During the first week maximum, I keep the cycle of 24 hours to avoid stretching. Be careful not to exceed the first week at least with photoperiodic plants.
- Germination % --- In water 20/20 seeds have opened for good luck I'm waiting to talk when they come out of the ground but it seems that we are going towards an excellent percentage of germination..."Not too bad"...
- Soil and Food --- The soil used is entirely organic in every part and is the Plagron Promix that will be used with the 100% organic pack provided by Zamnesia complete with all the main fertilizers for your plant buy it at the link --
https://www.zamnesia.io/it/11457-plagron-easy-pack-natural.html
// Strain Description // Guys, we have really reached a turning point! Our breeders have recreated one of the most sought-after strains by Californians: the very powerful and exquisitely delicious Runtz. This cross between Gelato and Zkittlez is everything you could want from a cannabis strain: tasty, powerful, balanced, productive and fast flowering. Buy the seeds and try it yourself!
- Get a seed of this fantastic strain --- https://www.zamnesia.io/it/6000-zamnesia-seeds-runtz-femminizzato.html
- Soil and Fertilizers entirely organic --- https://plagron.com/en
- Growbox --- https://www.secretjardin.com/
- Music and sound --- I made my girls listen to 432hz frequencies and music from www.radionula.com
- Z --- You can find these seeds, much more from the world of cannabis, mushrooms and an incredible series of accessories and gadgets on the reference site not only mine but of many growers ---- https://www.zamnesia.io


Likes
12
Share
@mowsgrows
Follow
Endspurt
...
Habe soeben einige große Teile entfernt, da diese mit Budrott versehen waren. Im Nachhinein war es wahrscheinlich eine schlechte Idee, den Bananen Zwitter zu behalten ^^
ich habe den Mädels für die letzten Wochen ein 80x80 Zelt gegönnt, um noch etwas rauszuholen.
Letzte Woche gabs Wasser mit Alfa Boost, ab jetzt gibt's nur noch PH reguliertes Wasser.
In 1 - 1,5 Wochen wird geerntet
Likes
21
Share
@Pietcandwcbucket
Follow
Going very well with this girl.. All going as planned.. Healthy as they can be

Likes
24
Share
@Greensoul920
Follow
Week 4! Today transplanted the lady’s in a 5 liter pot. The soil that I’m using is made of
Light mix bio bizz
Warm casting
70/30% of 444 and 284 - 1Tbsp per gallon
Rock dust blend -1Tbsp per gallon
Oyster shell - 1 Tbsp per gallon
A hands full of lupins
I sprinkle some myco on the root ball and water them with a simple compost the made of worm casting and molasses brew for 24 hours. I raise the power of the light of 20%


Likes
41
Share
@hinterhofgrower
Follow
🌱: Opend up the canopy a little and a light defoliation on day 43
💧 : 2l, 6l SIP, switch to flowering nutrients, reduced the Supermix because of crawling and dark green leaves on Day 44
💡 : Dli: 45 mol/m²/d
🤔: A week to late with the switch to flowering nutrients?
Likes
2
Share
@Glizzy420
Follow
Last auto i'll grow , autos are actualy good for fast and not so heavy stoners , my yield is good but not the way i want it , so i'll keep improving my shit , starting with femenised seeds next run also a blueberry , first femenised im going to use , so lets hope it will have a better harvest. Overall this autoflower blueberry yielded the most of all my autoflowers , dense buds , good quality and very fruity smoke!
Likes
38
Share
@Danger90946
Follow
Day 106 12/25/2021 being of a new week and this will be more than likely the last week this lady gets any nutrients thinking Wednesday. After that will start flush with collected rain water. After checking trichomes they were about 85% cloudy about 10% clear and 5% amber which is right where she should be since the end is coming fast.
Day 110 12/29/2021- Started flush today and will continue to just feed rain water until next Wednesday. Will cut her down next Friday 01/07/2022.

Likes
11
Share
@Skunkiest_bender39
Follow
Shame on me… habe den taupunkt am morgen deutlich unterschätzt. Täglich steigt die LF phasenweise bis auf 95%. Solar ist praktisch, Zelt darf aber nicht draußen stehen!
Der grow hat sehr viel Spaß gemacht, trotz einiger kleiner Fehler und Unachtsamkeiten meinerseits! Die Damen sind super und werden wieder in den Stock zurückkehren, konnte sie leider nicht voll bis zum Ende bringen ca 2 Wochen zu früh. Nächste mal weniger Pflanzen oder mehr entlauben und mehr umlauft dazu. Komme vom outdoor Growen und habe enorm viel Neues kennengelernt!
Banana’s & painkiller XL sind noch im Spiel ohne jeglichen Schaden oder Betroffene stellen von Schimmel. 🐝
Processing
Likes
1
Share
@lightmixcookies
Follow
Day 1:
- 1ml terra grow, 1ml pure zyme, 0.5ml power roots. 1L solution / 3 Plant
Day 2: no water
Day 3: 1,3L / 3 Plant
Day 4: no water
Day 5: 1,3L / 3 Plant
Day 6: no water
Day 7: no water
Likes
18
Share
@BudMunchies
Follow
11/27: harvest day. Well, i have chopped them all down. I trimmed all the bud and put it in seal bags in the freezer. No drying - fresh frozen. Sometime in the next few days i will turn it all into bubble hash. If i had gotten the buds that i wanted I would have dried and cured much of this. But as this is just a typical looking and smelling lemon strain, it all went in the freezer.
If not for all of their expectations set by FastBuds, i would likely have loved at least one of the plants. The one labeled PL1 was a monster. It produced over 27oz of trimmed wet bud. The hat is more than the other 3 plants combined. With a total of 53 Oz of trimmed wet bud harvested and frozen. The one that i labeled PL4 was insanely frosty when compared to the other 3 phenos. I have clones of bother PL1 and PL4 that i may consider using for breeding projects where i want a strong lemon. The other two plants were mostly forgettable.
Likes
26
Share
@GrowGuy97
Follow
2 of them got cut on day 66 the last one on day 69 but overall I couldn’t be happier with these babies they all put off some amazing buds & didn’t give me much trouble at all! This is by far my favorite auto of this grow & I will be doing another run with them! If you havnt already go get you some seeds from seedsman you won’t be disappointed! Will be back with more pictures, dry weight & smoke report as soon as she is done drying! Thank you to everyone for following & happy growing friends!🙏🏼🙏🏼✌️🏼🌱


Processing
Likes
15
Share
@vibealive
Follow
Not too too much to report... Kind of on Auto Pilot really until the end... The broken top is FINE, and it's looking GREAT man!!
I'm sure we're going to get a solid yield... :)

Likes
47
Share
@S2340420
Follow
Hit a dry spell this week leaves weree white droopy just gave them some water n theve perked back up might need to add a bit of time on at the end time will tel
Processing
Likes
20
Share
@No_Clout
Follow
Still looking smaller than usual but I think it could be down to the genetics I’m not sure, I saw a little brownish/orange burn spot on the tips of Grapey Walter #2, it dosent look like nute burn but not to sure it’s an issue at the moment.
Did the first bit of LST of these girls tonight and hopefully they will respond well and start bushing out letting the dident branches catch up.

Likes
8
Share
@JohnnyBarrel
Follow
Week 16
Everybody is on Flower!
End of August: daylight 13h20: 7h20/20h40.
Day temperature max: 26°C - Night temperature : 17°C
Sunny weather - 2/3 rainy days in 2 weeks
Enriched the soil with seaweed powder and bat guano.
Continue to add flowering nutrients: Grower Master
I added some Calmag one time.
Watering 2L/plant every 3 days (2 days would be better)
With humidity growing and the relatives hot temperatures: the predators are attacking plants. Everything appears so fast: Aphids, caterpillars, leaf miner flies. Did a general defoliation before spray my mixture Garlic + laurel (12cl Garlic juice + 5cl laurel infusion + 1L distilled water: beware PH!!). I sprinkled diatomaceous earth on top of soil to protect and minimize the infestation.
Brake Pad Breath: still deep green and bushy. Flowering since 4 weeks. The most advanced, pretty good flowers with long pistils are growing. Spared until now: the plant is victim of Aphids, miner leaf flies and caterpillars in a « reasonable way »….try to eradicate the problem without shocking the plant at this stage.
Flash Back#2: around 2 weeks flowering, stretched a few centimeters more, well developed plants with lot of blooming sites. Relatively spared by pests, just some aphids.
GMO X Zombie Kush: some difficulties to recover….just engaged the flowering process, not to bad if she resist to the second pest’s wave.
Royal Moby: uncertain destiny….recovering good, sativa style: 155cm, just starting the flowering stage…super late!
Harvested a pretty auto flower: White Russian by Serious Seeds. Well developed plant, a little bit long to be ready but resinous and meaty buds.
Likes
93
Share
@Ferenc
Follow
Hi! First of all, this is my first time in my life. I planted 2 different kind of plants one is autoflowering (Gelato Cookie D'ohpe), Gelato Cookie Doh-ope Auto By Dr Krippling Seeds
Gelato Cookie Doh-ope Auto. Ground breaking genetics have gone into the Triple G range. Grand Heft Auto’s genetics main characteristics is its big composition, and heavy yields. Whilst stabilizing their specially selected Girl Scout Cookies strain with the GHA a number of times, they also crossed this with an amazing Gelato Auto. GGG3’s fruits are ripe with aroma’s and flavor. Yields are approximately 80 gr/plant and the aroma from these flowers are special. The taste from these dense, sticky buds are sure to have you coming back time after time for more of this great tasting flower. The other one is feminized (Purple Punch).
Purple Punch Feminized Seeds By Barney’s Farm.
Purple Punch Feminized Seeds are a 90% indica dominant hybrid. with a combined lineage of Larry OG x Granddaddy Purple this genetic is capable of an indoor yield of up too 700g/m2. Expect aromas of Baked Apple Pie as well as Cherry and caramelised Blueberries. Also expect a short bushy plant with great trichome production and a THC count of 25%. This high yielding, high THC hybrid is an all-round quality genetic with a fast harvest window of 50 to 60 days. Yet another great addition to Barney’s Farms Cali Connection Range. I started counting my day from the day I started germination. 2 different seeds, one is autoflowering (Gelato Cookie D'ohpe) and the other one is feminized from The Bakery Co. called Purple Punch. I started germination by putting them to the water for 12 hours in the evening on Sunday. After twelve hours I put them between paper towels. It started sprouting very quick, the next day I needed to put them to the soil. Purple Punch the feminized one started growing faster, bigger sprout, compare to the autoflowering Gelato Cookie D'ohpe. I started using a 60 W led lamp for the seedling stage this lamp has 2 head 30-30W that was divided for the two plants 30 W each. The next day they came out of the soil and started their life. The Purple Punch was growing faster. First, I had my own made place made of kitchen foil under my computer desk :D, and then I purchased a grow tent which is 140x60x60. I did not use any ventilation the first week and kept the humidity 85-90 percent, and I used trigger spray on the plant also. Watering the first 7 days was 10 ml in the morning and after 12 hours later also 10ml, so every morning and evening 20ml a day. I also used trigger spray to keep the soil wet around and sprayed the plant also. I never use tap water at any stage I buy still water from the shop and they love it. I want 100 percent organic plants so my nutrition will be bat guano mix with acacia honey. My soil mix is Coco coir, perlite mix 70:30 which is mixed with a soil that consists of 20% sphagnum peat moss, 35% garden peat, 10% high-quality organic Worm-Humus, 30% perlite, and 5% Pre-Mix. These two kinds of soil ratio are 50-50 Percent.

Likes
31
Share
@MxGrow
Follow
Feliz por como van mis gorilas, todos los días hay cambios y cada semana tengo que aumentar el riego, esta semana utilice en total 18 litros, 4.5 litros para cada planta aproximadamente.
En los primeros 6 litros uso:
▪️︎4ml de Connoisseur A y B por litro de agua.
▪️︎2ml de Rhino por litro de agua.
▪️︎2ml de Bud Candy por litro de agua.
▪️︎2ml de Carboload por litro de agua.
▪️︎2ml de B-52 por litro de agua.
Espero 30 minutos y despues aplico otros 6 litros con los siguientes nutrientes:
▪️︎4ml de Connoisseur A y B por litro de agua.
▪️︎2ml de Nirvana por litro de agua.
▪️︎2ml de Big Bud por litro de agua.
▪️︎2ml de Overdrive por litro de agua.
▪️︎2ml de Voodo Juice por litro de agua.
No tengo medidor de EC, por lo tanto trato de que las mediciones en ml sean exactos con una jeringa.
☆ 1 día a la semana riego las plantas con 6 litros de agua sin nutrientes y con un PH en 6.0, hasta el momento no han presentado carencias pero tengo la duda si tienen exceso de nitrógeno por el color verde intenso de las hojas.

Likes
8
Share
@High_Grade_Dadli
Follow
Well I having been laggin with update but I think am up to speed now...well u kno the fitess of the fitess must survive....still been having so water lag issue with the older one so finally decided to change the pot but she still managed that bit of stress good well see what happens in the rest weeks to come.....the other two are 6 weeks this week ...the one that got hst not by choice the crown is barely hanging on have some tape holding it managed to push a seed....this strain seem to be very resilient.....look at dem resin and this is jus the 2nd week of flower....until next time happy growing