The Grow Awards 2026 🏆 


Likes
Comments
Share
@GoldenWeedGrower
Follow
Legend
Timestamp: 📅
EC - pH: ⚗️
Temp - Hum: 🌡️
Water: 🌊
Food: 🍗
pH Correction: 💧
Actions: 💼
Thoughts: 🧠
Events: 🚀
Media: 🎬
D: DAY, G: GERMINATION, V: VEGETATIVE, B: BLOOMING, R: RIPENING, D: DRYING, C: CURING
________________________________
📅 D105/R01 - 28/02/24
⚗️ EC: 0.9 pH: 5.2
🌡️ T: 21-25 °C H: 50-65 %
🌊
🍗
💧
💼
🧠 Ripening starts
🚀
🎬 Added timelapse and screenshots and monthly rate of T-H and VPD 📈📈📈 from TrolMaster App
Translate
________________________________
📅 D106/R02 - 29/02/24
⚗️ EC: 1.2 pH: 6.7
🌡️ T:21-24 °C H: 50-65 %
🌊
🍗
💧 Added pH+
💼
🧠 If someone who followed the diary from the beginning is asking himself what about mother plant "Mamma Aglio", here I posted some picture of her which demonstrate the difference between a bad and a good grow
🚀
🎬 Added pics of Nicole and pics of "Mamma Aglio" to show the difference between a bad and a good grow with sounds and TrolMaster logo. Added usual timelapse and screenshots.
________________________________
📅 D107/R03 - 01/03/24
⚗️ EC: 0.8 pH: 6.4
🌡️ T: 20-24 °C H: 45-65 %
🌊 2L
🍗
💧
💼
🧠
🚀
🎬 Added Timelapse and screenshots. 4 pics added
________________________________
📅 D108/R04 - 02/03/24
⚗️ EC: 0.8 pH: 6.7
🌡️ T: 20-25 °C H: 45-70 %
🌊 1L
🍗
💧
💼
🧠
🚀
🎬 Added Timelapse
________________________________
📅 D109/R05 - 03/03/24
⚗️ EC: 0.8 pH: 6.7
🌡️ T: 21-25 °C H: 45-65%
🌊 RES Changed 💦💦💦
🍗
💧
💼
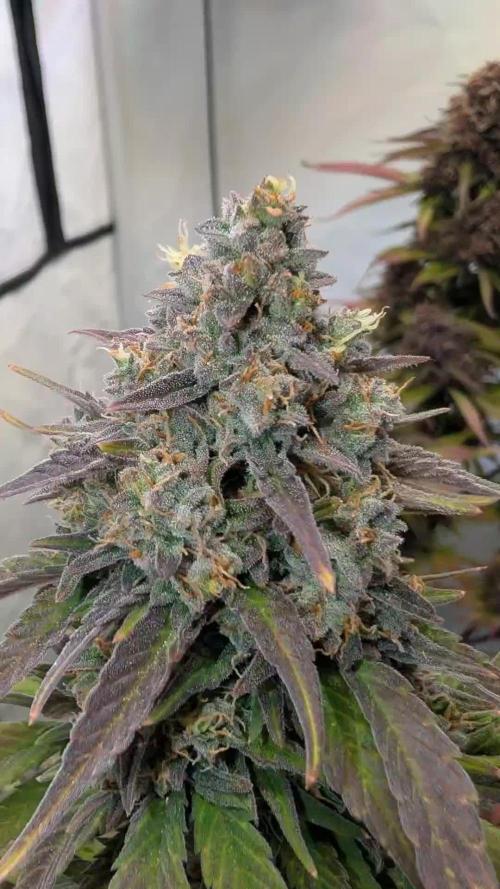
🧠 I'm starting the flush, as trichomes look milky and quite ready. In this last week the ripening will be complete and th girl would be ready for harvesting.
🚀 Flush started
🎬Added 8 pics of trichomes, Timelapse and sceenshots. Two pics and two videos of my "garden's pre-harvest magic" 😋😋😋
________________________________
📅 D110/R06 - 04/03/24
⚗️ EC: 0.2 pH: 7.5
🌡️ T: 19-25 °C H: 55-65%
🌊
🍗 Flawless finish
💧
💼
🧠 1 day with pure water and now I added Flawless finish
🚀 Flushing
🎬Added Timelapse and sceenshots
________________________________
📅 D111/R07 - 05/03/24
⚗️ EC: 0.2 pH: 7.5
🌡️ T: 20-25 °C H: 55-65%
🌊
🍗
💧
💼
🧠
🚀 Flushing
🎬Added 8 pics. Added timelapse and screenshots. I also prepared a timelapse of the entire week with some music 🎵🎵🎵 and weekly rate of T-H and VPD 📈📈📈

Likes
80
Share
@Greenwolvesfarmer
Follow
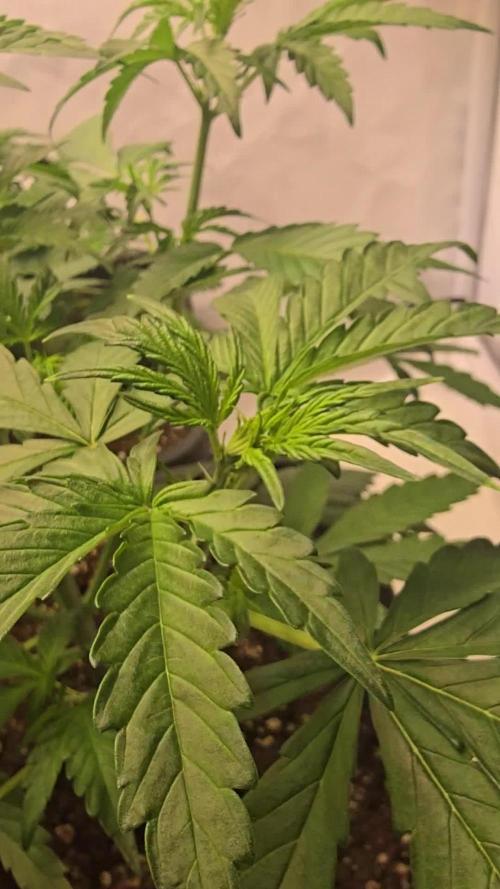
Me impresiona su forma híbrida , sus hojas están preciosas ! Y su vista desde arriba realmente parece una "X" ... A esta nena se le hará el mismo tratamiento que a mi querida lemonking ... Todo bien por el momento su espacio internodal anda de lujo ! Bella a tu espera !!
.
.
.
#lemonshiningsilverhaze #royalqueenseeds #greenwolvesfarmer


Likes
9
Share
@KurtThePlantGuru
Follow
Buds are flowering up super nice! Had a tiny issue where I thought it was much worse then it was (I got sum water on the leaves and it burnt circle shaped burns on them) I worried it was a fungal disease or something. I removed the leaves in a panic, and since haven't had any issues!
Anyway the smell is amazing already I'm getting notes I really didn't expect to smell on a Superboof cross! Almost remiscent of Creature Feature or Acapulco Gold with a bit more gas! It is only week 4, so ideally the Terps should transform. I am loving it so far
The bud structure is looking amazing, the top nugs are almost spear shaped which is really cool, some of the buttom bugs are almost spear shaped as well but more circle/fat. Standard nug look. It's beginning to stack some frost on as well! I have a good idea the nugs are going to have a nice lumpy - spear shaped buds. Almost looks as if the tops are foxtailing which would be really cool too!
Amazing genetics. Every issue I've encountered has been so quickly corrected and bounced back. No herms, definently high grade genetics and I'm happy to be working with Homegrown Genetics to be able to post this seed to harvest and share with everyone!

Likes
42
Share
@Ganjagrandaddy
Follow
Day 7 flowering: Well growmies, what a week this has been. These ladies have bought their A game to the party it seems. I have spent the week constantly moving stakes and re seating restrained branches. They are all responding really well to the different methods used to exploit their growth in the l.e.d . The topped girls are vigorously pushing the 4th nodes as mains and ate spreading out nicely to their pots edges. The #1Amnesia has really burst into life and is a huge cabbage of a girl. Leaves are nice and thick with a rubbery strength thanks to the silicon additions i think. Lots of huge fan leaves to power those thickening stems holding the numerous growing tips. I think she will be a very productive girl come harvest time Her Fim has given her a monster looking main head along with some really big secondary branches fighting through the thicket. An amazing looking lady already. #2 is also looking very nice too with her main shape now being "bush" instead of rectangular. Again lots of staking
and leaf tucking will get the best from this productive girl. #3 is similar to #1 bit not as big looking in scale. She is pushing the plant next to her already so will need to be really held firm with some wire and brute force!.
The 2 Girl scout cookies are a lot smaller looking in general but as a different hybrid mix , I am not surprised. They have both been opened right up with strong pegging and a week of constant training. The stems on them both will no doubt hold some nice sized fruits as they stewtchbinto space and with so many bud sites exposed to the lights , it should help boost the final yields. The 4th nodes on the #2 have set so perfectly to keep this training ongoing this way. Now the smaller sites can themselves see the light direct , they should also avoid just being popcorn buds and attempt to be the big boss.
I am more than happy with their growth this week and commend Zamnesia for the genetics. Beauties in the making now.
Until next time growmies, be lucky

Likes
25
Share
@Brebzzz
Follow
10/12 begin week 6 start of flowering do some lst and defoliation hoping doing right
11/12 dont know if my Light is enough so i buy i mars hydro 1000 to be sur they have what they need
Likes
27
Share
@CannbellFarms
Follow
I’m overjoyed with the phenos this strain is producing, strong vibrant purples with some serious flavour profiles!
Scent Profiles we have:
Candy Lemon Sherbet 🍬🍋
Sweet & Piney Diesel 🍭🌲⛽️
Sweet & Tangy Tropical Punch 🏝️🥊
Alongside this, these beauties are the frostiest and the most insanely dense koala looking nugs I’ve ever produced!
Likes
48
Share
@Northern_Ent
Follow
Aug 17: great plant. Hit 30 C today, and there was a two minute hail storm late in the day. It sounded very impressive on the roof, but I had moved the pot plants up against the house and they were fine. The rest of the garden took a mild beating.
Aug 18: rained all day.
Aug 20: sunny yesterday and most of today. Watered with some Kekp extract in the evening. Flowering is progressing and we’re still in mid August so things are looking good.
Aug 22: don’t take flash pics of photoperiod plants unless you’re immediately using a 730 nm far red light to put them into dark mode.
Aug 23: looking good for the end of another diary week. This Gorilla Cookies is definitely the fastest flowering of the four plants I’m growing this year.


Likes
14
Share
@Gc_Dank_Aus
Follow
I love growing this strain, smells delicious the whole way through. 10/10

Likes
13
Share
@WeedTheNorth
Follow
Great strain with Strong genetics. I'll approach this gal a little differently next time with regards to training. I topped early and this plants sativa side kicked in and grew a tall lanky legged gal 58". The quality is fire here I'd definitely train differently to get the most out of your canopy which is what I'll focus on in the future. By far the most dense and sticky buds I've grown to date and it comes on my 1st year Anniversary cultivating cannabis. Thank-you Grow Diaries for allowing me to learn from this fantastic platform as well as share the experience to others.


Likes
3
Share
@BenandLippisfinest
Follow
Es geht auf die Zielgerade zu, wir haben heute Tag 64 seit dem sie aus der Erde geschaut haben. Die terps werden immer intensiver, die Buds sind fest und voller Trichome. Die ersten Bernsteinköpfe sind auch schon zu sehen an den Fastbuds strains, extrem feste und dicke buds. Die Apple Fritter von RQS hängt zwar hinterher, aber entwickelt auch sehr schöne Feste buds und sie duftet nach grünen Äpfeln.
We're approaching the finish line; today is day 64 since they emerged from the ground. The terpenes are becoming increasingly intense, the buds are firm and covered in trichomes. The first amber heads are already visible on the Fastbuds strains – extremely dense and thick buds. The Apple Fritter from RQS is lagging behind, but it's also developing very nice, firm buds and smells of green apples.
Likes
2
Share
@frostyherbals
Follow
Buds are stacking nicely. I can't help but wish they were a bit bigger. Not sure if this is due to the root issue earlier in the grow, the new LEDs, or the fact that I FIMed and then LST the plant to have lots of tops. I'm thinking it's probably a combo. Not thinking the ES300s are to blame since they make shit grow so quick and happy. Part of it is also that my #4 and #1 will be pretty light compared to #2 and #3. But ultimately, I think I'm going to be extremely happy with the quality and frostiness of it all...
I'm dropping PPMs from low 500s to high 400s throughout the week.

Likes
3
Share
@ThatsmyGrow
Follow
This week is special, i got the New System from ac infinity. I need to get comfort with everything, but its realy high Qualität.
For now we can get the best vpd for the lady, so i hope the best for the flower.
Likes
10
Share
@Ieiogrow94
Follow
Eccoci qui!!!
Tutto procede per il meglio, i pistilli sono usciti e ora si va dritti dritti alla maturazione, NE VEDREMO DELLE BELLE!!!
Che dire se non WOW, due bimbe in salute e dalle quali mi aspetto molto!!
Reagiscono molto bene alle fertilizzate e già emanano un odore veramente incredibile, OTTIMA GENETICA!!
Grazie a tutti per il supporto ❤️🔥🌲


Likes
25
Share
@TheBudWhisperer
Follow
Week 4 of veg. And all just maintenance right now. Should be flipping in a week regardless of what the smaller ones might be doing. Pruning and tying em down to maintain a very low canopy for the stretch. So far, so good. No real deficiency issues as we’ve been keeping the regimen real conservative. All is well to the flower show👍


