The Grow Awards 2026 🏆 


Likes
Comments
Share
@lkxxy
Follow
so far I'm only feeding them with destilated water
day4: unfortunately the 4th seed grew the other way around I carefully moved it over without touching it directly
day5: 24hours later it looks a little sad but I think it will get over it.
the other 3 are perfectly fine and achieved a height of 7cm so far I'm watering every 2 days approximately 200ml desolated water
day6: on day 2 after operation the 4th one is growing and starting to look healthy , them step is even thicker than the other 3 had at that height I think. gonna leave the cup on it of another day probably and depending on how it looks tomorrow I will take it off
day7: Plants looking healthy so far, 4th one is recovering nicely
day8: The 3 are growing healthy and number 2 and 3 are already showing their second pair of leaves and I think it's safe to say number 4 recovered and is now back on track:)
day9: Today I put 400ml of water on the three bigger ones but on the outer area to water the soil overall without pouring 400ml directly on the Plant, number 4 is getting on track and is growing nicely after the beginning problems she had.
day10: I was a bit worried since number 2 rolled their first 2 Leaves a little bit but I was told they will drop of anyway and not tot worry about them too much. besides that they are all growing nicely.
day11: Last day of week 1 and so far everything is going very well.

Likes
15
Share
@Uwish
Follow
Hello guys,
Here I am again to present you a new run, still with the best leds of the market nevertheless as I changed my growing space from 120x120 to 150x150. So I had to update the material inside...
I will run with 3 EVO 5-150 lamps of 320W or 960W with Bluetooth dimmers.
For the Hydro system, it will be the V-SYSTEM from Alienhydroponics.
In fertilizers I am always with Advanced Nutrients.
I work with osmosis water.
Currently, 4 clones took on 4.
Once the roots are ready, I will transfer the cuttings from the propagator to the V-SYSTEM.
------------------------
since the 16/08, when I transplanted the plants in the RDWC system, I noticed some points that I will mention below and correct next time.
1. The cuttings are too small, allow enough time so that I can completely fill my pots with clay balls.
2. Cut out the bottom of the pots from the cuttings.
3. 3/4 of the cuttings are touching the water, so one is late. Next time when transplanting, add more water, up to the basket in order to immerse all the plants and not to create a difference between each one, consequence now I have 3 that are ready to explode and one that will struggle behind, problem corrected today by increasing the volume of water.
4. The b-52 is a real pain in the ass in RDWC, you have to clean the 2 filters almost every day, with this new soup I'm testing without and I think I'll continue like this just with the base sensi grow A and B, as I use Root rot X, I won't use voodoo juice since all the bacteria would be killed.
5. Use of Voodoo Juice is useless if using Root Rot X which will kill the bacteria.
I don't know why but when I transplanted in the RDWC, I put my set up in growth mode, except that the plants were not ready for it, moreover, I made a FIM on each. So I lost some days, these last days I went back to a ppdf of 150, now that my roots touch the water, I declare growth 0 on 22/08, I will do between 21 and 28 days of growth. And as my roots are doing well and touching the water I'll go to a PPFD of 300
++

Likes
23
Share
@WSA_Matt
Follow
All plants have been chopped down now. Will switch over to harvest on here once these last plants finish drying. Then I can get a full harvest weight of everything.
2 weeks of curing for the first harvest. It is a very fruity smoke. Very sativa high but also a heavy body high. No sleepies or dry mouth. Really enjoying the strain. If I had to guess, I'd say we should be over 2 pounds.
Likes
6
Share
@BigGGrows
Follow
This week was a big week for the candy cush. I noticed upon watering her to run off, that in the same day the pot would go super dry and light weight. I also noticed stress in the leaves and roots poking out the bottom of the pot. It was time for a transplant. So far so good! Upon transplanting i performed more LST to help her fill in the pot. She went from a 1 gallon to a 5 gallon. She was also defoliated thia week.

Likes
5
Share
@Ninjabuds
Follow
Last week, my pound cake auto plant totally exploded with growth! It's insane how much it's changed. I swear it grew several inches overnight. The leaves are this gorgeous shade of green, and the whole thing looks super healthy and happy. I'm seriously so proud of my little plant baby.
Likes
9
Share
@grower1212
Follow
Dia de riego, claramente una no se ve tan saludable como la otra, ya que bebe mas agua y necesita mas dosis de nitrógeno. Comenzare a regarlas con dosis por separado para reforzar a la mas débil.

Likes
7
Share
@PotCasso
Follow
Week 9 Flower Swelling
Watered in at 500ml
*Lights switched to 18/6 day 60 of Flower
Processing
Likes
3
Share
@GladaMinnen
Follow
Green gelato is an awesome strain that keeps evolving. A real pleasure for the eye to see. Royal gorilla isnt showing so much progress.. going a bit slow. Is like half the progress of Gelato. And they have exactly same conditions.
Going to start using more supplements at the start of next week.
Was hoping to veg only 4 weeks, nut feelslike ii will have to double atleast.

Likes
19
Share
@CultoCannabiss
Follow
Hice transplante a las pequeñas y he estado usando piraña de advanced nutrients algo de Greatwhite y fertilizantes Orgánicos linea BAC


Likes
24
Share
@tangie
Follow
Harvest time has come.
It is difficult to kill a plant I have been raising so lovingly and with a lot of care as a wonderful living being that she is (and we all are as One).
I even stayed up all night once to do a slow full 3x flush of the soil with emergency pH correction and buffering when I finally received the meters and looked at runoff values. It was almost like manually pumping a blood transfusion for a patient overnight.
The idea to grow indoors came as a lightning and almost by a random chance. It was, of course, a synchronicity of a high order, because that flash coincided precisely with a rare moment where I had a small window of time to collect seeds of my choice in person and transport them safely and very quickly. And get extremely helpful advice from a moderately experienced grower, who helped me avoid self-taught rookie mistakes and pick an almost perfect setup for my purposes. Many steps I have learned only when it was time to take them, and since there's only so much I can do in a day, I got to some procedures like instrumentally checking salt buildup and substrate pH pretty late. I did monitor her leaves from the get-go, so leaving aside a light nute / photon burn of the tips, I think it went pretty well. Definitely better than I would have imagined!
I wanted to do a small sitting meditation beside the plant before cutting her to dry. Wanted to thank the plant for this majestic experience and the healing power of gardening and caring for a plant on top of the medicinal values of cured buds and edibles we made along the way from trimmed fans. Those were unexpectedly strong and pleasantly smoooth. Wanted to tell her that I will miss her and remember her fondly, especially since she is my first full successful grow. The first time is always an unforgettable experience. Wanted to tell her that I do not want to kill her, and it was painful for me to FIM and shape her.
A sitting meditation turned into a dynamic meditation when I started removing light gear and feeding system and cleaning the grow space in preparation for drying.
Pretty quickly I noticed that I have a very real feeling of experiencing light- to medium-dose mushroom trip. I had vaped some 50/50 hybrid street bud half an hour earlier, but it was a very modest dose — shout out to TinyMight, you guys are amazing! — but no psychedelics. At that moment I felt that I don't need to say anything to the plant, because we are one and she had known my every feeling and intention from the start.
And then I realized that what I had considered to be a sombre event, is just a transformation for the plant, it's next manifestation. Having lived as a plant, she will now transform into happy and healing experiences of those who will enjoy her flowers.
This plant has supported me and helped me heal deep trauma and depression at least twice in my life over a period of a few months on each occasion. In between those healing periods it was just a get high and enjoy shit because why not kind of thing, and it didn't have any long lasting psychological effect at all, in stark contrast to classical psychedelics (LSD, shrooms, DMT etc). During those non-healing periods I didn't even have an urge to smoke all that often. I could easily not touch the stuff for a couple of months straight. My yearly consumption was in low single digit grams. Sometimes I felt that I did not enjoy the effect at all, it was slightly unpleasant even. Why would I want to blur my crisp perception to a gooey marshmallow state of cannabinoid high and scattered attention?
But when it is time to do some inner work — and you cannot miss this feeling if you strive to tune into your inner state — god, is it a POWERFUL plant!
I am very happy and humbled to be a conduit for this energy by caring for the plants and raising them.
I respect this plant very deeply.
---
Split her into thee parts by leaving only a few nodes creating the outer layer of colas on each level and effectively "topping" her a couple of levels above (or below, technically, now that she's upside down) and this creating a new drying layer/level.
Tried wet trimming and I think I liked it. Will try to complete it in the next 1-2 days if I decide to go ahead with the idea.
---
After drying for 7 days, I stabilized humidity at 60-62% for 4 hours and then chopped off buds (trimmed in batches during the first 3 days of drying), weighed and packed into glass jars for curing. Literally packed, because she yielded over 4 litres of dried trimmed bud (I think it was 4.5l) weighing 267g.
WOW. I did not expect that on my first run I will be able to grow so much potent medicine. A lot of it is fluffy, but can be easily pressed denser, if storage or appearance are a concern. In fact, I had to press the buds slightly to make it all fit in two 2-litre jars.
Thank you to everyone who helped me along the way and thank you for your warm wishes!
And thank you — the One reading this right now.

Likes
20
Share
@MMSC16
Follow
Day 64 - June 5
June 5 - 09.45AM Swelling continues, Pistils are beginning to shake, with some vibrant orange. The end is maybe 10 days away. Senescence continues with minor purple hue starting.
June 5 - 09.45AM Once AC is fixed I will push this further.
June 5 - 09.45AM Temperature at 79F.
June 5 - 03.45PM AC temporarily fixed. Day temps and night temps will be cooler.
June 5 - 08.25PM Temps back down to sub-75F. Trichomes are still clear!
June 6 - 04.20PM Day Temps under 75F. Trichomes still clear.
June 6 - 04.20PM I regret removing 3 3-finger leaves beneath canopy, this was done to promote more airflow below, but with harvest being so near, it was likely unnecessary stress.
June 7 - 08.00AM Watered approximately 5.5L. Humidity has spiked as a result, perhaps I should add a dehumidfier straight after watering. Keeping temps closer to 70F to try and kick start senescence.
June 8 - 09.30AM Morning temp at 70F, night temp likely 65F (not confirmed) - I suspect the tent will get no hotter than 74F today. Trichomes still clear, with some cloudyness appearing.
June 9 - 09.30AM Trichomes are clear, some heads are half clear, half cloudy.
June 10 - 09.30AM Removed wilted leaf, still lots of clear trichomes.
June 10 - 05.10PM Soil is cold, likely due to the lower temperature. Weight of pot is still a little heavy, I'll water approximately 6L before lights out tonight.
(Day 70) June 11 - 08.30AM Watered 5.5L to runoff, towel collecting droplets under roller. Was too tired to water yesterday. Time taken to saturate soil was roughly 1 hour.

Likes
12
Share
@mucho_loko
Follow
two of the four females are way behind compared to the others, the pistils are just starting to show up now, while in the other four the pistils are already quite fat.
as it's my first time, I'm not sure how much time I have left to harvest, but I believe it's around 5 weeks.
Likes
2
Share
@Jardin33ro
Follow
Buenas! Esta semana pasaron cosas, agregamos red scrog para luego inducir la flora. Ya pasamos 12/12 pero me gusta darle una semanita de pre-flora. Seguimos con IPW de athena de forma foliar para prevenir todo tipo de plagas y enfermedades, una vez x semana. Una de las que viene mas grande le hice un supercropping para bajar el canopy. Vienen como locasss. Ultimo riego con Sensi Grow y ahora pasamos a sensi Bloom. Saludos

Processing
Likes
1
Share
@magicjohnson
Follow
So This week was the same as the last really, It seems all I have to do is sit back and watch these ladies do their thing!
Ive not gone full on with the bloom supplements or PK yet as only 2/5 of the GG are seriously flowering.
The other 3/5 GG are now Finally showing some signs of flower and some tops are starting to build and lowers producing more pistils each day!
The Stardawgs continue to explode, even some friends who were sceptical about the performance of the Quantum board LED's have been flow away by the results.
All of the buds seem to be building dramatically top to bottom which no shortage of frost!
Macro shots on the way!!


Likes
118
Share
@Njanne
Follow
This was my first time growing outdoors, and this variety did well in Eastern Ontario region. I started seeds indoors and put the mainlined plants in the garden in early May. They were done flowering September 27th. The plants were beautiful and purple. The flavour is sweet and earthy. This is remains my favourite variety. One thing I learned from this outdoor grow is that I need to allow more space between plants. One of these Purple Kush plants was choked out and didn't grow as well as she could have. Next year I'll do a better job.

Likes
37
Share
@Rob96
Follow
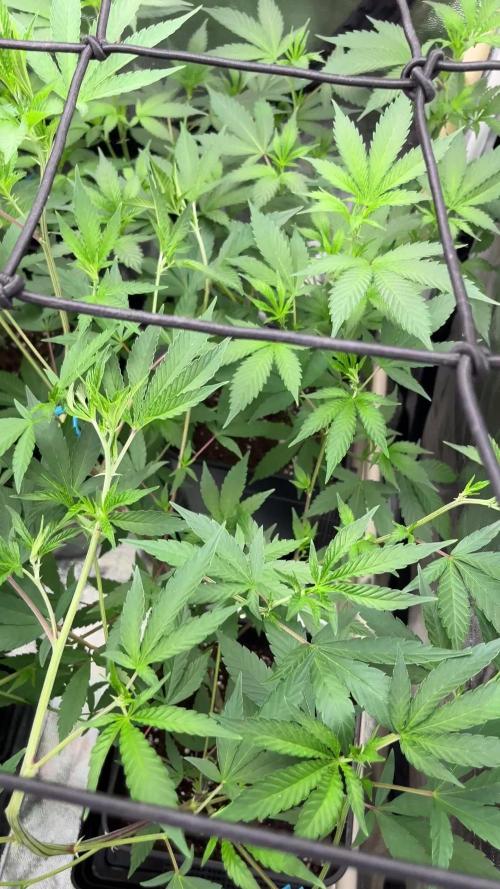
Cut net down this week and had a reshuffle around, dos si dos was a lot taller so move lights up and put other 3 plants on top on boxes to level top as much as i can
Had to do a little late trimming to help airflow down low and just give a little more breathing space as suffered with a little rot on my first grow luckily not too bad though but fingers crossed none at all this time, i managed to avoid it on my secone grow so hopefully will be ok
Plant looks strong and healthy, had no issues so far plenty of tops cant wait to see it fatten up


Likes
3
Share
@Earthsower
Follow
She has grown about 10cm in the past two weeks showing signs of young stigmas no signs of deficiency the Fuel dog looks healthy for the hight she is. The fuel dog will not be fed anything until required. She stands at approximately 28cm

Likes
6
Share
@Jack_Greenstalk
Follow
smell is strong now. sour 76 has a range of citrus, number 1 is lemon dominated with fuel scent underneath. number 2 has a smell super similar to tangie! seeing sour 76 parent is cali sour d (cali orange x sour d x mexican sativa) cross to 76 afghan it makes sense to me it has reminiscent smell to tangie (cali orange x skunk 1 [mexican sativa x afghan indica x colombian sativa]) very similar parent lineages there! havin smoke test both, sour 76 is much more heavy handed high! plants finish at 66 days this run. at this point I gave last main feeds before tapering nutes back lower for week 8 and then flush week 9


