The Grow Awards 2026 🏆 


Likes
6
Share
@Elguacho420
Follow
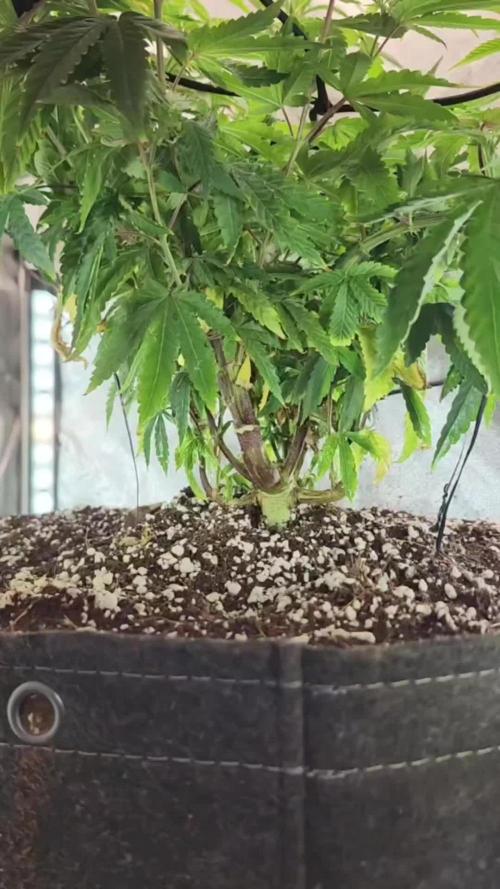
Buenas a tod@s!, bueno novena semana de flora de estás tropicanna poison, seguramente ante última o última semana, les falta nada... La plata está hermosa, más allá de sus hojas marchitas tiene unos frutos super pretos, compactos, pesados y mucha resina... Tanbien ultima semana de nutientes. Aclarando q es mi segundo armario, y sigo teniendo algunos problemas q mejorar, siempre trabajando humildemente, planta humilde y muy hermosas, no tengo experiencia, escucho todas las opiniones, pero eso no me define, me encantan mis plantas y cada día trabajando para q sean mejor.. falta muy poco... Un saludo y buenos humos para tod@s!!! 💨💨🔥😎⚕️💪🏻
🇦🇷🤝🏻🇪🇦

Likes
30
Share
@Togoutouseg
Follow
La purple haze était vraiment plaisante à cultiver. Une des deux a eu un problème dès le début de croissance, et malgré tout, j'ai réussi à l'envoyer en floraison. Cela montre bien que les variétés de zamnesia sont très bien pour les débutants, elles sont très résistantes. La haze était de taille moyenne. Une odeur très épicée et terreuse, un vrai plaisir au nez. On voit bien que c'est une sativa, elle provoque de grosses crises de fou rire, la première fois que j'ai tiré dessus j'ai tiré trois taf et j'ai rigolé pendant 30 minutes, complètement incroyable. Très cérébrale, pleins d'idées qui nous passent par la tête, elle rend très énergique et n'a pas d'effet de détente sur le corps. Ne pas fumer en soirée avant d'aller dormir, plutôt en après-midi, j'ai beaucoup de mal à dormir si je l'utilise en début de soirée. Attention tout de même, elle provoque pas mal de parano je trouve, typique d'une sativa. En tout cas excellente variété pour aller marcher et profiter d'une belle après-midi. J'ai optenu 45g et 30g en sachant que j'ai eu pas mal de problèmes.


Likes
7
Share
@BushDoctor740
Follow
Things are moving along great.The buds are developing and smelling absolutely amazing.Cherry cola won’t be a big producer but wow is her scent potent.The Lemon cherry cookies having the biggest buds so far and will finish first but still needs some time.Ive increased light intensity to 80 percent which kinda fried the fan leaves but no longer needed at this point.


Likes
16
Share
@GreeneScene
Follow
I had trouble with my humidifier set up so she only took 5 days to hand dry . Fortunately I purchased a programmable humidifier so moving forward it’s all gravy. After everything was cut from branches & weighed she ended up yielding 20gs of some airy foxtaily bud.
I knew this would be a disappointment so we’ll just wait to see what the smoke is like , what the smell is like , & what the taste is like .

Likes
5
Share
@GREENPHOENIX6262
Follow
01/06 - Transplant into 7 gallon pot successful - nute feeds have increased in doses - AC infinity supplement lights added to 2x2 tent working in combination with Marydro light for under canopy coverage😎😎😎
01/11 - No transplant shock into 7 gallon pot - She is coming along nicely with no issues - Fan leaves are sturdy and mid grow coming in effectively 😎😎😎😎😎😎😎

Likes
14
Share
@HanfConnoisseur
Follow
Week 3: Vegetative Growth and Care
Welcome to the fourth weekly update of our cannabis cultivation journey in Germany! As we move into the third week of vegetative growth, our strains—Pulp Friction, Cookies Haze, Eleven Roses, Poddy Mouth, Critical Lemon Kush, and OG Kush—continue to thrive.
This week, we’ve focused on maintaining optimal growing conditions and further refining our Low-Stress Training (LST) techniques.
Key Developments:
1. Enhanced Vegetative Growth:
- The plants are showing significant growth, with lush, green foliage and strong stems.
- The 18-hour light and 6-hour dark cycle continues to support their healthy development.
2. Continued Low-Stress Training (LST):
- We have adjusted the LST ties to guide the plants’ growth, ensuring an even canopy and maximizing light exposure.
- The plants are responding well to LST, with multiple branches growing vigorously.
Steps Taken:
1. Monitoring:
- Maintained temperature around 24-28 degrees Celsius and humidity between 50-60 percent.
- Kept the soil consistently moist, watering when the top inch of soil felt dry.
2. Nutrient Management:
- Continued with a balanced nutrient solution to support vegetative growth.
- Monitored the plants for any signs of nutrient deficiencies or excesses and adjusted the feeding schedule as needed.
3. Adjusting LST:
- Gently repositioned the LST ties to ensure all parts of the plants receive adequate light.
- Avoided over-stressing the plants by making gradual adjustments.
4. Pest and Disease Prevention:
- Regularly inspected the plants for any signs of pests or diseases.
- Maintained a clean growing environment to minimize risks.
Next Steps:
- Prepare for the transition to the flowering stage, which will begin soon.
- Continue to monitor and adjust the environmental conditions and nutrient regimen to support healthy growth.
- Keep an eye on the plants’ overall health and make any necessary adjustments to the LST setup.
Stay tuned for next week’s update, where we’ll discuss the transition to the flowering stage and the care practices involved. Feel free to ask any questions or share your own experiences in the comments below!


Likes
19
Share
@Joeycrack9
Follow
2 Lemon Mandarin
2 Papaya Sherbet
1 Orange Sherbet FF
2 Gorilla Melon
2 Lemonpaya
Likes
4
Share
@GREENPHOENIX6262
Follow
Week 1 Veg - 10/01*
Currently CHERRY COLA is coming alone accordingly, first set of leaves have already sprouted and will be giving her small amounts of Nitrogen in about a week.


Processing
Likes
29
Share
@Reaper
Follow
if u wanna skip details just read the CAP LETTERS
day 29 - januari 2
waterleaves from under the stems got cut off, also trimmed the lowest branches because the leaves were getting too big
the soil plant has gotten no trim or cuts at all
day 31
the ph of the res was 5.3 i changed water , roots look brown, not rotten or slimy just brown.
day 32
the hydro plant gets healthy growth after the water change. ph is still too low (5.5) im waiting for my *PH up*
i ordered online. never tought i would need it lol. she goes well on 5.5 but not enough calmag is absorbed like it does on 6.2
The pictures of day 32 display the difference is very big in the stems, the soil plant only got topped while the hydro plant had already a litle trim on the lowest branches and the branches above (in the midle of the bush where i topped them) so she got more stress and still is bigger then the soil.
day 33
i got no ph up (for now yikes)
sooooo i took 8 liters out of the res and replaced it with pure rainwater and 170 ppm calmag in it without nutrients to keep the acid level a bit higher.
it worked as u can see in the final pictures the plant gets new growth a bit faster.
ph up should be here by end of the week.
day 35:
plant start to stretch finnally, while i was doing LST later in the evening one of the top stems just snapped off completely OOOPS 😆.
theres still a lot of branching going on and a nice bush she will recover very fast from this loss as i summoned the Cannabis Gods into my room as the planets lined up and perfected my PH up to 6 by adding the purest rainwater from the universe the roots cleaned themselves back to pearlwhite and started absorbing the nutes faster then ever. in all silence i knew this was my destiny and the stems grew so fast i could hear them grow. the whole experience was too much as i collapsed to the ground and stood up left the room and knew... i would never see these ph and calmag problems ever again and went down the stairs with my new powers
THE PLANTS BOTH GOT GERMINATED ON SAME DATE. BOTH GOT TOPPED ON SAME NODE. I WAS FORCED TO TRIM 4 BRANCHES OF THE HYDROPLANT BECAUS IS WAS BLOCKING TOO MUCH LIGHT I ALSO CUT OFF THE 4 BIGGEST WATERLEAVES ON THE MAIN STEM.
THE SOILPLANT DID NOT NEED ANY TRIMS AS SHE IS NOT GROWING AT AN INSANE SPEED, HOWEVER THE SOIL PLANT LOOKS HEALTHIER AND BIGGER BECAUSE THE FANLEAVES ARE STILL THERE. IF U WATCH THE STEMS IN THE PICTURES OF DAY 32 U CAN CLEARLY SEE THE HYDRO IS WAY BIGGER. I NEED TO CORRECT MY PH SO SHE ABSORBS MORE CALCIUM MAGNESIUM FOR EXPLOSIVE GROWTH.
Likes
5
Share
@Bamz84
Follow
No Complaints No Issues Or Problems In The Garden...just being watered PH 6.0 and cal mag for now☺️
Likes
3
Share
@brpet
Follow
Changing reservoirs whenever pH becomes unstable. Usually after around a week and a half. Seeing some nice buds developing. Found a ball that exploded when I touched it. Going to cut this plant down probably to keep it from pollinating others completely.
Likes
18
Share
@Luca90
Follow
Back to lst, my homemade scrog wasn’t too good so I decided to order a professional one for the next grow in the meanwhile I tide them back doing lst
Also now they are really growing bigger and bigger
Again not sure if I’m doing a good job only time will speak
Got a microscope posted a pic and video of how my watermelon is doing with its flowers, the northern light is still not in full flower but its switching