The Grow Awards 2026 🏆 


Likes
Comments
Share
@WeedM8
Follow
Hello m8 welcome to this journey with me in this diary will have very interesting strains hope u find something useful
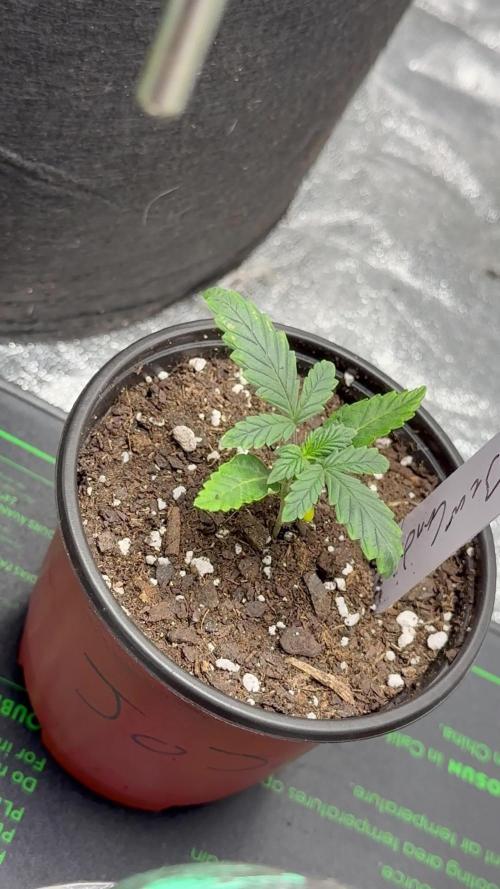
Persian Girl
- [ ] 1st week Veg: germinated in substrate lighting very close so it jets medium high humidity after the 3rd day they started sprouting
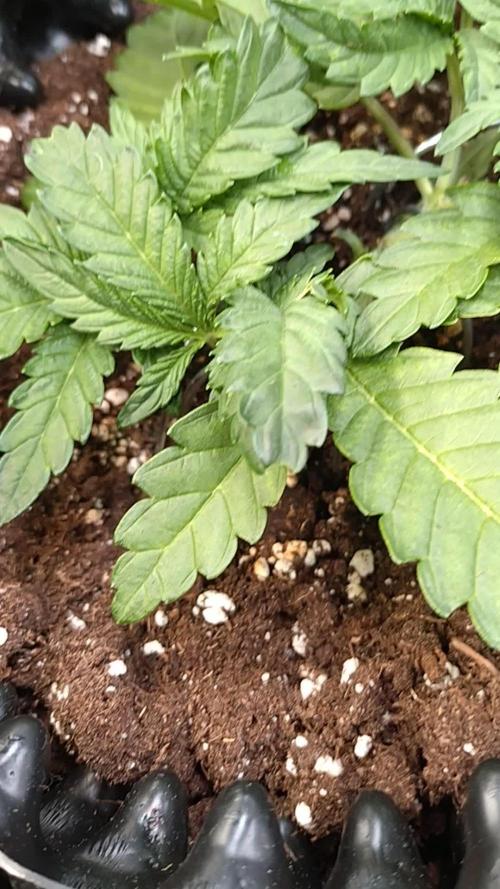
- [ ] 2nd week Veg: this week my ventilator broke down and as the temperature stayed very warm nothing developed much i did change light hight put them more far
- [ ] 3rd week Veg:fortunately this week i had fixed the ventilation and the temperature has go down a bit allowing the little plants to develop and reinforce
- [ ] 4th week:very good developments in this week I already started feeding a bit two times but i didn’t have to…once was enough
- [ ] 5th week Veg:
- [ ] 6th week Veg
- [ ] 7th week Veg
- [ ] 1st week Fl
- [ ] 2nd week Fl
- [ ] 3rd week Fl
- [ ] 4th week Fl
- [ ] 5th week Fl
- [ ] 6th week Fl
- [ ] 7th week Fl
if this was useful please like and follow

Likes
7
Share
@HowieMcHowie
Follow
Es wird. An den sehr heißen Tagen wird es schon mal 40 grad. Entsprechend gering die Luftfeuchtigkeit. Mit Bodenwässern und Befeuchter halte ich sie hoch. Das Stengeltraining unterstütze ich mit einem Ventilator

Likes
69
Share
@Mimi420
Follow
Hi growers!
The girls growing great!They tall from 75-85 cm.I removed some lower yelowing leavs and lolipopet them a litle to get better air flow.Started to bud nice and the smel is geting steonger.Tnx for checking in 😉


Likes
1
Share
@Cannerd
Follow
How ya doing mates?? Awesome week last week - all photos and logs have been added so be sure to check it out! This week is going great so far! I've switched to an early vegetative state nutrient system. As you'll see in the daily logs early this week, this bumps up the micro and grow nutes, and keeps the bloom at 0.6ml/gal. A quick note about last week - I'm unable to update the measurements, but please note that those nutrient amounts are measured in ml/gal, NOT ml/l.
Anyhow, this week I'm just waiting to get my order of diatomaceous earth so that I can make up another batch of soil. I'm still debating between topping this week before repotting or letting them take root in the new pots first. Decisions decisions lol. I think at the very least I'll clean up some of the lower growth to make sure the energy is being spent at the right places. I've been switching back and forth between just LST and mainlining in the past - but I think I really like the ease and cleanliness of mainlining. The draw back is the recovery time they take in the process haha.
UPDATE:
The D.E. has come in, and I repotted the girls this week. I mixed in about 1.5-2 cups D.E. for the whole pot, as well as some Bat Guano and Kelp Meal for micro and macro nutrients to use on dry cycles.
I've also included some photos of the mother plant to give an idea of what's to come! I've just started to flower it, which is the first time for this strain - so I'm pumped!
Day 15:
M.C. 01-21 After reviewing the last set of photos from last week, I figured I'd play it safe and dimmed the light back down to 25% strength. The mother plant is almost ready for flower, and I'm down some tents so she'll be taking this one over shortly. These photos were taken shortly after the lights went off, and they look quite happy! You can see some of the side branch developement in today's photo for MC-01. The pots are fairly dry now, and I've decided to move to the next stage in the nutrient regime. This kicks up the Micro and Grow nutes, while maintaining the Bloom amounts.
M.C. 02-21 A nice top photo for MC-02, you can really see the lighter green in this photo. Not to worry though, as these will darken back to a vibrant green as long as I give her what she needs shortly! The pots are fairly dry now, and I've decided to move to the next stage in the nutrient regime. This kicks up the Micro and Grow nutes, while maintaining the Bloom amounts.
M.C. 03-21 Look at that little leaf poking out from the 2nd node! Some slight yellowing you can see too, but again, not to worry. The new mix should rectify that. I've decided to move to the next stage in the nutrient regime. This kicks up the Micro and Grow nutes, while maintaining the Bloom amounts.
Day 16:
M.C. 01-21 Today is the day - for the mother! I've cleared out some space and moved plants around. So back out to the grow room these girls go! MC-01 seems much better today with the reduction in light. The 5th node is almost flattened out and the 6th coming through still. Most notably though, you can really see the work she's put into the side branches! The branches at nodes 2 and 3 are starting to produce more leaves - great sign! The new growth at the top is also a nice dark green. Added 500ml water to the tray.
M.C. 02-21 MC-02 seems to have liked the adjustment of light as well. She's got nice dark green growth at the top, and the little branches at the 2nd node seem to have a full leaf! Added 500ml water to the tray.
M.C. 03-21 The photo from today is cool, because you can see how close MC-01 & 03 are, even though there's almost a full node difference. MC-03 is stretch out a bit to compete with her sister for the light haha. She's also put some more effort into the side branches that you can see. Added 500 ml water to the tray.
Day 17:
M.C. 01-21 I figured a video would be the best way to illustrate the changes today! They've been back in the grow room under the Veg dedicated light for a day now and seem to be loving it! MC-01 has its' 5th node out, splitting the 6th node, and I can JUST see the 7th node coming in. I don't think they'll get too much more height, as you can see that the side branches are starting to stretch now! She's definitely going to be well tangled in the roots by the end of the week when I hope to repot her.
M.C. 02-21 MC-02 is doing great despite the difference in height! You'll notice the side branches stretching out at nodes 2 & 3. The pots are also still fairly wet at their center, so I'll hold off on water most likely. At least this clone will have time to root more while we wait for the supplies!
M.C. 03-21 MC-03 also has great side branching! If you take a look at the group photo from today, you'll see that both MC-01 & 03 are practically the same height, but MC-03 snuck in there by the stretch haha.
Day 18:
M.C. 01-21 My order of D.E. came in last night, perfect timing! As you can see, her roots have fully reached the bottom, and have started to migrate upwards with the water that's absorbed. The soil was a little dry for my liking, which made things a little difficult/dusty but still no mishaps! Watered around the root-zone before covering with more soil to keep the gnats down.
M.C. 02-21 Not quite as much lateral root growth as MC-01, but still plenty enough for a repotting! Her soil was a little dry as well. Ideally I should have given them a light misting from the top of the soil and let is drip down to keep the dusty bits together haha.
M.C. 03-21 Nice and thick root growth, no issues with repotting, and strong stalk. The extra spacing in the nodes may prove to be helpful during the training phase.
Day 19:
M.C. 01-21 Some nice top shots today as they slowly get acclimated to their new homes. Once I see them push out a new node, I'll probably top them. This is to make sure that they're taking to the new pot without causing any extra stress before they can take it. Today I watered them with an early veg nutrient. I like to stay cautious with nutrient boosts since they're in soil - not to mention the added nutrients from the repotting.
M.C. 02-21 Top shots for the girls today. Not much change, but also no immediate signs of shock either, so I'll take it.
M.C. 03-21 You can't really see it in this angled shot, but the small branch at the second node is coming along nicely! I think the girls are happy that they each have their own tray not haha.
Day 20:
M.C. 01-21 Definitely noticing some slow changes to the top nodes when comparing the pictures from the previous day. The leaves are slowly starting to separate, and I'm not noticing too much yellowing yet which is good. Watered with 500ml water to keep water migrating upwards to meet the roots.
M.C. 02-21 Not noticing much change in this girl today, but that's okay. She's most likely focusing on the root developement instead which I can't complain about! Watered from the bottom.
M.C. 03-21 Maybe seeing some separation in the top leaves, however more notably are the small branches at the 2nd node that you can see better here. Still a bit of stretching with them as they get longer. I might even keep them on for clones later on. Watered from the bottom.
Day 21:
M.C. 01-21 Looks like she gained some distance last night, as the top node is now above the fan leaves, unlike 2 days ago. I'm really getting eager to top them, as I don't want them to waste too much time and energy growing tissue that I'll just end up cutting off. I'll be bumping the nutrients up starting next week to keep the progress going, moving to a mid-veg stage shortly. I'm going to let things dry up tonight for a fresh boost of water tomorrow to give it a dry cycle as the pot is still a bit heavy.
M.C. 02-21 MC-02 really worked hard last night it seems, as she almost completely flatted out her top leaves! I think she's ready for a topping, but I'll let her benefit from the headstart and let the other two catch up and root before. dry cycle for her tonight as well.
M.C. 03-21 MC-03 was busy last night too and is now slowly flattening out the top node as well! Maybe tonight they'll have enough progress to go topless afterall haha. Dry cycle in prep for watering tomorrow.
Likes
2
Share
@Canaryweed_tf
Follow
Pues ya tenemos la quinta semana de las GingerPunchAuto de la familia de Kannabiaseeds. En está semana han sacado más pelos blancos y que siga así. También les comunico que tienen distintas estructuras por que en las primeras semanas sufrieron un poco y como sabréis si le generas un pequeño estrés a las Autos se van a notar bastante, ya que las autos no tienen esos días de recuperación que podría tener una feminizada. Pronto más noticias😘
Likes
3
Share
@Piernaslocas
Follow
Ellas van fuerte , espero que no se vaya de las manos.
Les he dado micro vita de top crop un riego antes de pasar a floracion, pues el día de pasar a floracion ,toca riego foliar con Big one, me daba un poco respeto una posible sobrefertilizacion. 0'4g/L

Likes
1
Share
@NAG420
Follow
Just regular water 6.5 temps been great got a little behind on me transplanting her she will go inside 5 gallon fabric pot. Will feed her the 1 week feeding after the transplant.


Likes
37
Share
@The_Bearded_Grower
Follow
Welcome to Day 57 2/12/21 it's 35 days into flower and she is looking good. I have seen lots of growth and she looks healthy.
I have just realized that I have been doing the rez wrong all along but I think I can fix the mistake without dumping the rez.
I should have been mixing a new rez every week but instead I was just adding 18 L . I put 2 18L bottles in the rez when it should only be 1 that way I have less waste and keep the nutes fresh
that's all for this week's update so as always Happy growing and keep your stick on the ice 🙏
Processing
Likes
13
Share
@kevgrow
Follow
Hey Friends, end of week 7 from seed
Plant#1 is growing big, its almost at the point i might need to purchase a bigger grow tent because its getting closer to the light and theres not much room left.
- Increased the Amount of nutrition
- In the beginning of the week, I increased the light to 250 lux x100 but after the 9th hr I saw a change in the plant, it looked very sad and the color was beginning to bleach so I decided to increase the light wattage for only 6 hrs at 250 Lux x100 and then 6 hrs at 150. So far its working, I will try to increase the light each day so the plant adapts to it.
Thanks for all the support, will keep you guys updated, see you next week!
Will buy some netting, “SCROG” Training for week 8
Likes
4
Share
@PhinolaGreen
Follow
4. Woche
So langsam geht es voran, sie wurde mittlerweile 3x getoppt und ich lass sie so jetzt wachsen, jetzt darf sie Groß und Stark werden 😀

Likes
16
Share
@Elogrower
Follow
Yeahhh...last week for them. I can't wait anymore. Facing the possibility to move to another house I'll have to finish the process earlier than I was wishing but far late that I first tough in how long it could take to harvest.
Last two weeks they are showing a few signs in their trichomes (Dwarf 100% white with a few getting gold colour - N.Lights 80% white, a few gold spots) but I'm running out time.
About my two Jacks, they are still drying in a homemade amazon cupboard dryer box (not happy with that but no other alternative) and when it be ready I'll let here my opnion.
Likes
6
Share
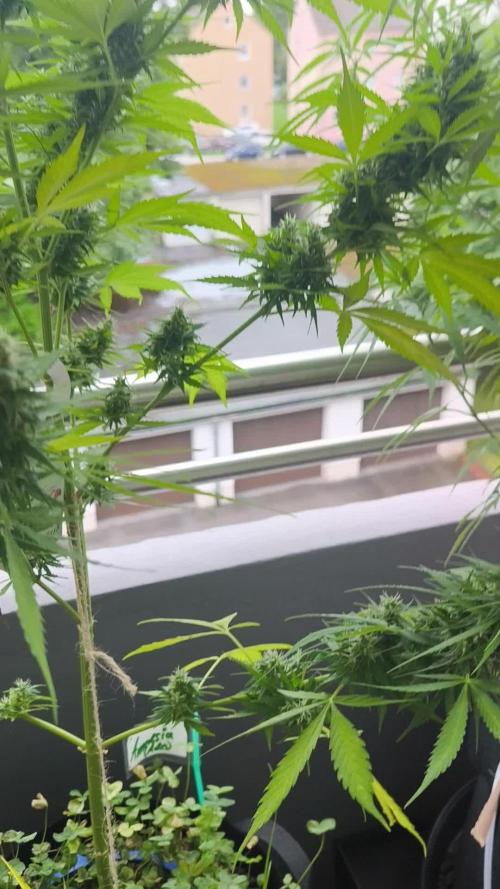
@BalconyBoy
Follow
04.08.25 the Auto Amnesias budsites are thickening up week after week, my guess is four more until chop, let's see. No bugs, fungus or other pests visible. Amazing to see this with powdery mildew present on the Quick Sherbet right next to it. It gets whiffs of peroxide spray but I don't drench it to avoid damage to the developing buds that are unaffected. Midweek the sun is said to pick up again at least for a few days in this unusual cloudy and cold stretch of summertime.
Likes
6
Share
@SzkolaZiola
Follow
Day 60 of 12/12
HARVEST TIME
They are soooo fine I barely have words.
Weak-neck gland trait is a fact. I was collecting FRESH, "WET" (non-dried) flowers for Fresh Frozen - the amount of trichome heads just breaking off during that process was astounding. Air was full of trichome heads every time I touched a branch or a bud.
I repeat - it was non-dried flowers, straight from a branch, from alive, watered plant - and I collected a few grams of loose heads in my TrimBin. Crazy stuff. I also pressed it and I got top-shelf rosin - without dryiyng and sieving or bubble ice wash. Mind blown 🤯
8 plants
60 days (8.5 weeks) of flowering under 12/12
4x4 ft tent
466W Mars Hydro light
= 2166g
of Whole Plant Fresh Frozen material (just trimmed buds + some trichome-covered leaves)
Now floweres are in deep freeze -36°C waiting to be washed for bubble hash and pressed into live rosin in the near future.
Likes
6
Share
@TherealNICOGREEN
Follow
Har det super godt efter været blevet, flyttet uden dørs, til resten af familien 🧑🧑🧒🧒💚☮️😇🤩glæder mig til at se hvor hurtigt de nu vokser, jeg har beholdt en indendørs. For at kunne sammenligne dem senere :) Men jeg ved jo næsten godt hvad det er der bliver bedst;) 🧡🖤💚🤩🤩😇


Likes
6
Share
@DeepRootsGrowTrees
Follow
Week #5 Gnomo Auto By Kannabia Nov 25- Dec.2nd plant has stayed consistent with its growth she's 11 inches tall with many tops she's more squat and bushy with big fan leaves. Had to cut some of the fan leaves to get the tops under them light and growth room.
Likes
15
Share
@No_Clout
Follow
Haven’t updated recently due to work/getting my forklift license, long story short I passed and now onto the plants.
The gelato are looking very well so far, switched the lights to 12/12 half way through week 4 so should be another week of stretch and then we will have the flower production (my favourite part) I’ve seen some weird marks on some leaves, not sure what they are or if their a problem but they don’t seem to be spreading etc so idk what it is but they seem healthy imo.
