The Grow Awards 2026 🏆 


Likes
Comments
Share
@MGGrowRoom
Follow
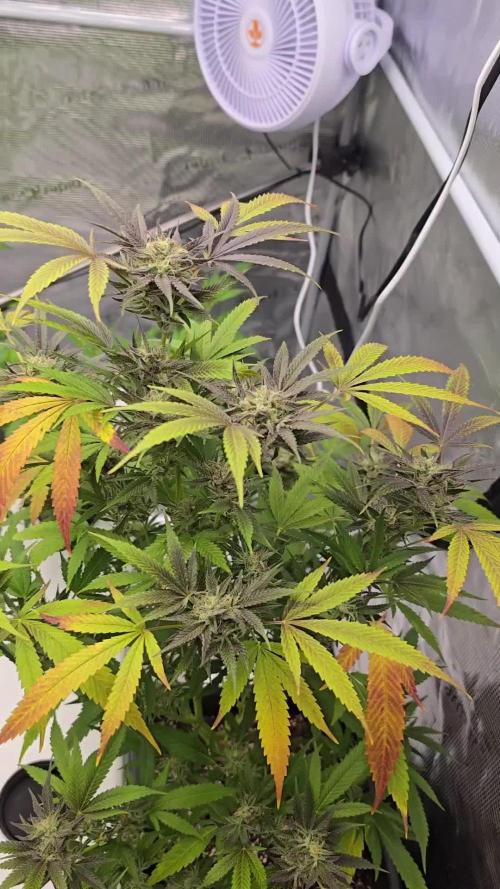
Week 2 of the flowering stage has commenced with my magnificent Mimosa x Orange Punch auto plant, and the progress is nothing short of extraordinary.
Standing proudly at 65 cm tall, the plant's growth and development continue to exceed my expectations, promising a bountiful harvest in the near future.
Environmental conditions remain stable and conducive to optimal growth.
Daytime temperatures range between 28-29°C, providing the warmth needed to support vigorous flowering, while nighttime temperatures maintain a comfortable 24-25°C.
Humidity levels remain consistent at 55-60%, creating a balanced environment that encourages healthy bud development without excess moisture.
In response to the plant's increased growth and metabolic activity during this crucial stage, I have further adjusted the watering schedule.
Now, the plant receives a generous 0.7 liters of water each day, ensuring that it remains well-hydrated and nourished as it directs its energy towards flower production.
One of the most delightful aspects of this stage is the emergence of sweet scents from the developing flowers.
Each day brings new aromatic notes, a testament to the plant's genetic heritage and the care it receives.
The flowers themselves are becoming increasingly resinous, with a light touch leaving my fingers pleasantly sticky—a sign of the potent resin glands producing cannabinoids and terpenes.
As I continue to monitor and care for my Mimosa x Orange Punch auto plant, I'm filled with a sense of anticipation and wonder at the natural processes unfolding before me.
Each day brings new growth, new scents, and new experiences in this journey of cultivation and discovery.
With dedication and attention to detail, I look forward to nurturing this plant through the remaining weeks of flowering, eagerly anticipating the day when I can enjoy the fruits of this labor in a bountiful harvest.
Until next time.


Likes
16
Share
@MountainFlowers
Follow
Final Report:
Grow:
The plants has grown very beautiful and healty without pests and diseases. They grown bushy and with medium height during all the life cycle.
I had try to use LST in third veg week but i did't made correctly and after that i dicided to return to grown normally without any particolar tecnique.
I used a littel more fertilizer then mine usual and that made the plants grown fast with only a littel bit of leaf margin burn which I solved by decreasing the quantity.
In the first two weeks of flowering stage the plants started grow not to very tall (except for one) and the number of the branches increase, in this phase i only defoliated when the fan leaves turn yellow in late stage.
During all flowering stage the flowers grown but they remained very soft, they turned dense and bigger in the last weeks and this time i waited until almost all of them were mature before harvest the plants(I waited a littel more respect OG Kush CBD).
I changed the taller plant from one grow room to another(in the sixth week) when she became too high and she couldn't stay more in the smaller grow box(nothing changed in the enviroment between the two boxes).
Equipment and grow box:
The enviorment of grow box has been optimized every stage with the right temperature, umidity and air flow.
Vegetative temp/umidity --> 23-29 °C/45-55%
Flowering temp/umidity --> 20-26 °C/40-50%
The air flow was created by two pc fans and one big fan.
Harvest:
This time the plants were full of dense buds but the lower branches had many fluffy flowers(i used them to make some hash) but the result not change too much .
The result of this grow is amezing compared to my old expiriences.
I harvested the flower and i made a fast curing process after i washed the crop and i let them to dry with a fan on it.
After five days a take the branches which were to dry and i did the final trimmig before put all the harvest in a open jar for finishing to dry.
I collected all the leaves, fluffy buds and trimming scraps in a bag and i let them dry.
I harvested the taller plant before the other two because she had matured earlier(with the OG Kush ladies).
Later i put the bag in the freezer and when i collect and dried all the scraps from OG Kush and Dandoverde Haze i did some Ice-O-Lator hash.
I used 250g of trimming stuff and i made 11.50 g of hash, I had use a set of 5 bag and i take the resin from the 160µ - 120µ - 73µ- 25µ bags.
I pressed all the resin in a great block of tasty strong hash.
Always better every time 😊💪
Total harvest ---> 126g only of dense buds and 11.50g of hash.

Likes
38
Share
@DomanAtrik
Follow
(UPDATE) Not bud rot, cabbage worms. Lame. Purchasing some BT killer. The week was going good until I (may have had a delusional) found some potential Bud Rot! I took photos and asked a question, no answer yet. So I cut the potentially infected area away and will monitor very very closely.

Likes
19
Share
@BB_UK
Follow
She’s slowed down on her stretch and started to produce flowers! She very sturdy and has very thick stems and sun branches. I’m intrigued to how she’s going to yield as she’s so huge and full of vigor as she was nearly a couple of weeks behind when I started her and look at her she’s a beast! Next I switch over to over drive for 2 weeks then initiate flush! So close but yet so far ya know 😉

Likes
3
Share
@dvr147
Follow
11-25-2024 - All three plants received 2000ml PH'd tap water with a dose of Recharge and Silica yesterday. These plants are in full on stretch mode now and they're growing rapidly. These three plants are already as tall as the last grow I had and we're not even into flower yet. My expectation is this week all three plants will go into flower. I'm seeing pre-flower on two of the three plants and would expect that all three will have signs by end of tomorrow. The Mystery Seed continues to be pushed in ways the other two have not. I top dressed the Mystery seed yesterday with 3 Tbsp Gaia Green Power Bloom and we'll see if that makes a difference or kills the plant. I suspect it'll be ok. If I do not detect any burning I'll probably treat all three with power bloom next week.
Otherwise, things have been going exactly to plan. There are no blemishes on the leaves and they've been maintaining a healthy green throughout the grow. I'm going to be watering a little more frequently as we get fully into flower AND I'll be ramping up the lighting in the tent to between 600-700PPFD. Should top out between 900-1000PPFD within the next couple weeks.
11-27-2024 - At this point I'm the big worry for these plants going forward as I have a hard time not messing with them. Since these are Autos, I'm only performing necessary defoliation to expose bud sites. As these girls head into flower I want to make sure I have light getting to as many as possible. These plants look very healthy and two of three are in pre-flower while the "Mystery" seed continues to stay in veg but is also an inch or two shorter than the other two plants....and has been topped. All three plants right now are as tall as the last three plants when I harvested so I consider this a good sign. Happy Thanksgiving!!
11-28-2024 - Happy Thanksgiving. Today I'm thankful for sites like this where I've learned so much. This morning, my CO2 levels finally are getting over 1000ppm which can only mean that the exhale bag is working now....took about 3.5 weeks. This morning I watered all three plants each with 2 Liters of dechlorinated tap water PH'd to 6.5. My tent conditions are OPTIMAL @ 75F/60%RH/1.1VPD/1000PPM CO2 and PPFD readings at the top of the canopy at 650 or so. The plants are growing vigorously now and are getting ready to go into full flower. I would expect flower sites throughout by the start of week 6 if not sooner. Its flower time!
11-29-2024 - Plants grew over an inch since yesterday and all three are stretching nicely. The Mystery Seed, which I topped, is a couple inches shorter but coming along nicely. All three are healthy, no bugs, no signs of anything except health. The conditions in the tent are still perfect and I'm feeling very confident in a good harvest.
11-30-2024 - Bumped up the lights this morning to 70% which should yield around 700-750 PPFD. Watered Granite Runtz and Frosted Cherry O's 2 liters each but the Mystery Seed was still a little wet so I'll water that one tomorrow. Its still not in flower so water uptake is a little less. CO2 levels continue to hover around 1000ppm and I've bumped the humidity down to around 50-54% since they're heading into flower. I also top dressed both the Granite Runtz and Frosted Cherry O's with Gaia Green Power Bloom.

Likes
14
Share
@GoldenWeedGrower
Follow
D36/V32 - 06/05/23 - SCROG net added. Some LST
D37/V33 - 07/05/23 - LST on SCROG
D38/V34 - 08/05/23 - LST on SCROG
D39/V35 - 09/05/23 - LST on SCROG
D40/V36 - 10/05/23 - LST on SCROG
D41/V37 - 11/05/23 - 👉 Water Change - Pure water for 2 days she's going to bloom
D42/V38 - 12/05/23 - 👉 second day of flush

Likes
76
Share
@Nugs_are_us
Follow
Hey all welcome back to sort of week 12 or week 4 of flower!
I have just got home and don’t no what to say...... gold leaf 1 has nanas that seam to have popped and could have wrecked the whole grow 😭
The girls are def hungry as you can see there is some yellowing of the leaves so they will be getting a good feed today and again in 3 days to keep them in the zone. They are stacking up and getting a little fatness to there buds. Frost levels are just starting to kick in and the tent is pungent!!
Well the next few days will be spent watching for signs of any of the other plants turning male on us. Fair to say I’m a little gutted about now as I’m about to chop up a gold leaf that will produce over 4oz of dry buds fingers crossed this diary ain’t over
Likes
26
Share
@GrowGuy97
Follow
All of the ladies are now starting to flower except the NHL I think it’s a little behind but all in all they are growing great!
Day 31 - Everything seems to be going great, fed the ladies yesterday havnt had any more issues yet (Thankfully) thanks for following & happy growing friends✌️🏼🌱
Day 33- A few of the ladies have some dead leaves not sure if it’s normal or if something is wrong.. they all seem pretty healthy other wise!


Likes
21
Share
@Staffedition
Follow
Привет друзья. Моей растихе сегодня 103 дня.
Паутинный клещь побеждаю
На много стало зеленее и пушистей.
Растение пришло в себя.
20.10 перевёл свет в режим 12/12
Начал применять LST технику на 19 дне и продалжаю применять её через день, а 18 августа добавил ДЕФОЛИЗАЦИЮ
С 20.08 ДЕФОЛИЗАЦИЮ делаю каждые 3,4 дня
С 20.08 LST технику делаю каждые 4.6 дней
На сегодняшний день влажность 54%
5.09.2023 заметил высокий Ph 7.9
С 48 дня Ph не ниже 5.8
На сегодняшний день Ph 6.0
Начал кормить с 60 дня Canna Terra Vega
PPM 870
Всем мира и добра!
Не забудь поставить лайк❤️, если понравилась как прошла неделя
И читайте наш TELEGRAM: https://t.me/smail_seeds
#Smail_Seeds 😀

Likes
4
Share
@LoganatorDude
Follow
Blue Black x Maple Leaf Indica x White Rhino x Ruderalis
70I-20S-10R
So far no nutrients in the water as of yet.
Starting to stink around day 19 of flower. Nice smooth skunky smell. Not exactly skunk. But smooth and sweet. Heat is not as bad but still pretty bad.
pH is good.
No visible signs of pests* or pathogens.
*pests* little fruit fly looking bugs that don’t land but hover around. And a tiny spider trying to catch them. Web production from this spider has been extremely minimal, and when present, only existing connecting from leaf tip to leaf tip; On the fan leaf tips furthest away from the center.
I haven’t removed the spider as it appears as an overwhelmingly insignificant problem, in fact: maybe a potential deterrent from other unwanted pests, like a protector/guardian. Either way I easily clear away any webs with my hands without even feeling or noticing anything. I think in the video, he is blurred out of focus on a leaf tip. Anyways. If the lil arachnid gets closer in towards the buds, I might consider moving him, but he is literally staying all the way to the outside perimeter of the plant. He is very considerate.


Likes
4
Share
@Organic473
Follow
This girl is doing what she wants spreading out and loving the space I made for her with the 10 gallon pot.
There are pistils popping everywhere on her pre flower I guess I have to start flowering her for the next week.

Processing
Likes
6
Share
@Jack_Greenstalk
Follow
topped previous weeks, this week was spent training plants out to get ready to flip to flowering light cycle next week. left platinum yeti number 4 alone it is smallest weakest growth so i'm doing less to it than the training wise.


Likes
459
Share
@Ju_Bps
Follow
Hello my friends 👨🌾👩🌾,
Week was great! I got my new lamp, SP3000 from Mars Hydro 💡💡.
The girls are beautifull 😍, we have lot of hedgehogs 🦔, already frosty ❄️❄️
A nice smeel when I open the tent 😋😋.
The canope is nice 🌲🌲, we have a nice rectangular green screen, as expected.
I didn't remove leaves, I know in few weeks some of them will be died, so I'll let the nature do is job.
So I just kick off the big leaves.
💦 1 Watering this week 1.5l/plant .
Water + Cannazym + Sugar Royal
PH@6
I continue to spray with water each day, but probably the last week I did it, I don't like put water on the buds...
I'll start the flowering nutes next week, I didn't give this week, so I'll start the schedule week 2 Flo.
Lamp @100%
After 1 week, I love this lamp, very nice for 120x60, all the canope is covered by the lamp.
Thanks community for follow, likes, comments, always a pleasure 👩🌾👨🌾❤️🌲
See you next week 👊👊
Mars Hydro - TS 1000
https://www.mars-hydro.com/ts-1000-led-grow-light
Mars Hydro - FC3000
https://www.mars-hydro.com/fc-3000-samsung-lm301b-led-grow-light
Mars Hydro - SP3000
https://www.mars-hydro.com/sp-3000-samsung-lm301b-greenhouse-led-grow-light
The High Chameleon - Vannila T
https://www.thehighchameleon.com/shop/vanilla-t-5

Likes
64
Share
@Ju_Bps
Follow
Hello community!
All was good this week, plant still look fine and healthy.
I've given two time water this week,
1 x 1.5l/plant water + rqs bloom tabs
1x 1.5l/plant water + rqs tabs + Sugar Royal
Next week, I ll give
1x water + tabs + sugar royal
1x water + tabs + canna pk 13/14
Main buds start to be big :)
Plant have a nice sugar smeel
Have a good week my friends, and see you next week!


Likes
7
Share
@Staffedition
Follow
Всем привет!
Моему малашу сегодня 11 дней.
Выглядит здоровым и счасиливым.
Поливаю водой, ни чем не кормлю
Признаков болезни и нехватки элементов не замечено!
Всем и мира и добра!

Likes
5
Share
@Willy_Balls
Follow
1st week of 12/12 light going beautifully. They are doing really well. Although I still experienced root issues. I think this spot is cursed :P
