The Grow Awards 2026 🏆 


Likes
Comments
Share
@Crownlaura
Follow
8 weeks / 56 days today.
Growth has slowed down a lot this week luckily. Smell is getting really hard to contain now.
Sticky orange buds still nowhere near as big as purple skunk but definitely a bit fatter than last week. Purple skunk buds are getting a lot fatter. Both are really sticky to the touch, looking a bit frosty close up and can see plenty of trichomes.
Little bit of leaf burn but not a lot I can do because of the space issue so just tucking the branches and leaves as best I can and moving the lights around a bit to minimise it.
Watering between 1 and 1.5 litres every other day and they are soaking it all up. Increased to 3ml per litre of nutrients too.
Humidity has been a lot easier to keep under control this week and hasn’t risen above 60 all week so I am happy with that. it’s been a worry for a few weeks.
I had a real panic this week when I thought I saw seed sacks forming at the base of each branch. But after hours and hours of reading, I am pretty sure they’re calyxes.
No intentional defoliation this week but I’ve accidentally snapped a couple of fan leaves whilst watering. I really need a bigger tent!
Would love opinions on when you all think they might be ready for the chop. Comparing to other diaries I still think I’ve probably got another 6+ weeks but I’m daring to think about how/where I’m going to dry them out. I’m pretty sure purple skunk will be ready first so drying in the tent will be a no go.

Likes
14
Share
@Jays_Not_Here_Man
Follow
Girls are fattening up! The one is doing great, good frost development and size. While the other is showing signs of lockout or deficiencies, but is still growing strong.
They are probably getting their last dose of nutrients next week, they are a 10-11 week strain and that’s fast approaching 🤤
RH was lowered to between 50-53% and temps have been steady around 77-79. They are coasting now, just gotta fill up the humidifier daily and watch them finish. Happy Gardening 👊🇨🇦❤️🌱

Likes
53
Share
@AutoCrazy
Follow
This plant sure is a dream to behold!! She’s starting to smell super sweet. The frost is starting to pop and the colours in the buds keep coming.
I did have a top off one cola go bad due to bud rot. It’s been super humid as of late.
Onward!!
😎🍿🍻🌱

Likes
10
Share
@Bud_vista
Follow
Welcome to week 7 growmies!
She’s doing great in her second week of flowering!
She is still stretching and got a bigger defoliation at the end of week 6.
For the start she’s getting only ph regulated water from top and some nutrients from bottom. There a little signs on the leaf tip why I skip nutrients for one watering cycle.
On mid of week 7 she’s still stretching and first orange pistils shown up. On weekend she’s getting another defloration and another round of nutrients.
We are finishing week 7 shortly! She was defoliated once again to ensure more light density in lower conopy. She’s doing still great and she’s not showing any signs of stress or leak of nutrients. It seems that she’s also stopped stretching. Looking forward to the next weeks!
Processing
Likes
29
Share
@DudeGrowsWeed
Follow
Fast Buds CA (still don't have a clue what CA stands for). Looking better. I gave her an overdose of Recharge and I think it helped bring some green back to the leaves. I'll probably OD her again. Nice little bud sites developing! 😃

Likes
19
Share
@GoldenWeedGrower
Follow
Legend
Timestamp: 📅
EC - pH: ⚗️
Temp - Hum: 🌡️
Water: 🌊
Food: 🍗
pH Correction: 💧
Actions: 💼
Thoughts: 🧠
Events: 🚀
Media: 🎬
D: DAY, G: GERMINATION, V: VEGETATIVE, B: BLOOMING, R: RIPENING, D: DRYING, C: CURING
________________________________
📅 D70/B08 - 24/01/24
⚗️
🌡️
🌊
🍗
💼
🧠 pH is finally stable on the lower side (hopefully)
🚀 The Tent-X is on its way, I can't wait to get it..
🎬 Added Timelapse video
________________________________
📅 D71/B09 - 25/01/24
⚗️ EC: 1.2 pH: 5.6
🌡️ T: 23 °C H: 45%
🌊
🍗
💧
💼 I put T-H Sensor of TrolMaster on the SCroG net
🧠
🚀Tent-X from TrolMaster received, I'm going to set it up tomorrow
🎬 Added Timelapse video
________________________________
📅 D72/B10 - 26/01/24
⚗️ EC: 1.2 pH: 6
🌡️ T: 23 °C H: 40%
🌊 Added 6L
🍗 Added Bloom A-B - CalMag - Big Bud - Bud Candy - B52
💼 Tent-X set up done !
🧠 It works perfectly and as I just see so far, from now on, I'm going to experiment a new way to grow !
🚀
🎬 Added Timelapse video and Set-Up videos and pics
________________________________
📅 D73/B11 - 27/01/24
⚗️ EC: 1 pH: 5.5
🌡️ T: 23 °C H: 40%
🌊
🍗
💧 Added a little of pH-
💼
🧠
🚀
🎬 Added Timelapse video
________________________________
📅 D74/B12 - 28/01/24
⚗️ EC: 1 pH: 5.5
🌡️ T: 23 °C H: 35%
🌊 Added 4L
🍗 Added CalMag - Bloom A-B - B52 - Bud Candy - Big Bud
💧 Added some pH-
💼
🧠
🚀
🎬 Added Timelapse video and 4 pics
________________________________
📅 D75/B13 - 29/01/24
⚗️ EC: 1 pH: 6.0
🌡️ T: 23 °C H: 50%
🌊
🍗
💧
💼
🧠
🚀
🎬 Added Timelapse video and "TM+ Pro" App screenshots. This is the app used to monotoring the Tent-X controller
________________________________
📅 D76/B14 - 30/01/24
⚗️ EC: 1.2 pH 6.1
🌡️ T: 18-26 °C H: 30-55% (from now on, I'll put the Min-Max values of T-H as I can easily read them from the app.)
🌊 4L
🍗 CalMag - Bloom A-B - Bud Candy - Big Bud - B52
💧
💼 I added a Humidifier as the H falls down to 30%
🧠 With the help of Humidifier, according with "TM+ Pro" app, I got the perfect VPD (Vapor Pressure Deficit) rate !! (see screenshots)
🚀 I have to face a very low rate humidity of the external enviroment
🎬 Added Timelapse video and T-H values daily graph, and perfect VPD from the Tent-X controller
________________________________

Likes
29
Share
@Naujas
Follow
A new project begins!!! with Zamnesia and Plagron, I have already grown them once - THEY are amazing!!!! But this time I want to try their automatic genetics:) the girl will spend all her growing time in a suitcase :D A really interesting journey awaits with her, I always have some hope of winning the main prize This time is NO EXCEPTION !!!:D Good luck to everyone :)

Processing
Likes
13
Share


Likes
11
Share
@Madman2020
Follow
Yeesh, what a ball drop
Circuit Breaker kept tripping.
Using 3 450w, co2, exhaust fan, 3 fans.
I unplugged the Co2 after 3 days of troubleshooting.
Vpd got totally screwed, plants didnt get watered and messed up the steer.
Irrigation system clogged(probably from stagnating)
Reservoir has buildup of organic material.
Think it was caused from Kelp, and microbes being added to the tank
A bubbler didn’t help, covering it didn’t help. I did not try “hydrogaurd”
I will stop adding organic nutes.
I am now watering by dubbing a bucket into the tank and gand waterin
Also, no more than 1000w of lighting in a room.
I prefer to use a full quality setup with less plants. No Co2 is ridiculous. Each test ive done has shown that co2 gets me heavier yields.

Likes
5
Share
@Blakoby
Follow
Going slow i believe because I chocked the seed with peat moss. I needed to put vermiculite, rookie mistake. I’ll do better next round though!

Likes
12
Share
@DawgBoi
Follow
The flowering is really starting to weigh on the branches so I supported them with bamboo sticks and everything is looking pretty good. Ill be posing more photos at the end of the week.

Likes
10
Share
@Barzenegger
Follow
Altough the "anonymous" seedling was still a bit behind, I decided to move the plants into the AutoPots. The pots were still disconnected from the tank and the plants were handwatered for the time being.
3 days later it was clear that "anonymous" had died. I was getting a bit frustrated since the fourth pot was now empty and the other 3 plants were growing happily. I started another germination attempt.

Likes
2
Share
@Fat_Olsh_Farms
Follow
Day 57. Very frosty beautiful buds going. About to do some minor defoliation.
Day 60. Fed with megacrop. Giving it megacrop every other watering, 10-15% runoff.
Likes
6
Share
@tomatoGrower
Follow
Went away for a week and missed ideal harvest. Unfortunately, the harvest seems to have been fried to a crisp. Last time I share the responsibility. :(

Likes
57
Share
@SmokieMcPot
Follow
2 Girls 1 Cup week 9? Short term memory loss is a m'fer...
*edit* i have talked directly to quite a few suppliers/vendors/etc... and i can tell you FastBuds is a great company to do business with. im not licking boots here... i paid for my beans, and am loving these FastBuds genetics so far. JUST LOOK AT IT! a little short, but i think thats my fault from around the day 21ish mark if ya look back in the diary. i told myself i wasnt going to run any more autos, unless it was some odd occasion. but IF i do in the future... it WILL be FastBuds. unless this pink runtz i have ends up being an auto, and if it is.. im going to off the fucker lol.
Day 56- GC is trying to catch up. I think stabbing the main helped a lil lol. Few random plucks on WG tonight, and don't even want to start on GC for now. May clean it up a bit later depending on how the back feels. It's got a ton of branches that are going to be too close REAL soon. Kinda f'd GC off over a week ago, and said I'd run it again in the future to make up for it. So not too pressed on how it looks, as long as it stays alive until WG chopping day. Atleast it wasn't a male 🤣. Anyway, bumped the girls up to the "aggressive" mid bloom GHE feed. Using TAP water to reduce the amount of calmag needed since mine has N in it.. Breakdown as follows:
5gal TAP water - 137ppm
15mL calmag - up to 252ppm
10mL hydroguard
Micro- 33mL
Grow- 33mL
Bloom- 47.5mL
RES total after PH correction - 818 @ 5.91.
=============================================================================================
Day 57- I REALLY need to cut back GC... like yesterday... backs been hurting something fierce, and I'm out of my medicine of choice ATM. few random plucks on WG today. may make my way in there again later and start hacking away at GC. will update pic if I do. They're both liking aggressive feed, maybe a touch too heavy on the N though.
*edit* 🎶oops, i, stabbed it again...🎶 lol. still feel there's a branch that's gotta go. Started pulling WG out some to help expose lowers. Need more garden wire for sure
=============================================================================================
Day 58- cut back GC even more.. we'll keep it alive, but I'll make sure it doesn't block the beloved WG. remember, there will be a list of things I learned I did WRONG in this experiment and will share at the conclusion. Trimmed up WG little bit later in their morning. Top view pic is after the small defol. Some fans only had the middle finger snipped, to be on the safe side. Progress seems slow on WG atm, but it's getting ready to fatten up and mature.
=============================================================================================
Day 59- i just cut back GC AGAIN!!! like HALF of its branches, and cut all the tops to the same length before snapping todays pic. after comparing 58 to 59's pic... it STILL looks like it grew.. WTF... that things confused ASF or something... just dont herm on me... WG finish is right around the corner.. a few weeks... hang in there GC... hang in there... ive been topping off with 80% strength nutes and RO water, and the EC has remained pretty consistent. may bump em up one more time for WG next week to help fatten her up some. right before we dial it all back for the end. WG already looking pretty frosty, and the weatherman is predicting some more in the next weeks.
*edit* added a night vid to show my WG defol struggles. Its easier to see why the foliage looks so thick and it needs a trim when lights on when you see lights off.. We're down to a few fans towards the bottom to help out down there. Rest are connected to bud sites, and are limited. May need to add a small fan blowing up WG skirt soon.
=============================================================================================
Day 61- nothing really to report. tried to kill the ice probe, and put frozen 1L bottle (in 12hr rotations) to see how it performed. i think 61.2 is a little too cold for my liking, and one morning i woke the temp was over 71.. the roots are messing with the flow and the water isnt getting chilled as much with the probe. problem ive been facing for the last week or so. ice probe back in, and warming up the tent with its exhaust again.. should fab up a duct system for a 3d printer... ideas... tinkercad here we go..
=============================================================================================
Day 62- kinda feel bad for leaving GC out of the shot yesterday. Since she's riding along in this experiment... added her back today. WG is starting to phase 2. Her finish is coming within the next 2-3 weeks I'm guessing. Maybe 4? We'll see what tricomes say when the time gets closer.
=============================================================================================
Been offered a cut off a custom strain that looks and tastes AMAZING! i know i may have mentioned pink runtz or amnesia lemon next... but i dont think i can pass up this opportunity.. will mention more about it, its name, etc etc when the time gets nearer..
As always, thanks for stopping by and checking out my current grow experiment.
Link to YT vid of the day 27 on timelapse https://www.youtube.com/watch?v=fJO-eTeyyEU
Likes
103
Share
@PEAKYPLANTERS
Follow
Happy evening to all of you .... Brothers of the world's most coveted company!
Peaky gardens burst of thousand-color flowers in an immense enchanted and fragrant valley ...
This week we dedicate ourselves to the rinsing of the soil to start cleaning the roots and eliminate excess nutrients
I hope the contents like you .... if so it was ... leave your opinion
Kiss Kiss
Likes
2
Share
@GingerGarageGrow420
Follow
Strain: Chill Out OG F4
Day 14 of Flower
Day: 63 from sprout
Medium: Fox Farm Ocean Forest
Light: Vivosun VS2000 at 75%
VPD: 1.3 kPa
Light Distance: 8 inches
Watering: By hand, ~16 oz daily
Nutrients: pH Perfect Advanced Nutrition Grow, Bloom, Micro 2 ml / L, 1 ml / L big bud
Automatic watering ready to go!
Likes
6
Share
@CanarianGrow92
Follow
Perfect strain to grow, easy, fast and sweet as sugar totally covered in trichomes.
The plants showed a very equaled and stable genetics and are very generous with a little care, this strain is almost like walking directly into a dutch candy shop with all kind of winegum smells, simply perfect.

Likes
46
Share
@Capo420
Follow
Awesome Week💚
Following some great discussions with more experienced growers, I really think we got things back on track!
🙏 To those Growmies
I really raised the ppm this week we topped out around 630 PPM
This was in an attempt to balance out some nutrition issues.
I think the ladies have responded very well. 😃🌱💪
Raised the light up to 24in as well a few days later after seeing positive changes due to feeding regiment.
Started preflowering, showing pistols on all plants. Counting down these last 7-8 weeks when the ladies beauty comes out 🤩
Will update throughout the week with photos and videos.
Happy Growing!
🤙💚💪🌱😎🌱💪💚🤙


Likes
1
Share
@Dxublecxp
Follow
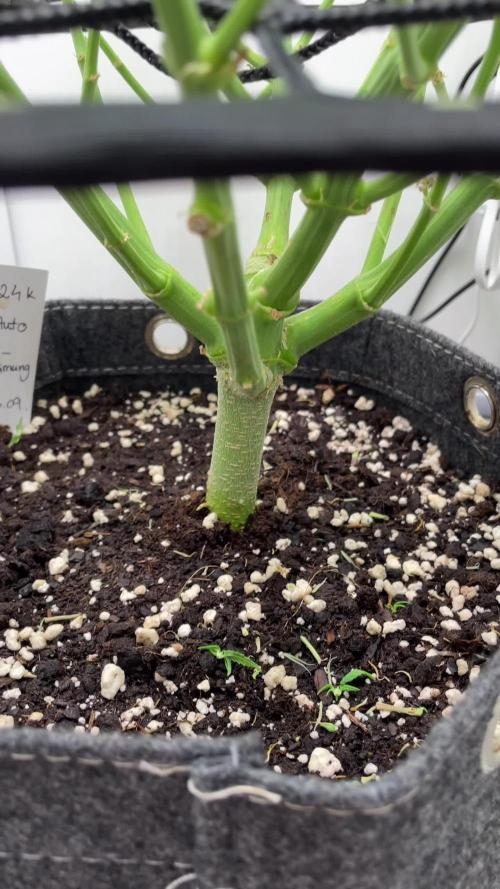
Third plant that started as worst seed and was in slightly worse soil setup and pot actualy seems to be on the way to become the most yielding one. Thanks to its bigger pot (16 l instead of 12 l) and one more week of veg it grew the largest. This week i got back home from my summer trip and applied some low stress training to get more sun to the bottom leaves. By the 7 weeks I was gone the plants were fed just water and still look amazing to me.
Hight of the tallest plant is 65, and the other two are 55 and 50.