The Grow Awards 2026 🏆 


Likes
Comments
Share
@Margoulin
Follow
2/04
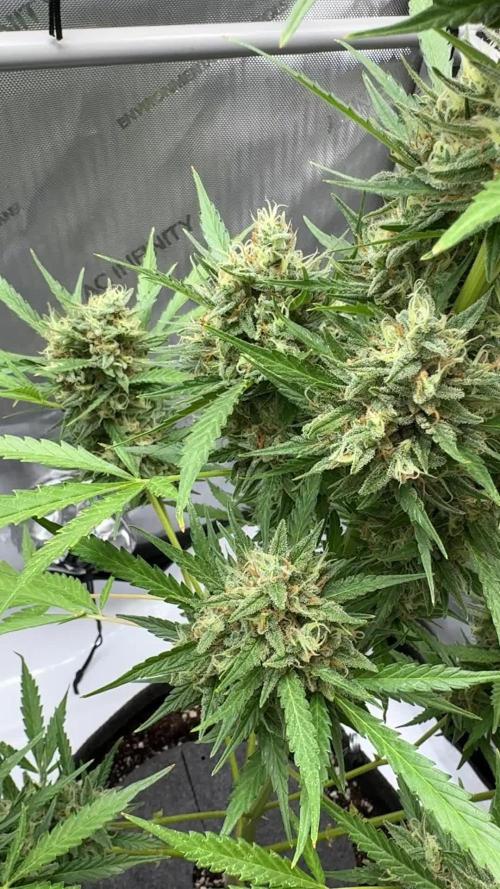
Very nice strain by Weed seed shop, first time 100% indoor. Growed Fems and Autos outdoor from their bank few times in the past, and it was also nice.
Loved the colours, very homogeneous plant.
Manicure made just before the harvest
I will weight flowers after drying, before curing and add infos and photos


Likes
27
Share
@Fat_Olsh_Farms
Follow
Always dry trim. The leaves come off more easily when dry and it preserves more THC with the longer drying time. Will weigh up in 7-10 days.
Smoke report. Tastes like strong grape juice when you hit it. Very smooth and easy on the throat. Pretty much gave me instant relaxation and relief from my depression. Seems like a good morning smoke which I love. Thanks fastbuds!
Weighed up to 2.5 Oz. Could've claimed 3+ but didn't count ANY larf.


Likes
13
Share
@Growyourownathome2x2
Follow
16th of April day 37 some defoliation done to open up the inner nodes let them get some more light to grow up

Likes
44
Share
@RakonGrow
Follow
Note :
+ jegliches Zubehör wird in der GermniationsWoche aufgelistet . Zeitraffer Videos folgen immer nachträglich.
+ videos werden so geschnitten das nur ein geschlossenes Zelt erscheint , ergo Fehlen paar reale Minuten (ca 1 Std) .
Day 57:
+ 2.0 Liter Flaschenwasser
+ + Dünger für Blühte
+ + + Canna Terrar Flores (Achtung wirkt wie PH-)
+ + + Canna Boost
+ + + Cannazym
+ + + Canna PH+
+ + PH 5.91
Da es heute heiss ist , wird wie Gestern laufen . Bis 19:00 Uhr wird das Licht reduziert und dann DLI nachgeholt.
Day 58:
Da es immer noch heiss ist , wird wie Gestern laufen . Bis 19:00 Uhr wird das Licht reduziert und dann DLI nachgeholt.
Day 59:
+ 2.0 Liter Flaschenwasser
+ + Dünger für Blühte
+ + + Canna Terrar Flores (Achtung wirkt wie PH-)
+ + + Canna Boost
+ + + Cannazym
+ + + Canna Rhizotonic
+ + + Canna PH+
+ + PH 5.91
16h jetzt mit 1000 PPFD und jeweils 1 Stunde Sonnenaufgang und Sonnenuntergang.
Day 60:
Mal ein bissel Größenvergleiche gemacht .Das Clipper Feuerzeug ist 7.5 cm hoch .
Day 61:
+ 1.75 Liter Flaschenwasser
+ + Dünger für Blühte
+ + + Canna Terrar Flores (Achtung wirkt wie PH-)
+ + + Canna Boost
+ + + Cannazym
+ + + Canna Rhizotonic
+ + + Canna PH+
+ + PH 6.01
Day 62:
Das Wetter bleibt stabil, damit bleiben die Growwerte auch stabil. Bisher Läuft das 1000 PPFD Spitze und 750 PPFD Sekundätriebe ganz gut . Ihre Freundin die leider ein Wasserschaden erlitten hat (tja da war wohl irgendwas im Wasser was ein Regenbogenfilm erzeugt hat , im schlimmsten Fall Waschmittel) nimmt der einen Seite zwar licht, aber geht halt nicht anderes bei nur einer Lichtquelle . Ich fahr halt gleich ein doppel Experiement mit dem Licht. Bisher aber holt sie ganz gut nach mit 900-1000 PPFD auf die ziemlich gleich hohe Krone .
Day 63:
+ 1.75 Liter Flaschenwasser
+ + Dünger für Blühte
+ + + Canna Terrar Flores (Achtung wirkt wie PH-)
+ + + Canna Boost
+ + + Cannazym
+ + + Canna Rhizotonic
+ + + Greenhouse Feeding BioEnhancer
+ + + Canna PH+
+ + PH 6.01

Likes
8
Share
@Roberts
Follow
Fast version A is doing good. She is vegging nicely. Maturity signs should be showing up soon. Everything is looking good. Thank you Dutch Passion, SSSC, Athena, and Medic Grow. 🤜🏻🤛🏻🌱🌱🌱
Thank you grow diaries community for the 👇likes👇, follows, comments, and subscriptions on my YouTube channel👇.
❄️🌱🍻 Happy Growing 🌱🌱🌱
https://youtube.com/channel/UCAhN7yRzWLpcaRHhMIQ7X4g.


Likes
4
Share
@TheObserver
Follow
Switch to flowering stage
Day #38 12/12 with red LED light from tonight on. ScrOG net Is on. Pots are still wet, no need to water. I defoliated a little bit, then I'll let the alone for a while.
I need to find a environment for the clones. It stresses me a bit but I don't want to kill those 4 little clones, not voluntarily.
Day #40 I still tend to water too much but I'm slowly learning. Watered until saturated with Biogrow and Atami B Cuzz a +b (for coco, whatever),a swell I added a bit of magnesium nutrient by Cifo, a garden store brand. Trying to understand how to ScrOG.
I built a small growbox with leftovers from my garage. Not a penny was spendt in this operation. Clones are still alive. Starting a new diary.
Last night reading blogs I discovered 💡🌟🔆 Photone App 💡🌟🔆, a free grow light meter https://growlightmeter.com/download/
They also have a web guide to establish how much light your canopy needs in the moment https://growlightmeter.com/calculator/ . In pre flower it figured out I need 1100 umol of red LED light (calculation DLI). I adjusted my light height accordingly, It was too close.
Very, very useful. Those guys in switzerland deserves a huge kudo.
Day #42 Growth Is fast. I snapped a branch trying to ScrOG so I repaired It with wire, as I done with tomato before.
Watered with some broth and my own nutrient I use in my garden. I defoliated a Bloom that was facing down.
Humidity at 60%, I'm struggling with It a bit. Dehumidifier in the room Is now set at higher setting.
Happy growing. Any advice is apreciated.


Likes
10
Share
@Gamfin
Follow
// Day 85
I started to give her only water + CalMag at the last watering. That was 3 days ago and today I gave her water + CalMag again. No nutrients anymore, she still has plenty, which you can see by her green leafs. And she is still drinking a lot, which means that she is not near to be done. No fade on her what so ever which is really sad, I was looking forward to some nice colours at the end of flower. It's day 85 already, she does not look ready at all. I'll give her 2 more weeks max., after that I just chop her down no matter how she looks. I go on vacation and want her to dry during that time. I cannot let her stay in the tent when I am gone so that's her last chance. Hopefully she finishes during the next 14 days.
For the ones who missed it: I removed a head bud from a side branch because of spider mites. I catch some here and there on the leafs but did not spot another camp yet. Hopefully it stays that way and they're not well hidden inside bud sites. That would be a catastrophe. I'll do a bud wash of course but I doubt that you can flush all their well hidden web-camps out, if more of them exist. Let's just hope that I am lucky this time.
// Day 88
Got 3L again, just plain water. No CalMag, no pH adjustment, just hard H20. She does not need anything anymore at this point of life.


Likes
92
Share
@GMSgrows
Follow
Everything is doing fine. Checked the runoff waters and the ppm going in was 800, 1.6 sec and the ph was 5.8 using Cyco nutrients, and it says to keep ph from 5.5 to 5.8 through bloom.
So the runoff water was at 900 ppm and pump ph is sitting at 6.0.
The top of the one cheese is past the light, but she is so large there is a lot of flowers under the light. There starting to do some bulking now.
The odours from the cheese is pretty strong. Looking forward to getting this month finished. Some fine strains to try next.

Likes
10
Share
@DangerMouse
Follow
Day 105. I do not have enough experience to tell if that is a long time to finish for an autoflower.
2 Days ago I added 8 liters of water pH'd at 5.9. I'm also curious of anyone knows if this strain produces amber colored thrichomes. I've read some stuff on the internet that certain strains produce almost none at all. I can't tell of people are telling the truth or I just should have more patience and wait for them to show up. The close-up pictures you see are from day 105.
Almost all her sugar leafs are yellowish or completely yellow btw. I forgot to make recent pics of the cola's. I'll add some of day 103.
On a sidenote, by the looks of it, the buds are still gaining some nice mass and density.
Cheers,
DangerMouse
--------------- Day 107 -------------------
After 10 days of FloraRipen another batch of FloraKleen. I added pics of the trichomes and some buds.
The runoff had an us/cm of 4500... Like I said before, my meter must be broken, right?
After 48 hours of flushing I'll just change the water for pH'd at 5.9.
Does anyone know what kind of bugs are in the runoff? The video is of the water that came out of the bucket. I've seen them before for did not capture them. The look a bit like springtails but does anyone know? There are none on the plant itself, just in the water. Let me know!
Happy growing,
DangerMouse

Processing
Likes
9
Share
@Wiebechillin
Follow
- A couple of branches have snapped due to LSTing. Newbie here, researched and found out branches that were not completely snapped could be saved
- This led me to discover bending branches until they "kink" can actually be used as a type of LST
- 5th seed ended up straightening out and grew normally. Happy I did not throw it out. Very resilient
*******************************************************************************************************
First signs of flowering during this week


Likes
6
Share
@Flower420
Follow
Chelsea is doing well. Resin is starting to show on her leaves. Some hairs are showing orange on bud sites. She’s officially taller than my first grow with Durban Poison. I added a bit of Golden Tree this round. Because why not? It’s golden tree!

Likes
16
Share
@StickyFingah420
Follow
Día de cosecha y la verdad estoy muy contento con lo que veo, son hermosas estas flores y su fragancia exquisita.
La planta tuvo una deficiencia de Cal/Mag, la que se corrigió a tiempo pero de igual manera afectó en su crecimiento y rendimiento, más allá de eso estoy feliz por las flores de calidad que tendré para degustar más adelante.
Likes
120
Share
@DogDoctorOfficial
Follow
Get ready for a fun and informative update, including the training techniques i am using to shape our Tangie into a true ninja warrior!
Our Tangie has been flourishing with energy and vigor, showcasing her ninja skills at every turn. With each passing day, she grows taller and stronger, reaching for the sky like a true botanical ninja. Her vibrant green leaves are a testament to her health and vitality, shimmering in the grow room like emerald blades of a ninja's sword.
To help guide our Tangie's growth and maximize her potential, i've employed the art of Low Stress Training (LST). Picture this: we're like plant whisperers, gently manipulating her branches to create a symphony of growth. Through the technique of leaf bending, i encourage her branches to spread out, creating a wide and even canopy. It's like teaching her the ancient martial art of flexibility and agility.
By skillfully bending and tying down her branches, i ensure that each bud site receives an equal amount of light. This training technique not only promotes better light penetration but also encourages the growth of multiple colas, leading to a higher yield of resinous and potent buds. Our Tangie is like a ninja warrior, adapting to her environment and maximizing her potential with every training session.
But training isn't limited to physical techniques alone. I am also nurturing our Tangie with the perfect balance of nutrients from Aptus Holland. Their specialized formulas act as her ninja fuel, providing her with the essential elements she needs to grow strong and healthy. With each nutrient feeding, she absorbs the power of growth and development, inching closer to becoming a legendary ninja of the cannabis realm.
Of course, light plays a crucial role in our Tangie's training regime. She thrives under a PPFD (photosynthetic photon flux density) of 500, bathing in the intense glow of her training camp. These photons are like her training partners, pushing her to optimize photosynthesis, grow denser foliage, and develop the building blocks for future bud production. With each photon absorbed, she becomes a more formidable ninja warrior.
Creating the ideal environment for our Tangie is essential for her training success. She prefers a cozy temperature range of 27 to 28 degrees Celsius, providing her with the warmth and comfort of a tropical paradise. With a relative humidity level of 60 to 70%, she thrives in the perfect balance of moisture and freshness, creating an environment that supports her ninja-like growth and training.
Before we conclude, let's give another shoutout to Dutch Passion, the master breeders behind our Tangie strain. Their dedication to crafting top-notch genetics has allowed us to embark on this incredible journey. I am forever grateful for their expertise and commitment to the world of cannabis cultivation.
So let's continue this thrilling adventure with our Lego Ninja Tropical Tangie Run. Embrace the power of LST and leaf bending as you shape your plants into formidable ninja warriors. Remember to provide them with the right nutrients, light, and environment to support their growth. May your gardens be filled with the spirit of the ninja, and may my Tangie's training lead to an abundance of resinous and flavorful buds.
Stay tuned for the next update, where we'll unravel more tales from the captivating world of our Tangie. Until then, keep training with passion, harness the power of LST, and watch as your plants transform into stealthy ninja warriors.
As always thank you all for stopping by, for the love and for it all , this journey of mine wold just not be the same without you guys, the love and support is very much appreciated and i fell honored and blessed with you all in my life<3 <3 <3
#aptus #aptusplanttech #aptusgang #aptusfamily #aptustrueplantscience #inbalancewithnature #trueplantscience #dutchpassion #dogdoctorofficial #legoninjago #growerslove
With true love comes happiness <3 <3 <3 Always believe in your self and always do things expecting nothing and with an open heart , be a giver and the universe will give back to you in ways you could not even imagine so <3 <3 <3
Friendly reminder all you see here is pure research and for educational purposes only
<3 <3 <3 Growers Love To you All <3 <3 <3

Likes
Comments
Share
@JararacaHaze
Follow
Week 9: Growth, Clones, and Preparing for Buds
This week brought some important changes to the grow!
The plants stretched significantly, taking advantage of the rainy weather, despite the temperature fluctuations.
Overall, the conditions are supporting their development well.
Notes:
I made a few more clones, and so far, all of them are thriving. It's exciting to see a 100% survival rate for the clones so far.
Out of the 12 plants, I identified three males. Two of them have started opening their pollen sacs, and I’ve begun collecting. The pollen is being stored in the freezer for future breeding projects.
I did a light defoliation to improve light penetration to the lower branches, which should help promote even growth.
Likes
15
Share
@SmokingTiki
Follow
This week was half sunny and half cloudy. I increased a bit the Bio-Bloom and the plant looks nice.