The Grow Awards 2026 🏆 


Processing
Likes
6
Share


Processing
Likes
27
Share
@Reaper
Follow
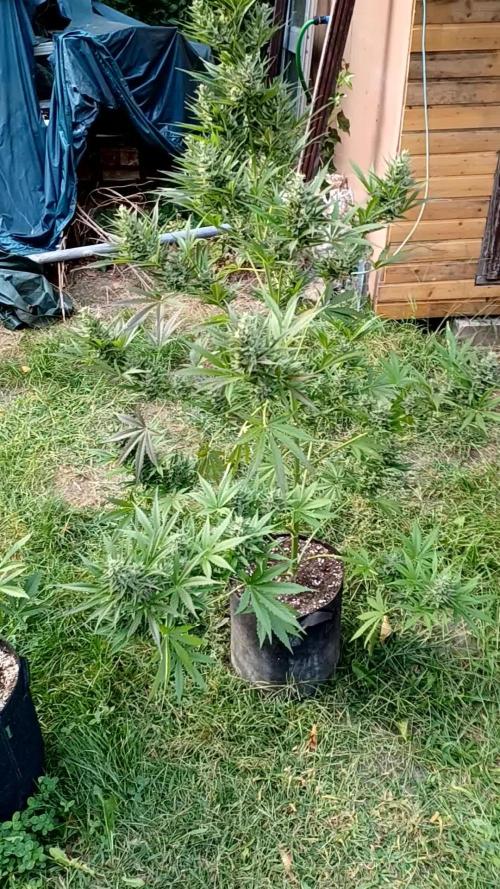
START OF WEEK 8 of the critical
start of week 7 for the girl scout coockies.
the critical is the plant u see first the coockies are in top left corner and bottom right. the midle and top right are my 2 new criticals who are still in VEG but i put them in the flowertent to speed it up a litle (the light is stronger and i got the space) when the flower light goes out i move those back to my veg room (bathroom uhum) 😅
nothing too special this week ill probably harvest the critical next weekend and let the coockies go another 3-4 weeks. the buds are fattening and i see the tips of those leaves have slight signs of nute burn so just water from here.
see u next week
(edit: lol the critical has major calmag issues do not watch those leaves shes almost done and surviving my heatwave torture tent)


Processing
Likes
20
Share
@eldruida_lamota
Follow
Que pasa familia, andamos por aquí, puesto que está farm cheese a cogido muy buen ritmo, esta será la última semana que la daremos de crecimiento, y en nada pasamos a 12/12.(floración).
El ph está controlado en 6.5 , la humedad está por debajo de 55% y la temperatura no sube los 26 grados.
Vemos un ejemplar que está ramificando bien, el led me está gustando mucho la flor crece más compacta.

Likes
22
Share
@Naujas
Follow
well, that day dawned :) growing in a suitcase was really difficult, temperature, humidity, plant growth, everything was very difficult to control, but I managed something, it was an extremely interesting experience :) 119 gr wet, I think it will be between 25-30 gr dry , which I think is really good from the suitcase :) it was something different than usual, and now I'm going to grow another begina, which is much bigger than this one :) good luck to everyone, and thank you.:)


Likes
5
Share
@Brendanfromtherose
Follow
I've brought the PPM down again and kept the pH at 5.7-5.8, plant looks great first grow so very happy, Alot of Trichomes and don't know if I should be getting ready to flush and harvest, buds still getting fatter and she's still thirsty and drinking water but a lot of amber pistils and not sure if the crystals are clear or Milky but plant looks Great, just unsure when to harvest,
I've reduced nutes a little more and calyxs still fattening up, gonna hopefully start flushing at end of this week for about 2-3 days in my 4gallon bucket

Likes
5
Share
@Deltatigrou0169
Follow
Salut à tous,
Je vous est mis les vidéos de hier car je n'ai pas eu le temps de le faire.
Je vous est mis les vidéos d'aujourd'hui, vous verrez sur les vidéos et photos que j'en quelques unes qui pousse bizarrement pourtant elles ont toutes le même traitement 🙃. Elles font 8,5 cm à part mes petites Mutantes.
Bonne soirée à tous 😉
Likes
5
Share


Likes
12
Share
@CanarianGrow92
Follow
Half way through the flowering now.
Oreoz from the super sativa seed club is looking great.
she loves food and supports HST very well, we did several toppings, and is very suitable for a scrog, she stretch more like a sativa plant, with longer branches but the buds have the typical indica snowball structure, a well balanced hybrid i must say. The smell has some nice hints of chocolate with some gassy creamy background. Very rich in THC and in general a very easy to grow plant.
some support is required due to the longer branches
Likes
12
Share


Likes
65
Share
@MadeInGermany
Follow
Flowering day 3 since time change to 12 / 12 h
Hey guys .
My cutting heating broke 3-4 weeks ago, which was fixed immediately and everything went wonderfully.
Now, 3 days ago, the central heating broke down in the entire room, so that at night I only have temperatures of around 13 degrees :-( .
One or the other lady is slowly starting to see a phosphorus blockage, as this can no longer be absorbed at temperatures below 15 degrees, like many other nutrients :-( .
A friend looked at the heating yesterday and came to the conclusion that a real company had to do it, which is by no means possible for a stranger to enter my room.
I quickly ordered heating mats for all the boxes so that the ladies could at least get warm feet.
That's all I have this winter full can do .
Let's hope everything will be fine 🙏🏻.
As soon as the heating mats are attached in the coming days, I will post them in the pictures.
Now for the update.
Despite the severe cold, the ladies are still doing well and have made good progres .
The ladies only had to be watered once this week, each time with 1 l, because it absorbs the water very slowly because of the cold and I don't want to overwater it.
I took every single plant in the pot to take a close look at their roots.
These are snow white and look very healthy 🙏🏻.
It was also the last time neem oil sprayed so that the last trips are finally gone.
Otherwise everything was checked and a lot of planning was done, like I do with the heating mats.
Since a friend had the same problem in one winter and the heating mats got 10 degrees plus on the pots, I am very confident that it will at least bring something for the last cold month 😃
🙏🏻.
Despite LST, she grew extremely in the vegetarian 😂 since I know the grinspoon, I will definitely do a few more LSTs during the initial flowering 😅
until then have fun and stay healthy 🙏🏻
👇🏼👇🏼👇🏼👇🏼👇🏼👇🏼👇🏼👇🏼👇🏼👇🏼👇🏼👇🏼
You can buy this Nutrients at :
https://greenbuzzliquids.com/en/shop/
With the discount code: Made_in_Germany you get a discount of 15% on all products from an order value of 100 euros.
👇🏼👇🏼👇🏼👇🏼👇🏼👇🏼👇🏼👇🏼👇🏼👇🏼👇🏼👇🏼
You can buy this strain at :
https://www.barneysfarm.com/dr-grinspoon-5
Water 💧 💧💧
Osmosis water mixed with normal water (24 hours stale that the chlorine evaporates) to 0.2 EC. Add Cal / Mag to 0.4 Ec Ph with Organic Ph - to 5.8 - 6.4
MadeInGermany


Likes
18
Share
@Grow_for_Happiness
Follow
So it's the end of week 2 Veg and I can't believe it but I transplanted 3 of the girls already! I don't think I have ever transplanted that early, usually it's at least another week or more. Guess that's the difference of starting under T5 bulb vs starting under full spectrum LED. Incorporating microriza into starting soils helped also I'm sure! By day 18 they were looking a little sad, water didn't help so figured they're probably short on space and craving their new 2 gallon fabric pots. Took them out of the solo cups and as they pics show they were ready indeed! Roots for days, nice and thick/healthy/white roots.
When prepping soil I use a 100L bin. I always make sure to wash my hands and wear a face mask as the dry amendments get into the air during mixing and you really don't want to breath that. I mix the soil with worm castings to an 80/20 ratio then add my dry amendments and mix well. As well as incorporating Dynomyco into the soil at the recommended rate of 15ml per 10L I also sprinkle it into the transplant hole. Since using this stuff I've never had transplant shock and they just seem to grow faster and thrive more 💪.
Light has been at 30" and have lowered to 25"@50%. Goal is to reach 17.5" which should give a spread of 450-500 umol/s according to PAR tests.
Can't wait to see the growth this week! 🤞👍🙏


Likes
5
Share
@Ninjabuds
Follow
It’s the 1st week of flower I flipped the plants to 12/12 a few days ago. There is a lot going on and a lot of cool and amazing things coming in the near future. Make sure to check out my YouTube page. I bought me a DJI gimbal this week. Might be my new favorite toy. The temps are starting to break for the summer. I don’t see it being very long until winter is here and it’s time to use a heater and not an ac unit. All of the plants are healthy. The plants have all grown so well I turned down the light intensity a bit today the plants didn’t seem like they was starting to strech very much. Hopefully the lower light intensity will make them strech out just a bit


Likes
14
Share
@Jamescarter
Follow
Fifth week and booming I wanna say chop next week but might hold out extra two weeks start flushing yesterday en she's pack with trics sticky as hell well happy I bought purpanater it's the don swer by it now

Likes
79
Share
@DudeGrowsWeed
Follow
Mexican Airlines is approaching cruising altitude!! LST has been working great so far IMO. The lower nodes that usually become the lower, less productive, branches are looking like main colas! I doing more LST on my new grows now too! Started feeding Fox Farm Big Bloom this week with Recharge.