The Grow Awards 2026 🏆 


Likes
Comments
Share
@sjrseid
Follow
Some high-stress training was required. Fartbutt (the plant on the right) outgrew the container again, so I intentionally snapped the top to prevent further upward growth (I left it attached so it could still form a central cola.

Likes
21
Share
@Wrongholn519
Follow
It's been another easy week in the Fastbuds tent. I've spent most my energy preparing my outdoor grow space for a wild summer. At this point, there's not much I can do except water and watch my plants grow. I've added videos of other plants in relations to the mimosa cake just for visual aid. I also added a photo of my cheese auto.. it's still drying!
With the Mimosa cake auto I've been taking fan leaves off slowly for weeks now. This is a very busy plant. She is also going to run later than I expected. She's on day 76 and I suspect 95 to 100 days to finish time. I'll have to keel feeding her bloom nutes for the next few weeks; her 3 gallon bucket ran out of nutrients already.
Feeding schedule: water, feed, water, feed
Step 1- I'll take an aeration stone and use it to remove the chlorine residual in the water... this only takes 8 - 12 hours depending on water temperature. (I'm a water treatment process operator, I have checked several times in the past with my own Cl2 meters).
Step 2 - add Calmag
Step 3- add bloom nutes
Final step - pH the water accordingly (very important that this is final step)
A TDS residual of 500 ppm equals roughly 1 E.C. (I just double it)


Likes
4
Share
@afroman9_guru
Follow
A mold infestation has appeared.
The humidity has been 70% for the last 2 weeks.
The weather has been disappointing for the umpteenth time. It's hard to get a harvest in the summer without an air conditioner)
I was 2 weeks short of harvest. Today I trimmed the foliage, which I usually don't do at this time before harvest.
I'm unlikely to reach the finish line; the weather forecast is rain.


Likes
45
Share
@masterofsmeagol
Follow
9/3 Shook the plants off this morning and took a few pics and did a video. Let's see if it uploads. Plants are doing good. Toasted toffy is due for another plant doctor application tonight. It seems like I'm losing lots of leaves. Looking back on my other diaries I guess it's normal. BUT I could've had pest/pathogen problems then. I'm over thinking it. Toasted toffy only needs a few more weeks. It will definitely outvrun the disease. The nugs are super dense too. The plant in the 50 is loosing leaves faster than I'd like. It is also one of the furthest along. The big leaves that turn yellow look like it's a calcium/magnesium issue. The stalk and branches are all bright green and healthy looking. So are the flowers. It could be something below the soil. I couldve been overwatering but last time I waited until it drooped. It will be fine though. I'm happy with my results so far. Not my best or biggest year but I'm going to put in the work and Mae these plants produce the best quality cannabis that im able too. Also I think plant doctor may kill insects. K bicarb with dawn does too. I've found a few dead bugs like flies and pillars. Pillars actually seem to be gone. Not many moths either. Unless I see them I'm not going to treat them for it. This is that magical time where you get to watch the plant produce those beautiful flowers. Despite some small problems I'm very grateful for what I have. I've worked hard for it.
9/4 Watered everything but the sherb pie which was still heavy with leaves yellowing. It's tied for the furthest behind in flower with the seed in the 10. I treated the toasted toffy with 1/4 gallon (4tsp/gallon) of plant doctor. I avoided flowers as much as possible and tried to just get a few leaves. I used the rest on the soil. I just wanted it to absorb a little faster. That's why I sprayed the foliage. It's not 4 days it's 14 days when tje plant doctor just leaves behind a bunch of potassium and phosphorus after it's done its job. Can't be used in a 14 day interval with copper and I think that's what treats septoria best. I dontvknow if I can use that in flower. Doesn't really matter. Things are looking good. Plant Doctor and the K bicarb seem to be doing there job effectively as long as i stick to the application times. I made a short video but didn't upload. I'll try again but I may have some medical emergencies that need to be dealt with. If not I should defoliate and tie down some event horizon branches. I thought about treating the other event horizon as well. I'm not positive it has septoria but it wouldn't hurt anything to be practice. It AT LEAST has a couple suspucuous spots. I smelled a skunk as soon as I got out of my car. It can't get in my grow but I might put out traps to catch it. We'll see how it goes. Video seems to be uploading. It's at 31% so I'll wait for it. I think I've got like four or five weeks on my toasted toffy and one event horizon and the one in the 50 that I THINK is red runtz. That's good that I'll have different plants to harvest at different times. It's seeds from here on out though. It was hard to find info on some of the strains I'm growing but they all have ONE thing in common. They are EXOTIC and they are at least MODERATELY DIFFICULT to grow. AT LEAST lol. Last year I picked the right seefs and strains and it greatly helped. Still, if these are difficult strains to grow, then I'm doing a good job.
EDIT: I WAS STONED BUT IM PRETTY SURE I TREATED THE PLANT IN THE 50 WITH PLANT DOCTOR. DIDNT SPRAY BUDS. TRIED TO GET THE LEAVES THEN USED THE REST ON THE SOIL. I REMEMBER BECAUSE A STREAM ACCIDENTLY HIT A COUPLE LEAVES ON THE HUGE PLANT IN THE 10.
9/5 Sherb Pie was light and drooping. It's not to far in flower and still seemed moist yesterday with a little bit of weight. I watered it a gallon. I defoliated a little but I need to go through that plant. I have a bunch of plants that need a little work. The 50 gal seed is losing lots of leaves. I must not be feeding it enough, overwatering or maybe theres some sort of lock out. The plant looks nice and healthy. Leaves just turn yellow and die. Looked like a calcium or magnesium deficiency but i saw a septoria spot. I wouldn't think I've over feed or locked out using the small amounts of nutes I've used. It will be time to feed again soon. It's in the middle of flowering and still has leaves. I'm hoping things work out. I just have an anxiety disorder and worry too much. I'm GOING To have a great harve! I just need to keep moving forward and putting in the work.
9/6 What a fucking shitty morning. I did research on how to keep skunks out of your garden. Because I smelled it and the neighbors shot a few. Dad put traps out and it caught one. It wasn't a no spray trap so I approached it with him. Both had tarps. I kept telling him to throw it while I was distracting it bur he got a cramp and only got it over half. The half away from my garden. It's pretty far and down in a field but still. We had talked all morning about how to release it. I offered to drive their dog to take it for a walk so his alcoholic girlfriend wouldn't spiteful put the dog on its run. It wouldn't be sprayed but I made it out like it would ruin my plants. Picked dad up and got him to the bathroom. In that 30 seconds the stupid bitch grabbed the dog and brought it outside despite me YELLING "Can't you wait 5 minutes!? We've been dealing with this all morning. I heard fuck you in my head and she did it anyway. Dog ran at the skunk barking and it sprayed. Not a lot but I was fucking pissed. She's a full blown alcoholic and doesn't like me around early or the fact that my old man's 80 and house is mine. Anyway I got back and there was NO SKUNK SMELL. AT ALL! I WATERED EVERYTHING BUT SHERB PIE AND FED EVERYTHING BUT SHERB PIE. ILL FEED AND WATER THAT TOMORROW. WATERED A GALLON WITH A QUART OF FEED. Researched my strains found out they were all "difficult" to grow. One year ago to the Day I cut my first tenth planet. I got a couple close to a few weeks but the others will be later. If I can pull this off though I'll have some crazy quality! Grateful for what I have that's for sure! I doubled beastie bloom this time. We'll see how it goes.nothings uploading. I did some vids a pictures but I'll have to upload today.
9/7 I think it rained last night. I forgot to water and feed the sherb pie but I'll do it when I get back. I shook off the plants the best I could. I need to get the leaf blower out now and put it to use. Buds are swelling like crazy. GMOs are very tight flowers. Same with the event horizon. Rock hard nugs. With the gmo's I'm not worried. The were monster cropped so they have enough leaves even if some do die off. The toasted toffy only has like four weeks left. Same with the event horizon. The plant in the ten is the furthest behind but it's extremely healthy. I removed some leaves from the bottom and large fan leaves. The plant in the 50 I hope finishes before it loses all its leaves. I treated it with plant doctor and SOME people strip their plants but I don't. I'm grateful for what I've got. Won't be the biggest harvest but WHEN I make it to the finish line I will have some incredibly potent strains. I'm proud of myself to even get these to finish seeingvthe level of difficulty on cultivation. I'm trying to upload some stuff. We'll see.
9/8 Apparently it rained pretty hard last night. Took forever to go through and shake everything off and defoliate what needs it. Sherb pie is praying to the sky and almost totally purple. It's flowering so much more in the last couple days. Everything has. Even the one in the ten is stacking up! I defoliated most of what needed it and I was soaked. I noticed a branch on the middle gmo that was getting heavy and starting to break away from the trunk. It wad wobbly but I don't think there was a break un the Cambrian. I made a sling with rope (couldn't find zip ties) and I pulled it tight amd secured that branch to the tomato cage. GMO buds are hard as rocks. Everything is in overdrive. They liked that beastie bloom. I have cha ching but nothings ready for that yet I don't think. We'll the event horizon and toasted toffy might be I'll have to check. It's been beautiful today but not too hot. Lots of wind which is good. I'll upgrade supports as needed. Flowers are progressing at an amazing rate. Weather is supposed to be great the next few days. I'll keep this updated.
9/9 Had to shake the plants off. WATERED EVERYTHING BUT THE SHERB PIE WHICH WAS REALLY HEAVY. It's also lost a lot of leaves and the majority of leaves have turned purple. Toasted toffy and event horizon and red runts are pretty far into flower. I tried to take some pictures. Even the ten is blowing up! That looks like I'm going to switch to cha ching when flower gets further. Trichs are developing nicely on the ones further in flower. This year it's going to be quality over quantity. All these strains are ranked HARD to grow but have insane cannabinoid profiles and high THC %'s. So if I can keep it together for another month I'll be golden. Looking forward to it. This is the fun part. It's also the anxiety provoking part. I've learned a lot just since joining grow diaries.

Processing
Likes
32
Share
@Scandinavia
Follow
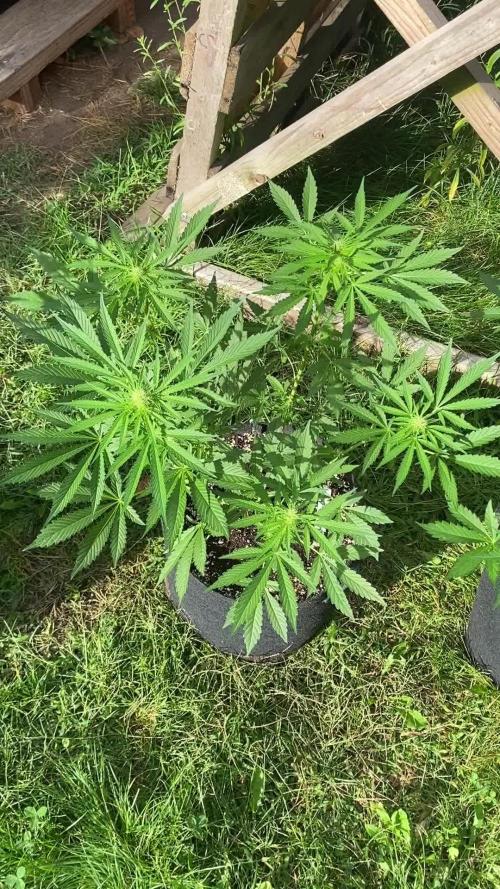
Day 7 today from sprout. They are doing great, but i have sometimes 29c in the tent and my humidy sometimes fall to right under 40% which i dont like, but the girls seems to like it. Also i lowered both lights 10 cm down.. The Led is about 70cm above, and the HPS 70cm. I may begin feeding them very soon with BioGrow and BioHeaven but only 1/4 of recommended dossage.
In the night i now have around 60% humidity, and it also helped me get my core tempature down from 28-29c to around 26-27c because my lights wasnt on 24h anymore
Likes
34
Share
@ertaverd
Follow
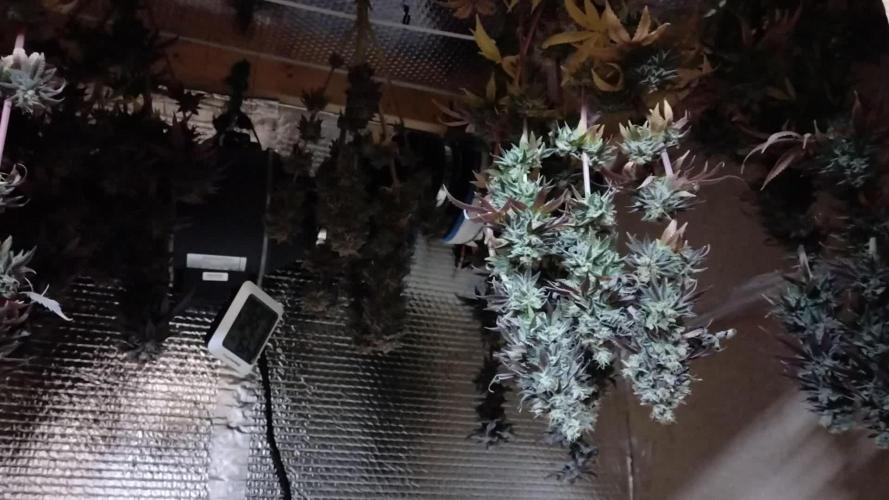
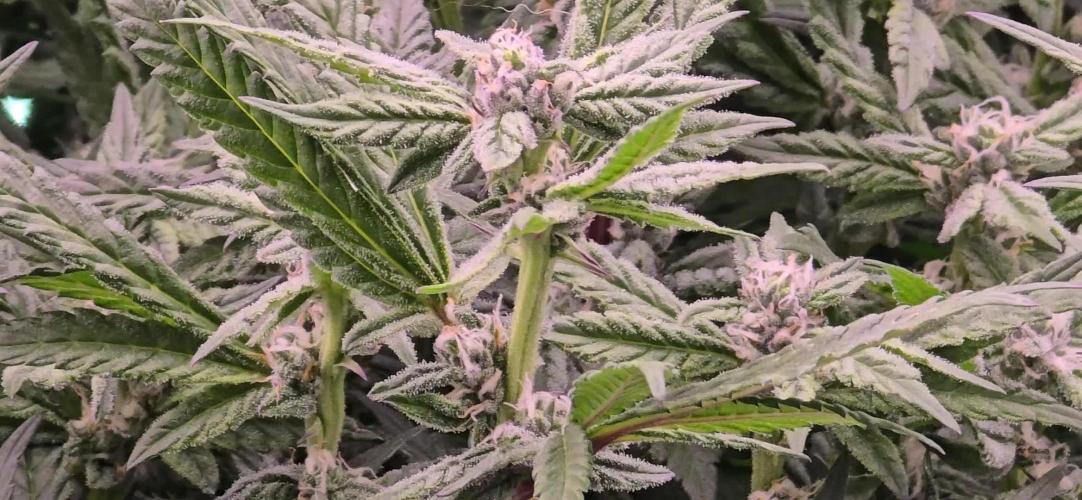
everything is fine, the rains have stopped and it seems that the plants are quite mature, I think I will harvest them next week. It has been 2 weeks without watering with fertilizer, making the washing of roots as natural as possible. They have developed a very beautiful purple color in just 2 weeks, because of the stress caused by the cold. I have also found some worm and some rotten bud but usually it is holding very well. I found a leaf of a very powerful pink color, much more than I had ever seen, and that color is not repeated throughout the plant, I leave some photos. chekit

Likes
8
Share
@Mon_monde_onirique
Follow
Semaine 2 de la végétation, purple shine arrivé à 4étage de feuilles , ça va être le moment de lui appliquer la première taille.
Dans son air pot 1L purple shine développe un joli réseau de racinaires.
Le 15/04 première taille application+ application foliaire de geisha, au lendemain de la taille purple shine semblait aller très bien l'apport foliaire geisha lui a fait un grand bien.
Cette seconde semaine de végétation purple shine a commencé a profiter de tout les nutriments de croissance contenu dans la gamme terra samouraï de @shogun(terragrow, katanaroot, silicon, calmag, geisha foliar)
Likes
46
Share
@Roberts
Follow
I had a pretty good overall grow with Drunken Bitch Slap from Aeque Genetics. She grew well under the Hortibloom Solux 350. It looks like she will provide several ounces of good bud when dry. She got very big and has long saggy branches with nice frost buds on it. She smells like a black licorice, and gas smell. I am very curious to how she smokes. Thank you Aeque Genetics, and Hortibloom. 🤜🏻🤛🏻💪🏻❄️🌱
Thank you grow diaries community for the 👇likes👇, follows, comments, and subscriptions on my YouTube channel👇. ❄️🌱🍻
Happy Growing 🌱🌱🌱
https://youtube.com/channel/UCAhN7yRzWLpcaRHhMIQ7X4g


Likes
15
Share
@Oetelando
Follow
One of the Zakes ( topped one)get Harvest today.
In 2 Weeks i can say more but she looked very very nice
Eine Zake (Getopped) wurde als 1. geerntet da sie den Trichome Chek bestand.

Likes
16
Share
@Wakesk8
Follow
The clone looks nice, I have some issue ( in my opinion ) with cal mag but balance is great 👍
Any suggestions??


Likes
35
Share
@MadeInGermany
Follow
Info:
Unfortunately, I had to find out that my account is used for fake pages in social media.
I am only active here on growdiaries.
I am not on facebook instagram twitter etc All accounts except this one are fake.
Flowering day 36
since time change
to 12/12 h.
Hey guys :-) .
The buds developed really well this week 👍.
They get wider, bigger, and firmer.
They are already starting to smell very tasty.
This week it was poured 3 times with 1.2 l each (nutrients see table above).
Unfortunately I found a couple of single trips that tell me that the trips still haven't completely disappeared.
Since I'm not a neem at this stage I will inject more oil and the lady has already finished over half of her cycle, I will let her run like this and the newcomers will be treated again 👍.
So I hope that at the next round all of them will finally be gone.
I had the problem more than 5 years ago and it took a long time until everything was ok again and there was no animal left.
Otherwise everything was checked and everything was cleaned.
I wish you a lot of fun with the update.
Stay healthy 🙏🏻
You can buy this Nutrients at :
https://greenbuzzliquids.com/en/shop/
With the discount code: Made_in_Germany you get a discount of 15% on all products from an order value of 100 euros.
You can buy this Strain at :
https://greenhouseseeds.nl/
☝️🏼☝️🏼☝️🏼☝️🏼☝️🏼☝️🏼☝️🏼☝️🏼☝️🏼☝️🏼☝️🏼☝️🏼
Green House Seeds Company Cup Clone 🏆
Type:
Wonder Pie
☝️🏼
Genetics:
Wedding Cake x OG Kush
👍😍
Vega lamp: 2 x Todogrow Led
Quantum Board 100 W
💡
Flower Lamp : 2 x Todogrow Led
Cxb 3590 COB 3500 K 205 W
💡💡☝️🏼
Earth: Canna Coco Professional +
☝️🏼
Nutrients :
Green Buzz Liquids :
Organic Grow Liquid
Organic Bloom Liquid
Organic more PK
More Roots
Fast Buds
Humic Acid Plus
Growzyme Big Fruits
Clean Fruits
Cal / Mag
Organic Ph - Pulver
☝️🏼🌱
Water: Osmosis water mixed with normal water (24 hours stale that the chlorine evaporates) to 0.2 EC. Add Cal / Mag to 0.4 Ec Ph with Organic Ph - to 5.8 - 6.4


Likes
30
Share
@PapasGrow
Follow
Kosher Haze fem 🚀
50/50 Hybrid (Kosher Kush x Karel's Haze)
From Super Sativa Seed Club 💎
And seedbank.ge 🌱
Flowering with Mars Hydro FC 3000 🚀🚀
Also added some UV leds for finishing up.
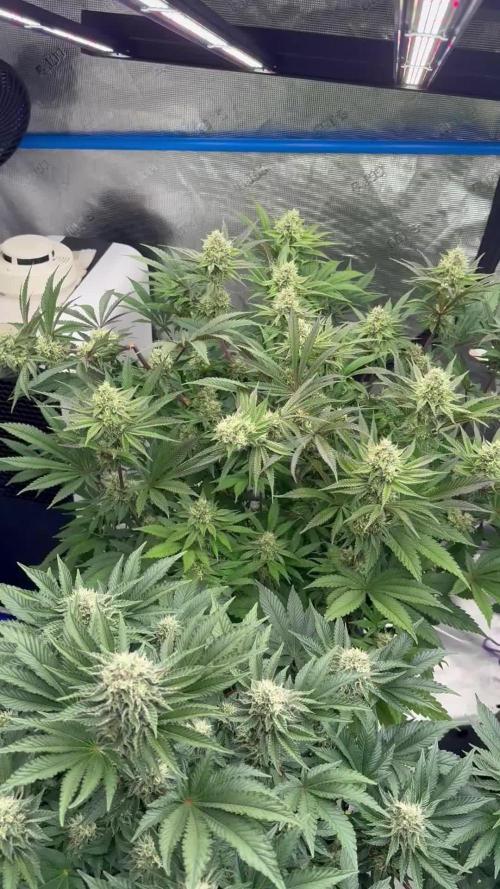
Flowering week 8, super frosty flowers, almost ready. Flushing... 💦
Day 60 trichome check video. Not ready yet, about 5 days away from harvest. ✂️


Likes
4
Share
@madlangs
Follow
All going well. Not had a single problem
Super boof is fading extremely fast
Ppfd is 1000 in places