The Grow Awards 2026 🏆 


Likes
Comments
Share
@Indicaianer
Follow
Alle 6 haben in 2 Wochen sehr gut angewurzelt und entwickeln sich gut.


Likes
29
Share
@Flower420
Follow
This is her last week before Harvest!
I decided to start her off with just Ph water. Midweek I added just 1 gallon of ph water with Florakleen (10ml/gal). After that, I’ve just been observing her suck whatever is left out of her leaves. Her buds are still developing nicely. I just bought a microscope. Took some pretty cool pictures of her trichomes! She looks to be ready now. Cutting her down first thing Sunday morning (11/28). I will update her harvest next week.
Until then… Letting her do her thing before it’s time to ✂️


Processing
Likes
57
Share
@LockDownGrow
Follow
ok so everything has gone fantastic , no nutrient burns at all , and have been slowly creeping up the base nutrients , i have stopped the cal mag and now adding house and gardens bud XL at full strength these girls are now in full swing of flower and i bought a new ph stick this week ,
i have found when PHing the feed bucket that its best too have air stones in the bucket , add all nuts and then ph but do not use the feed that day as if you check the next day the ph is off again so i left it 24 hours after i add more ph down , and it seems too make the measurements alot easier and stable , i have bent down the main stems " without damaging them onto my netting too A keep the canopy all the same high so my lighting is covering all plants at the same distance and also it allowed the side stems too reach up too ,
i also was sponsored another new led light by kingbo this week so have added another 600watt led too the grow , so now have two 600's and one 900watt , and temps are still fine sitting at 24c lights on and 19-20 off , so am pleased with that , this lady is by far the bushyist plant with the most branches she also didn't stretch much and is packed with bud sites ,
Likes
25
Share
@Hawkbo
Follow
This is probably the final week of the full tent shots, these were taken a few days ago and at this point there is only 8 plants that have not yet been harvested. I learned a lot this run, tried some new shit, grew out my own crosses, dialed things in by getting rid of the light leaks and adding the heater so it was a success. The new lights out performed my expectation and the leaf strip might become a staple in my garden. The leaf strip made me nervous I wasn't sure how it would turn out but all of my buds are noticeably larger, the lowers are filled out and as dense as the tops and it saved space, water and nutrients. The lights could have contriuted to the larger buds but the other things made it well worth it. I have been vegging out the next run for a while trying to keep them from growing too much in 1/2 gal bags so there should be some interesting plants there stay tuned.
* These came out pretty good, #1 was a lanky bitch and leans heavily toward my Ciroc cut but has these sweet lookin pink tips. I feel like the buds could have filled out a little more but maybe I will run it back and if they do fill out I will hit it with the MC2 pollen and make some fems. #2 is the mutant and is ridiculously frosty, usually when I have a runt it comes out decent at best but this one outdid itself. The buds actually came into shape pretty nicely, they are a little slim but the frost is insane. Some of the photos of #2 might look like I didn't take them compared to my usual photography style and that's because my girl took them, she is a little more artistic than I am but it was her first time using the new camera so some are slightly out of focus because the ISO was too low and there was a little camera shake.
REMEMBER , IF YOUR SHOPPING FOR GEAR YOU CAN USE THE CODE “BANGDANG” FOR 10% OFF YOUR ENTIRE PURCHASE FROM ANY OF THE FOLLOWING COMPANIES.
@greenbuzzliquids
@rainscience_growbags
@gorilla_grow_tent
@growlightscience.led
NEW* @Rocbudinc Seeds on his website *
*****Gorilla grow tent discounts extend to all companies affiliated with grow strong industries which include..*****
@super.closet
Lotus Nutrients
Kind LED grow lights
Likes
235
Share
@SlowpokeFuegobud
Follow
DAY 50
Defoliated a bit, hoping to slow her down, but I'm writing this day 51 and she is 94cm now.. unstoppable! 😶
Pre-flower started day 40. So maybe we can walk thru the fire with our heads straight.. 🙏
DAY 52
99cm now. Watered with Biobizz, did a normal bloom dosage.. 💧 I will be raising calmag a bit now, EC of water will be 0,6-0,7.
DAY 54
108cm :crane:
DAY 55
114cm 😬 😬 😬
Watered with 4L nutrient solution + 1L BioEnhancer solution 💧 🐟
Removed some lower stems in the shades. Twisted the two long stems with shorter stems from the sides, so the shorter stems are more in the middle, the longer stems are more at the edges now. 😅
DAY 56
118cm.. :metal: Thinking about a ZZ Top logo.. maybe I will have to drastically snap the two branches.. I actually feel adventurous about it. 😎
... 2 hours later: I did it, I snapped the stems (not completely). Let's pray for healing. 🙏
The stems make the ingwaz rune now, the seed. Oh so metaphorical. 😤 It represents taking time to grow & transform, peace, silence, bursting into manifestation. ✨
Which reminds me of the pollen in the freezer.. it's time now! 🐝
LED running at 100% now. Distance is between 25 and 40cm.
💚
Wishing you a great week! 😘
__________________________________________________
SET UP
Mars Hydro LED TS1000 sponsored by @marshydrococo2 😘
https://www.mars-hydro.com/led-grow-lights/ts-1000-led-grow-light
custom exhaust fan 270/320 m³/h
3x Garden High Pro fans 5W
tap water EC 0,25 - adding Calmag (Plant Magic) to EC 0,4-0,6 - adding pH minus Bloom (AHH) to pH 6,5
biobizz Lightmix - later Plantaflor organic tomato soil 🍅

Likes
2
Share
@CannaIGrow
Follow
Seems to be growing and looking good. I can’t wait to see how she grows out.
Likes
11
Share
@7points
Follow
Very exciting as the tops are starting take formation and really become more developed.

Likes
12
Share
@DeepRootsGrowTrees
Follow
MIMOSA by ROYAL QUEEN SEEDS
Week #21 overall
Week #4 Flower
This week she looking good buds are getting some weight on them overall plant doing good this week!!
Stay Growing!!
ROYAL QUEEN SEEDS
MIMOSA
Likes
4
Share
@knnabisgrower
Follow
Empezamos la septima semana cambiando el ciclo de lúminico a 12 horas de luz y 12 horas de oscuridad para inducir la floración, también empezamos los riegos con fertilizantes para estimular la flora y aumentar la producción de tricomas, mejorar el aroma de la flor y aumentar el peso final de la cosecha.


Likes
22
Share
@Still_Smoq
Follow
Week 9, 3-9 October 2025
3-9 Oct - Observed and let the plant grow.
Buds continue to develop and swell as it grows toward maturity. The smell continues to intensify as well. A lot of trichomes have developed and the hairs are just starting to turn brown. Because of the plants smaller size, I don’t have to do a weekly reservoir change, it’s more like every 10 days. She just doesn’t consume as much as a larger plant would.
- 2 Oct changed nutrient solution
- 2 Oct updated feeding schedule
- Using reverse osmosis water with EC/TDS at 0
- Adjusting PH to 6.1 daily using GH up/down
- Nutrient solution EC 2.1 at 72 degrees F
- Light power at 75%, DLI 45 canopy coverage at 18hrs
- Using PYPABL, Air Pump, 400GPH
That is it for this week. Thanks for the look, read and stopping by.

Likes
25
Share
@MadeInGermany
Follow
COMMENTED BY
MadeInGermany MadeInGermany 8 minutes ago
Flowering day 19
since the time
change to 12/12.
Hey all together 😀.
This week she has developed beautifully ☺️.
I poured it 3 times with 1.2 l this week.
Tomorrow I will add the 2 g GHSC Powder Feeding Bio Bloom because the first blossoms are coming :-).
I checked all the leaves thoroughly for pests or diseases and everything is fine ☺️.
Next week I'll look at your roots as soon as the coconut is completely rooted.
As every week, the tent was cleaned and the entire technology checked.
The humidifier was also refilled every day 👍.
In the next few days I will remove the bottom shoots so that the energy doesn't end up being wasted in the small popcorn buds.
I wish you a lot of fun with the update.
Stay healthy 🙏🏻 and let it grow 🍀
You can buy this Strain at :
www.Zamnesia.com
Type:
Purple Punch
☝️🏼
Genetics:
Granddaddy Purple x Larry OG
👍
Vega lamp:
2 x Todogrow Led
Quantum Board 100 W
💡
Bloom Lamp :
2 x Todogrow Led
Cxb 3590 COB 3500 K 205W
💡💡☝️🏼
Soil :
Canna Coco Professional +
☝️🏼
Fertilizer:
Green House Powder Feeding
☝️🏼🌱
Water:
Osmosis water mixed with normal water (24 hours stale that the chlorine evaporates) to 0.2 EC. Add Cal / Mag to 0.4 Ec Ph with Organic Ph - to 5.5 - 5.8 .

Likes
44
Share
@RakonGrow
Follow
Note :
+ jegliches Zubehör wird in der GermniationsWoche aufgelistet . Zeitraffer Videos folgen immer nachträglich.
+ videos werden so geschnitten das nur ein geschlossenes Zelt erscheint , ergo Fehlen paar reale Minuten (ca 1 Std) .
Sanlight Tageslichtzyklus in Lebenswoche 6 :
+ 200PPFD - 1h - 750PPFD - 16h - 750PPFD - 1h - 200PPFD = DLI 46.60
+ + Formel : DLI = PPFD * h * 0.0036
+ + in LebensWoche 6 ist der Max-DLI ohne CO² : 45.0
Dazu kann man sich gerne die Zeitraffer angucken . Die Pflänzchen brauchen schon Ihre Zeit auf touren zu kommen . Ergo ist Sonnenaufgang und Untergang reines Stromsparen .
Day 36:
+ 2Liter Flaschenwasser
+ + Dünger für Büte
+ + + Canna Terrar Flores (Achtung wirkt wie PH-)
+ + + Canna Boost
+ + + Cannazym
+ + + Canna Rhizotonic
+ Final : PH 6.2
Nach dem die Mangelerscheinungen wie gewünscht aufgetreten sind, gehts jetzt mit Blütedünger weiter . Sie hat sich prächtig in die neue Umgebung eingelebt. Wetter werte sind hier Super , also ist auch im Zelt super Stimmung :))
Videos folgen in den Tagen .
Day 37:
Sie wächst gerade noch paar Zentimeter :)) Blühten werden mehr .
Day 38 :
Und wieder das Licht etwas höher händen , den Sie wächst noch immer !!!
Day 39 :
+ 2Liter Flaschenwasser
+ + Dünger für Blühte
+ + + Canna Terrar Flores (Achtung wirkt wie PH-)
+ + + Canna Boost
+ + + Cannazym
+ + + Canna Rhizotonic
+ + + Greenhouse Feeding BioEnhancer als PH+
+ Final : PH 5.5 (das Urgesteinsmehl zieht das sowieso auf mindestens PH 6.5)
+ etwas Entlaubung der defiziet Blätter.
Day 40:
Day 41:
+ 2Liter Flaschenwasser
+ + Dünger für Blühte
+ + + Canna Terrar Flores (Achtung wirkt wie PH-)
+ + + Canna Boost
+ + + Cannazym
+ + + Canna Rhizotonic
+ + + Greenhouse Feeding BioEnhancer als PH+
+ Final : PH 5.5 (das Urgesteinsmehl zieht das sowieso auf mindestens PH 6.5)
Day 42:
+ 2Liter Flaschenwasser
+ + Dünger für Blühte
+ + + Canna Terrar Flores (Achtung wirkt wie PH-)
+ + + Canna Boost
+ + + Cannazym
+ + + Canna Rhizotonic
+ + + Greenhouse Feeding BioEnhancer als PH+
+ Final : PH 5.6 , Drain PH 6.89
Likes
15
Share
@Meisterwulle
Follow
Hallo zusammen 🍀👀,
Der Flush ist gestartet und es sieht wunderbar aus! Bin insgesamt sehr zufrieden mit der Größe der Pflanzen und auch mit dem Aussehen. Finde, das Training zu Beginn hat sich ausgezahlt und bin natürlich gespannt wie viel dabei rauskommt :D. Auch dem Dünger kann ich ein großes Lob aussprechen - im Vergleich zu Biobizz hat sich AN auf jeden Fall durchgesetzt. Natürlich hab ich auch im Vergleich zu den letzten Durchgängen eine stärkere Lampe benutzt, was das Ergebnis deutlich beeinflusst.
In den Nahaufnahmen sind schon deutlich orangene/braune Trichomköpfe erkennbar, weshalb ich nächste Woche auch ernten werde.
Ich danke bis hierhin allen, die mir folgen und mich Supporten. Würde mich riesig über ein Like freuen und folgt mir gerne für weitere Diaries in der Zukunft. Ich lerne auch immer wieder gerne dazu und merke, dass ich mein Können von Diary zu Diary steigere.
Nächste Woche kommt wie gesagt ein Report zur Ernte und in den kommenden Wochen dann ein Smoke Review.
Ich wünsche euch ein schönes Wochenende, lasst es krachen und stay high 🍀😎
LG Wulle

Likes
11
Share
@Liamp1603
Follow
This grow cycle was one of my best from start to finish I had 5 females 4 of which were brilliant all shown colour all fruity gassy and amazing only the one was bland and green in colour and smelt different really good nug atructure but the smell wasn't there for me ... this is around my fifth grow and I'll be running these strains again to get it down to one pheno of these genetics
Likes
62
Share
@HinduGod
Follow
WOW LOOK AT DAT!!!! DA PLANT IS NEAR DA END!!! I MADE AN ORANGE PEEL TEA WITH WORM CASTINGS TO GIVE IT A LITTLE BOOST!!!! DAT PLANT IS USING ITS RESERVES IN DA LARGER FAN LEAVES DAT IS VERY VERY GOOD!!!! SUN GOD AND RAIN GOD HAVE BEEN WORKING VERY VERY GOOD TOGETHER!!!! HARVEST IS VERY VERY SOON!!!!!😎
PLEASE COME AGAIN!!!!!
Likes
10
Share
@All_about_420
Follow
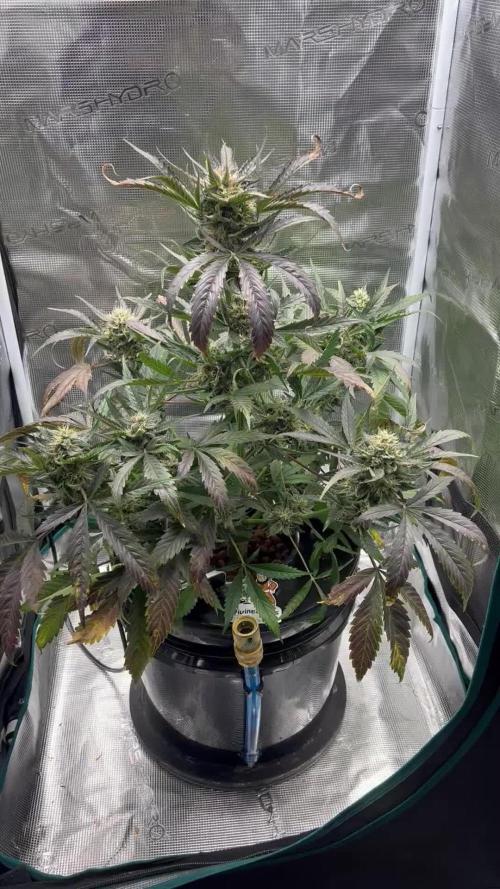
In der zweiten Stretch-Woche haben die Amnesia Haze Mädels ordentlich an Höhe und an Canopy zugelegt.
Alle drei wachsen jedoch relativ unterschiedlich.
Die beiden ungetoppten bilden den größten Kontrast.
Die eine ist die Größte mit 74cm, die andere die Kleinste mit gerade mal 45cm, also ganze 30cm Unterschied.
In der Mitte liegt die Getoppte mit 58cm, die sich schön über mehrere gleichmäßige Main Buds verteilten.
Darin ähneln sich die Mittlere und die Kleinste. Trotzdessen die Kleine nicht getoppt ist, wächst sie jedoch ähnlich.
Die helle Farbe des Blattwerks deutet auf einen erhöhten Nährstoffverbrauch im Stretch hin.
Deshalb ist die kleinere auch weniger davon betroffen, als die anderen beiden.
Den BioBizz Nährstoffgehalt habe ich entsprechend angepasst und erhöht.
Da der Dünger auf Biologischer Basis ist, wird es ein paar Tage dauern, bis das Futter verwertet ist und auch komplett ankommt.
Die Farbe wird also dann bald schon wieder leuchtend grün sein.
Jetzt haben sie noch eine Woche bis zur finalen Defolierung und bis zum Lollipopping...
Bis dahin...

Likes
26
Share
@Bread_n_Buds
Follow
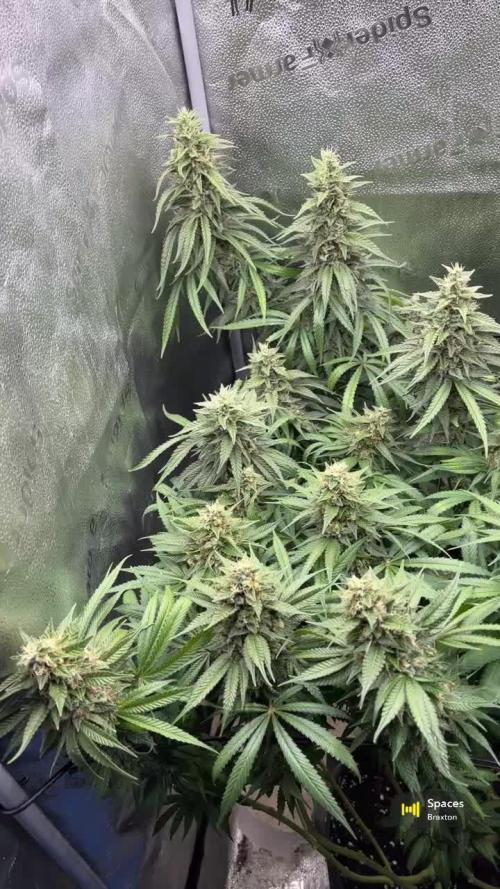
We have reached the second week of flowering for our beautiful photoperiod ladies of Zamnesia. Born 1 September now at day 45 amazing.
---- The general environmental conditions are good, there is always a little too much heat from next week we should have just enough for the resin a sharp drop in temperatures that could also give us beautiful foliage for this period.
--- Our Cosmic Noodles are plants, beautiful, elegant in growth, with low internodes and fast flowering. In fact, as you can see, after only two weeks we have beautiful buds unlike others and not only that... The lateral buds have grown very nice and aligned and the central one slightly exceeds them. Really beautiful to be true, we bet, delicious too.
--- Fertilization program - The fertilizers are always Plagron and I am following the table that I generated on the site depending on the chosen substrate. Create your own card and follow it, never be presumptuous my friend as I have been in the past, follow the card and look at the plants, not all need the same amount of fertilizer. We have reached the moment of giving a good dose of iron in the first weeks of flowering on the advice of Plagron directly foliar and I am at the end of the second week of flowering. It had started a little quietly but now it is proving to be among the best.
---- https://plagron.com/en
- Power Roots - 1 ml/l
- Alga Bloom - 4 ml/l
- Pure Zym - 1 ml/l
- Sugar Royal - 1 ml/l
- Vita Race - 5 ml/l
--- The Plagron 100% Organic pack is available on Zamnesia at: https://www.zamnesia.io/en/11457-pla gron-easy-pack-natural.html
--- The dehumidifier now works between 50% and 55%
// Strain Description //cross of Alien OG and Rollercoaster Haze, Cosmic Noodles offers excellent yields and extraordinary aromas. This variety is very powerful, contains 25% THC and produces intense and long-lasting effects. Stimulating and relaxing at the same time, Cosmic Noodles causes an energizing cerebral effect that fades over time becoming soothing at a physical level.
- Get a seed of this fantastic strain --- https://www.zamnesia.io/it/10777-zamnesia-seeds-cosmic-noodles.html
- Soil and Fertilizers entirely organic --- https://plagron.com/en buy on www.zamnesia.io
- Growbox and air system --- https://www.secretjardin.com/
- Light - P2000 Viparspectra https://www.viparspectra.com/
- Music and sound --- I made my girls listen to 432hz frequencies and music from www.radionula.com
- Z --- You can find these seeds, much more from the world of cannabis, mushrooms and an incredible series of accessories and gadgets on the reference site not only mine but of many growers
—— https://www.zamnesia.io