The Grow Awards 2026 🏆 


Likes
Comments
Share
@Alpha_Green
Follow
Some of you may have wondered:
Why do I use CO2 at average 950 ppfd μmol/m2/s (moral flow)?
The answer is quite simple. Because of lack of space in some regions of my cultivation area, I simply cannot keep the ideal distance to my Sanlight high-performance lamp, due to some height growth of various strains. And so some of the main colas have ppfd values of 1250 μmol/m2/s and even more...
So this is how I manage to achieve and compensate for such high radiation levels even with a CO 2 balance. And I have to say, my strategy to avoid various light stress symptoms works just fabulously. In combination with CO 2 implementation, my babies are simply unbeatably insensitive to light. Thats it!
Beginning of 3rd week flowering:
Again feeding my babies by 36 hours fermented potions of Bio Tabs Kompost Tea PK-Booster (15 g pro Liter) and added:
5ml Orgatrex/Liter
1 Spoon of Bactrex
1 Spoon of Mycotrex
1 Spoon of Mycco-Vital
1 Spoon of Dynomyco
A little tip for those who are interested in small modifications that have a big difference or influence - on the result - effect - beauty - health - taste! Before adding microorganisms or beneficial bacteria or Mycorrizae and Trichodermas, please use oxygen-saturated water. On the one hand, unwanted chlorine gases evaporate and the small world of the microbiome becomes even faster and more rewarding in compost tea to sprout.
Last but not least for this week, I would like to introduce my reasons, why I prefer growing biologically and sustainably.
First of all, it’s something which suits very well in these times/days we are living now. Sustainability is a big need and task for our planet. 🌎 Nature means life. Our home, the air we breathe and everything that surrounds us. Not just today. Hopefully tomorrow as well.
Maybe I'm starting to protect our environment on a small scale, but maybe I can also make a big difference at all.
If you change the way you look at things, the things you look at change...
I thought about what’s the difference, between Mineral Feeding and Super Soil Feeding.
It’s very easy. Biologically Growing is a similar process than the natural soil activities out there in the lap of nature’s. So plants has to work and interact with the microorganisms and microbiomic communities in the soil. So the plants will never get lazy like the lazy ones of mineral feeding growers.
If you grow biologically, you will feed the soil first and the microorganisms will support every parameter next to your plant conditions. And that will generate an unbelievable spectrum of Terpenes and Trichomes you will never forget.
It’s the same comparison, when you daily visit McDonalds and you eat only fast food. How does your body and mind react on this shit for money?!?!
May I invite you to think about it…
See you next week dear Growmies! Have a nice Weekend and take care…
Peace out!
Addendum for Day 53:
At the moment we unfortunately have another winter onset here in Germany. This means that I am forced to take additional heating measures due to structural facts in order to be able to keep the temperatures constant. After all, just tonight the thermometer climbs again to -1 degree Celsius.
In addition, my exhaust air system runs out of my bedroom terrace and I therefore grow winter and summer with the patio door open. Well, sometimes I experience real weather-related challenges. But all in all, no problem...
"Where there's a will, there's a way."
Addendum to pouring out the fermented PK tea: I always administer half a liter of lukewarm aerated water with 3.5 ml of cannazyme per liter to each plant. This means that the "root machine" is not supplied with supplies unprepared and the nutrient solution can thus also be better distributed in the soil. Since I also work with cloth shoes, I spray them evenly moistened everywhere with water that is also warm before pouring them out from the outside. This has the advantage that the moisture stays where it should: in the pot!
... I did the math today ;-) We are still in week 7 until this Friday. And week 8 starts on Friday! OMG... still so much time yeahh!
Today my Fast Buds Sour Jealousy and Sweet Seeds Big Devil and Dark Devil Automatics arrived. I'm looking forward to it.
This time Fast Buds next Time Sweet Seeds. Love them too. Very beautiful genetics.
Today a review video of the beginning of week 3.
At the time of the pictures, I had minor signs of nitrogen excess. (Light peaks first at the crown of the roof and then slightly continuing to the middle section.) I then painstakingly racked my brains as to why this could be. I found that very slight dry spots had formed and therefore the root found small accumulations of nitrogen that caused its problems. But then, when I carefully homogeneously checked the moisture content in the substrate, the problem evaporated again. However, they had not shown any loss of growth rate during this time. Nevertheless, they developed as expected.
They Strawnanas had no problem with that.
In the end, I always have a hard time killing them. But I guess that's the way things go.
We live and die.
We come and go.
But it's not there yet. ;-)
Tomorrow is day 56.
Tomorrow’s updating day!
Can't wait to see their progress.
Have a good time and see you tomorrow… 🏽🕊️
🏽 ☮️🕊️


Processing
Likes
13
Share
@BigBudWolf
Follow
SMOOTHIE AUTO (Fastbuds)
42 days from sprout.
At the end of the sixth week and she started getting taller quickly. Almost doubled her height this week. Leaves mostly look good and bud spots are building.
Likes
17
Share
@Naujas
Follow
To tell the truth, I am very surprised myself, how amazing she is FastBuds Gorilla cookies, she copes well with a small space:) she drinks 1 liter every day :) everything looks better than expected:) good luck to everyone.
Likes
25
Share
@Buff716cannathis
Follow
The Terp tent in full flush mode.... started flawless finish on day 75/81 and flushed all 4 plants throughly let dry out on day76 at night b4 loghts out i then fed 1 liter each plant of plain ph reg water 6.0 ... day77 marked plain water 5.95ph. With slight run off about 3 liters. Day 78 /84 is today which upon checking my trics id say they will be ready for 48 hrs of straight darkness on day 83/89..... from there they will be sawzawed unless yall got a pair of scissors that can cut through 3 inch stems hahaha damn rhino skin .....(buyit)
All 3 cookies gelato are turning purple 😋 💜 😍 ya babe shine for me
Cg1 is a yeilder that smells like straight up Blueberry pancakes with some side muffins
Cg2 is short but she got cake bro ..... sticky n will be a trimmer
Cg3 no joke smells like candy gas and so frosty I think we might class this one as the best I might ever grow lol no shares on this lady fingerprint scanner on the jar opener .......
Green gelato is one hella weird growing plant to me idk why maybe I did something wrong or right but these buds r still skinny but fattened up alot tha ks to over drive .... they are about 20 inch buds and 6 main colas that long smells like lemon candy and gas earthy mix deff gonna be a trimmer but a decent yeild I bet for how small the bud sticks are lol 😆 they like foot long hotdogs but like 2 of em in 1 lol 😆 😂 👌
Anyways so far so good kept it clean tidy and fulfilled my passion for thc ...
What more could always bored needed something to do carpenter with zero side time ask for honestly tho for my 1st ever grow eith 100%brand new equipment not knowing what I'm doing , I think I did well I pat myself on. The back ... I hope to make my name in the I dusty somehow someway down the line ... possibly breed my own strains and brand it the terp tent thanks for those who veiw my.grow and stay green fams. Till next week when we get some hopefully final pics b4 dry?????


Likes
81
Share
@LockDownGrow
Follow
ok so everything has gone fantastic , no nutrient burns at all , and have been slowly creeping up the base nutrients , i have stopped the cal mag and now adding house and gardens bud XL at full strength these girls are now in full swing of flower the Cal mag has made absolutely no difference too the yellow colour of this blackberry so I suspect it is just how this strain is as meany diary's on here of the same strain are also on the yellow side , but it's certainly not affecting the speed of the growth of her , i also bought a new ph stick this week ,
i have found when PHing the feed bucket that its best too have air stones in the bucket , add all nuts and then ph but do not use the feed that day as if you check the next day the ph is off again so i left it 24 hours after i add more ph down , and it seems too make the measurements alot easier and stable , i have bent down the main stems " without damaging them onto my netting too A keep the canopy all the same high so my lighting is covering all plants at the same distance and also it allowed the side stems too reach up too ,
i also was sponsored another new led light by kingbo this week so have added another 600watt led too the grow , so now have two 600's and one 900watt , and temps are still fine sitting at 24c lights on and 19-20 off , so am pleased with that ,
I accidentally bend the main stem last week while I was putting them under the netting too try and control the stretch , luckily it did not crack or snap the branch at all and she didn't droop on that branch at all and has healed already , it may or may not be related but as soon as it happened the side branches thickened up too the thickness of the main stem , this plant has over taken the rest in size even being a full week too 15 days younger , it's certainly not ideal but it really does not appear too have slowed down the growth and may well go in my favour , this lady really did stretch out from week 4 into 5 and is showing no sign of slowing down , her side branches are very thick almost as thick as the main stem , her leaf production was minimal and I have only had too remove very few too expose the bud sites , the yellowing seems too be recovering now and most of the plant is green now ,
Update ,
Now gone a lush green colour instead of that horrible yellow , and the buds have already started too purple , she has also stepped up a gear with her nutrient intake almost drinking 6 pints since Thursday ,
She seems too have slowed down on the stretch and has so meany bud site scattered all over her with as the diary name suggests black roses everywhere , and note too any seed banks reading this if there is not a purple stain out there already called black rose now is your chance lol and Iwant a sample pack first kinda like the tester :)
Now defoliation , as you can see they really didn't seem too mind at all being stripped and within a couple of days they had all replenished the lost leaves and even this week olive had to pull the odd few off as they have grown out ,
Method , well all info now is simple ,
Anything I cannot tuck under something that is blocking a bid site with shade I remove too middle or bottom ,
Everything else stays , I just stand above the plant and pull off anything covering the sites , it's really as simple as that , I see some strip them until there is nothing left on but a few sugar leaves , but for me didn't like the look of the plants , for me the growing process is just as much fun as the fruits ,


Likes
4
Share
@Xabii
Follow
Found litteral balls on the plant, no bananas but full on pollen sacks right at the topping spot, did remove them since I did not see balls anywhere else, hope this is just a one time thing due to topping.
Values are average of the day.
DATE - EC(us/cm)
20250426 1843
20250427 1893
20250428 1961
20250429 1995
20250430 1952
20250501 1649
20250502 1722
DATE - PH
20250426 6.00
20250427 6.00
20250428 5.99
20250429 5.99
20250430 6.03
20250501 6.24
20250502 6.27
DATE - ORP (mV)
20250426 316
20250427 294
20250428 283
20250429 272
20250430 259
20250501 248
20250502 225
DATE - °C - RH% (Tent Temp/RH)
20250426 24.0 51
20250427 25.0 43
20250428 26.1 43
20250429 26.1 38
20250430 25.9 42
20250501 25.4 47
20250502 26.6 48
DATE - °C (Reservoir)
20250426 19.5
20250427 20.0
20250428 20.7
20250429 20.6
20250430 20.4
20250501 20.4
20250502 21.7
DATE - CF
20250426 18.43
20250427 18.93
20250428 19.61
20250429 19.95
20250430 19.52
20250501 16.49
20250502 17.22
Likes
5
Share
@BigGGrows
Follow
This was 2 weeks into flush...only molasses and TPS signal was given; mixed within tap water ph 6.0.

Likes
42
Share
@TheCannaProphet
Follow
~Humboldt Seed Co. AMHERST SOUR DIESEL~
???Secret origins???
The mystery of the unknown🧐
Amherst Sour Diesel is a cannabis seed whose origins are kept a secret. This wonderful vigorous marijuana plant will reward your work with large, elongated, compact buds complemented by a rich complex aroma. Indoors it performs best with a short growth and outdoors, in temperate, warm, dry and Mediterranean climates or in a greenhouse. A marijuana plant that boasts balanced properties.
-Top-notch flavor and effect
-Idyllic feelings to treat the senses
-The aroma of this cannabis hybrid is a pleasant combination of ripe fruit and oil. The flavor is rich and complex, with hints of tropical fruit, oil and exotic wood.
-The effect, typically Sativa, is euphoric, uplifting, powerful and long-lasting. A cannabis strain Sativa lovers will know how to appreciate.
____________________________________________________________________________________________________________________________________________________________________________________________________________________________________________________________________________________________________________________________________________________________________________________________________________________________________________________
Tech Specs:
~Amherst Sour Diesel~
Feminized
Genotype: 20% Indica / 80% Sativa
Cross: Chemdawg x Amherst Super Skunk
Suitable for: Indoors and outdoors
Indoor flowering: 65-70 days
Indoor yield: 400-600 g/m2
Outdoor harvest time: Late October
Outdoor yield: 2000-3000 g/plant
Outdoor height: 2-3 m
THC: 27%
CBD: 0.1%
____________________________________________________________________________________________________________________________________________________________________________________________________________________________________________________________________________________________________________________________________________________________________________________________________________________________________________________
THE SETUP:
~Planted into Jiffy Peat Pellets that were hydrated with de-chlorinated water with SuperThrive added then ph'd to 6.0 @ 80℉
~Grown 100% organic in 10g fabric pots with Mother Earth 70/30 Coco/Perlite medium amended with 2tbs/g of Down To Earth 4-4-4 / 2 cups/g of Earthworm Castings / 1tbs/g of Dr. Earth Flower Girl 3-9-4, 1tbs/g of Dr. Earth Bat Guano, 3/4 cup of Down To Earth Azomite and 1 tsp/g Down To Earth Fish Bone Meal.
~24hr light cycle during Germination / 19/5 light cycle for Vegetation and 12/12 for Flower
~Straight water ph'd @ 6.2-6.8 when needed and weekly Compost Tea's.
____________________________________________________________________________________________________________________________________________________________________________________________________________________________________________________________________________________________________________________________________________________________________________________________________________________________________________________
WEEKLY UPDATES:
10/11- Week Eight! Here we go on our way to sticking a fork in this run!
Her fade is in full swing and she's putting out trichomes like crazy! Hopefully by the end of this week she'll be hanging after she spends a couple of nights in the dark.
I watered today using straight water that's ph'd to 6.5-6.7 @ 72℉. I gave her a 1g to keep her flush going and then turned her pot.
Trichome status: 70% milky / 30% clear
10/13- I watered today with 0.75g of straight water that was ph'd to 6.5-6.7 @ 72℉ and gave her pot a turn.
She's progressing in her fade and is still bulking up. Her trichomes aren't quite where I like them yet, so more than likely she'll be going in the dark by next weekend! She is one beautiful cultivar! 🤩💚
10/15- My routine of watering every other day continues. Yesterday I watered her with her usual 1.5g of straight de-chlorinated water that was ph'd to 6.5-6.7 @ 72℉ and gave her pot a turn. Today was just spent checking her over, turning her pot and doing a quick check of her trichomes which are close, but not quite ripe enough yet!
10/17- Wow!... Eight weeks of flower DONE! 😎👍
Now my sights are set on getting this girl finished up and on her way to 48 hours in the dark before she's hung to begin drying.
I went ahead and watered her with her usual 0.75g of straight de-chlorinated water that was ph'd to 6.7 @ 72℉ and checked her trichomes, which are looking just about right!
This journey is coming to a close in the next couple of weeks with her harvest, drying and trimming up. I so appreciate you following along with me , it's been a blast sharing with you all! 😎🙏
~Thanks so much for checking out my diary! This epic run is in the home stretch with harvest fast approaching...Stay lifted and be Blessed! 😎🙏~
This week promises to be exciting so don't forget to check in! Harvest time will be here before you know it and I'm getting stoked to see the results! 😎🙏💚
~Thanks for stopping in! This epic run is in the home stretch with harvest fast approaching...Stay lifted and be Blessed! 😎🙏~

Likes
Comments
Share
@Prakimi66
Follow
This genetics requires a lot of heavy feeding and heavy light and a lot of space because they gonna grow like beasts. In about 79 days from seed they were ready . One of the plants had small buds but full of trichomes, rich in terpenes with a nice smooth Latte creamy smell, the other had fluffier buds with more hazey smell

Likes
17
Share
@RDWCGrowing
Follow
Week 3 Day 1 8/26/2023
Water Change Day!!
Added:
36 gallons of Water
TPS SILICA GOLD-.5mil/Gal
Root Drip- 1mil/Gal
CALMag- .5mil/Gal
GH FLoraMicro-4.2mil/Gal
GH FlroaGro-3.8mil/Gal
GH FLroaBloom-3.0Mil/Gal
ORCA-.5mil/Gal
She continues to be my Mutant!
Week 3 Day 2 8/27/2023
Topped her a little and took a little from the bottom. The PH was just a little high so I added 4mil PH down to get it to 5.86.
Week 3 Day 3 8/28/2023
Topped her a little and just enjoyed her individuality.
Week 3 Day 4 8/29/2023
Topped her a little, and started cleaning up the lower 1/3, I am starting with the fan leaves that are touching the clay and some of the lower, lower portion but leaving the stems for when I take clones.
Week 3 Day 5 8/30/2023
The temp has been getting to 79-80 the last few days and I don't like it that high. I lowered the light to 29 inches and decreased intensity to reach the 350ppfd for the plants. By dropping the light it should also drop the temperature.
I took a few bottom leaves as I start my clean up, leaving the lower stems for clone material for now.
Week 3 Day 6 8/31/2023
Found out why the temp had been getting so high in my tent and my grow room, the controller for my other light for my other tent was malfunctioning and overheating. I guess this was the unknown contributing factor to the sudden increase in temp, how am I sure about this, because the light no work no more. I am working with Spider-Farmer Warranty since the light was under a year old, very sad day yesterday was to replace my SE 7000 on my breeding plant which was in week 9 of flower with a VS2000 I am thinking I am going to have to cut my losses.
On a good note she looks Amazing full on Growth Spurt happening, I adjusted the PH up slightly to get it from 5.81, to 5.89.
Tomorrow Measurements incoming.
Week 3 Day 7 9/1/2023
She is looking Mutanty this morning! I took off some lower leaves cleaning up the bottom 1/3.
Processing
Likes
154
Share
@CBD_Sweden
Follow
@FAST_BUDS,
Hi all the happy people here in GrowDiaries.
This is my second cultivation ever and it will be fun to try a bigger space than my closet grow.
First, I'm just going to say I'm done with the construction of my new growroom.
I put some pictures on the construction here in week one.
The room is 2.14 meters by 1.7 meters and has a ceiling height of 2 meters.
It provides a floor area of 3.6 square meters.
I use a 54 Watt Lightwawe T5 for germination and 2 Pcs 400 Watt HPS lamps.
I have a channel fan that replaces the room air about 40 times an hour to get a comfortable environment in the room, the air enters a fresh air intake from the outside.
The air is purified through a carbon filter to then leave the room to the rest of the basement.
Then I use that heat to heat the rest of the basement.
I will use 8 pcs 15 liter Autopots to grow with and a 100 liter water tank that supplies the pots of water and nutrition.
I will grow completely organically in soil and will watercure my buds to get the best possible medicine for me.
But there are no cultivation rooms to be displayed here, so I continue with what is most important.
Today I have put my seeds in my moisture dome and hope the seeds have germinated within a few days.
I am very excited to see how the new growroom will work and how this new secret CBD plant from @FAST_BUDS, will turn out.
..............................................................................................................................................................................................................................................................................................................................................
2017-09-11. Kl 12.00. Week 4 starts. I have cleaned the whole room for the new week and gave the girls water and nutes. Added videos and pics. Girl nr 1 is 27 cm high and girl nr 2 is 22 cm high.
-----------------------------------------------------------------------------------------
2017-09-12. Kl 10.00. New pics and video. Girl Nr1 has grown 5 cm in 23 hours, from 27 to 32 cm.😍
-------------------------------------------------------------------------------------
2017-09-13. Kl 22.00. Everything is looking great in the garden right now. Added new video.
--------------------------------------------------------------------------------------------------
2017-09-15. KL 10.00. New video added. Girls are looking great and they got 3 liters of water and nutes this morning. Girl Nr 1 is 38 cm high and Nr 2 is 28.
-----------------------------------------------------------------------------------------------------------------------------------------------------------------------------
2017-09-16. Kl 10.00. The girls grow like crazy, i have to defoliate about 20 leafs a day. Added 2 liters of water and nutes this morning and 2 new videos.
-------------------------------------------------------------------------------------------------------------
2017-09-17. This is the last day of week 4. Added a time laps from germ to week 4.
Likes
24
Share
@Newbiegrower420
Follow
UPDATE: Day 1 of week 14- Thursday 19th Nov!!!!
Woop woop! We’re getting close, my magnifying lense arrived and I’ve got my first real good look at the trichomes.. All looking fairly cloudy with about 10-15% ambers coming through.
So as we’re super close now I’ve now started flushing. Not doing a run off as have been using Biobizz soil & Nutes. First flush is done and girls are looking happy. One lady seems to have really heavy colas as she’s struggling to stand up straight. So I’ve staked her to keep her more upright. Think she may bring the best yield of all four girls as it stands so far.
Final couple of weeks now, I can’t believe I’ve made it this far and really can’t wait to try my first home grown bud🍃
UPDATE: Day 2 of week 14 - Friday 20th Nov:
Had to water them early as the girls were very dry after their first flush.. I on average water them every 48 hrs, but they were ready after 36. Already noticing some slight discolouration on the leaves 🍁... Glad I didn’t jump the gun and chop them this week after seeing some amber trichomes..
A bit more LST as they had stretched a little. I’m short on lamp to plant distance but noticed what looked like a little leaf burn on one of the tallest nugs. So did what I could to bring the height of them down just a little 👌
UPDATE: Day 4 of week 14 - Sun 22nd Nov:
As soon as the lights went on today, more water seemed required at around 36hrs since the last flush. The girls seem to be loving it!
Buds do seem to be fattening up a little more each day and I think one girl is slight more ahead than the others as she has mostly orange pistils compared to the other three..
Still need to see more amber trichomes on all four ladies before they’re ready!
UPDATE: Day 5 of week 14 - Monday 23rd Nov:
Small amount of LST to keep the girls as even as poss.. Defo seeing some discolouration in the fan leaves now.. All but one of the four girls have nearly completely orange pistils now which are folding back in to the buds. But Trichomes need to be a little more amber before they’re ready.. The fourth lady however is slightly behind with less orange pistils, some white ones still to turn orange and trichomes are still a mix of milky and clear on the lower buds. When I topped this one it didn’t work as well as the others so she has one really massive cola and all the others are much smaller in comparison to the other three plants..
I think we’ve got a week to 10 days left roughly till harvest.
UPDATE: Day 6 of week 14 - Tuesday 24th Nov:
Another water flush again today.. All seems well, lower small buds still need a few more amber trichomes I think.. But gonna post a question on here to make sure.. Don’t wanna get this wrong.
Sooooooo close now and I’ll be seeing 🤩🤩🤩

Likes
346
Share
@Canna96
Follow
This week went pretty well, other than she stretched like crazy and I am now getting worried about running out of vertical space. I also had a few of my bottom leaves get a few brown and yellow spots on them. I did post some pics and asked a question, thank you for the responses, much appreciated! I am thinking about adding my Spyder Farmer LED 100 Watt light into the tent for the nebula auto because it is about 23 inches shorter than the sour diesel. I believe it would only raise my temp about 2 degrees, and possibly lower the humidity by one or two percent. I must say my dehumidifier has been a freaking stud, running 24X7 and not complaining. I should look into adding another unit, it has been in the mid 90's and muggy for about a week. So far I have to say I am super impressed and excited with this setup, the genetics, and with growing this wonderful plant in general. Already planning ahead to my next grow, and what I can do better. I have been enjoying myself and I really appreciate everyone who has taken the time to answer my questions! I am having a blast and am excited to see what this lady will give up in a few weeks!

Likes
3
Share
@sanibelisl
Follow
Day 28 and all is going strong for the Mulberry. She has great shape and thick branches that reach the same height as the main trunk. Have removed the bare minimum in foliage but plan on more in the next two days and then it’s time to watch her stretch. She is in the first stages of pre flower with pistils at every node.
She is pretty to look at, strong and commanding. The reason I trust Daz, and all the folks at Night Owl Seeds!
Thank you, Merry Christmas and a Happy New Year
Day 30
Water day. Canna nutes @ 1 tsp per gallon. Growing fast! Stretch


Likes
16
Share

Likes
13
Share
@CommonCourtesy666
Follow
Week 3 finds me a little confused, should I transplant BB2 into her final home today?
What’s going on with BB1? Somethings up with her leaves.
Is this the pre veg stage? Wait another week before moving them? Any help would be great. 👾
Addendum: what a crap ass week. Cal mag deficiencies, leaf miners and woke up this morning to find my gro pro co2 tub had fallen and took out one of BB3’s leaf. If anyone knows anyone who works for that company, let them know their design sucks monkey ass. Hopefully next week is easier.

Processing
Likes
24
Share
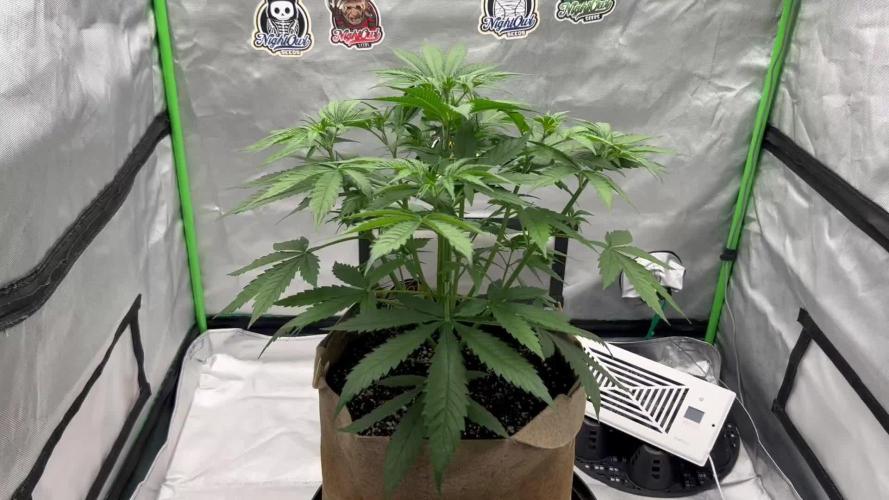
@Hawkbo
Follow
These have been growing kind of slowly but I got the temps up a little this week by adding some extra light and am getting vpd dialed in. These will only be in this tent for a few more days I am just starting to harvest the main tent so once that is done they will be moved to the Gorilla Grow Tent and put under the new Growlightscience LEDs so we can see how the perform full cycle. The autos will have to get moved back into this tent once I flip the main tent but the photos will prob need a few weeks of veg before that happens. Been doing foliars with the Growzyme from greenbuzz as well before lights out every other night which seems to make them happy. I think theyll take off over the next couple weeks.