The Grow Awards 2026 🏆 


Likes
Comments
Share
@Cameltoe
Follow
First off i would like to say sorry to Sebastian and @Exotic_Seed for not keeping up with the diary. I have neglected this plant and she has been punished. Super low humidity,lack of water,snapped branch and also split the main stalk down the middle the other day. I noticed it a few hrs later and used a pipe cleaner to cinch it back together.
😍

Likes
61
Share
@Island
Follow
Day 8 Flower
The mission until the end of pre flowering is Fill all scrog area.
Both Plants smelling well, showing pistils and become more thirsty.
Now Im watering 3, maybe 4, a week (2 times with nutrients).
At this week I started with Big Bud from Advanced Nutrients and its the last week of Open Sesame (Fox Farm).
Now every week Im gonna stay anxiows, vegetative is boring but flowering dont.
Lets ROCK! 😆
Day 11 Flower
The routine still the same, watering 2 times a week with nutrients.


Likes
9
Share
@SSKNFbyHAZE
Follow
In a week, I give compost tea, and fermented plant juice once each ^^
Hope you guys have a wonderful day today ^^v
*** Please Like, comment & share ***
Highly appreciated -----/-----<@

Likes
41
Share
@AlphaNoob
Follow
Ph meter is broken so I’ve just been feeding plain water, going to try order one ASAP.
I also forgot to lower the light a few days ago, checked on them two days ago and three of them had fallen over so I had to tie them up with garden ties and adjust the distance of the light.
Fastberry seems to be a bit behind the others, I might have overwatered a little bit the other day, hopefully it bounces back sooner than later.
Ph meter has come will be feeding nutrients for the first time with their next feed

Processing
Likes
4
Share
@xavwav
Follow
flush. buds are heavy and weighing the stocks down. trichomes are not cloudy yet.

Likes
26
Share
@561honda
Follow
Chimera was 🔥 I got 8oz and a 1/2 . 4oz from the more purple leafs one and the least purple leafs had 4 and 1/2oz and i broke one top main branch by accident .Had 50 grams of sugar leaves and 100 grams of regular fan leaves ! Made 100g of regular fan leaves to 1 stick of butter and was night night i didnt think it would work but it actually did !! 😆 The more purple one smells and taste fruity and sweet and the other less purple was smelling like gas and now smells and taste like straight lemon 🍋!!⛽️ 🔥 💣 Next grow will be 12 clones in 2 gallon square pots in 100% coco and automatic watering every 6hrs and switching from Fox Farm to Athena blended nutes and see what happens !!!! 😆


Processing
Likes
26
Share
@Oyziphar
Follow
DAY 25 Topping for the second time (pics before topping). Definitive numbering of the plants.
These Cookies are the smallest plants of the selection ; height varies from 12 - 17 cm
The slowest growing plants of the collection are the Royal Cookies. You can see that the leaves (in week 4) have all remained green. They showed no lack of nitrogen compared to the other strains, because of their slow growth.

Likes
5
Share
@StoneyMelony
Follow
Overview of my grow:
Tent: Secret Jardin DS120 4 x 4 (120 cm by 120 cm)
Lights: 2 x 120 Watt CTlite c4 clusterled
Climat: Trotec Dehumidifyer 240 watt- 10L/24h
Filter: Prima Klima carbon filter PK2600
fan: 2 x Secret Jardin 20watt osc. fan
Pots: Gronest 4 x 11 liter airpots
Water : automated water system
PH: bluelab
Nutrients: Plagron cocos A + B
Plagron PK 13/14
ATA cal/mag
Epsom salt
Week 8 She really is getting fat, trichomes are all over the buds now and there is an amazing smell. i give this week again a PK boost and it seems to work.

Likes
74
Share
@GROWitALL
Follow
All around took every nutrient like a champ. Dense, Stinky , Sticky Buds! Add these to your Sativa Arsenal
1LOVE
:)


Likes
35
Share
@FreshCoastOrganics
Follow
Two of the LSD25’s are starting to show their colors, one is quite small but her flowers are densely packed. We will see if she starts to develop the purps soon!
They have grown quite a bit since, I had to tie down the top cola on one of the girls because she was getting so tall and lanky. I have minimal room to grow in so I have to manage the height properly since LSD25 can be anywhere from 15-35in tall from what I’ve seen.
I still haven’t fed them anything other than, volcanic spring water with Fish Sh!t and Bud Candy. I’m balancing the water out with TnB naturals since the volcanic spring water tends to be either base or slightly alkaline.
The reason I use volcanic spring water here and there is to add, calcium, magnesium, potassium, silica and tons of other dissolved fulvic trace minerals from volcanic springs. I usually switch between Fiji and Waiakea spring water. It sounds a bit fancy but I alternate between this and distilled/reverse osmosis. I only use RO/D when mixing with nutrients or when I’m trying to flush nutrients from my mediums. I use volcanic spring water and local spring water from an artesian well when trying to feed a balanced water with minimal inputs.
Likes
3
Share
@Aleks555
Follow
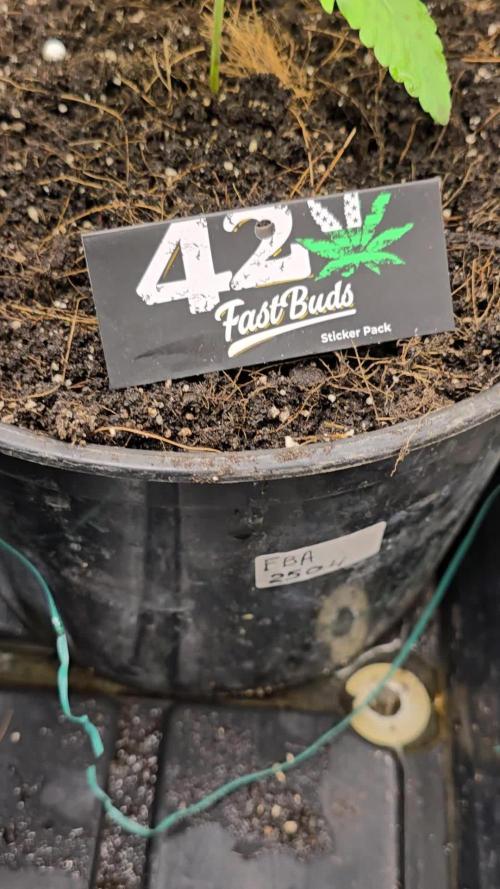
We are entering the third week of growth for our FBA 2504 strain from 42Fast Buds, and everything is progressing beautifully. We've recently transplanted the plant into a 10-liter pot, giving it more room to thrive. Even though it's an autoflowering strain, we've decided to experiment with a 12/12 light cycle—12 hours of light during the day and 12 hours at night—to see how it responds.
The daytime temperature peaks at 30°C, with an average range between 27°C and 28°C, while humidity is consistently maintained at 60% to 65%. The plant has reached a height of 14-20 cm and is already showing three sets of leaves. We're preparing to start low-stress training (LST) to help guide its growth.
In addition, we've begun feeding our beauty with nutrients from Xpert Nutrients, and we’re really pleased with the results so far. The plant looks strong and vibrant, and we're excited to see how it develops over the coming weeks!


Processing
Likes
12
Share
@2Stones1Bird
Follow
Checkout my Instagram @smallbudz to see the Small budget grow setup for indoor use, low watt, low heat, low noise, step by step.
13/12/2019 - Change the light schedule to 12-12h after 8 weeks of no signs of flowering I think is a photo not and auto.
16/12/2019 - Fed her 1.5l of 6.5PH water with 0,5ml of each: Grow, Bloom and Max, and 1ml of each: Heaven, Alga-mic and Vera, noticed about 10% run off, I use about 1/3 of the nutrient dosage on the chart, to achieve about 200/300PPM (500 scale).
17/12/2019 - Did some defoliation on the lower branches mainly.

Likes
8
Share
@Luv2Grow
Follow
Overall this was a pretty smooth grow and didn’t have any issues with her. She was definitely a short and stout plant and majority of her flowers are rock hard. She did have a couple colas throughout that produced so fairly airy flowers but could of been because of something I did to her. Still very happy with the 235.9 grams of wet flower so far and while I know she’ll lose some of her weight, she still should produce a decent final dry weight.
Likes
127
Share
@DreamIT
Follow
🎃👹👽MONSTERCROPPING RED MANDARINE 👽👹🎃
____________________________________________________________________________________________
💀 12.2 everything is OK. tomorrow I try a new macro lens to photograph purple trichomes 😍
💀 13.2 ...
💀 14.2 Happy Valentine's Day
💀 15.2 ...
💀 16.2 Ready the carnival photos ... which is your favorite? 😁🦄
💀 17.2
💀 18.2 Red Mandarine bonsai shaped in the shape of a heart, with a ring in the center. Created to celebrate 3 years with my current partner, if you read, hello I love you <3
____________________________________________________________________________________________
📜👀 A look at the details of what I'm growing 👀📜
🍊💚 Red Mandarine F1 🍊💚 by 🌱🍭 Sweet Seeds 🍭🌱
📋 Details
⚧ Gender
▪️ Feminised
➰ Genes
▪️ 55% Indica / 45% Sativa
🎄 Genetics
▪️ Red Poison Auto (SWS39) хCalifornia Orange x Skunk hybrid)
🚜Harvest
▪️ 400 - 500 g / m²
🌷Flowering
▪️ 49 - 63 days
✨THC
▪️ 16%
✅CBD
▪️ 0,2%
🏡Room Type
▪️ Indoor
🌄Room Type
▪️ Outdoor
🕋Room Type
▪️ N/D
🎂Release Year
▪️ 2019
__________________________________________________________________________
👀📷🥇 Follow the best photos on Instagram 🥇📷👀
https://www.instagram.com/dreamit420/
🔻🔻🔻Leave a comment with your opinions if you pass by here🔻🔻🔻
🤟🤗💚Thanks and Enjoy growth 💚🤗🤟
Likes
Comments
Share
@destroytek
Follow
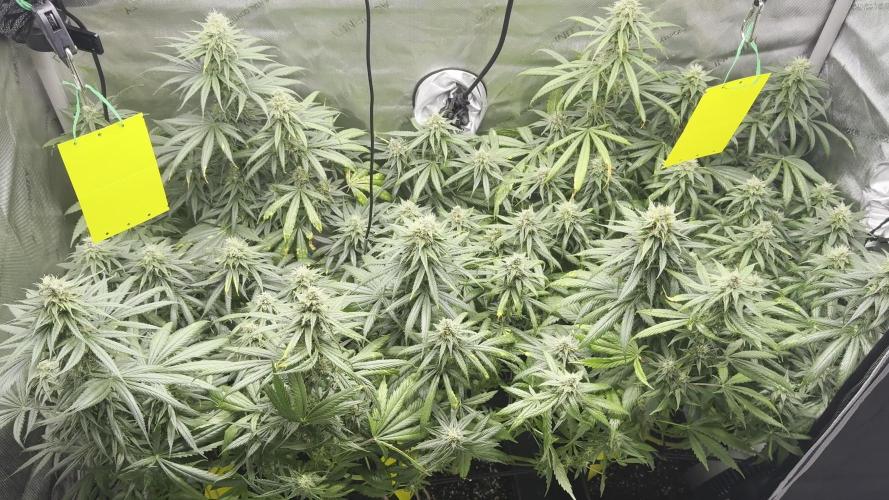
Flowering Week 6 – Fading Leaves, Persistent Flies
The sixth week of flowering brought a mix of progress and persistent problems.
The whitefly issue unfortunately hasn’t gone away. I replaced both yellow sticky traps at the end of the week, and within minutes, two new whiteflies were already spotted on the fresh left trap. The old one had four additional flies on the back. This pest pressure remains a concern, but I’ve decided to hold off on further neem oil sprays for now, given how far along we are in flowering. I’ll keep monitoring closely.
Nutrient-wise, I stayed cautious this week due to ongoing signs of overfeeding. Leaf tips are still showing yellowing and some burn, especially on the lower leaves. Many leaves have pronounced yellow spots and curled tips — a clear sign of excess nutrients earlier on. To reduce stress, I watered with plain pH-adjusted water (5.5–6.0). Total watering volume was approximately 29 liters
This week I also did a second round of lollipopping, focusing on removing all small popcorn buds and lower growth under the net that wouldn’t develop well.
Despite the nutrient stress and the ongoing whitefly presence, the plants are still developing well. Buds are getting chunkier, trichome production is visibly increasing, and the overall structure is solid. Still, I’ll be keeping a close eye on both leaf health and pest activity in the coming days.
⸻
TL;DR – Week 6:
• New whiteflies still showing up – 7 total seen this week. Both sticky traps replaced.
• Additional lollipopping done: removed popcorn buds and shaded growth under SCROG.
• Leaf symptoms (tip burn, spotting) persist – watered with plain pH water, once with half HESI dose.
• Watered 3x this week: 9.5 L (pH only)
• Light stayed at intensity level 7
Likes
38
Share
@MrSpooky882
Follow
Sieht alles gut aus soweit Keim Quote 24/25 aber der letzte kommt noch 😅
Typisch Barneys Farm Top Qualität!


Processing
Likes
93
Share
@Ferenc
Follow
Week 6th started. I will add each plant 100 ml water 2x a day so 400ml altogether. I still always spray the topsoil also. The same fertilization method will be done, Monday, Wednesday, Friday 2x 100ml acacia honey and bat guano water mix for each plant. I changed their places so Purple Punch is the left side now and the Gelato Cookie D'ohpe placed to the right. I always rotate them to get equal light. Last day of the 6th week. Gelato Cookie D'ohpe doubled its height. I decided to make the Purple Punch flower but it is not autoflower I separated it for 36 hours darkness and then I will give 14 hours darkness and 10 hours light the first 7 days. So every night I will put it in the tent with the other one and remove in the morning to be in darkness. I also need to reset the timers. End of this week Gelato Cookie D'ohpe is 65 cm, Purple Punch is 35cm.

Likes
21
Share
@JeyGanesha
Follow
Eccoci arrivati alla 5°settimana di fioritura..le cime sono belle dure. Sono compatte e dure come una pietra... Spero che in queste ultime 2 settimane alimentino di volume. Non che siano piccole ma sé vengono un poco più grandi serei più contento. Come chiunque penso😂🤣😂🤣😂👍💪