The Grow Awards 2026 🏆 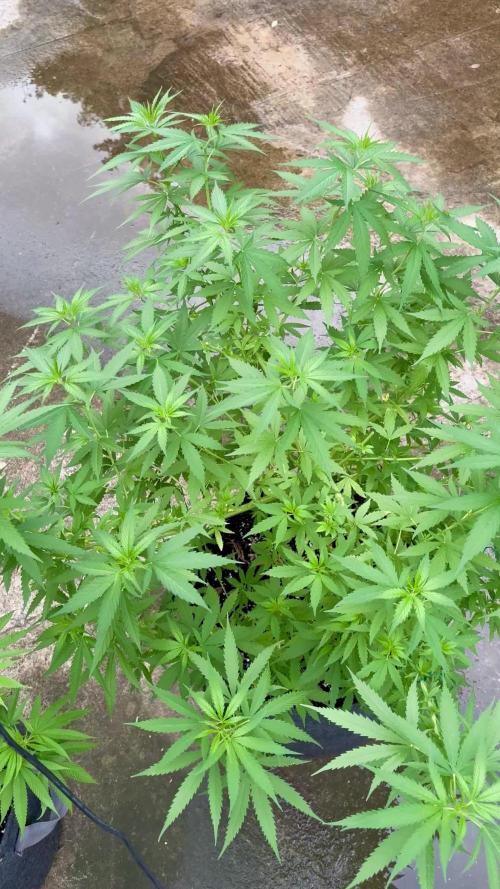


Likes
7
Share
@Organic473
Follow
As the rain continues this girl is showing her potential…I clipped a few clones from her this week…she is recovering successfully. She has about four more weeks in veg before I let her flower bin the start of 2026 Jah Guide.


Likes
1
Share
@chapothegrower
Follow
had to cut her very early because of some mold problems, but had about 50-60 grams of amazing, organic weed from this plant!

Likes
5
Share
@moswald14
Follow
she smells so good I cant wait to chop her down. thinking about chopping her on monday, the 13th so I can have a little smoke of her on 4/20 possibly. seeing amber trichomes on the cola leaves and they are starting to turn amber elsewhere too. only will gain maturity when she drying
Likes
9
Share
@PlumpPelican
Follow
Added in a fifth Zsweet Inzanity clone that I had growing on the side from the original 6 clones.
Slight defoliation around the base of the stems, so far the plants haven’t been too bushy.
Plants still have signs of a magnesium deficiency so I will wait 1 more week until I switch to flower. This will also give the plants a few more days to full up the gaps in the ScrOG net.


Likes
9
Share
@Tikush24
Follow
Mon kit
-tente horticulture 2x2x4 pied
-terre de rempotage promix
-lampe led AGLEX 1200W
-1fan pc rentre dair
- 1 fan sortie d’aire
-1 fan usb
Debut de la deuxieme semaine

Likes
13
Share
@NanoLeaf
Follow
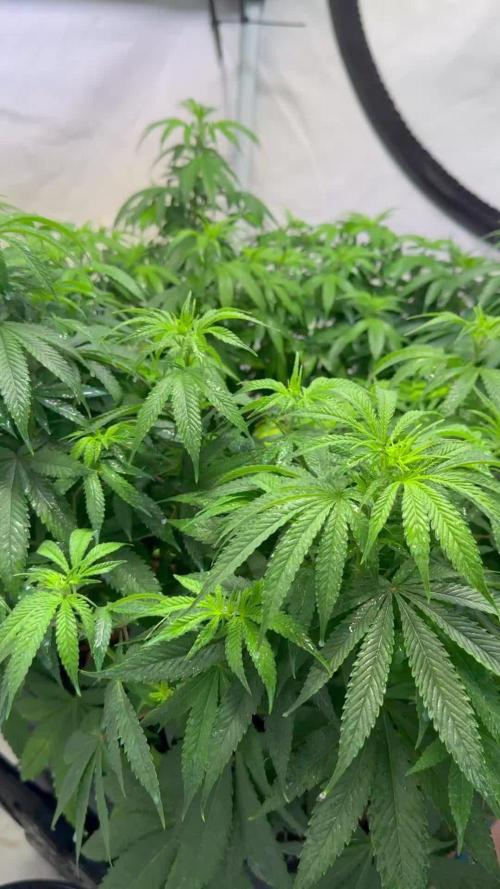
Week 8 and week 3 of flower!
The terpenes are making my mouth water and the ladies are fluffier than ever and stacking up nicely.
Due to weather changes recently I was able to keep lower over all temperatures and the humidity has increased slightly but it’s right where I want it (50% RH).
Purple Lemonade is fading nicely and her colours are becoming more and more vibrant - she has about 2 weeks left. Terps are insane!
All the other strains are happy as can be and also showing slight fade on leaves here and there. Very impressed with my Divine Seeds pheno’s and definitely recommend giving their strains a try very strong and easy to grow. Ethos Zweets literally smelling like candy canes. Dutch Passion Colorado cookies definitely giving off hues of a bakery.
Overall it was a smooth week and I can’t wait for the smooth smoke!
Organics is the easiest way to grow with minimal effort and great results. Shoutout to Green House Feeding Bio Line 😎


Likes
567
Share
@Rock_n_Roll_Randy
Follow
This grow with the TSW2000, FC4800 and 8x8 Grow Tent has come to an end🤘🤘. I'm so happy with the results mars hydro has done👍. Best lights you can get in my opinion and TONS of other people agree with me on this too👍. I always say mars hydro gets em frosty and their lights DID get em nice and frosty and the buds are so tasty and smell awesome🤘. I trimmed up 6 plants so far. Got 9 more to go. And it seems like I get a 1liter Mason jar per plant and is about 2 ounces per plant. Some are a bit more than 2. Not a huge haul per plant but I'm still very happy with it because the quality is amazing. I will never want to use anything but MARS HYDRO. Extremely satisfied with the entire grow with mars. The weed quality is very good and controlling the heat was simple because they don't get that hot. The lights were very easy to setup and so was the tent. I STONGLY recommend any products from Mars Hydro. You will not be disappointed 👍
Thanks for following my grow and good luck to all my friends and remember to have fun with your grows🤘🤘 rock n roll a joint everyone🤘🥁🎸
FOR EVERYTHING MARS HYDRO VISIT:
www.mars-hydro.com
PROMO CODE: rocknroll
VISIT THE ALIEXPRESS STORE:
@marshydro_aliexpress2
Instagram: @marshydropenny
https://youtube.com/channel/UChU5ZWwNi-DvnO3oWVU3ceA
Thanks for taking the time to read and check out my shit🤜🤛
GET THE MAX FROM MARS👍: Welcome one of the newest members of the Mars Hydro family🤜🤛🤘. The Mars Hydro FC 4800 480W LED Grow Light can accommodate up to a 4' x 4' area for flowering. It has OVER 2000 LED chips consisting of the best selling Samsung LM301B diodes which has a Luminous Efficacy of: 220 lm/W
0.2 W, 3 V mid power,
Osram 660nm Diodes, Infrared light and UV LIGHT👍. It boasts the incredible efficiency of 2.8 µmol/J, maximum 2.5gram yield per watt with 30% higher Average PPFD. This High-intensity spectrum is beneficial for plants at all stages - from veg to bloom, and creates Big dense Buds👍. achieve 50% higher yields & quality compared with the old lights! Only consumes 480W for 4x4ft personal grows, and 3x3ft for commerical grow. It comes with a dimmer and daisy chain function with a maximum of up to 15 lights, the master light controls the rest👍. Wide 6-bar design offers even & wide canopy coverage and can maximizes your grow space. slim 180° FOLDABLE DESIGN... YES I SAID FOLDABLE🤘🤣 , making it compact and easy to install, it's IP65 WATERPROOF and will give you no worries while growing in a humid environment and makes it a flexible high performance commercial grow light for enormous SUPER FROSTY yields.😛😛😛. MARS GETS EM FROSTY BOYS👍
AWESOME HEAT DISSIPATION: The Low energy consumption FC4800 growing light has 6 passive-cooled bars and an aluminum heat-sink a removable driver you can upgrade later or have it outside your tent. with zero noise you can save up to 50% in your electricity bill compared to HID's or HPS lights!
It also has a removable driver so you can upgrade it in the future or have it outside your grow space for better heat control in your growroom👍
UPGRADED FULL SPECTRUM: Yield Max Spectrum with enhanced red (Top-Bin Samsung 3000k-5000knm, Osram 660nm Deep Red), speed up blooming & fruiting, perfectly suited for full-cycle growing. The FC4800 LED grow lamp was born for Big Buds, perfect for commercial, grow tent, grow room, hydroponics, and all soil grows.👍
THE BEST SAMSUNG DIODES: THE FC4800 has Top Bin genuine Samsung Osram Diodes, combined with remarkable 2.8 µmol/J Efficacy, 30% higher Average PPFD, 50% less energy consumption, to maximize your yields. They give you a TRUSTED 3 years warranty 100% Satisfactory guaranteed!!!
The MARS HYDRO 8x8 Grow Tent interior is made of a unique diamond design mylar which is highly reflective. (Other companies mylar and reflective rate is as low as 50%, and it won't provide efficient light. They use thick 1680D oxford canvas, and being double stitched, it is tear proof and perfect for locking in the light. Their grow tent keeps 100% of the light inside the tent and helps your plants absorb more light. EXTRA-THICK material means No light leaks or rips at all.👍
Strong Stable metal corner adapters and poles are the trustful supporters of the tent. It's very sturdy, neither rusting or paint flaking off. quick and easy tool-free setup. They use heavy-duty metal zippers, with double layer black lining, by far the best on the market which creates a light-proof seal.
The Easy observation windows are made by double layers of cloth. Observe the growing conditions of your plants without opening the tent and avoid disturbing your plants. The observation windows also serves to dissipate heat and ventilate the air.
The tent includes 2 removable waterproof floor trays to hold soil and water. The removable tray can be taken out to wash easily.
They guarantee the grow tents are easy to install even if you've never done something like this before. Clear Instructions and no tools needed! They also offer 30-day unconditional refunds for quality problems. Just contact their friendly 24 hours customer service 👍
Likes
13
Share
@Popothamio
Follow
Aquí unos vídeos de la segunda semana de floración. Ya tiene los led definitivos y la malla más abierta, hace rato que pasaron a la 8 ball kush. Los riegos eran de medio litro cada dos o tres días todos ellos con fertilizantes. Se me olvidaba comentar que la red mandarin es de flor roja y de las tres solo una salió con ese tono que me está gustando bastante y otra cosa que no comenté es que la 8 ball tiene dos semanas más de crecimiento que las otras pero se le hizo lst y podas apicales a varios brazos.. las red mandarin solo fue una poda apical a cada una antes de la mallla.


Likes
12
Share
@NORTHWALESAUTOS
Follow
Great week of flower. She's starting to take shape nicely. Smell unbelievable.
Likes
71
Share
@CrazyHorse
Follow
Hello my grow mates 😇
As first week occur I cannot complain at all. She start to develop a foliage and it is a little to much for her, so today (Day 7) she was supported 💪
Please have a good evening, You Lovely Girls Growers 😇 💪 🙏
Processing
Likes
6
Share
@Moss420
Follow
Added the first screen into the tent. Decided to kick Big Mumma out because she just wasn't growing any taller and the other plants were really over growing her.
For the new setup I used kitty litter trays and mesh to sit the plants on - each plant gets its own tray so I can track runoff EC individually and I cut little flaps in the mesh so I can wet vac the runoff. With this setup I shouldn't need to move the plants out of the tent until harvest.
For the scrog I just tied some builders rope around the poles of the tent and tied the trellis netting off with training wire. I've been manipulating the growth just to try and fill out the whole screen, I also gave them a good haircut because I plan on flipping them soon, don't want them to outgrow the tent.

Likes
19
Share
@GoldenWeedGrower
Follow
Legend
Timestamp: 📅
EC - pH: ⚗️
Temp - Hum: 🌡️
Water: 🌊
Food: 🍗
pH Correction: 💧
Actions: 💼
Thoughts: 🧠
Events: 🚀
Media: 🎬
D: DAY, G: GERMINATION, V: VEGETATIVE, B: BLOOMING, R: RIPENING, D: DRYING, C: CURING
________________________________
📅 D63/B01 - 17/01/24
⚗️ EC: 0.1 pH: 7.4
🌡️ T: 23 °C H: 58%
🌊 Flushing
🍗
💧
💼 Added CO2 dispenser system
🧠
🚀
🎬 Added 1 pic
________________________________
📅 D64/B02 - 18/01/24
⚗️ EC: 0.9 pH: 7.2
🌡️ T: 21 °C H: 53%
🌊 Res changed
🍗 Added CalMag - Bloom A-B - B-52 - Bud Candy - Rhino Skin - Voodo Juice
💧
🧠 pH is still too high, I'm evaluating to use pH-
🚀
🎬 Added Timelapse video
________________________________
📅 D65/B03 - 19/01/24
⚗️ EC: 0.8 pH: 7.4
🌡️ T: 20 °C H: 45%
🌊 Added a little bit of pH-
🍗
💧
💼 LST
🧠
🚀
🎬 Added Timelapse video and 1 pic
______________________
📅 D66/B04 - 20/01/24
⚗️ EC: 0.8 pH: 7.4
🌡️ T: 21 °C H: 51%
🌊
🍗
💼 LST
🧠
🚀
🎬 Added Timelapse video
________________________________
📅 D67/B05 - 21/01/24
⚗️ EC: 1.2 pH: 7.4
🌡️ T: 21 °C H: 50%
🌊 Added 6L
🍗 Added Calmag - Bloom A-B - B52 - Bud Candy
💧
💼
🧠
🚀
🎬 Added Timelapse video and 2 pics
________________________________
📅 D68/B06 - 22/01/24
⚗️ EC: 1.2 pH: 5.9
🌡️ T: 21 °C H: 51%
🌊
🍗
💧 Added pH-
💼
🧠
🚀 As I would join this contest : https://growdiaries.com/giveaways/TrolMaster-Tent-X-Ultimate-Grow-Challenge I asked for a Tent-X device and they accepted to borrow it to me until the contest ends.
🎬 Added 1 pic
________________________________
📅 D69/B07 - 23/01/24
⚗️ EC: 1.2 pH: 5.2
🌡️ T: 22 °C H: 51%
🌊 Added 4L of water
🍗 Added Calmag - Big Bud - B52 - Bud Candy
💧
💼
🧠 pH is finally stable on the lower side (hopefully)
🚀
🎬 Added 4 pics


Likes
38
Share
@Chucky324
Follow
Hello. This is the end of week 9 and the beginning of week 10 of flowering.
Got 1 week of flushing done. I'll give the 3rd flushing tomorrow and and I should get another in before the harvest, starting on Aug 5, a Monday.
In years past, it's taken about a week to cut it down, hang the branches for a few days and then put the buds into curing bags.
Getting yellow leaves because of the flushing and there is another week to go so there will be more yellow leaves.
That's Ok. I think if you mistreat them a bit, you gets more THC at harvest.
The 3 plants I have inside were wilted when I checked on them. With the heat they went through their water faster since the last watering.
Now they have got lots of yellow leaves, especially Plant #8b. That twin has been a little strange since the start. Oh well?!?
The inside plants are a week behind the ones in the greenhouse and they will be harvested after I've finished in the greenhouse.
Showed some of my flowering peyote. They are self pollenating and the oldest is about 20 years old.
Finished book 5 of Weirdo. I've got more Freak Bros. comic books for the next diaries which will be Pink Kush and Death Bubba from weedasecgenetics.simdif.com/ or weedasec.org/
OK. Keep Growing Straight.
Chuck.

Likes
8
Share
@JABS420
Follow
Curing 1 and half plants and froze the other 1 and a half for hash later. Can't wait to try!


