The Grow Awards 2026 🏆 


Likes
Comments
Share
@Alpha_Green
Follow
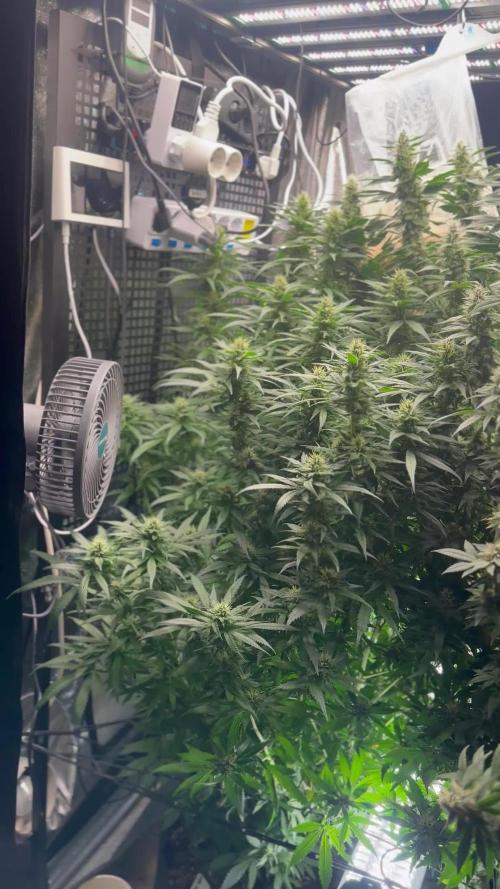
Addendum @ Day 1 - Week 9
Hello dear Growmies!
Today I'm back on day 1 of week 9. The sun has just risen and I was able to notice that they are now very thirsty and demand more and more. Today I then have an aired Cannazym injection 2 l per plant.
Everything is going well so far. I let Co 2 phase out slowly. Also, my corners only shine warm red/deep red. However, at full strength. I have reduced the SanLights dimmed down to 90% from today until Monday evening.
... I want to let them transpire again in front of her last fermented compost tea, relaxed and breathe deeply.
I was very positively surprised by my Dutch Passion sidekick. Super robust genetics. Also very reliable. I will also take a closer look at their portfolio in the future.
"The true meaning of life is to plant trees under whose shade one does not expect to sit." ...
Addendum @ Day 63:
So far everything is going well. All the girls are still very diligent and have only been watered enzyme-rich since Monday.
Slowly, the first signs of harvest day are emerging.
I think on Sunday, I'll turn off my light system and then leave it relatively dry for another two days in complete darkness. And then off to the drying net at 62% humidity.
But all in good time and good conditions.
meanwhile my Sanlight only runs at 80%, but that's still enough power for my big voluptuous ladies. In addition, there is also the completely great and summery warm spring to Germany. And so now I want to lower the temperatures a bit during "daytime" the last few days to protect the trichomes. And once again, I was able to learn a lot. It was also a great pleasure for me to see the different strains in their different developments.
I am also very happy to have found a nice place here on this wonderful platform for plant lovers. With so many wonderful people and their way of dealing with this plant, yes I find that fascinating...!


Likes
4
Share
@Mr_nugs_lover_David
Follow
She's looking beautiful and she's getting huge now on her 3rd week,I can't wait to transplant her asap. She's gonna be such a beautiful big bush! So excited! Follow me on this adventure to see how I grow my organic medicine! Peace ✌️ 💚

Likes
28
Share
@Mosquito_Haarlem
Follow
Week 7 is begonnen en ze doet het goed.
Bloemen beginnen voller te worden en haar kleuren zien er gezond uit.
Ik heb ook wat onderste bladeren en takken weggeknipt.
Pomp het op 💪🏽
Ik zal gedurende de week nog verse foto's updaten dus hou het in de gaten 🧐

Likes
6
Share
@MaestroBud
Follow
🌸 Critical Orange Punch – Week 6 Flowering | Enter Overdrive
Critical Orange Punch is now showing off its compact and resinous nature. The structure is becoming more solid, and the buds are starting to accumulate mass and sugars thanks to the initiation of the Overdrive phase in the Advanced Nutrients Master Recipe protocol.
Irrigation management has been optimized with 3 watering cycles per day via drip kit, to keep the substrate constantly moist but never saturated.
🔆 Combined lighting:
Phlizon FD9600 at 100%
Mars Hydro ADlite 100W for undercanopy coverage
🌀 Evolving climate control: The Trotec TTK 33 E will be activated on Friday evening in automatic mode at set humidity, with continuous draining, to maintain ideal levels during the most critical hours.
➡️ No additional boosters beyond those in the table. Maximum fidelity to the AN recipe.
Likes
169
Share
@SlowpokeFuegobud
Follow
🍊 🐶 💜 🍊 🐶 💜 🍊 🐶 💜 🍊 🐶 💜🍊 🐶 💜 🍊 🐶 💜 🍊 🐶 💜 🍊 🐶 💜
Welcome to week 9, my fellow growmies!! 💚 💚 💚
DAY 57
Watered with 3ml humics +growzyme + bigfruits 💧
DAY 59
Watered with 3ml bloom (?) + 2ml PK + 4ml humics + growzyme + 3ml bigfruits 💧
DAY 61
Watered with 4ml bloom + 3ml PK + 4ml humics + growzyme + bigfruits 💧
DAY 63
Watered with 4ml bloom + 2ml PK + 4ml humics + growzyme + bigfruits + LO + 2ml calmag
💧
Thanks for stopping by, it's a true pleasure to have you as visitors!! 💚 💚 💚 😘
💜 🐘
______________________________________________________________
About Sour Tangie Dawg cannabis seeds
Sour Tangie Dawg is a sativa dominant cross between the famous Tangie and Chemdawg. Expect a combination of sweet & fruity mixed with a gassy, jet-fuel flavour. The amazing mix of citrus, tangerine, pine and gasoline produces uniquely rich, dank buds. The powerful sativa high is strong, uplifting and long lasting, great for creativity and socialising.
Chemdawg is the parent of OG Kush, all Diesel strain originate from Chemdawg. The Tangie is originally a Skunk hybrid strain but extremely fruity with the trademark Tangerine flavour. This strain is potent with THC-levels over 20% alongside very generous yields of top quality weed, very suited for hash and rosin producers. If you’re looking for a strain to produce the best tasting concentrates this Sour Tangie Dawg is a proven winner! She easy to grow and the perfect choice for SCROG growing due to her growth speed and stretch. We advise switching to 12/12 light when 75% of the net is filled. For outdoor growers the harvest period is early October. Indoors she’s finished after 9 weeks of flower - fast for a sativa dominant strain. We recommend growing in soil with organic nutrients for the best tasting weed.
Get some fantastic genetics here: https://supersativaseedclub.com/ 💜 🐘
___________________________________________________________________________
SETUP:
80x80x180 cm Zelsius
240W Full Spectrum LED IR UV dimmable
DW240H-A6-HS
Heatsink color red
LED Chips:
512pcs SAMSUNG LM301H + 24pcs Osram 660nm + 8pcs Osram IR 730nm + 8pcs UV 385nm
Color mix: 2700K + 4000K
2,8umol/J
Driver HLG-240H-C2100B
Coverage: veg 5x3ft / flower 4x2ft
Product size: 628x205x68mm
Green Buzz Nutrients
Shouts go out to my sponsors @GreenBuzzNutrients, thanks so much for your support! ❤️
If anyone would like to try their amazing organic products, use code GD42025 for generous 25% discount (for orders of minimum 75€) ✨
https://greenbuzznutrients.com/
Biobizz Lightmix
custom exhaust fan 320/270cm³/h
Carbon Active Granulate 240cm³/h
tab water pH 8 - EC 0,25 with Calmag to 0,5
Advanced Hydroponics pH minus Grow + Bloom to pH 6.2
🍊 🐶 💜 🍊 🐶 💜 🍊 🐶 💜 🍊 🐶 💜🍊 🐶 💜 🍊 🐶 💜 🍊 🐶 💜 🍊 🐶 💜

Likes
64
Share
@MadeInGermany
Follow
Hi people :-)
Today the update of the Blue Gelato # 41 🌱.
She looks very healthy and vital 👌.
It has grown very nicely this week.
I only uploaded 2 of the same videos for testing, once in 4 K and once in HD. Since the last videos of the quality were unfortunately not so good when you watched them on the PC.
I hope this bug is now fixed, otherwise it is because of my apps etc.
Tomorrow there will be a few more pictures, because unfortunately I only came to the videos today.
That's a hell of a lot of work that comes with growing, and still work in everyday life 😅.
What you don't do for your passion 😍👍
I wish you all a nice start into the new week, let it grow and stay healthy 🤗🙏🏻🌱🍀

Likes
27
Share
@adam_pawloski87
Follow
Let’s go day 43!!!! Week went real well , girls started preflower so sometime this week I will be switching up the nutrients for flowering! We are stable and looking super healthy! Can’t wait to see what these ladies do this week! Hope you all enjoy !
Likes
12
Share
@BeHappyNtoke
Follow
everything is still going great new growth starting to show trying to debate on the veg time due to small pots introduced a slight breeze to strengthen stem
Likes
13
Share
@Canadian
Follow
I feel sorry for my plans this 2 weeks I haven't been able to look after them properly I've been working long shift with Christmas approaching there's no time for anything so I was pushing in a lot of nutrients into them and I caused a nutrients lockout .I have flush them out with just clean water at the right pH 6.5 and they are responding very well from now on I will continue to Baby them so they gave the best result possible within the circumstances of the plants.
Thank you for reading I will continue to update have a happy grow

Likes
69
Share
@AsNoriu
Follow
Day 36. Girls got EcoThrive dry amendments, 3 handful of BioBizz Worm Castings , 2 ml of EcoThrive BioSys and 2 ml of Great White . All was mix and rubbed into top soil and watered after.
Before that girls got heavy training, worthless buds and branches were taken off. He lost two bottom branches on each, if would care - it would be extra mass.
Loads of last to expose, buds were form already and it was perfect time for such cruelty ..
Only 6.3 water for 3 weeks, then last top up before harvest.
I like simplicity of dry amendments.
Mars SP3000 is still delivering as you could only dream. She is on full blast.
Happy Growing !!!
Likes
147
Share
@MrJones
Follow
MrJones Black Berry OG
🔹🔹🔹🔹🔹🔹GOALS🔹🔹🔹🔹🔹🔹
🌞Flowering Environment - 75/80℉ and 50% Humidity
💧 Feeding - Advanced Nutrients Bloom Regiment - Great APP!
🍃Training / Added the second trellis last week, it is doing a great job with support, SCROG process makes it hard to defoliate the plants.
🕷️ IPM - Will be using Green Cleaner" 1 OZ per Gallon, and CannControl from Mammoth alternating between product each month for Integrated Pest Management.
💡Mars Hydro LED / Veg TS-1000 / Flower 480W FC 4800, this light is just performing very well!
🔹🔹🔹🔹🔹🔹🔹🔹🔹🔹🔹🔹🔹🔹🔹🔹🔹🔹
📝 Rambling - With week 14 here, will be the last week of nutrients and will be starting with PH H20, the buds continue to get fat!
🔹🔹🔹🔹🔹🔹🔹🔹🔹🔹🔹🔹🔹🔹🔹🔹🔹🔹
▶️ Friday - 04.09.21 / Feeding 40 OZ of Advanced Nutrients
▶️ Saturday - 04.10.21/ Feeding 40 OZ of Advanced Nutrients
▶️ Sunday - 04.11.21/ Feeding 40 OZ of Advanced Nutrients
▶️ Monday - 04.12.21/ Feeding 40 OZ of Advanced Nutrients - Thrdr girls are getting PHAT! I was a bit concerned a few weeks ago but now I am just as happy as can be!
▶️ Tuesday - 04.13.21/ Feeding 40 OZ of Advanced Nutrients
▶️ Wednesday - 04.14.21/ Feeding 40 OZ of Advanced Nutrients
▶️ Thursday - 04.15.21/ Feeding 40 OZ of Advanced Nutrients
🔹🔹🔹🔹🔹🔹🔹🔹🔹🔹🔹🔹🔹🔹🔹🔹🔹🔹
📜 Cultivar Information - We have created this strain by crossing the best Black Domina available with Very Berry and our own Lost Coast OG Kush, this plant produces large colas with a super intense sweet berry flavor with a sweet-smelling aroma that varies from fruit and berries to sweet candy. This lady offers tight internal stacking giving a perfect structure for those super heavy colas, which is perfect for growth both indoors and out, if grown outside she is fairly resistant to mold and powdery mildew which is a real bonus with such large colas.
🔹🔹🔹🔹🔹🔹🔹🔹🔹🔹🔹🔹🔹🔹🔹🔹🔹🔹

Likes
7
Share
@PavementPunk
Follow
Snapped the main branch a little but its been healing ok. Besides that shes been getting bigger filling out her new pot. Also took the smaller lowest branch for my first clone attempt. Probably gonna experiment with a couple more cuttings maybe even an auto clone for laughs. Been raising the light an inch at a time as i noticed signs of light stress. All in all good week happy growing friends

Likes
179
Share
@StarLorr
Follow
Welcome to my Øpium diary.
In this diary:
Seeds: sponsored by Ðivine Șeeds
Media: Promix HP
Nutrients: Advanced Nutrients, Diablo Nutrients, Gaia Green Power Bloom.
Light and Weather: Şun☀️and Mother Earth.🌎
___________________________
Feeding:
Tue 06Aug: 4L nutrients pH'd 6.5 and 4L water not pH'd
Wed 07Aug: 8L water not pH'd
Thu 08Aug: top dressed Gaia Green Power Bloom 6 tbsp
Sat 10Aug: 2L water not pH'd
Sun 11Aug:6L water not pH'd
Mon 12Aug: 8L water not pH'd
___________________________
*please note that most water only feedings are 2L at the time throughout the day in bottom saucer*
___________________________
Øpi survived the wrath of Debby(Tropical Storm)she stood her ground(in her pot)😂Monday I added a piece of wood to the anti-tipping device to hold up the lower branches as they pull the plant sideways and will only get worse as the buds gets bigger and now Øpi look more straight than leaning sideways.😃
______________________________
Øpi and other sisters got the defoliation treatment, mostly fan leaves.
_______________________________
Top dressed her up with Gaia Green Power Bloom about half a 3/4cup as i can't keep up feeding her liquid nutrients in such industrial amounts😅but the results are already showing and she seems to like it, i will continue liquid nutrients feeding once or twice a week.
______________________________
Thanks for stopping by, likes and comments are appreciated!👊🏻😎
Keep on growin!
Keep on tokin!!!
😙💨💨💨💨💨

Likes
36
Share
@nonick123
Follow
Día 66 (05/08) Cerrado por vacaciones
Día 67 (06/08) Mi amigo viene a casa a hacer un riego con 1 Litro de H2O pH 6,5
Día 68 (07/08) Cerrado por vacaciones
Día 69 (08/08) Vuelta de vacaciones! A ver como están después de 5 días sin verlas... 😱
Riego con 1 litro. OnionOG con 1.5 L
Añado 3 cm de sustrato nuevo porque se ha compactado y se ven las raíces! 😢
Día 70 (09/08) Riego 500 ml H2O pH 6,55
Eliminación de algunas ramas bajas
Día 71 (10/08) OnionOG vuelvo a hacer topping a todas las ramas principales! 💥
Riego 500 ml H2O pH 6,55
Sesión de fotos semanal!
Día 72 (11/08) Riego con 1 Litro de Té Vegetativo de Lurpe Solutions. Preparación: 24 horas con bomba de aire (oxigenación) con ingredientes:
Green Sunrise 8 ml/L + Insect Frass 16 ml/L + Hummus Lombriz 8 ml/L + Melaza 1 ml/L + Kelp Hidrolizado 0,25 g/L
Aplicación foliar Kelp hidrolizado de Lurpe Solutions a 0,25 ml/l
💦Nutrients by Lurpe Solutions - www.lurpenaturalsolutions.com
🌱Substrate PRO-MIX HP BACILLUS + MYCORRHIZAE - www.pthorticulture.com/en/products/pro-mix-hp-biostimulant-plus-mycorrhizae


Likes
14
Share
@Downunder90
Follow
Week 8 Update: Transition to Flowering 🌸✨
🌟 The Flowering Stage Begins 🌟
Welcome to Week 8! Big changes are happening in the grow room. This week marks the official switch from the vegetative stage to the flowering stage. With the light schedule now adjusted to 12 hours of light and 12 hours of darkness, the plants are entering the crucial phase where all the hard work of vegetative growth will start to pay off in the form of buds.
🌼 Flowering Transition 🌼
Light Schedule:
The light schedule has been reduced to 12 hours on and 12 hours off, which signals the plants to begin flowering.
I'm aiming to maintain a Daily Light Integral (DLI) of around 40 to optimize bud development.
Greenhouse Super Lemon Haze 🌞
Responding quickly to the light change, with the first signs of pre-flower pistils emerging.
The even canopy from LST will help the plant distribute energy effectively to multiple bud sites.
Humboldt Seed Bubba Kush 🌿
This compact, bushy plant is beginning to show signs of entering the flowering stage.
Its strong structure is set to support what should be a dense, resinous bud formation.
Blueberry Muffin 🥞
Continuing to exhibit robust growth, with the first signs of transition into flowering.
The dense frame developed during veg should result in a productive flowering stage.
🌱 Continuing Care 🌱
As the plants transition, I'll be adjusting their care to support this new phase:
Nutrient Adjustment: Shifting to a flowering-focused nutrient schedule with increased phosphorus and potassium to support bud formation, while gradually reducing nitrogen.
Environmental Control: Monitoring and adjusting temperature and humidity to ideal levels for flowering, ensuring the environment promotes healthy bud development.
Training & Defoliation: Continuing LST and selective defoliation to maintain an even canopy and improve light penetration to lower bud sites.
🌸 Looking Forward 🌸
The plants are now in the flowering stage, and this is where the real magic happens. Over the next few weeks, we'll start to see bud sites develop and eventually swell into full, aromatic flowers. I'll be closely monitoring the plants to ensure they have everything they need for a successful bloom.
Stay tuned for next week's update as we dive deeper into the flowering phase!
Happy growing! 🌸💚


Likes
11
Share
@Gamepichayut420
Follow
อาทิตย์นี้ตัดยอดเอาไปชำ อาทิตย์หน้าเตรียมเปลี่ยนกระถาง รากทะลุกระถางสุดๆ ฟูๆเลยเจ้า Freakshow
Likes
16
Share
@Marccap1
Follow
Another hot week in cali... But my ladies are loving it... As you can see... Well stay safe people and stay hi!

