The Grow Awards 2026 🏆 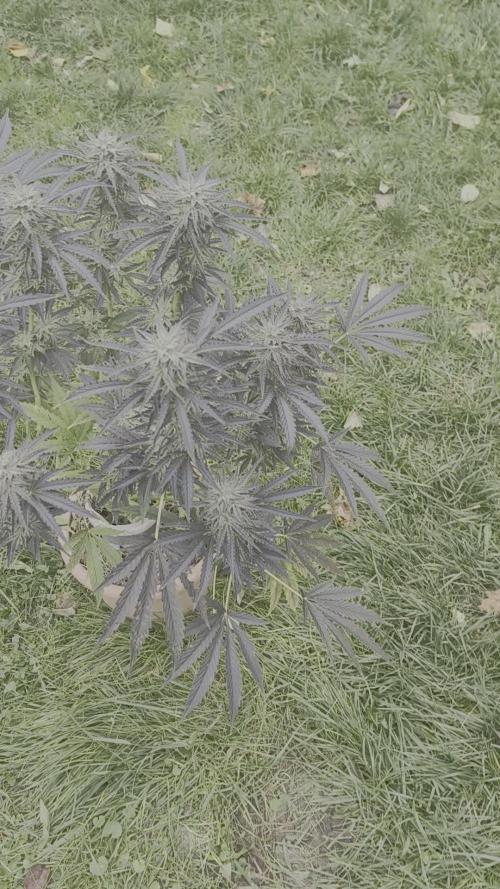


Likes
4
Share
@Nistnov
Follow
Had no time for the harvest so i took the risk and let her grow, under a rain cover. Im surprised that i didnt spot any bud rot! Removed fan leaves for better airflow.
The weather makes it hard for her to fatten up, so i will give her one more week to finish up.
Shes super frosty and has such an amazing smell.
I did harvest 3 small branches that are drying and curing right now, looking forward to the smoke test.


Likes
120
Share
@DogDoctorOfficial
Follow
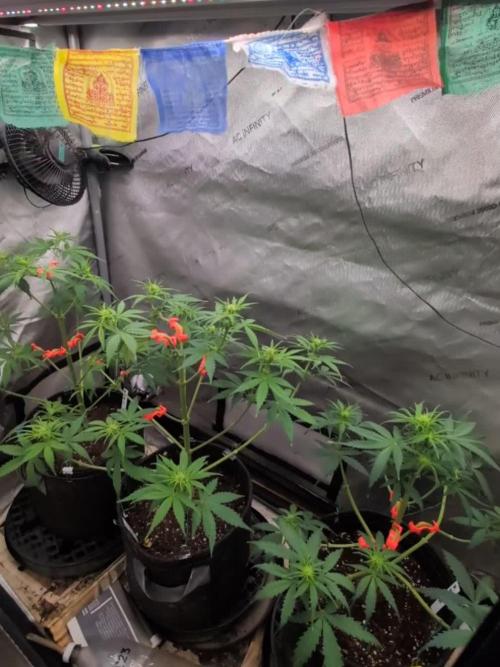
Week 9 (Week 1 of flowering) has been a jaw-dropping experience in my Tropical Tangie Ninja Run. Our girl is absolutely killing it! Her luscious green foliage is a sight to behold, and my Lego Ninja buddies are always on point, making sure everything is in order.
The excitement escalated as I spotted those little preflowers showing up towards the end of the week. I have a strong hunch that she's going to turn into a flowering monster during the first two weeks! <3 <3 <3
To support this explosive flowering growth, I made some savvy moves in my nutrient game. I decided to switch from my root booster to the fruit booster. Why, you ask? Well, my Tangie is transitioning her focus from root development to bud production. So, it's like shifting gears to give her exactly what she needs to create those magnificent flowers!
But that's not all. I also added some P-booster to my nutrient mix. You might wonder why? It's because this little ninja booster is packed with phosphorus, the secret ingredient that stimulates robust flower formation. We want those buds to be big, dense, and super potent! <3 <3
With a canopy as lush as this, I'm already contemplating a potential defoliation around day 21 of flowering. It's like planning my ninja strategy in advance! But let's keep that for the next update hehe.
As for her TDS numbers, they might not seem massive at 230, but remember, I'm using those amazing Aptus All-in-One Pellets mixed with the soil. Her main NPK is already packed in there, and these boosters are just giving her that extra ninja kick!
With room temperatures at 28.9°C and a humidity level of 62%, the conditions are perfect for our Tangie to thrive. I can't contain my excitement for this epic ninja run!
I'm deeply grateful for your unwavering support and the wonderful products from Aptus Holland that have played a crucial role in this journey. You all make this adventure truly special, and I'm thrilled to have you by my side, also of corse a huge SHOUT OUT to Dutch Passion for this incredible oportunity and for the amazing genetics they create and release to the world <3<3<3
Stay tuned for the next update, where we'll witness the true transformation of our Tangie into a flowering ninja goddess! <3 <3 <3
As always thank you all for stopping by, for the love and for it all , this journey of mine wold just not be the same without you guys, the love and support is very much appreciated and i fell honored and blessed with you all in my life<3 <3 <3
#aptus #aptusplanttech #aptusgang #aptusfamily #aptustrueplantscience #inbalancewithnature #trueplantscience #dutchpassion #dogdoctorofficial #legoninjago #growerslove
With true love comes happiness <3 <3 <3 Always believe in your self and always do things expecting nothing and with an open heart , be a giver and the universe will give back to you in ways you could not even imagine so <3 <3 <3
Friendly reminder all you see here is pure research and for educational purposes only
<3 <3 <3 Growers Love To you All <3 <3 <3
🌿

Likes
4
Share
@Growstopher
Follow
4.21.25
3rd week of veg started today and the tie down method is starting to payoff!
Hoping to get another week or 2 of veg get some more green growth we will see.
Thanks for checking out grow have good week!

Likes
5
Share
@Jays_Not_Here_Man
Follow
The girls have blown up with their flower stretch. Despite the good growth, all the buds are still staying tight, and should be some decent nugs. I’m glad they got some reasonable growth before the flower
Change happened, there could be as many as 5 more weeks of flower left for these buds to fatten up 😎
Added some more Clyde to the feeding regiment. They seem to be doing well, but could probably use a bit more phosphorus and potassium, but are showing leaf burn… I’ll keep an eye on that. RH was brought down to between 54-56 %, and temps are steady between 77-79 degrees at lights on, and 69-70 degrees lights off.
I continued with some LST of bending the top down and tying to the pot. They responded well. I don’t want to do a whole lot, just try to keep the canopy semi even. No defoliation yet, possibly next week. Happy Gardening 🇨🇦👊❤️

Likes
26
Share
@KingSalomonsWeed
Follow
Joa, die Gelato ist super stable. Gebrochener Hauptstamm. Egal. 2 mal, auch egal. Sie ignoriert es einfach. 😍
Sensi Seeds
Good looking girl.
Duftet hervorragend.
Aus dem zelt kommt eun frischer Bananen angehauchter treibhausduft.
Sehr angenehm.


Processing
Likes
88
Share
@Fergie
Follow
hey guys so we are getting very close now . i collect my new aircon unit tomo morning im going to throw straight in tent and drop down to 18 for last few weeks . I started flush begining of week on both girl looking so nice a d smell is just amazing . Til next week only a few more to go 😀

Processing
Likes
4
Share
@mikolajgrows
Follow
Growing good, haven't noticed any worrying signs, RP is happy I guess in it's tent ;)
Likes
290
Share
@Ferenc
Follow
Crazy week.
Weather has changed went to be more rainy and colder.
Some days were even close to 6 celsius degrees in the night.
We have got more like cloudy some days with some hours of sun but nothing significantly strong light.
She does well, getting dense and the smell is very strong!!!!!!
Like sweet and citrus and like absolutely I feel in my mouth tho....very very very nice!!!!!!
Looking also good maturing she is quite big so i surrounded her from one side with rubbis bag to not be be able to see by my neighbours... obviously not a tomato plant even if she is placed between.... 🤪
She will make it more rain less sun but she is okay.
I also checked the trichomes nice maturing they look milky but apparently they need to mature and the pistils are white anyways I go after the trichomes I think she grew more a bit as well. I am happy ;)

Likes
5
Share
@Vince_Van_Grogh
Follow
D34, 12 Oct, Sunday
♥️ 2.2 L 💛2.1 L 💚 1.9 L
CalMag, GrowBig, BigBloom, TigerBoom
Finally started bottom feeding, which makes things easier.
Defoliated a bunch and lollipop for better air and exposure.
A lot slower in growth than Mephisto genetics. But let's see.
D37, 15 Oct, Wednesday
♥️ 2.7L 💛2.5 L 💚 2.2 L
All with just Recharge and nothing else.
CalMag and/or K def on ♥️ and 💛.
Let's see if it can still be fixed.

Likes
17
Share
@Eddjack
Follow
Ok non entra più nel box....ho legato una un ramo al lato del box. Speriamo non si bruci con il mars al 100% . Per il resto procede bene ha un buon odore agrumato speriamo crescano in fretta.
Likes
55
Share
@Max1973
Follow
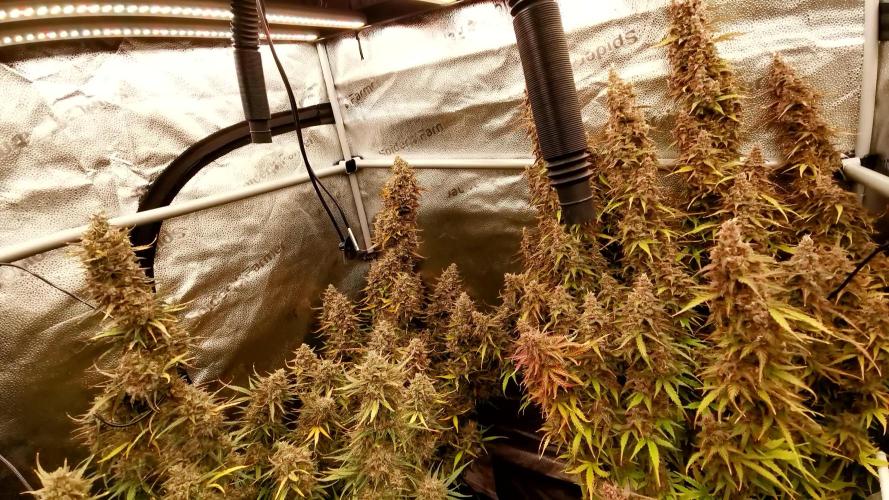
Day 57 - The girls are bursting with flower....... looked abit light (the main tops looked a light green, showed signs of nutrient deficiencies), so upped the Dutch Master Gold One Flower, it's 1000 ppm now.... thinking about Defoliation... outside temperatures are middle of winter, 0oC to 20oC (32oF to 70oF) .... but typical high low is 5-15oC (40-60oF)......... surprisingly the LED's warm the tent upto 20-24oC,
this is important point.... i am running the lights, 6 pm to 6 am... 12hrs lights on all night, and all day is night mode...... during the day is the highest temps of the day... and during the lowest temps, they have the light heat .......
Day 61 - I trimmed em .... this was the third defoliation..... things are starting to get sticky..... ah i'm just going to wing it.... they are 2 months (8 wks) from seed.... idk what i'm doing.......
i did some serious stress bending today, and had to put afew tie downs in..... my theory is to hurt em as much as i can without killin em....
to make em harder, stronger, faster, more stressed, so they can survive anything..... grow em stronger......
the smell is zero in the home, but once i got them out for their 2 week haircut, they started producing some strong wet kisses, that were sticky and wet.... the
aroma of heavenly ladies was abundant...... 😎😎
idk... this tastes so good.... it's like some kind of weird berry combo goodness.... i'm vaping vanilla custard atm and this is so good with vanilla custard.... vanilla custard kush n cookies... haha
watch the video......... 😎


Likes
142
Share
@BudBoutique
Follow
Wedding Cake was pretty easy and fast to trim.
! bud weight = dry after 2 weeks


Processing
Likes
2
Share
@420Somewhere
Follow
Started adding the nutes at 1ml/l. Just using Advanced Nutrients Sensi Coco A+B for veg, Will add in some molasses after any HST or defoliation (stress).
Looking good so far.
Likes
10
Share
@EhCndGrower
Follow
Day 17 and she is growing still a little slower compare to everyone else, but hope the side branching will pick up a bit for training. Keep freaking out thinking I have mites again but I don’t see them on my leaves. Plus I think I have grasshoppers nibbling on all my gals leaves. As of Saturday Fozzy Bear (we wanted it Fozzie but official paper work says otherwise) joined the family and his new big brother Buddy. He has already grown a few inches since we got him but god is he ever cute, and god bless Buddy for taking his playful shit since

Likes
21
Share
@CannaArchive
Follow
Week 13 was harvest time for two of the Bruce Banner plants 🌸✂️
#2 and #3 were clearly ready, with mostly milky trichomes and some amber, so I decided to finish them this week.
Both plants were taken out of the tent on Thursday and placed into complete darkness for 48 hours.
Due to the heavy buds, they had to be secured to the ceiling, as they would have tipped over otherwise.
After the dark period, both plants were cut on Saturday and hung to dry 🌿
Only the large fan leaves were removed at harvest, while the smaller leaves were left on to ensure a slower and more even drying process.
Bud structure is very dense and compact, with strong resin production and loud terpenes already noticeable at harvest.
Aroma is a mix of chemical, citrus and sweet notes, very typical for Bruce Banner.
Bruce Banner #1 stayed in the tent this week, as she was still slightly behind in maturity and needed more time to finish.
Environment (before harvest):
Temp ~24°C
RH ~50–55%
Overall a very smooth and controlled harvest week.
Plants finished strong, and the quality looks very promising going into drying and curing ❄️🌱
Likes
24
Share
@DeepRootsGrowTrees
Follow
GORILLA COOKIES 🍪 FF/ FASTBUDS
WEEK #16 OVERALL
WEEK #8 FLOWER
This week she's just about done she's got about 1 week left before harvest buds are looking good and got a nice aroma to them. She's just on water now to flush. Stay Growing!!
Thank you for stopping by and taking a look it's much appreciated!!
Thank you FASTBUDS!!
GORILLA COOKIES 🍪 FF / FASTBUDS