The Grow Awards 2026 🏆 


Likes
13
Share
@DaisyNabis
Follow
cada dia mas glotonas mis bellas, estoy aplicando riego casi día por medio, solo una vez a la semana las abono, el resto solo con agua. hice algunos amarres a los tutores ya que están en pleno crecimiento


Likes
2
Share
@LoganatorDude
Follow
New week, so far the feed was recently a pinch of seaweed bliss with some fulvex, to assist with the heat. New feed will be posted soon.
I am re-entering the Fruity Pebbles!! She never died, and in fact, I’d looking pretty good considering!!!!! Super cool


Likes
12
Share
@Budking420
Follow
Went crazy with LST as I'm anticipating that stretch as they decide to start flowering through the week! I'm so excited the 2 with the older soil happily took nutrients almost to the point I could have went even full strength. The grobiotics is a special formula I got a sample of from a close friend. It consists of canna leaf, organic molasses and lacto bacillus!!!! It was great for improving the life of my soil I look forward to buying it when it becomes available it's not really available yet as far as I know. It improved my microbial life 100% my soil is definetly living and these plants are super happy. I hope you guys are enjoying these diaries as much as I am. Check back next week to see just how fast they grow & remember its 4:20 somewhere!!!!!!!!

Likes
7
Share
@GoodTimesOrganics
Follow
Welcome Back!💚
Die Sleepy Joe ist nach 56 Tagen Blüte nun Erntereif!
Die Trichome alle samt milchig und es gibt einige Bärensteinfarbene. Ich denke ich habe den Peak gut erreicht.
Das Aroma ist Kräftig und wirkt ziemlich ausgewogen zwischen etwas süßlich fruchtigen und dann doch etwas stechendes Gas artiges.
Heute wird geerntet!
Die Umgebungsgegebenheiten sind aufgrund des nassen Wetters etwas anders.
—————
🌞 Temp: 24°C
🌚 Temp: 18°C bis 19°C
💦 RH: 56%
💨 VPD: 0,98 kPa
😎 PPFD: 830 mqm
—————
Grüne Grüße 🥦

Likes
3
Share
@GardenxManxJames
Follow
Heavy feeding really don’t give it plain water the uva light are helping . But did some defoliation.

Likes
11
Share
@4_Pro2Bono_0
Follow
Flipped these ladies 06 Oct 23 (Friday). After watering 09 Oct 23 (Monday) I walked in and the before SOG photos are what it looked like, I put up the new net and tied a few tops down to spread the canopy out. With the new trellis in place I'm going to let theses ladies rip and add another trellis once they outgrow their current one.
Likes
18
Share
@Dunk_Junk
Follow
She's almost done.
Watching pistils to all turn colour and trichomes to go more cloudy.
Likes
15
Share
@masterofsmeagol
Follow
8/10 Hurried morning. Today was water day and the hose fucked up. Dad got it working while I filled half the jugs needed with water and the requisite amount of plant doctor. I gave the preventative dose (which is 1/2 tsp per gallon but I upped it closer to 1 tsp per gallon) on the plants that have received the three full treatments, the 10th planet in the middle and the chemdog. The rest received their last full dose. I had watered the NATURAL mk ultra and other tenth planet yesterday so I'm waiting until tomorrow when the need water to give them their treatment. Other than the 10th planet I'm worried things are going pretty good. Tjat's probably tine too. I certainly wouldnt have even noticed it a few years ago. I only bought like half the amount of soil as last year and really tried keeping costs down. These aren't the biggest plants I've grown but I'm grateful for what I have. I'm working hard to get the most out of them I can. I'm planning to give it a few days and then feed later in the week.
EDIT: I THINK I got my grow question deleted. Finally. It's strange that I didn't get ONE outdoor growers response. Doesn't matter. I figured out the best course of action. I'm lucky. Or maybe I just work hard. I defoliate twice a day. I have some pruning to do on the interior of a COUPLE plants. I've cleaned them up pretty good this year. No signs of ANY wpm which is great but suprisinging considering the rh and the rolling fog most mornings.
8/11 I gave the tenth planet in the back and the mk ultra I didn't get yesterday. The mk ultra got the preventative dose (upped from 1/2tsp to 1tsp) and the 10th planet tge full dose. I'll have to check but I think this is the last cure dose for everyone. Found a pillar INSIDE a bud on the special kush that's far ahead. Then you can see on the video a HUGE cut worm or something on the branch I pull down. Luckily I saw it. Wasn't there when I got back but it took a few bites. Looked on the camera and saw a bird swoop in and grab him. Thank the lord! It's going to be 100° today and tomorrow with heat advisory in effect. I'm going to have to treat these plants for pests/pillars some how. I might just use BT and my super alkaline water. The septoria is under control and I'm just afraid spraying anything would make things worse. I'm certainly jot going to let them eat my early flowering plant. I can't apply ANYTHING in this heat. I'll research and maybe if it gets low enough tonight I might be able to do something. I'm going to go back over and check that plant going branch by branch. That one 10th planet tgat WAS the biggest plant is severely stunted amd has some "strange" looking leaves. I wasthinking about getting it off property or just chopping and burning but I figure it's been in there long enough that the others could be infected. I think it spreads through pests if that's the case then it might be better to get rid of it. I'm not sure what I'm going to do yet. I'm going to stop and try to get some mulch today.
EDIT: I found a place I can get a bale of straw and I think I'll use that to mulch. It's almost a 100°. After killing the pillar this morning and missing that cutworm I came back over to REALLY look at the special kush in later flower. I looked through every branch and every bud. I found four pillars on that plant. No REAL damage yet and extremely small. I had to pull buds apart to find them. It's like they were hiding from the heat. That was miserable hand picking them in 100° degree weather. Luckily the bird feeders are close but the bigger birds chase the smaller ones. The smaller birds have found a new food source and perch on my cage waiting. I'm leaning towards treating the flowering plant with BT-k. Seeing that tge citric acid WON'T kill fungus I'll just use OUR super alkaline water and hope for the best. Nothing will get treated during this weather.
8/11 IT reached 105° yesterday and I had a family medical emergency. Came over this morning to several plants drooped right over despite me checking MD day and them being fine. Phone dodnt charge so I couldn't get pictures. Watered everything but the ones that got it yesterday cause they looked good and still had weight. I had to leave before the ones that were down could pick back up. The kush plants seem to tolerate this heat much better. Beside the ones in the 10s tge others are taking this hear fine. I'll update when I get back.
EDIT: Went back over around 10. Another hot day. Suppised to be HOTTER than yesterday. I don't know how that's possible. both our thermometers went to 104 lately. Oh and I dont think that's beet curly top virus I think it's just great stress! I've grown this strain before and it's not the most resilient but it's other qualities make up for that. That's a loud off. I checked most buds on the plant in late flower and found a grass hopper IN the cola! No damage that I could see and I flicked him in the head which killed it. I came back to the chemdog that I didn't water drooping. I watered that and the 10th planet I didn't get this morning. The only one that hasn't got water today was the natural mk ultra and when I was there it was still heavy and looked really good so I left it. I'll have to come back around four and check things out. I'll be watering that tonight for sure. It will be hot tomorrow too then it will be better weather. I need to feed but I'm uncertain whether I should in this heat. All the kush strains I'm running are have Hindu kush as a parent and seem to be able to take the heat no problem. We don't get heat like this usually. It's different when it's 100° and 99% rh than dry heat.


Likes
51
Share
@eldruida_lamota
Follow
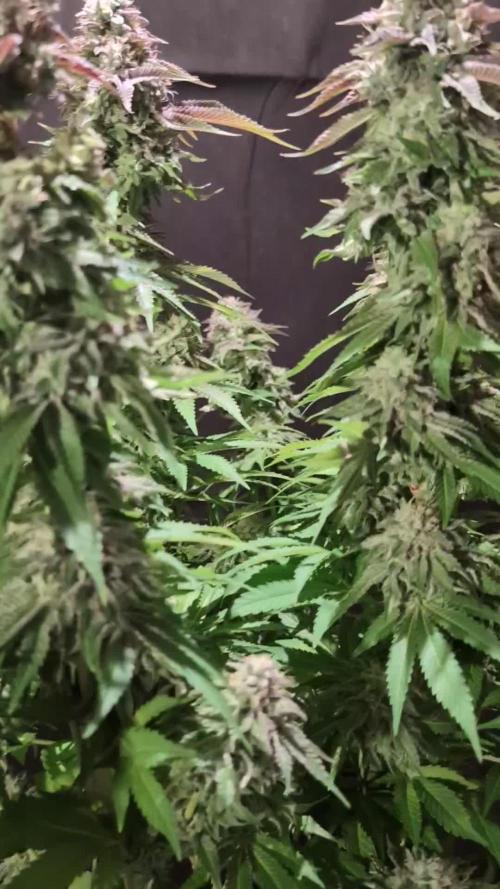
Que pasa fumetillas, ya estoy de vuelta y traigo la quinta semana de floración jaujas, que aromas que desprende esta variedad, y como tricoma 🔝, que más se puede pedir.
Bueno por pedir, que no se caigan del peso de las flores en semanas que salga cantidad pero que no caigan 🤣.
Buen porte andan también con buen color, y las flores están prietas prietas 💎
.
La humedad esta al 45% la temperatura está entre 21/25 grados , y como siempre el ph , ya que es de lo más importante,está en 5,8/6,0.
.
AgroBeta:
1 ml x L Flowering black line , vía radicular.
0,2 ml x L Beta shark, vía radicular.
0.5 gr x L mega PK , vía radicular.
0,8 ml x L Terminator, vía radicular.
0,5 gr x L Engordacogollos, vía radicular.
0,3 ml x L Tucán , vía radicular.
0,1 ml x L Betazyme, vía radicular.
0,3 ml x L Tricoma, vía radicular.
0,05 ml x L Gold Joker, vía radicular.
0,2 ml x L Silver, vía radicular.
.
Hasta aquí todo familia 🕸️ , un saludo y buenos humos fumetillas💨💨💨.
Likes
4
Share
@Barcelona_Farmers710
Follow
Buenas farmers!! Después de pasarnos tres dias con sólo agua volveremos con la mitad de nutrientes durante los próximos dos riegos, ya empezamos a prepar nuestras plantas para la fase final ! Espero que os guste buenos humos family!💚
Processing
Likes
14
Share
@kevgrow
Follow
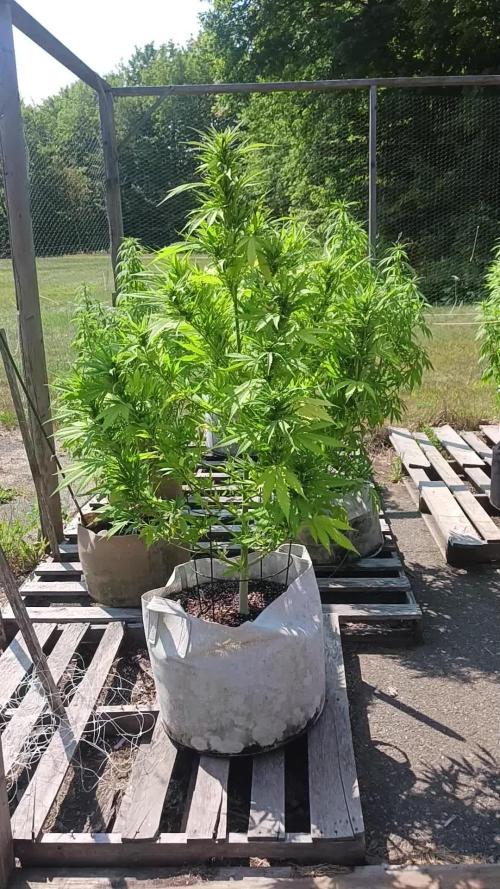
Hey Friends, I just started my very first grow. Excited to see the outcome, Its a learning process, discovering new things everyday.
Plant #2 growing rapidly, seed was very dark compared to others, does that mean something?
On day 4 i noticed the leaf turning yellow on the borders, currently only feeding water, will keep an eye on that and do some research on the topic.


Likes
7
Share
@NO_DRAMA
Follow
Week start very good. I already transfer Brain destroyer in to the big pot 💪
I will transfer Soul Drain tomorrow 💪💚
27.03 I make topping)
Likes
4
Share
@Fergie
Follow
Hey guys so here are my 2 rippled haze lady's and are looking awesome can't wait to see them beef out another week and I will look start to begin topping them and get some structure going .. til next week


Likes
2
Share
@Topshelf_only
Follow
Still very hot with high humidity. still not to worried this strain is meant to be mold resistant. Definitely putting it to the test.
Likes
91
Share
@CANNASIM
Follow
RQS . STRESS KILLER AUTO CONCLUSION BEFORE HARVEST.
Harvest time is here, choose to do a final post with how the girl looks after the final flush, so enjoy.
If you are looking for a super resistant strain and easy to grow functional medical strain this is the one.
She was given tap water, and used flawless finish for 6 hours then flush again, 2-3 times in this two weeks, expecting top shelf from her.