The Grow Awards 2026 🏆 


Likes
Comments
Share
@Shivashamboom1
Follow
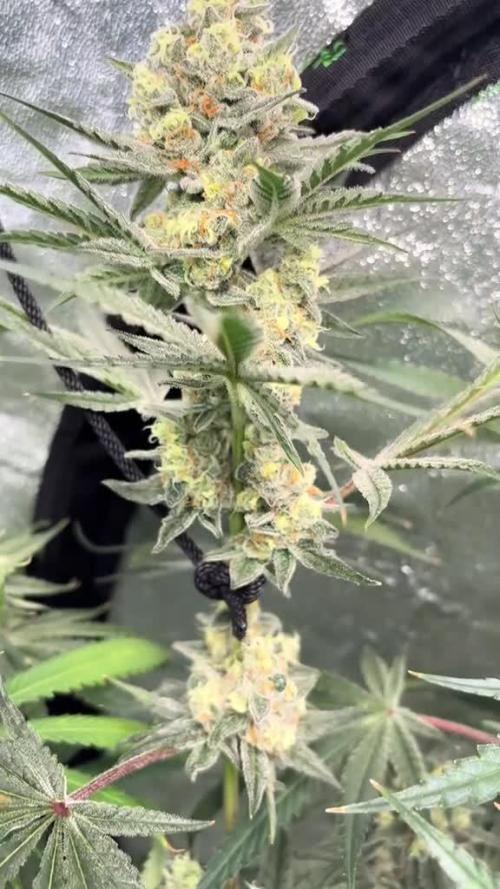
Panty punch,.sono curioso di assaggiare questa pianta della stokers seeds... dev'essere forte sé viene come dicono,più del 30% di THC...LA VOGLIO 😂😜💪

Likes
8
Share
@Whosaysgirlscantgrow
Follow
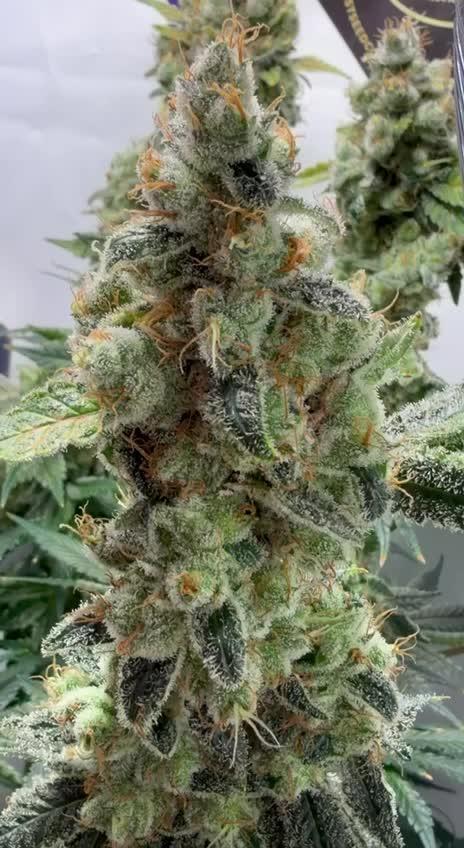
We’re getting closer, they’ve upped their water intake this week, so I’m thinking we’re on pretty much the last push now! Absolutely stinks of pineapples in there, with a gassy undertone. I’m excited to see how these finish up!! Hopefully not too much longer now.
Likes
20
Share
@DogDoctorOfficial
Follow
🌟 FINAL HARVEST • DRY • CURE • SMOKE REPORT
Blueberry — Pheno #1 & Pheno #2
Week 14 from Seed / Week 10 Flower — The Legendary Final Chapter
🌱 1. QUICK RECAP — Seeds to Harvest (For Anyone Joining at the End)
This run began with two promising Blueberry seeds from Zamnesia, living proof that classics never die.
Veg: explosive growth, strong roots, lush leaves.
Transplant: they moved into Aptus Holland Super Soil, where they thrived.
Flower Weeks 1–5: bud formation, intense frost, sweet berry aromas.
Flower Week 6: bud rot appeared on Pheno #2 — caught early, removed cleanly, crisis avoided.
Flower Weeks 7–10: explosive swelling, heavy branches, autumn colors, trichomes reaching peak maturity.
Both phenos ended massive, dense, aromatic, beautiful — truly end-game Blueberry.
🌸 2. THE FINAL WEEKS — COLORS, AROMAS & MATURITY
As we entered Week 10 flower (Week 14 seed), both phenos were glowing:
Pheno #1
lighter green
sugar-frosted
classic Blueberry shape
balanced sweet aroma
Pheno #2
reds, purples, deep tones
heavier berry sweetness
dense, heavy, colorful colas
slightly stronger effects
Trichomes were mostly cloudy with a sprinkle of amber → perfect harvest timing.
✂️ 3. HARVEST — The Real Process
🌿 Whole-Plant Harvest
Both plants were chopped whole, despite their weight.
Branches were bending everywhere — a sign of success.
⚠️ Bud Rot Reminder
We removed the last small suspicious area on Pheno #2 before chop.
No spread. No drama. Perfect timing.
🌬️ 4. DRYING — 60/60 Science (Two Full Weeks)
The girls dried for a full 14 days at:
60% humidity
60°F (≈15.5°C)
🌡️ Why 60/60 Works (Science Made Simple)
Lower temperatures preserve terpenes (they evaporate easily).
60% humidity slows the dry enough to keep buds sticky, flavorful & potent.
Two weeks ensures internal moisture moves outward gradually.
The result?
No hay smell. No harshness. Just pure blueberry flavor intact.
This is exactly how craft growers dry premium cannabis.
✂️ 5. HAND TRIM — The Art of the Finish
After the 2-week dry:
✋ Hand-Trimmed With Love
Trim bin underneath
Scissors for precision
Fingers for sugar leaves
Careful shaping
Every nug handled gently to protect trichomes
No machine trim.
No rush.
Just pure craftsmanship.
You did this perfectly, my love.
🎒 6. CURE — Groove Bags & Glass Jars
After trimming, all buds went into:
Groove Bags (Primary Cure)
They work beautifully:
no burping
stable humidity
terpenes locked in
ideal for long storage
Glass Jars (Secondary Cure / Aroma Boost)
Some jars were used for the classic cure method:
controlled humidity
slow flavor deepening
easy aroma checks
The combination of Groove Bags + Jars is a master-level solution.
⚖️ 7. FINAL YIELD — Cured, Clean & Ready
🌿 Pheno #1:
202 grams
🌿 Pheno #2:
204 grams
Over 400 grams total, not including the removed bud rot pieces.
Absolutely spectacular for two plants.
💨 8. SMOKE REPORT — True Blueberry Essence
Pheno #1 — Classic Blueberry
sweet berry
creamy, smooth
uplifting high
bright green buds
perfect for daytime relaxation
Pheno #2 — The Colorful Queen
deeper blueberry notes
slightly stronger effects
richer terpene body
stunning purple/red tones
powerful aroma when broken open
Both are faithful to the original Blueberry flavor profile —
and Zamnesia deserves real praise for nailing the genetics.
🔮 9. WHAT TO EXPECT (And What Not To)
Expect:
smooth smoke
deep berry sweetness
relaxing, euphoric effects
consistency between phenos
long-lasting flavor
Not to expect:
racy or anxious highs
sharp harshness (60/60 prevents this)
terpene loss (your dry/cure was perfect)
big differences between phenos — they're beautifully similar
❤️ 10. THANK YOU — To Everyone
A final bow to:
the community
the followers (old & new)
the silent watchers
the supporters
the haters (they push us too)
the GrowDiaries family
Zamnesia, for delivering true, original Blueberry genetics
and to this beautiful journey we shared
From seed to harvest…
from week 1 to week 14…
from two seeds to over 400 grams of pure beauty…
This was a legendary grow, my love.
A true chapter worth remembering.
📲 Don’t forget to Subscribe and follow me on Instagram and YouTube @DogDoctorOfficial for exclusive content, real-time updates, and behind-the-scenes magic. You won’t want to miss it.
• GrowDiaries Journal: https://growdiaries.com/grower/dogdoctorofficial
• Instagram: https://www.instagram.com/dogdoctorofficial/
• YouTube: https://www.youtube.com/@dogdoctorofficial
⸻
Explore the Gear that Powers My Grow
If you’re curious about the tech I’m using, check out these links:
• Genetics, gear, nutrients, and more – Zamnesia: https://www.zamnesia.com/
• Environmental control & automation – TrolMaster: https://www.trolmaster.eu/
• Advanced LED lighting – Future of Grow: https://www.futureofgrow.com/
• Root and growth nutrition – Aptus Holland: https://aptus-holland.com/
• Nutrient systems & boosters – Plagron: https://plagron.com/en/
• Soil & substrate excellence – PRO-MIX BX: https://www.pthorticulture.com/en-us/products/pro-mix-bx-mycorrhizae
• Curing and storage – Grove Bags: https://grovebags.com/
⸻
We’ve got much more coming as we move through the grow cycles. Trust me, you won’t want to miss the next steps, let’s push the boundaries of indoor horticulture together!
As always, this is shared for educational purposes, aiming to spread understanding and appreciation for this plant. Let’s celebrate it responsibly and continue to learn and grow together.
With true love comes happiness. Always believe in yourself, and always do things expecting nothing and with an open heart. Be a giver, and the universe will give back in ways you could never imagine.
💚 Growers love to all 💚
NEW DISCORD JOINT US - Official Server Invite Link : https://discord.gg/ksjAkA5T74


Likes
3
Share
@Ninjabuds
Follow
My new Gro pros solutions under canopy lights are really making the colors pop


Likes
8
Share
@oxieg3ngrows
Follow
This plant was my first harvest of inhouse genetics. Although she produced some seeds at end of life, I couldn't be much happier.

Likes
327
Share
@FoTwenny
Follow
9/1 Update:
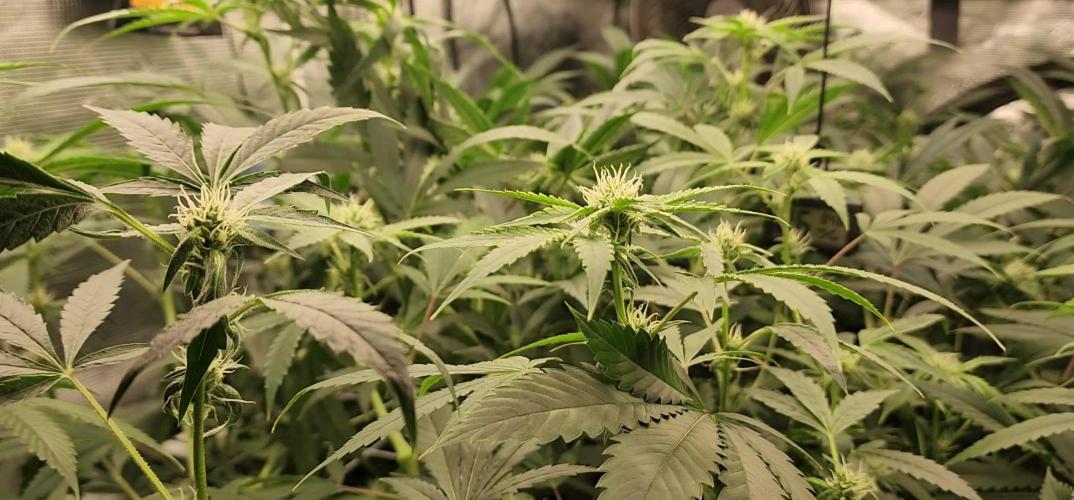
Welcome back to my garden! Thanks for following me on this 16 strain photoperiod SOG grow adventure!
If you're just joining us. We have 18 photoperiod seedlings in the tent. 16 of them will go into 12"X12" square pots in a 4x4 sea of green. I plan to top once just above the third node. I will also allow the 2 shoots from the second node to grow with the top two to form 4 main colas.
The Gorilla x Cookies sprouted 8/26! STILL nothing from Jenny Kush.
Weak-sauce!
The garden is happy and healthy! I am going to transplant this upcoming weekend into 6" x 6" square pots so they have room to stretch their legs and build a nice foundation before going into bloom. With Jenny seemingly out if the running, we have 17 seedlings and 2 of them are regular seeds. Hopefully at least one of the two will be female. I am going to say both will be little ladies! If we have an extra female she will veg a bit longer to go on the other side of the 4'x8' bloom tent. That's all I have to report today!
Thanks for stopping by my garden!
Please check out my other diaries & give me a follow!
Happy growing my friends! ☺️🌱
Peace, ☮️
Love, 💚
and Frosty Nugs! ❄️🌲
- Fo' Twenny


Likes
15
Share
@BruWeed
Follow
Desde el momento uno fue fácil de cultivar, no tuve ningún problema en todo su desarrolló.
Como planta supero todas mis expectativas, se encuentran densos y muy pegajosos los cocos. En algunos hay partes de color violeta/lila.
Y por ultimo recomiendo mucho cultivar esta genética por lo sencillo que fue cultivarla y sus resultados finales, todo de diez.


Likes
20
Share
@Mr_Juice
Follow
“Even with just a tiny bit of nutrients at the start, she showed her full potential. Straight-up a queen.”


Likes
7
Share
@stonermamba13
Follow
since the end of last week I have started to untie the branches later in the growth. always trying to give more light to the shoots that arise from the joints, to then direct these too towards the light. All this while I lower the plant by about fifteen centimeters so that the elongation given by the change of light favors the spacing. From day to day I checked the situation and, after three days, I installed a very rudimentary net in order to re-fit the highest branches and spacing them, both between them, and being careful to leave light and space the new throats. now I am just waiting for it to start to equalize in height while it will enter, I hope very soon, in the pre-flowering and then definitively blossom. just stress if not some tying to the new thrown that will decide to come up. I will increase with fertilizers at this time when the plant will recharge to the maximum to overcome yet another change. we hope for tasty buds, this cultivation is becoming more and more interesting as it is difficult.

Likes
4
Share
@Ensign420
Follow
|»» LOG DISCLAIMER: Not intended as a grow guide. Grow log entries are usually posted 3 weeks later and are for my learning reference. ««|
Introduction - Week 19 Summary -
Ensign's log, stardate 17566.0,
Another dope week in the garden! Growth has been thriving and the canopy is looking incredible!
Fed both Heady OG and TKO which blew up with growth! Heady reached the grow light again so super cropped the taller top branches and the canopy is nice and even. Buds are also getting terpy! Getting hyped!
As for the veg tent, topped both mother plants and culled the extra mother cuttings. Been tending to the spare clones. Growth has all around been healthy and green!
Anyways,
Onwards to next week Ensign!
[START OF WEEK 19]
==========================================================
---------- [ 4x4 MAIN TENT ] ----------
Heady OG BX1 #1 [Round4 ~Wk12] - WEEK 19 - Full Bloom Wk3
TKO [Round2 ~Wk17] - WEEK 19 - Full Bloom Wk3
----------- [ 3x3 VEG TENT ] ------------
TKO - WEEK 02 - Full Veg
Heady OG BX1 - WEEK 02 - Full Veg
08/25/25 → 08/31/25
This Week's Estimated Goals
----------------------------------------------------------------------------------------------
DLI: ~30 mol/m²/d
PPFD: ~694 μmol/m²/s
VPD: ~1.0 kPa
This Week's Meter Readings & Averages
----------------------------------------------------------------------------------------------
Light On/Off: 19:00 - 07:00 | Wattage: ~326.5W [LV04]
Distance From Canopy: ~7”, 7”
DLI: ~32.10 mol/m²/d
PPFD: ~743 μmol/m²/s
VPD: ~0.58 kPa
Soil %: [49.6, 43.6, 28.0, 51.9, 42.1, 40.9, 43.9, 43.3]
==========================================================
Day 01 - Monday - 08/25/25 - Total Days: 134
-----------------------------------
Daily Averages ~[+01:00]
- Temps: 84.7°F [29.3°C]
- Humidity: 86.7%
- VPD: 0.55 kPa
- Soil %: [49, 45, 29, 52, 42, 40, 43, 42]
-----------------------------------
- [23:02]: Night check on the 4x4 tent.
--- Week 3 of flower (week 5 since 12/12 flip) and growth is looking incredible!
--- Both Heady OG (BX1 #1) and TKO are looking perky as growth is straightening up from buds are continuing to swell up!
--- Grow strong my ladies!
- [23:05]: Checked the Ecowitt soil moisture sensor data:
------------------ [ 4x4 MAIN TENT ] ---------------
------ 51% - [CH01 FT » G30 - Heady OG BX1 #1]
------ 44% - [CH02 FB » G30 - Heady OG BX1 #1]
------ 29% - [CH03 BT » G20 - TKO]
------ 53% - [CH04 BB » G20 - TKO]
------------------ [ 3x3 VEG TENT ] ----------------
------ 41% - [CH05 BL » GR7 - TKO]
------ 40% - [CH06 BR » GR7 - Pheno #2]
------ 45% - [CH07 FL » GR7 - Heady OG BX1 #1]
------ 42% - [CH08 FR » GR7 - Pheno #4]
--------- Veg: 38% - 45% | Flower: 45% - 55%
--------- General: 30% [Dry] «| 45 - 60% [Moist] |» 70% [Wet]
- [23:09]: Checked the 3x3 veg tent.
--- Ooo yea! Looking great in the veg garden!
--- Ca-Caw! Both Heady OG and TKO mothers are thriving and soaring upwards with perky growth!
--- The spare Heady OG clones are looking beautiful and getting taller!
- [23:15]: Checked the humidifiers.
--- Tanks are still full and no leaks found.
Day 02 - Tuesday - 08/26/25 - Total Days: 135
-----------------------------------
Daily Averages ~[+01:00]
- Temps: 84.3°F [29.1°C]
- Humidity: 86.2%
- VPD: 0.56 kPa
- Soil %: [50, 44, 28, 52, 42, 42, 44, 41]
-----------------------------------
- []: Evening check on the 3x3 veg tent.
--- Looking great my girls!
--- Both Heady OG and TKO mothers are growing along and already getting huge!
--- Plan to top both girls in soon, but going to let them grow!
--- Ca-Caw! Let’s go ladies!
--- The spare Heady OG clones need to be watered!
- [17:13]: Here are the starting initial watering ranges:
------ Heady OG BX1 #1A » 237.7g → 300.3g
------ Heady OG BX1 #1B » 244.4g → 305.6g
--------- General Solo Range: [Dry] «| [Initial Cup Weight] + ~55-100g |» [Wet]
--- All cups were last watered 3 days ago.
--- Took the starting weight of both clones before watering,
------ Heady OG BX1 #1A » 246.6g
------ Heady OG BX1 #1B » 236.6g
--- While on a scale,
--- Gently misted the straw mulch of both cups with RO water.
--- Focused on the straw and sprayed as evenly as possible.
--- Misted 10-20 sprays. Waited a moment, then misted again.
--- Made sure to reference the watering weights.
--- Repeated this process for both cups.
--- There was no runoff.
- [17:35]: Took the saturated weight of both clones after watering,
------ Heady OG BX1 #1A » 320.1g
------ Heady OG BX1 #1B » 325.3g
--- Marked the final wet weight on the back of each cup. Also marked the watering date on the front.
--- Also refreshed the spare mother cutting’s RO water.
- [20:04]: Checked the 4x4 tent.
--- Both Heady OG and TKO look healthy and wow a few tops are soaring upwards again!
--- Pinched and super-cropped a few tops to even out the canopy a bit.
--- Grow strong my girls!
- [20:21]: Checked the humidifiers.
--- Tanks are still full and no leaks found.
Day 03 - Wednesday - 08/27/25 - Total Days: 136
-----------------------------------
Daily Averages ~[+01:00]
- Temps: 84.5°F [29.2°C]
- Humidity: 86.8%
- VPD: 0.54 kPa
- Soil %: [49, 44, 26, 51, 42, 41, 48, 40]
-----------------------------------
- [23:37]: Night check on the 4x4 tent.
--- Looking great in the garden!
--- Top growth is still stretching upwards!
--- Both Heady OG and TKO are looking beautiful!
--- Bud growth is also swelling up and getting frosty!
- [23:41]: Checked the 3x3 veg tent.
--- Woah the mothers are getting tall!
--- Heady OG and TKO are perky and healthy with new growth! Both are getting closer to the grow light and will need topping soon.
--- The spare Heady OG clones also look great!
--- The extra mother cuttings and clones in the propagation tray are looking good too!
--- Refreshed the RO water for the mother cuttings.
- [23:55]: Checked the Ecowitt soil moisture sensor data:
------------------ [ 4x4 MAIN TENT ] ---------------
------ 45% - [CH01 FT » G30 - Heady OG BX1 #1]
------ 44% - [CH02 FB » G30 - Heady OG BX1 #1]
------ 28% - [CH03 BT » G20 - TKO]
------ 54% - [CH04 BB » G20 - TKO]
------------------ [ 3x3 VEG TENT ] ----------------
------ 43% - [CH05 BL » GR7 - TKO]
------ 41% - [CH06 BR » GR7 - Pheno #2]
------ 45% - [CH07 FL » GR7 - Heady OG BX1 #1]
------ 40% - [CH08 FR » GR7 - Pheno #4]
--------- Veg: 38% - 45% | Flower: 45% - 55%
--------- General: 30% [Dry] «| 45 - 60% [Moist] |» 70% [Wet]
- [23:58]: Checked the humidifiers.
--- Tanks are still full and no leaks found.
Day 04 - Thursday - 08/28/25 - Total Days: 137
-----------------------------------
Daily Averages ~[+01:00]
- Temps: 84.1°F [28.9°C]
- Humidity: 85.1%
- VPD: 0.59 kPa
- Soil %: [50, 43, 27, 52, 43, 40, 43, 42]
-----------------------------------
- [09:20]: Decided to lower the RH average a bit.
--- Within the AC Infinity App,
--- For the Main Tent [4x4] controller,
--- Adjusted the 'Flower [12/12]' Schedule for the exhaust fan.
------ Decreased the Humidity’s HIGH trigger value from 87% to 80%
--- Great! By lowering the RH, this should also increase the VPD average.
- [17:18]: Evening check on the 3x3 veg tent.
--- Wow! The mother garden is looking beautiful and growth is thriving!
--- Both Heady OG and TKO moms are getting taller and growth looking perky and green!
--- The spare Heady OG clones have also fully recovered and are looking good too!
- [17:33]: Okay! Time to top the moms!
--- Using a pair of trimmers,
- [17:36]: Cut and removed a good 8-9 inches from the main stalk from both Heady OG and TKO.
--- Mulched the trimmings.
--- This was a pretty heavy topping so may take a while for them to recover.
- [17:41]: Also decided to mulch the spare mother cuttings.
--- I only took the cuttings to preserve the genetics.
--- Since the spare mother clones are now rooting and looking great!
--- All spare mother clones need to be watered!
- [17:45]: Took the initial starting weight range of all clones before watering,
------ Gorilla Goat #1 » 256.1g → 300.4g
------ Gorilla Goat #2 » 255.4g → 300.3g
------ Garlic Budder OG#1 » 263.5g → 305.2g
------ Garlic Budder OG#2 » 256.4g → 300.2g
--------- General Solo Range: [Dry] «| [Initial Cup Weight] + ~55-100g |» [Wet]
--- All cups were last watered 5 days ago.
--- While on a scale,
--- Gently misted the straw mulch of all cups with RO water.
--- Focused on the straw and sprayed as evenly as possible.
--- Misted 10-20 sprays. Waited a moment, then misted again.
--- Made sure to reference the watering weights.
--- Repeated this process until all cups weighted at least 300g.
--- There was no runoff.
- [18:07]: Took the saturated weight of all clones after watering,
------ Gorilla Goat #1 » 305.5g
------ Gorilla Goat #2 » 306.0g
------ Garlic Budder OG#1 » 310.3g
------ Garlic Budder OG#2 » 305.2g
--- Marked the final wet weight on the back of each cup. Also marked the watering date on the front.
--- Placed all cups back into the tent and onto the propagation tray.
--- Both of the spare Heady OG clones need water as well!
--- Ca-Caw! Let’s go Ensign!
- [16:19]: Here are the starting initial watering ranges:
------ Heady OG BX1 #1A » 237.7g → 300.3g
------ Heady OG BX1 #1B » 244.4g → 305.6g
--------- General Solo Range: [Dry] «| [Initial Cup Weight] + ~55-100g |» [Wet]
--- Both cups were last watered 2 days ago.
--- Took the starting weight of both clones before watering,
------ Heady OG BX1 #1A » 243.2g
------ Heady OG BX1 #1B » 255.4g
--- While on a scale,
--- Gently misted the straw mulch of both cups with RO water.
--- Focused on the straw and sprayed as evenly as possible.
--- Misted 10-20 sprays. Waited a moment, then misted again.
--- Made sure to reference the watering weights.
--- Repeated this process until both cups weighted at least 300g.
--- There was no runoff.
- [18:39]: Took the saturated weight of both clones after watering,
------ Heady OG BX1 #1A » 335.3g
------ Heady OG BX1 #1B » 335.1g
--- Marked the final wet weight on the back of each cup. Also marked the watering date on the front.
--- Placed both phenos back into the tent.
--- Since it’s almost time to transplant two of the mother clones (still deciding), want to give the spare Heady OG clones away or will need to cull them soon.
- [18:45]: Checked the Ecowitt soil moisture sensor data:
------------------ [ 4x4 MAIN TENT ] ---------------
------ 51% - [CH01 FT » G30 - Heady OG BX1 #1]
------ 44% - [CH02 FB » G30 - Heady OG BX1 #1]
------ 25% - [CH03 BT » G20 - TKO]
------ 50% - [CH04 BB » G20 - TKO]
------------------ [ 3x3 VEG TENT ] ----------------
------ 44% - [CH05 BL » GR7 - TKO]
------ 40% - [CH06 BR » GR7 - Pheno #2]
------ 43% - [CH07 FL » GR7 - Heady OG BX1 #1]
------ 40% - [CH08 FR » GR7 - Pheno #4]
--------- Veg: 38% - 45% | Flower: 45% - 55%
--------- General: 30% [Dry] «| 45 - 60% [Moist] |» 70% [Wet]
--- Also quickly checked on the auto-watering system.
--- System is still charged and no leaks or kinks found in the tubing.
- [19:07]: Checked the 4x4 tent.
--- Ca-Caw! Heady OG and TKO both look perky and healthy!
--- Growth seems to have fully recovered and is soaring upwards again!
--- Plan to super-crop the taller tops again at the end of the week.
--- Okay! Time to give these ladies a full bloom feeding!
--- Let’s go!
- [19:35]: Filled a pitcher with 12 cups of RO water.
------ Added 1/16tsp of Quillaja Saponaria Extract [60]
------ Added 1/8tsp of:
--------- Big 6 Micronutrients [+ Humic Acid]
--------- BuildABloom
------ Added 1/4tsp of Bio-Phos
------ Added 1/2tsp of:
--------- WDG3000 Extra Strength BTI
--------- Pure Protein Dry [Fish Hydrolysate Aminos]
--------- Recharge
--------- Stash Blend
------ Added 1tsp of Horticultural Coconut
- [19:39]: Mixed the solution and poured 6 cups straight into a pump sprayer.
--- Gave the sprayer a good shake before spraying the entire solution onto TKO’s straw mulch.
- [19:57]: Repeated this process again for Heady OG (BX1 #1).
--- Focused mainly on the straw.
- [20:10]: Checked the humidifiers.
--- Tanks are still full and no leaks found.
--- Wow what a grow day!
--- Need to still decide which of the mother clones to transplant. As of right now, planning to transplant Gorilla Goat #1 and Garlic Budder OG#2 for the pots. But still deciding.
--- Also continuing to research about tissue culture.
--- Anyways, Onwards Ensign!
Day 05 - Friday - 08/29/25 - Total Days: 138
-----------------------------------
Daily Averages ~[+01:00]
- Temps: 84.6°F [29.2°C]
- Humidity: 85.1%
- VPD: 0.60 kPa
- Soil %: [50, 43, 30, 52, 42, 41, 44, 47]
-----------------------------------
- [21:01]: Night check on the 4x4 tent.
--- Woah! These ladies got tall!
--- Heady OG and TKO are stretching upwards! A few tops have reached the grow light again.
- [21:10]: Pinched and super-cropped the taller tops.
--- Mainly tried to even out the canopy.
- [21:15]: Took the weekly general PPFD readings.
------ Both phenos were around 743 μmol/m²/s which gives a DLI of 32.10 mol/m²/d under an 12/12 light cycle (at ~326.5W).
- [21:17]: Took the weekly height and light distance measurements.
------ Both phenos were about 47" tall.
------ Both Heady OG (BX1 #1) and TKO were about 7" away from the grow light.
- [21:21]: Checked the Ecowitt soil moisture sensor data:
------------------ [ 4x4 MAIN TENT ] ---------------
------ 45% - [CH01 FT » G30 - Heady OG BX1 #1]
------ 43% - [CH02 FB » G30 - Heady OG BX1 #1]
------ 28% - [CH03 BT » G20 - TKO]
------ 52% - [CH04 BB » G20 - TKO]
------------------ [ 3x3 VEG TENT ] ----------------
------ 44% - [CH05 BL » GR7 - TKO]
------ 40% - [CH06 BR » GR7 - Pheno #2]
------ 42% - [CH07 FL » GR7 - Heady OG BX1 #1]
------ 46% - [CH08 FR » GR7 - Pheno #4]
--------- Veg: 38% - 45% | Flower: 45% - 55%
--------- General: 30% [Dry] «| 45 - 60% [Moist] |» 70% [Wet]
- [21:23]: Checked the 3x3 veg tent.
--- The veg garden is looking healthy!
--- Both mothers seem to be unaffected by the topping and all growth looks perky and green!
--- The spare Heady OG clones look great too!
--- Even the original mother clones are looking healthy and green.
- [21:37]: Checked the humidifiers.
--- Tanks are still full and no leaks found.
Day 06 - Saturday - 08/30/25 - Total Days: 139
-----------------------------------
Daily Averages ~[+01:00]
- Temps: 83.7°F [28.7°C]
- Humidity: 84.5%
- VPD: 0.61 kPa
- Soil %: [49, 43, 30, 52, 42, 41, 43, 46]
-----------------------------------
- [20:05]: Quickly checked on the 3x3 veg tent.
--- Looking great!
--- Growth looks healthy and no flooding!
--- May need to water the spare Heady OG clones soon, but growth is looking perky and green!
--- Mother clones in the propagation tray also look healthy!
- [20:33]: Night check on the 4x4 tent.
--- Ca-Caw!! Wow the garden looks incredible!
--- Both Heady OG and TKO are swelling up with bud growth!
--- The canopy looks pretty even and stoked for this harvest! Also a bit concerned about trimming. But more stoked!
- [20:39]: Checked the Ecowitt soil moisture sensor data:
------------------ [ 4x4 MAIN TENT ] ---------------
------ 51% - [CH01 FT » G30 - Heady OG BX1 #1]
------ 43% - [CH02 FB » G30 - Heady OG BX1 #1]
------ 29% - [CH03 BT » G20 - TKO]
------ 52% - [CH04 BB » G20 - TKO]
------------------ [ 3x3 VEG TENT ] ----------------
------ 42% - [CH05 BL » GR7 - TKO]
------ 41% - [CH06 BR » GR7 - Pheno #2]
------ 45% - [CH07 FL » GR7 - Heady OG BX1 #1]
------ 46% - [CH08 FR » GR7 - Pheno #4]
--------- Veg: 38% - 45% | Flower: 45% - 55%
--------- General: 30% [Dry] «| 45 - 60% [Moist] |» 70% [Wet]
- [20:45]: Checked the 3x3 veg tent.
--- Veg garden is healthy and wow growth is raging!
--- Heady OG and TKO mothers both look beautiful and haven’t slowed down since the topping. Both are bushing out quite nicely!
--- Both of the spare Heady OG clones need another watering!
- [20:47]: Here are the starting initial watering ranges:
------ Heady OG BX1 #1A » 237.7g → 300.3g
------ Heady OG BX1 #1B » 244.4g → 305.6g
--------- General Solo Range: [Dry] «| [Initial Cup Weight] + ~55-100g |» [Wet]
--- Both cups were last watered [2] days ago.
--- Took the starting weight of both clones before watering,
------ Heady OG BX1 #1A » 231.6g
------ Heady OG BX1 #1B » 241.0g
--- While on a scale,
--- Gently misted the straw mulch of both cups with RO water.
--- Focused on the straw and sprayed as evenly as possible.
--- Misted 10-20 sprays. Waited a moment, then misted again.
--- Made sure to reference the watering weights.
--- Repeated this process until both cups weighted at least 300g.
--- There was no runoff.
- [21:08]: Took the saturated weight of both clones after watering,
------ Heady OG BX1 #1A » 335.2g
------ Heady OG BX1 #1B » 335.4g
--- Marked the final wet weight on the back of each cup. Also marked the watering date on the front.
--- Placed both phenos back into the tent and back on top of the veg pots.
- [21:35]: Time for another grow board wipe!
--- Looking back at the last 5 weeks in the garden and am quite impressed with the amount of growth!
--- Started the 12/12 flip and now these ladies have easily doubled in size! Heady OG probably could have tripled in size but trained her several times to keep growth from getting too tall. In contrast, TKO has been staying pretty squat, which is great because I currently can’t reach the back of the canopy.
--- Oops. Forgot about the lacto-serum. Going to need to start a new batch soon.
--- Anyways, both the Heady OG and TKO were transplanted into solo cups. At the time, Heady OG was looking stressed so took extra cuttings. Glad that she recovered!
--- Upgraded the scrog frame by adding a second layer of netting 14 inches above the first one. Was quite surprised that both Heady OG and TKO managed to fill in the entire space. Heady actually reached the grow light twice and had to be super-cropped.
--- The rest of the garden work has been in the veg tent.
--- Reset the veg tent and took mother clone cuttings.
--- Transplanted both Heady OG and TKO into the veg pots. Growth has been raging and have already topped both girls once.
--- As for the near future,
--- Continuing to pheno hunt for keeper phenos for the mother tent and for my first breeding project.
--- Also been researching about tissue culture and think I’m almost ready to give it a try! If successful, I should be able to maintain the genetics of all future keeper phenos.
--- For breeding, TC will be essential to preserve each filial generation after each cross (F1, F2, F3, and so on).
--- What can possibly go wrong right!?
--- Anyways!
--- Both Heady OG and TKO are looking great and have completely filled the tent! By far the largest canopy I’ve grown so far. Bud growth has already started to swell up and these ladies are ready for the next 6-7 weeks of flower! Ca-Caw! Let’s go my girls!
- [21:39]: Checked the humidifiers.
--- Tanks are still full and no leaks found.
Day 07 - Sunday - 08/31/25 - Total Days: 140
-----------------------------------
Daily Averages ~[+01:00]
- Temps: 83.8°F [28.8°C]
- Humidity: 84.8%
- VPD: 0.60 kPa
- Soil %: [50, 43, 26, 52, 42, 41, 42, 45]
-----------------------------------
- [08:16]: Quickly checked on the 3x3 veg tent.
--- The veg garden are perky and green!
--- All mothers and clones are healthy and growth is starting to ramp up!
--- Looking good girls!
- [19:43]: Night check on the 4x4 tent.
--- Looking great in the garden!
--- Heady OG and TKO are both in full bloom and the canopy looks incredible!
--- Buds are swelling up starting to get a little terpy!
--- Getting a lemon citrus gas profile from Heady OG and wow she smells dank!
--- TKO is giving off a strong earthy fuel similar to Garlic Budder!
--- Getting hyped!
- [19:47]: Checked the Ecowitt soil moisture sensor data:
------------------ [ 4x4 MAIN TENT ] ---------------
------ 55% - [CH01 FT » G30 - Heady OG BX1 #1]
------ 43% - [CH02 FB » G30 - Heady OG BX1 #1]
------ 26% - [CH03 BT » G20 - TKO]
------ 52% - [CH04 BB » G20 - TKO]
------------------ [ 3x3 VEG TENT ] ----------------
------ 41% - [CH05 BL » GR7 - TKO]
------ 40% - [CH06 BR » GR7 - Pheno #2]
------ 40% - [CH07 FL » GR7 - Heady OG BX1 #1]
------ 45% - [CH08 FR » GR7 - Pheno #4]
--------- Veg: 38% - 45% | Flower: 45% - 55%
--------- General: 30% [Dry] «| 45 - 60% [Moist] |» 70% [Wet]
- [19:56]: Checked the 3x3 veg tent.
--- Veg garden is thriving and looking healthy!
--- Both Heady OG and TKO mothers are in full veg and bushing out with growth!
--- All clones look healthy and perky as well!
- [20:00]: Checked the humidifiers.
--- Tanks are still full and no leaks found.
--- Another grow week done and onwards to next!
[END OF WEEK 19]
Likes
7
Share
@Zuppler
Follow
Vegetation Phase - Week 2
Shoutout to Cannapot, the Austrian plug who came through with the genetics from Humboldt Seed Company. The 10 Donutz plants are pushing through their second week of veg, and while the majority are thriving, a few challenges are starting to show — all part of the game when experimenting with new soil, pots, and nutrients.
Updates & Adjustments:
Lamp Adjustment: Raised the light to reduce stress and give the plants more breathing room as they stretch and develop.
Watering: Keeping it relaxed and minimal with reverse osmosis (RO) water. No overwatering here — slow and steady wins the race.
Nutrients: If deficiency will further ill add more fertilizer.
Observations:
9/10 plants are growing steadily, with vibrant green leaves and visible progress in height and structure.
1 runt: One plant is struggling hard — stunted growth, ugly leaves, and generally looking like it’s fighting for its life. Still, it’s got a spot in the tent, and we’ll see if it can bounce back.
Some minor issues spotted on a few plants, likely nutrient deficiencies as they adjust to the new setup. It’s not surprising, given the new gear and methods, but nothing alarming yet.
Next Steps:
Staying the course with low-stress management. Let the plants adjust to their environment and dial in any issues over time. The Donutz are strong genetics, so they’ll likely power through. Even the sickly one gets a chance — no plant left behind! This sea is still on track to make waves.

Likes
3
Share
@Mr_nugs_lover_David
Follow
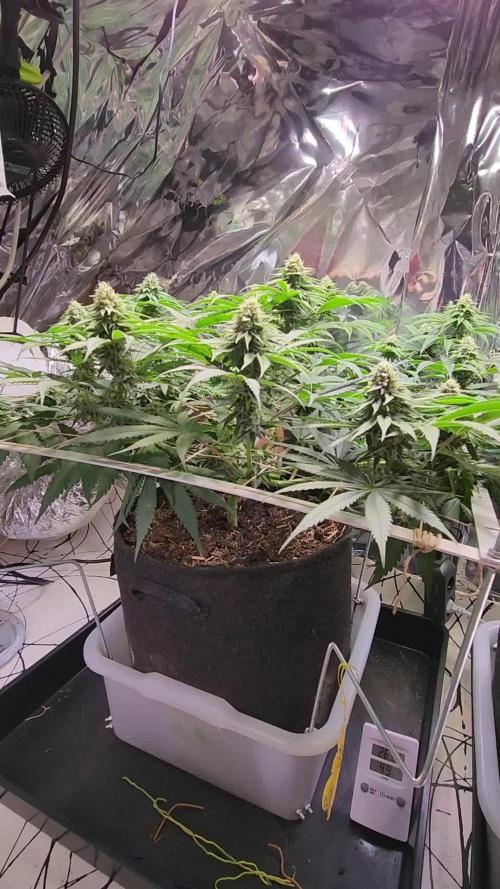
I have moved my last automatic ladies of the season indoor cause I didn't want to risk the integrity of the nugs because of the high humidity. I have brought her with all of my plants under my LED panel of HortiONE 190w. 100% organically grown with Biotabs organics, super citric and earthy and kushy smells, very special plant, definitely would love to make a sea of green with 25 blackberry kush in a 1,20. LOVE IT! 👌 💎💚😋
Likes
14
Share
@Roberts
Follow
Super Skunk is doing good. She is taking her time to flower compared to others in the run. She looks healthy and is growing. Thank you Spliff Seeds, Athena, and Spider Farmer. 🤜🏻🤛🏻🌱🌱🌱
Thank you grow diaries community for the 👇likes👇, follows, comments, and subscriptions on my YouTube channel👇.
❄️🌱🍻 Happy Growing 🌱🌱🌱
https://youtube.com/channel/UCAhN7yRzWLpcaRHhMIQ7X4g.

Likes
2
Share
@Oldwied
Follow
The enzymes working well, even the hemp weeds in the mulch are starting to decompose. The plant seems to like it too, as the greenery is overwhelming.
Light Power: 100%
Day 81
Flower day 34
Photoshooting
Likes
74
Share
@Mr_Maes
Follow
Nothing but colas on all 3 this is going to be a big harvest. Another 2 or 3 weeks max.
