The Grow Awards 2026 🏆 


Likes
2
Share
@Not_a_tutorial1990
Follow
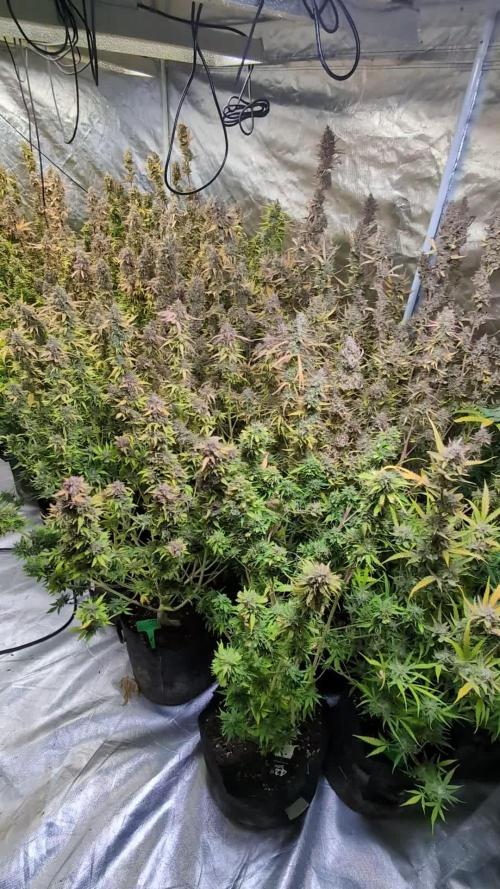
Struggled to maintain stretch but just gotta work with her.. didn't start showing signs of flower until 2 weeks into flipping lights to 12/12.
Likes
14
Share
@Rock_n_Roll_Randy
Follow
FOR EVERYTHING MARS HYDRO VISIT:
www.mars-hydro.com
www.marshydroled.ca
PROMO CODE: rocknroll
VISIT THE ALIEXPRESS STORE:
@marshydro_aliexpress
Instagram: @marshydropenny
https://youtube.com/channel/UChU5ZWwNi-DvnO3oWVU3ceA
(NEW) STRIVE NUTRIENTS 💪
https://strivenutrients.com/
Thanks for taking the time to read and check out my diary🤜🤛
FC-E6500 LED GROW LIGHT:
FC-E6500 grow light with 3978pcs OSRAM BridgeLux Diodes & Moso Driver, market-leading PPF 2.7 µmol/J, Max 2.5g yield/watt with 30% higher Average PPE, more cost-effective when compared to same style type lights. Only consumes 650W, perfectly cover 5x5ft (personal), 4x4ft (commercial) grow space. Innovative Precise Uniform Lighting-Built-in removable bars interval & dimmability enable the exact & dynamic PPFD control over each of the plant growing stages, FC-E6500 detachable bars deliverSuperior Heat Dissipation: Real Aluminum heatsink together with 6 slim profile passive cooled bars (THINNER & LARGER surface) and detachable Meanwell Driver, create less heat. save 50% hydro than other old grow lights! Driver can be mounted remotely on the side of a grow tent/rack or on an adjacent wall to remove heat from grow space. Full Spectrum UV IR LED: With Yield Max spectrum (660nm Osram enhanced Deep Red,2800k-5000k,730-740nm IR,380-410nm UV LEDs), Average PPFD the FC-E6500 LED grow lamp enables cultivators to produce BIG FAT Dense Buds, perfect for full-cycle hydroponic, soil, grow tent/grow room.
Dimmable Commercial Grow Light: Cost-efficient, easy dimming & daisy chain With a max up to 20 lights, IP65 Waterproof, master light easily controls the rest. Perfect for commercial & home horticulture.
FC4800 LED GROW LIGHT:
GET THE MAX FROM MARS👍: Welcome one of the newest members of the Mars Hydro family🤜🤛🤘. The Mars Hydro FC 4800 480W LED Grow Light can accommodate up to a 4' x 4' area for flowering. It has OVER 2000 LED chips consisting of the best selling Samsung LM301B diodes which has a Luminous Efficacy of: 220 lm/W
0.2 W, 3 V mid power,
Osram 660nm Diodes, Infrared light and UV LIGHT👍. It boasts the incredible efficiency of 2.8 µmol/J, maximum 2.5gram yield per watt with 30% higher Average PPFD. This High-intensity spectrum is beneficial for plants at all stages - from veg to bloom, and creates Big dense Buds👍. achieve 50% higher yields & quality compared with the old lights! Only consumes 480W for 4x4ft personal grows, and 3x3ft for commerical grow. It comes with a dimmer and daisy chain function with a maximum of up to 15 lights, the master light controls the rest👍. Wide 6-bar design offers even & wide canopy coverage and can maximizes your grow space. slim 180° FOLDABLE DESIGN... YES I SAID FOLDABLE🤘🤣 , making it compact and easy to install, it's IP65 WATERPROOF and will give you no worries while growing in a humid environment and makes it a flexible high performance commercial grow light for enormous SUPER FROSTY yields.😛😛😛. MARS GETS EM FROSTY BOYS👍
AWESOME HEAT DISSIPATION: The Low energy consumption FC4800 growing light has 6 passive-cooled bars and an aluminum heat-sink a removable driver you can upgrade later or have it outside your tent. with zero noise you can save up to 50% in your electricity bill compared to HID's or HPS lights!
It also has a removable driver so you can upgrade it in the future or have it outside your grow space for better heat control in your growroom👍
UPGRADED FULL SPECTRUM: Yield Max Spectrum with enhanced red (Top-Bin Samsung 3000k-5000knm, Osram 660nm Deep Red), speed up blooming & fruiting, perfectly suited for full-cycle growing. The FC4800 LED grow lamp was born for Big Buds, perfect for commercial, grow tent, grow room, hydroponics, and all soil grows.👍
THE BEST SAMSUNG DIODES: THE FC4800 has Top Bin genuine Samsung Osram Diodes, combined with remarkable 2.8 µmol/J Efficacy, 30% higher Average PPFD, 50% less energy consumption, to maximize your yields. They give you a TRUSTED 3 years warranty 100% Satisfactory guaranteed!!!
TSW2000 LED GROW LIGHT:
INCREASE YIELD AND CROP QUALITY WITH MARS HYDRO LED GROW LIGHTS: NEWEST SMD LED technology provides the highest PAR/LUMEN output (1122umol@18") and can make you get 30% higher yield compared to OLD blurple led lights. Max 2.5g yield per wattage and achieve maximum quality and quantity, much better than traditional HPS grow systems
LOW ENERGY CONSUMPTION LED GROW LIGHT: Consuming only 300W true output with 684 LEDS! It saves up to 50% energy than other led grow lights. Perfect for 3.5x3.5ft bloom stage, 4x4ft veg stage. Over 90% light energy can be absorbed by plants, it will have higher intensity in a MARS HYDRO grow tent with diamond design mylar, or by crossing over using multiple TSW2000
HIGH EFFICIENCY FULL SPECTRUM INDOOR GROW: 3000K 5000K and IR 660nm 760nm RED, makes it close to natural light, highly engineered to provide improved growing performance for plants at all stages of growing, rapid plant response from seed to flower; Uniform and wide-beam light distribution for your plant's optimal growth
8x8 1680D GROW TENT
The MARS HYDRO 8x8 Grow Tent interior is made of a unique diamond design mylar which is highly reflective. (Other companies mylar and reflective rate is as low as 50%, and it won't provide efficient light. They use thick 1680D oxford canvas, and being double stitched, it is tear proof and perfect for locking in the light. Their grow tent keeps 100% of the light inside the tent and helps your plants absorb more light. EXTRA-THICK material means No light leaks or rips at all.👍
Strong Stable metal corner adapters and poles are the trustful supporters of the tent. It's very sturdy, neither rusting or paint flaking off. quick and easy tool-free setup. They use heavy-duty metal zippers, with double layer black lining, by far the best on the market which creates a light-proof seal.
The Easy observation windows are made by double layers of cloth. Observe the growing conditions of your plants without opening the tent and avoid disturbing your plants. The observation windows also serves to dissipate heat and ventilate the air.
The tent includes 2 removable waterproof floor trays to hold soil and water. The removable tray can be taken out to wash easily.
They guarantee the grow tents are easy to install even if you've never done something like this before. Clear Instructions and no tools needed! They also offer 30-day unconditional refunds for quality problems. Just contact their friendly 24 hours customer service 👍
Likes
12
Share
@Papablob
Follow
Belle plante. Certainement une Championne dans sa catégorie.
21/08 63 g sec c'est pas mal.

Processing
Likes
35
Share
@Kingseeds
Follow
-the week of two in bloom and Only was fed with empty water.
-the frist defoliation in flowering stage


Likes
8
Share
@Greenthumb2021
Follow
My tallest plant has some really thick dense white pistols. She's still growing. But slowing down now. My other plant is still slow to flower. May be due to the cat eating half the plant in week one of flowering.
Processing
Likes
19
Share
@Oldmanbud__50
Follow
So no change just got fatter buds. The 2 on the ryt are being flushed for 7.10days. 2 on the left are different strains. Had a few newbie problems at the start but soon realised its a weed n if u listen to her she will let u know what she needs.. Been a nice journey and carnt wait to dry n try. Happy growing peeps
Processing
Likes
8
Share
@eldruida_lamota
Follow
Que hay familia, yo con muchos dolores de cabeza esta variedad es difícil de cojones, piden mucho alimento, han ensanchado bastante así que me toco hacer poda de bajos que no me gusta nada.
También estoy al ojo por que me huele a hermafrodita una de ellas, no me hagan caso el cultivo anterior salió top y ando todo el día fumado... pero no es el caso.
Nuestras green ak son bastante sensibles a los cambios de temperatura y bueno, no se la recomendaría a medir principiante si no más a gente con varios años de experiencia para poder sacar lo mejor de ellas.
Ph controlado 6,5 no fallamos en eso ni en el alimento ya veremos próximamente como avanza saludos familia.

Processing
Likes
13
Share
@DudeGrowsWeed
Follow
Alien vs Triangle is looking great, I think she's fully recovered from all of the HST abuse I put her through. She has some interesting Bonsai-esque bends. Bud sites are getting frosty too!👍
She's back-left in the group pics.


Likes
22
Share
@RDWCGrowing
Follow
12/25/2023-Germination Day 1
Merry X-mas 2023 I decided to start a run of SolFIre Gardens Hoodz Candyz S1. I am going to do a cup filled with RO water a touch of Hydrogen peroxide and let it sit for 24-48 hours until I see tap root then I am going to put it into a rapid rooter.. Tap root Down and put it about 1/4 of the say down the Rapid rooter.
I made some modifications to my basket on this run.. I have taken a few Pods that I use for my cloning machine and decided that I am going to try and use them as sure plants, so that I can take my water right up to the bottom of the basket this time and see if these can make my planting more consistent.
12/26/2023-Germination Day 2
Tap root achieved Planting Commencing
12/27/2023-Germination Day 3
Misted the dome lightly misted the rapid rooter and added a little water to the bottom of the pan to encourage root growth to the pan.
12/28/2023-Germination Day 4
Ground Hogs day
12/29/2023- Germination Day 5
She is up, she has broken surface, I misted the root riot, and around the bottom of the tray to try and entice root growth down rapidly.
12/31/2023- Germination Day 6
Ground Hogs Day
1/1/2024-Germination Day 7
HAPPY NEW YEARS!!.. I did it I planned it out so my planting day would fall on New Years and it worked.. Yay!!!
1/2/2024- Germination Day 8
Since the roots are not to the water yet, I am pouring one cup of water lightly on the hydroton around the lady to try and encourage root growth down to the water..
1/3/2024- Germination Day 9
Ground Hogs day, will continue until roots hit the water.
1/4/2024- Germination Day 10
Ground Hogs day, will continue until roots hit the water. I will just continue to top feed until roots are in the water.. Shouldn't be more than a few more days.
1/5/2024- Germination Day 11
Ground Hogs day, will continue until roots hit the water. I am going to change the water Sunday and kick off Week 1, I will just continue to top feed until roots are in the water.. Shouldn't be more than a few more days.
1/6/2024- Germination Day 12
Ground Hogs day, will continue until roots hit the water. I will just continue to top feed until roots are in the water.. Shouldn't be more than a few more days.
1/6/2024- Germination Day 13
Ground Hogs day, will continue until roots hit the water.
1/7/2024- Germination Day 14
Ground Hogs day, will continue until roots hit the water.

Likes
92
Share
@GMSgrows
Follow
Everything is doing fine. Checked the runoff waters and the ppm going in was 800, 1.6 sec and the ph was 5.8 using Cyco nutrients, and it says to keep ph from 5.5 to 5.8 through bloom.
So the runoff water was at 900 ppm and pump ph is sitting at 6.0.
The top of the one cheese is past the light, but she is so large there is a lot of flowers under the light. There starting to do some bulking now.
The odours from the cheese is pretty strong. Looking forward to getting this month finished. Some fine strains to try next.


Likes
7
Share
@Zuppler
Follow
**Week 8 - Third Week of Flower**
Things are getting wild in the Donutz tent! After the insane stretch last week, the plants have turned the space into a full-on jungle. The start of Week 8 called for drastic measures, and the results are setting the stage for explosive bud production.
**Key Updates**:
- **Aggressive Defoliation**: On Day 1 of the third flower week, the plants underwent a *brutal* defoliation. Every bud site that had started to develop its own leaves was stripped of its fan leaves, allowing light to flood the canopy. Even the smallest sites now have excellent exposure, giving them the best chance to mature into chunky nugs in the coming weeks. Despite the intensity of the trim, the plants are resilient and primed to bounce back strong.
- **Boosted Nutrients**: To support the plants after the stress of defoliation, I added another 5-6g of Greenhouse Feeding Bloom per plant. This ensures the soil stays nutrient-rich and gives the plants the resources they need to recover and thrive.
- **Watering**: Still rocking reverse osmosis (RO) water, ensuring clean and efficient hydration without any surprises.
**Observations**:
- The canopy is significantly cleaner and more open, with light now reaching deeper into the lower sections.
- The plants are handling the defoliation well, with no immediate signs of stress or shock.
- Bud sites are already looking promising, with visible development and an even distribution across the canopy.
**Looking Ahead**:
The next few weeks will be all about letting the plants recover and watching the buds stack up. With improved light penetration and a fresh dose of nutrients, everything is lined up for some impressive development.
The Donutz are thriving, and the Florida Gang vibes are at an all-time high — the tent is set to deliver big!

Processing
Likes
10
Share


Likes
4
Share
@FourTwenty_Plants
Follow
So far so good.
Frost Banger is showing some purple hues and the Purple Haze is full on developing purple buds.
The FBA2504 is my fav in this run shes tall and still growing, looking healthy except she has a lil Phosphorus deficiency at her top leaves but other than that they all are doing good.
We are already on day 43 with this run!

Likes
12
Share
@Wicked_Stix
Follow
Was a pretty smooth week for most the girls. Showing some steady growth. I topped all of the plants around day 12 other than the slurricane 7. Ph got a little high since the nutrient level was too low to buffer it at the beginning of the week. Slurricane 7 and sugar cane are the ones that took some damage. I think they will be ok though. I upped the nutrients to 1/4 tsp per gallon and the ph has held stable since then. Should be able to start some training the middle of next week and looks like we might be going 2 more weeks on veg before flipping them to flower depending on how this upcoming week goes. Guess you will have to show up next week to find out...