The Grow Awards 2026 🏆 


Likes
Comments
Share
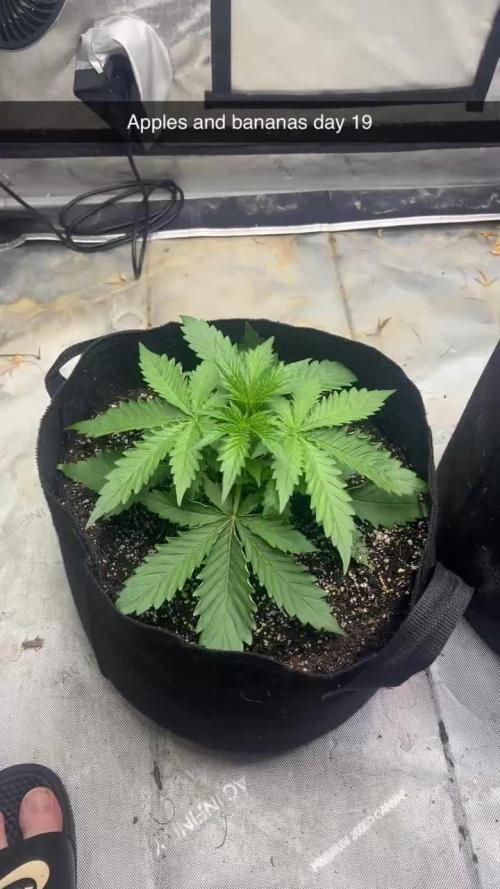
@Earthsower
Follow
She has been in vegetation for a couple of months. She has been topped just once. She now has four nodes which I will work with. She will receive banana juice when it’s time to feed her!

Likes
16
Share
@Dunk_Junk
Follow
She grew 17cm this week. Over doubled her height.
Lets see what she does in the next couple of weeks.
I note she got a LOT bushier. Also her leaves are VERY broad and indica like for such a sativa strain! 😶

Likes
19
Share
@Unkraut
Follow
what a great strain! great yield and incredible scent! it grew very large buds, due to bad weather and high RH i sadly lost a few of the biggest buds, but still got an awesome yield

Likes
11
Share
@Dreadnug
Follow
Growing fast - have the start of 16 cola locations and starting to work some of them back towards the middle of the plant. Lots of training - noticing that the ground cover is a bit too aggressive and getting in the way of light distribution so having to trim that back quite a bit. Also its making it hard for the training ties to stay in the ground.
Weekly nutes continue with same mix above.

Likes
23
Share
@RadDad
Follow
I've let our girl blue grow for an extra week and I think our base is looking really strong. It's time for topping to creat the base of our manifold.
To do this were going to use he Nebula's Manifold technique by Nubula Haze from GrowWeedEasy.com. I'm in no way affiliated with the site or Mrs. Haze but I have found her website to be a great place to start my cannabis growing journey. I've done so much more research now but it did start for me back in 2020 at GrowWeedEasy.com
Anyway I've got some video that will explain the method as I top the plant but basically what we're going to top down to the 3rd node and then clean all the extra growth off. This should leave only two growth tips and their fan leaves. Check out the photos and videos for more details.
Feeding and light schedules continue as normal.


Likes
29
Share
@SalocinSpecial
Follow
***Note that I started to count the days when I placed the seeds between paper towels. The seeds were planted 3 days later and sprouted from the ground 2 days after being planted.
D63 (26/04/2021) : I top dressed the soil of every pot with Gaia Green power bloom 2-8-4, earthworm casting, bone meal and shrimp compost. I think it was a bit late in the flower to top dress the Glue Gelato. From now on I will only give water.
D66 (29/04/2021): I saw more calcium deficiency but on the Banana Kush this time. She is really close from the light and I think this is why the closest leaves got some rust brown ish spots. The lamp under the Banana Kush and the Gelato is higher now. I made a gallon of home made organic CalMag supplement with Epsom salt, crushed egg shell and molasse. I gave all 3 plants 200ml of home made CalMag when watering them. I will gave them approximately 100-150ml of this CalMag supplement every other watering.
D69 (02/05/2021): The smell is crazy 😍 It smells soooo good! The house is starting to smell strong too 😳😅.
- Light: the lights are at 100% and at 12 inch form the plants.
- Temperature: during the day: 24-26C ; during the night: 20C.
- Humidity: the humidity is maintain around 46-48% all the time.
- Air circulation: There is an oscillating fan on the ground, one fixed fan pointing on top of the canopy and one fixed fan to help cool the lights.
- Water: I gave water every other day or when the ground feel dry or the pots feels light.

Likes
57
Share
@Todzilla
Follow
4 Purple Push Pops PPP (grew 2023 outside). Clones from my clone guy.
1000w LED, 4G Autopots, coco/perlite 65/35, RO water, Jacks RO, AC pro Controller and T8, 5x5 GG Tent with extension. Garage grow SoCal
We concluded the ripening this week with AC and dehumidification at 70° 40% relative humidity lights on and 65° and 45% relative humidity lights off.
We’re feeding Jacks RO and silica to the end, hence the fan leaves are still relatively healthy. This is a no flush grow.
I’ve n been growing at 80% lights (800w) for most of the Grow. During ripening, I pushed it to 90% or 900 W. On the final day, I run the lights 24 hours and I run 15 minute cycles of 900 W and 1000 W.
Just following the science; No more flushing and push the lights higher and higher at the end.
We started a slow chop to fine tune the quality and get more light deeper into the canopy.
After 4 more days of testing and monitoring they were ready, it all came down and we filled the 6-tier drying rack.
We’re curing At 70° and 55% relative humidity for two days and then bumping that humidity to 62%. The test round (top colas) is already in jars and beginning the burping stage.
Fiancé is happy, the hard work is coming to an end, and it’s time to start enjoying the fruits of our labor.
Best of luck on your grow.
Likes
23
Share
@MadeInGermany
Follow
Hey everyone 😃.
On 09/10/20 she was placed in the flower tent at 12/12 h 😀.
You have developed incredibly well with the Green Buzz Liquid Nutrients 👍.
I am very curious how it will develop in the coming week.
Until then, I wish you all a good time and stay healthy 🙏🏻.
You can buy this Strain at
https://thecaliconnection.com/seeds/girls-scout-cookies-34.html
You can buy the fertilizer at
https://www.greenbuzzliquids.com/
Type:
Girls Scout Cookies
☝️🏼
Genetics:
GSC Tint Mint
👍
Vega lamp:
2 x Todogrow Led
Quantum Board 100 W
💡
Bloom Lamp :
2 x Todogrow Led
Cxb 3590 COB 3500 K 205W
💡💡☝️🏼
Soil :
Canna Coco Professional +
☝️🏼
Fertilizer:
Green Buzz Liquids :
Organic Grow Liquid
Organic Bloom Liquid
Organic more PK
More Roots
Fast Buds
Humic Acid Plus
Growzyme Big Fruits
Clean Fruits
Cal / Mag
Organic Ph - Pulver
☝️🏼🌱
Water:
Osmosis water mixed with normal water (24 hours stale that the chlorine evaporates) to 0.2 - 0.4 EC. Add Cal / Mag 2 ml per l water every 2 waterings . Ph with Organic Ph - Pulver to 5.8 .

Likes
13
Share
@4F1M6
Follow
I started germination of 5 Royal thai regular beans on 01/01/2021. HAPPY NEWYEAR!
I am germinating them using rockwool cubes and a humidity dome. I pre moistened my plugs with ph balanced water to 6.4 . Than enlarged the pre made holes using a wooden dowel. Than sowed my 5 beans into the holes. I then ripped a small piece of rockwool off each plug and mulched it up. Than lightly filled in the holes using the mulched rockwool. Than it was into the humidity dome to marinate, and complete the germination process.
Will likely take roughly 4 days to get some sprouts. Starting my adventure with Spliff Seeds Royal Thai. After they emerge I will get the plugs planted into 3 gallon pots to rock and roll. Cant fucking wait!
Spliff Seeds Royal Thai is a cross of a Early Thai mother and a Skunk #1 father. This mashup produces a lanky, stretcher variety signature of classic sativa strains. The strain gas a roughly 12 week flowering time. There is 3 distinct phenotypes from these genetics. One with fluffier sativa signature bud structre. One with chunkier, bulky bud structre coming from the skunk #1 father. Lastly but definitely hope to get me one of these!!! Is the phenotype that Carrys over that signature thai chocolate terpene pallet. Though it takes the longest to mature... Best believe it's well worth the wait.
Considering the natural plant stature and stretch. This will be a short veg, faster flip run. To keep these ladies tailored and suited for a indoor grow. All things considered... I'd probably get best results throwing these beans out during outdoor grow season. Letting them beast out and become trees. Mabey we just might try that with another batch. But with the research into the variety I've done I'm sure I can make em work some magic indoors. I'm amped for this.

Likes
14
Share
@goeser
Follow
This ladies cant take the nutrients like the fat banana strain but she is still growing nice. Hope to have some good results in 5-6 weeks. Quite impressed so far of the mars hydro ts 600 , 100 w LED

Likes
13
Share
@NO_DRAMA
Follow
If we look closer we can see bored leaves , i think we have little stress, but this plant is Perfect !!! Bravo Inseedious 💪
Likes
11
Share
@Karl_Heinz420
Follow
Tag 10 🌺
Die Ladys befinden sich voll im Stretch. Besonders die Pure Kush von OSS hat in den letzten Tagen ordentlich an Höhe dazugewonnen 🙌🏼 Die Pure Kush wird täglich mit 1,5l Osmosewasser gegossen, die zwei Ladys vorne (Bruce Banner #3 - links und Critical Kush - rechts) fordern lediglich alle zwei Tage 1,5l Osmosewasser.
Tag 12 🌺
Lollipopping 🌳 - 🌿
Tag 13 🌺
Sanlight Evo 3-60 100% (1000-1200 PPFD)
Temperatur: 24-27 grad Celsius
r.Lf.: 50-57%

Likes
56
Share
@Prilyfe13
Follow
March 22, 2024 Day 36
This week we are dialing in the light height and power level, as well as nutrient regimen. Training is the top priority during this last week or so of the veg stage. Everything else goes hand in hand.
Banana Purple Punch A is suffering from nitrogen toxicity, so the nutrients need to be dropped from 12 ml to 10 ml after I dilute the current regimen with 8 ml cal/mag water. I have to wait another day or so before diluting the basins as they are nearly full still. She also had some of the top side branches pulled down. The top is pointing down and has been for the last day while the side branches are doing exactly what they are supposed to do. They are growing into an even level canopy with the top being just below them. This is exactly what the plant should be doing. Very happy with this outcome.
The top on Banana Purple Punch B finally stayed down for the most part. It's reaching back up again, so I trained it back down. If the side branches don't start to reach, I'll have to top her. I'll give her a couple more days to see what happens.
What's weird is that she isn't suffering from nitrogen toxicity while having the exact same nutrient regimen as her sister plant. She also seems to be drinking a bit slower than Banana Purple Punch A. I think it has to do with the different phenome. The soil seems to be just as wet, but the bottom of the container isn't as wet as the other plant. The reservoir is also nearly full where the other is about 3/4 full. Not much difference, but enough to notice.
The side branches are all level with each other with the top being about an inch taller. Don't get me wrong, she is beautiful and most likely will have the best structure of the 2 plants.
I'll also be taking off the massive fan leaves on the stem in the next day or so. Even maybe this afternoon. I'm just concerned about the nitrogen toxicity. Is it enough to cause too much stress, or is it fine while I work on diluting the excess nitrogen out? I might just do it anyway and see what happens. As I've said before, I plan to do everything the exact same, but I'm starting to think these two need to be treated slightly differently. Like the possibility of having to top Banana Purple Punch B, or the nutrient intake difference between the two.
The light power is now at 90% with the height staying at 24". I need to measure the height of the plants, but I'm guessing they are about 10" with training underway. I don't really expect them to grow too much taller until the flowering stretch. Until then, I'll continue to train them down.
It's still snowing and freezing out, and the tent is still suffering from it. The temp went all the way down to 66° last night and won't climb over 75° today. I have the heater set to 78° and it's keeping the room at 75°, but the tent is still under 75°. It makes no sense. The humidity is kind of high as well. It is stuck at 57% to 58%. It's not high necessarily, but it's higher than what I want. I might put in my dehumidifier to help with the temp mostly and the humidity should drop just a bit. I'll see how it goes for the day.
Grow System Environment:
Temp: 72.4°
RH: 56.5%
VPD: 1.16 kPa
March 23, 2024
A bit to do today. I was going to water, but the reservoir for Banana Purple Punch B is still half full. However, the reservoir for Banana Purple Punch A is nearly empty. I definitely believe it has to do with the phenotype. Gonna have to focus on each plant separately from now on. I'll refill Banana Purple Punch A tomorrow when the reservoir is almost dry.
Trimming finally happened today as well. I removed all the main stem leaves. That's it and there is tons of open space now to fill in.
Banana Purple Punch A looks awesome now and had a couple adjustments done. A perfectly level canopy.
Banana Purple Punch B looks great as well. She opened up quite nicely. However, she is still a tiny bit bushy. No reason in removing more yet.
The light was adjusted today. The DLI is sitting perfect at 42 mol/m²/d. However the light is at 26" now. To be honest, I'm happy with the footprint. Excellent coverage wall to wall.
The environment looks pretty good today. 75° and climbing up to 76° to 77° by the middle of the day. The humidity is also pretty good hanging out between 57% and 58%. The real concern is still the night temperature. Last night it was down to 64° because it's that cold out.
Other than that, they grew about a half inch last night. Not much upward growth, but that's the goal. Lots of outward growth though.
Grow System Environment:
Temp: 72.6°
RH: 57.0%
VPD: 1.15 kPa
March 24, 2024
What a day.
Both ladies were massively trained. The branches on Banana Purple Punch A were sticking too far out, soni rounded them back in around the rim of the container. Suffice it to say, the tent is completely full.
The training opened up tons of light space. Auxiliary branches were tied down as well.
Banana Purple Punch B didn't need as much training, but I did get the top to pull down again. The side branches are still pretty tight. They are definitely over the container rim, but not as much as her sister plant. So not a ton to do today. It will take off soon during the flowering stretch and then training will be needed.
Speaking of full tents, I'll be adding the trellis in a week. I think I'm gonna need it. I also learned how to super crop, so I can use that technique if need be. However, I'm not much of a fan with the trellis. My last harvest had the trellis stuck inside the plant until after drying and I could cut the plant up. Anyway, we shall see what happens.
Both reservoirs got a half gallon of 8 ml Cal/Mag. That should reset the nutrient intake so I can start the 10 ml dose next watering.
Differences between the two plants are pretty obvious. From the plant structure to even the roots. Banana Purple Punch B has no roots showing while her sister plant is showing roots now. Both plants are super strong and will do quite well. I wonder if the buds will be structured differently as well.
I didn't need to move the light today after I trained the plants down. It's still at 42 mol/m²/d.
Based on their current growth and the health of these plants, I'm expecting them to grow up to 3 ft. At least that is the hope. I'll take 4 ft, but no taller. That's all the tent can handle. I don't expect these to be short based on their growth and hardiness. So at minimum, we can see a couple 2 ft plants.
It's 20° f out today. The tent temp is hanging out at 75°. The humidity is a bit high today. Hanging out around 58%. It should drop a bit later on and the temp should increase by mid day.
Grow System Environment:
Temp: 72.5°
RH: 57.3%
VPD: 1.14 kPa
March 25, 2024
So I know it's the middle of the week, but I forgot to rotate the plants around until today. So I rotated them out. Now Banana Purple Punch A is in the rear quadrant with Banana Purple Punch B back in front.
They are still very different.
While Banana Purple Punch A is stretching with an open canopy, Banana Purple Punch B is
still tight even with the stretch starting. The canopy is already getting dense from the previous light defoliation. I'll definitely have to take more leaves off in the coming weeks.
In fact, both of them have massive leaves that will surely be a nuisance in the near future.
Both plants are in the flowering stretch now. I thought it was pre-flower last week and I was right. Now they are both flowering and I'll be starting the flowering nutrients next week as scheduled.
I didn't move the light again today. The side branches haven't caught up to the very tops yet. The canopy is still level, just need the auxiliary branches and side branches to start stretching. The DLI increased to 43 mol/m²/d, but flowering means a higher DLI. So I'll be increasing that to 45 mol/m²/d at the start of next week. It's only like 3 days, so it should be perfect for the stage the plants are in. I'm still keeping a minimum of 22" to the canopy, but will hold over 24" for as long as I can. As I said yesterday, I believe I can expect 3 ft from these ladies.
They have been stretching, but the top branches are also stretching, so they have to be tied down as they get long enough.
Speaking of branches, I accidentally half snapped one of the top branches on Banana Purple Punch B. No worries though, I'm not concerned with this. Every snap or partial snap I've had always ends in a better plant. Not to mention it's a side branch and not the top, so we're good.
As for watering, both plants are very different. Where Banana Purple Punch A is taking in about a gallon every couple days, Banana Purple Punch B is taking half of that. There still aren't too many roots coming out yet, so that could be the cause of the slow down. As the system works, it only provides water as needed by the soil and plant. So currently , there isn't a reason to flood the soil. According to the plant anyway. The soil is perfectly moist and the plant is perfectly happy. The good part is, when the roots do hit bottom, the plant will really take off. So I can only assume my watering technique worked as I planned.
Back to Banana Purple Punch A. Her water intake is fairly impressive, especially at this age. She's still young and has a lot more growing to do. This may be a gallon a day plant in the upcoming weeks.
The environment is still a bit off. Temps are still low and the humidity is still high. However, the VPD is in range. It will need to increase by next week, but that shouldn't be a problem with this cold front almost over with and spring fast arriving. Currently the temp is hovering at 73° and the humidity is around 59%. Definitely not ideal, but not much I can do at the moment. I may add my small dehumidifier to the tent to see if that helps. The high humidity is definitely not from an external source. The humidity in my room is down to 22%. So it's not that issue. It's the plants. A great sign. The whole tent is filled wall to wall. So there's a lot of release from the plants. Very good. I still need the temp to climb though.
Grow System Environment:
Temp: 71.4°
RH: 57.2%
VPD: 1.10 kPa
March 26, 2024
Both ladies needed watering today with Banana Purple Punch A bring dried out and B having a bit of water on the bottom. Definitely drinking much slower than her sister plant. Again, I believe it's the phenotype, so I'm not worried. If it continues, then I may have some concerns, but when the roots start popping out in earnest, the plant will take off and need lots of water.
I also made a couple minor adjustments to the canopies of both plants. Nothing really Earth shattering, but at least a note of the day. Oh and I attempted to tuck all the lowest leaves under the plant to make more outer rim space. It kinda worked. I might just cut them off.
I removed a few more leaves from Banana Purple Punch B. She's getting super bushy and she definitely needed it. I'll be trimming away as she grows. Very little at a time, but more frequently than normal. Like every 2 days instead of every 4 to 5 days. She's definitely robust enough to handle that technique. I haven't ever actually done a full defoliation before, so I don't know what's better. I hear too much controversy over defoliation on autos, and this seems to work wonders. Hell, I'm pretty sure FastBuds says to trim throughout the grow to keep up with the density of the plant.
I don't have anything for Banana Purple Punch A. She's fine and growing. Not the tallest plant in the tent, but also at the same height as 2 others, so I only have 1 plant that's a bit taller.
Just the couple adjustments to the canopy. However, her buds are already pronounced and fat. I can definitely tell the buds are going to be super dense. Actually, both plants have the same size buds. They are brand new and big already. Granted, the stretch hasn't started yet, so they may be smaller buds loading up the top with multiple nodes. I dunno. They are big for a few days old.
The lighting is still the same. I should also add that I did end up moving the light yesterday. Like an inch up to match 24". I may have to drop the light slightly to keep from going to 100% power. But we shall see. As I've said before, I'll go as low as 22", but that sacrifices the footprint a bit.
The environment is driving me crazy. It's not cold out anymore, but I cannot for the life of me get the temp on my room over 70°. Looks like I need a new heater. To combat this issue, I finally added my dehumidifier. Hopefully it's strong enough to clear out some of the humidity and help increase the temp. The environment has been stuck at like 72° and 60% humidity and flowering has begun. I really want it down to 55% now. No idea why it's still so high with the humidity in my room is around 23%. It's super dry.
I just checked the environment and the dehumidifier is working somewhat. The temp increased to 76°, which is fine. But the humidity is still kinda high at 57%. It's the VPD I'm really focusing on now. Currently it's hovering around 1.2 kPa. It's better, but I'd rather be closer to 1.28 kPa. We'll get there in the end. The dehumidifier just needs to acclimate the environment.
I decided to drop the nutrients back down to 8 ml instead of 10 ml. 8 seems to be fine and I really don't want more nitrogen toxicity. Unfortunately, I ran out of Bud Candy and have to order more, so that will be added next watering. I'll be starting Tasty Terpenes next week. And I start Big Bud next watering as well, I think.
Grow System Environment:
Temp: 71.6°
RH: 57.9%
VPD: 1.09 kPa
March 27, 2024
Today was trimming day. I did a full defoliation on both plants. Banana Purple Punch B especially needed it. They both got about 15% of the leaves off. The massive ones that is. No small ones. So now there is plenty of space for the auxiliary and side branches to grow and spread out unimpeded by excess foliage. I know there is a lot of controversy in this, but they needed it.
Banana Purple Punch A had a little less taken off. Mostly the outer leaves that were pressing in on the other plants in the tent. Some of the inside leaves were blocking precious bud sites. So those had to go. Maybe 4 of those. All in all, I'm quite happy with the outcome. I'll check on them in an hour or so to see how much stress they have undergone. I usually wait for the end or middle of the flowering stretch to start pulling leaves, but this time around I think I got the timing right.
Banana Purple Punch B might be a bit ahead in flowering. At least, her buds are huge already.
Banana Purple Punch A drinking more than the other plants in the tent. Significantly more. While the other plants are about a third of gallon in, this lady has already taking in about 3/4 gallon of the reservoir. I wonder why that is. The plants are all the same height, but by training only though.
The shortest and most matched with canopy height is Banana Purple Punch B. I expect her to take off just like the rest of the plants in the tent. However, she is also the least thirsty. Again, it has to be the phenotype. I just hope this isn't a sign that she will end up short. I might submerge the bottom of the container in the reservoir to better activate the wick system. Theoretically, the container should have already been wet at the bottom before activating. That way the plants and wick system can match up and keep up with each other. I know they can cruise through about 3/4 gallons a day when activated properly. The submersion should help with it. I'll see how things go over the next day or 2. If the rest of the ants in the tent need water by then and she's still slow on the uptake, I'll submerge and reactivate. If not, then we are good to go.
I didn't mess with the light again. No need yet anyway. Although, I will check the DLI and height when I check on the plants for stress. Let's hope they took the defoliation like champs.
The environment is now back to normal. Somehow the main heat in the house was turned way down. I'm guessing a child. Smh. Anyway, now that it's fixed, the temp is around 80° and the humidity is around 54%. A bit warm, but I'll take it over 73°. The humidity is right where it needs to be. I'll take the dehumidifier out today to help drop the temp to a comfortable 77°. The humidity should also increase to around 56%. Exactly where I want to be right now. In a week, I'll try to keep it below 55%. I may try to drop the temp down to 75° in a couple weeks.
Update: I messed with the light. Strangely enough, I had to drop the power down to 80% and ended up with the light being around 25". Now the DLI is at 42 mol/m²/d. I'll look at it again starting next week. I may have to bring the power up again, but I don't think I will for another week at least. Right now, the DLI is perfectly fine. It will help with the ants reaching and spreading those nodes out for the flowering stretch.
Grow System Environment:
Temp: 76.5°
RH: 55.3%
VPD: 1.36 kPa
March 28, 2024
No training today. I was considering pulling a couple branches down a bit, but everything is level and the plants are the same size.
There are some major differences between these two, however. And some notable similarities.
The main difference is the internodal spacing where Banana Purple Punch A has decently spaced internodes, while Banana Purple Punch B has extremely tight internodes. It's stretching now, so maybe the spacing will catch up.
I'd also like to note that these two plants are seriously flowering now. The other major difference I have noticed is water uptake. Banana Purple Punch A is taking double what Banana Purple Punch B drinks. I had to refill the reservoir as it dried out of Banana Purple Punch A. I also cleaned out the reservoir. Tomorrow, I'll do the same thing for Banana Purple Punch B. I was originally going to wait until tomorrow for both, but I can't let the reservoir dry out completely. There should be significantly less water tomorrow. I'll also have B-52 from Advanced Nutrients. I have Sensizym coming as well. I'll be adding a half dose of B-52 starting tomorrow. I'll add it to Banana Purple Punch A next watering.
I didn't move the light at all today. Both plants are happily basking in the light with some perfect praying going on. Nothing to move.
The environment is finally back to normal. The temp is between 76° and 77° with the humidity at 55% to 57%. The VPD is where it's at though. Around 1.33 mol/m²/d give or take a few. Right where I want to be.
So the plants are looking absolutely stunning. Both have the very same massive leaves of a beautiful green. No stress whatsoever from the defoliation and trained to near perfection. I may move a couple branches here and there as they stretch, but I'm happy with what I have right now. Just enough space in each quadrant for each plant to grow without overwhelming any other plants.
As things are looking, I may not need the SCroG net for a bit. The branches are all the same height for now. I may be implementing it if I need to keep the canopy level. Other than that, I'll use it to make sure the branches don't tip over from the buds. I plan on buying some cross bars so I can mount the SCroG net to that. Much more useable training space. Anyway, we shall see how it pans out.
Grow System Environment:
Temp: 73.6°
RH: 54.9%
VPD: 1.25 kPa
Likes
14
Share
@MrReeferMadness
Follow
Massive root growth this week!
I Started week 5 on Saturday past, I've let some of the branches that were held Down for a while free, I manipulated some other branches to work on the symmetry as well as some selective de faning on all the gorrila zkittlz. As the three all look like different phinos I've treated them separately to suit the growth of each plant.
The Psychosis was the skiniest and smallest from week 1-4.. Now its the tallest. I had to pin her down harder with the lst this week and she reacted really well growth wise. 3 days later lots of fresh branches shot up so I decided to take clones for a new diary I will be starting next week 😎


Likes
6
Share
@Lastix
Follow
You begin to see the formation of buds in all their beauty.
Performed massive defoliation at the beginning of the week and at the end of the week as if it had never been done, the foliage regeneration is absurd.

Likes
7
Share
@Naujas
Follow
well, it's exactly 12 weeks :) and my house is full of lemon aroma :) the girl endured really difficult growth, but she coped with everything perfectly :) who followed the growth, you saw that she grew on the balcony for 10 weeks, and she spent the last 2 in the grow tent :) 500 gr wet weight !!!!:) , before putting it in the ground I expected less than 10 g dry yield :D then this growth turned out super well, if it wasn't for my vacation I would have let it grow for about 2 weeks I think. but everything is still very good, I'll go home, fix it and do a smoke review :).

Likes
22
Share
@JustSmokeItB
Follow
Starting Week 2! All three ladies doing great... Blueberry is the beast of the three and Amnesia Haze the runt (as expected). Light moved up to 30" and 100% and dropped humidity to 60%.
Week 2 coming to a close today! Starting Week 3 tomorrow.

Likes
16
Share
@BLAZED
Follow
Week 17 (7-10 to 13-10)
7-10
Temps: 18.4 to 23.5 degrees
Humidity: 61% to 78%
8-10
Temps: 19.6 to 24.5 degrees
Humidity: 60% to 79%
Watering: 2000 ml.
9-10
Temps: 19.8 to 23.8 degrees
Humidity: 65% to 77%
10-10
Temps: 19.1 to 24.3 degrees
Humidity: 55% to 79%
11-10
Temps: 18.7 to 24.2 degrees
Humidity: 46% to 68%
Watering: 2000 ml.
12-10
Temps: 17.8 to 22.1 degrees
Humidity: 54% to 66%
13-10
Temps: 17.6 to 26.1 degrees
Humidity: 42% to 69%