The Grow Awards 2026 🏆 


Likes
Comments
Share
@bcuzZ
Follow
- upped light intensity to ca. 600 PPFD by taking of the domes of the E27 LEDs
- performed LST and defoliated larger leaves that were blocking the new nodes; snapped the main stem from Forbidden Cherry #1. Damn. She survived, but so much pain. Stupid beginner mistake. She´ll recover!
- Otherwise, great growth, no other issues.

Likes
6
Share
@CryptAnon
Follow
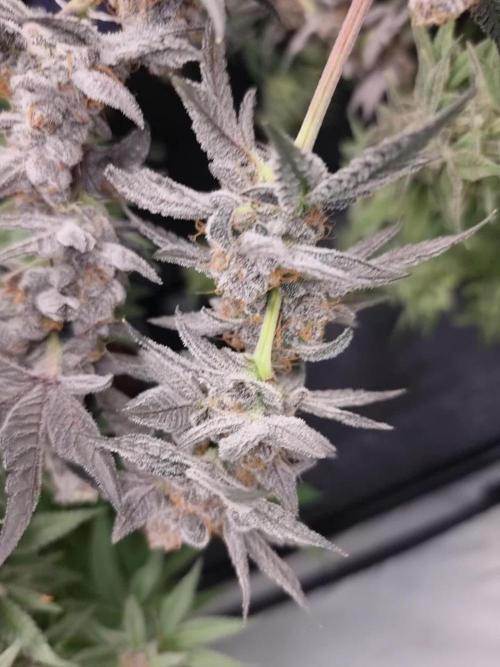
Buds are fattening, hairs are turning orange and the smell is very pungent. Getting some black tips on leaves, any advice would be great. I gradually lowered the ec last week and this week, wondering if that’s what caused it, ph has been dialed. About 2 weeks until harvest.

Likes
13
Share
@SufalloBoldier
Follow
Light up to 70 %power. Run off was 1200ppm organic still so will feed next time for first time bloom nutes. White preflowers starting to shoot up all over the place. Will continue with a bit more lst throughout the stretch period.

Likes
37
Share
@Roberts
Follow
Mandarin XL auto has been growing good this week. She got her first lst training today. She is starting to make good progress. She is due for a solution change soon. Thank you Medic Grow, Gen1:11, and Ganja Farmer. 🤜🏻🤛🏻🌱🌱🌱
Thank you grow diaries community for the 👇likes👇, follows, comments, and subscriptions on my YouTube channel👇. ❄️🌱🍻
Happy Growing 🌱🌱🌱
https://youtube.com/channel/UCAhN7yRzWLpcaRHhMIQ7X4g

Likes
21
Share
@Eauderay
Follow
Hello! I will be harvesting in few days and I can say she was a pleasure to grow and I am amazed she still flower not too bad even if she was slowly strangled on main and side shoots except the lowest buds who grew on the only side shoots without restricted uptake and you can see it!
Next time I am sure she will grow a bit bigger without this torture I inflicted to her straight from the beginning of flowering!
,she is turning yellow and some red fade colours too, I am sure I could give her one more week but I cannot wait any longer so soon she will be harvested... Next time maybe I will let her finish properly too! 😁❤️

Likes
15
Share
@RellestPlant3r
Follow
Now that I’m firmly in veg growth is very fast. I don’t have to water every day considering I’m using the wicking method in tandem with Coco coir medium. Nothing has gone wrong so far. The only thing is since this is my first grow I get a bit scissor happy when it comes to defoliation.

Likes
2
Share
@LittleBigTrees
Follow
I'm still feeding at full strength, they are just swelling now with cloudy trichomes so I'll hatchet over the next week at some point.
The two phenos look very different to each other but have similar smells.
In very happy with both plants, I can't wait to test them.

Likes
2
Share
@Elguacho420
Follow
Buenas a tod@s... 3ra semana de floración de la famosa critical, de momento van bien, algunas hojas oxidadas a esta altura pero creo q es normal, eh podido regular bien la comida( a mí creer) y eh visto mejoras en las variedades, no las noto como antes q estaban como decaídas y se las veia agobiadas, las veo bien y en esta tercera semana se ve claramente la diferencia... Los nutrientes utilizados se ve q son la bomba... 🙌🏻👌🏻 La semana q viene más y mejor, se están poniendo hermosas...❤️ Muchas gracias y buenos humos para todos... 💨💨🇦🇷🤝🏻🇪🇦 🏻♂️
Likes
19
Share
@Organic_G
Follow
Wieder vieles gelernt, gute Qualität, was soll ich sonst sagen, die kommende Zeot wird erst einmal mit Autos gearbeitet.

Likes
16
Share
@Chocolopeison
Follow
Comenzando semana 7 de estás nenas, aun las mantengo en 1L y hoy le hicimos su primera defoliación masiva, ahora a esperar que se recuperen para hacerle trasplante a maceta de 3,5L.
La verdad no eh tenido muchos problema, todo sigue igual siguiendo el mismo orden de nutrientes, bacterias y hongos benéficos una vez por semana, enzimas ahora se las estoy dando día por medio o cada 3 día.
Ya logramos sacar los primeros clones de la watermelon, punch y cookie y la thc bomb. la dss aun la tenemos tirando fuerza que no va mal pero no tenia espacio para más clones.
Saludos


Likes
13
Share
@Robeeriegenetics
Follow
Ooooooweeeeeee they’re all doing so good even the extras that I threw in flower with out cloning are doing great .. in just 2 more weeks I’ll throw the donor plants into flower
Likes
7
Share
@blaze_fpv
Follow
End of week 6 flower 😎 | buds are swelling up and getting more purple | you can already smell a strong permanent marker note | had to install yoyos since the stems started to bend quite hard

Processing
Likes
4
Share


Likes
6
Share
@XanHalen
Follow
Officially week 7
Dec 31:
Came back a week later to very heavy pots, needed 36 hour drying period, not happy, smaller plant has tips of leaves curling down, some like taco, dryed out the pots and went back to normal conservative feeding, need to fine tune the auto irrigation setup before I use it again for sure. All in all, nothing crazy happened. Really cool to see a plant be small, but way bigger after a week of vacation. First grow seems to be going pretty good!
PS: I think my hygrometer is broken, saying 85-100% RA even when I significantly improve airflow and it doesn't seem anywhere near that. Gonna do the salt paste test on the hygrometer
.
Jan 1:
I recalibrated my hygrometer and it’s working great, weird leaf curling of smaller plant still happening but seems to be improving, big plant is frosty and fat for week 7, seems to be at same stage in development as smaller plant but the pheno is beautiful.

Likes
83
Share
@Grey_Wolf
Follow
Chance Of A Lifetime
Greenhouse seeds Wonder Pie
Week six
12th June 2020
Welcome back ,
Well aprox 6 days have passed since I flipped the lighting schedule to 12/12 and they are starting to flower 👌
I was planning on vegging them longer but I decided that I didn't want to risk them stretching too much as they only have 70cm between them and the top of the tent .
Never mind I am still happy with the way my tent is filling up with the three girls and another plant I already had running.
Because I had already added enough Bio Grow to veg for an extra week or so , and the plants seem to be growing just fine with water
I will not add the Bio Bloom until the end of Next week . I am due to feed them with the enhancer again so I think that should see them thru the initial stretch and flowering nicely 👍
During this week I had to do a few alterations to the plants using LST and soft wire.
My main aim is to keep training each plant so that it fills in as much of the area around it as possible thus not wasting any room if possible .
Because I am using a living soil mix I occasionly need to "feed" it too , but incase I was breaking any rules regarding the competition I wanted to clarify whether worm castings
and worm tea made with molasses was allowed. Luckily I was informed recently that Yes it is ok so some time next week I will also add some fresh worm tea and a handful of castings to each plant.
I am super impressed with the uniformity of this strain as all three of mine look almost identical to a lot of the other Wonder pie diaries I have been following, this means that the strain is
homozygous and will no doubt produce a similiar result each time it is grown. Kudo's to Arjan and his team @Greenhouseseedco
Well that is about all for this weeks update , please leave a like & Thankyou for stopping by 👍
Likes
21
Share
@GRow_M8s
Follow
* Starting this week as the others, watering everyday, no deficiencies.
* We put out the net and start to filling the canopy with light LST.
* Raised the lights higher from 30cm --> 45cm.
* Nuts : Gemma crystalize NPK 1 feed per week, rest of waterings with the other formulations.☝️
* In the half of this week, all looks normal.
* Some pistils (starting from the previous week) on canopy turning amber, maybe a little earlier so we raised the lights (25k - 43k lux) to avoid any light/heat stress.


Likes
43
Share
@Jack_Greenstalk
Follow
added trellis netting this week to start SCROG. two layers close to eachother so I don't have to wait for entire square of growth to tuck under higher growth to keep flat even canopy. also minimizes my need for zip tie and garden ties needinf adjustment. I'm happy with veg growth thus far, and once the screen fills up with more green in a week or two these two ladies will both be ready to flip to flower. waiting on lower nodes to develop a bit more and get best use I can from a big(ish) 315 w LEC light.
the girls are getting foliar every 3 or 4 days. using heavy 16 foliar only at the moment but will follow their foliar mix as grow progresses.
smell has gotten much heavier, especially in nemo, the more blueberry pheno of the two, looking at the fan leafs I think V is more haze pheno with super thin sativa leaf structure.