The Grow Awards 2026 🏆 


Likes
Comments
Share
@Farmron
Follow
Side branches are looking really awesome.. one is very heavy already :)

Processing
Likes
43
Share
@Master_weeda
Follow
Jour42 defolliation
Stretch 10 centimètres
Jour47 arrosage avec de l'eau ph6.3 à laquelle j'ajoute 1ml par litre d'eau de topmax biobizz

Likes
13
Share
@HowtoBubatz
Follow
Lemon Haze is just doing her thing quietly in the background, slowly getting overshadowed by the booming Ztrawberriez ladies. 😅
She's started to give off a nice lemony haze scent, which is really pleasant, but she still looks like a small sword, tall and thin with not much going on on the sides. I don't expect much more stretch or branching at this point, but maybe the buds will fatten up a bit. Let's see what she has in store! 🍋

Likes
78
Share
@Roberts
Follow
Pure Ice cream is doing great under the Spider Farmer G5000/UVR40 lights. I just switched to a 12/12 schedule today. I will be doing a solution change in a few days to a blooming mix. Everything is looking great at the moment. Thank you Spider Farmer, Athena, and Pure Instinto Seeds. 🤜🏻🤛🏻🌱🌱🌱
Thank you grow diaries community for the 👇likes👇, follows, comments, and subscriptions on my YouTube channel👇. ❄️🌱🍻
Happy Growing 🌱🌱🌱
https://youtube.com/channel/UCAhN7yRzWLpcaRHhMIQ7X4g
Spider Farmer Official Website Links:
US&Worldwide: https://www.spider-farmer.com
CA: https://spiderfarmer.ca
UK: https://spiderfarmer.co.uk
EU: https://spiderfarmer.eu
AU: https://spiderfarmer.com.au
G5000 Light Amazon Link:
amzn.to/4643esa
UVR 40:
https://www.amazon.com/dp/B0BR7SGTHS
Discount code: saveurcash (Stackable)

Likes
2
Share
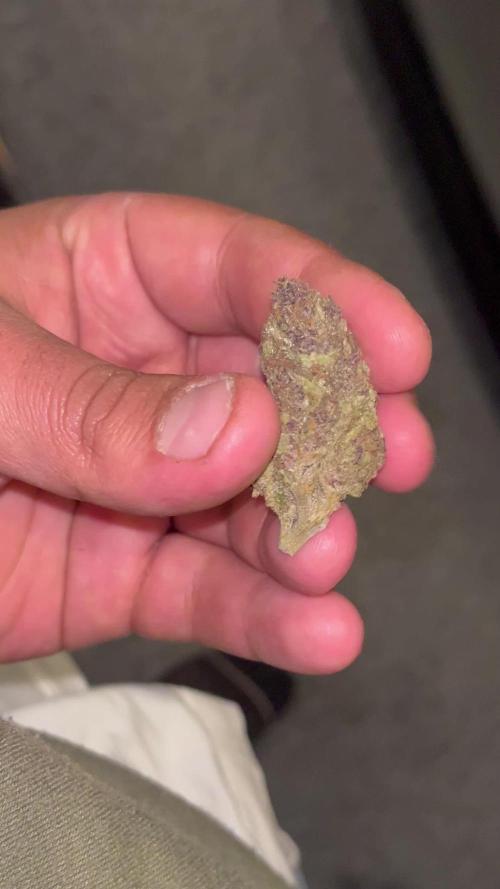
@PCZECHGROW
Follow
After three weeks of drying, I’m happy with the result – a total of 850 g. Some had to be removed and discarded due to mold, but it doesn’t look like it was grown outdoors at all, more like indoor quality. Definitely repeating in 2026.
Overall – condition and smell 10/10


Likes
15
Share
@JooseyBuds__BLM
Follow
Harvested on Day67, this was a small and fast lady! Her stems were skinnier than most plants Ive grown, although her buds were massive. For how quick and small she is, I was surprised to get 75g dry.
I would recommend this strain to anyone. The phenos are a bit random, as well as the size of the plant, but the yields are great and honestly all the phenos are fire.
Processing
Likes
5
Share
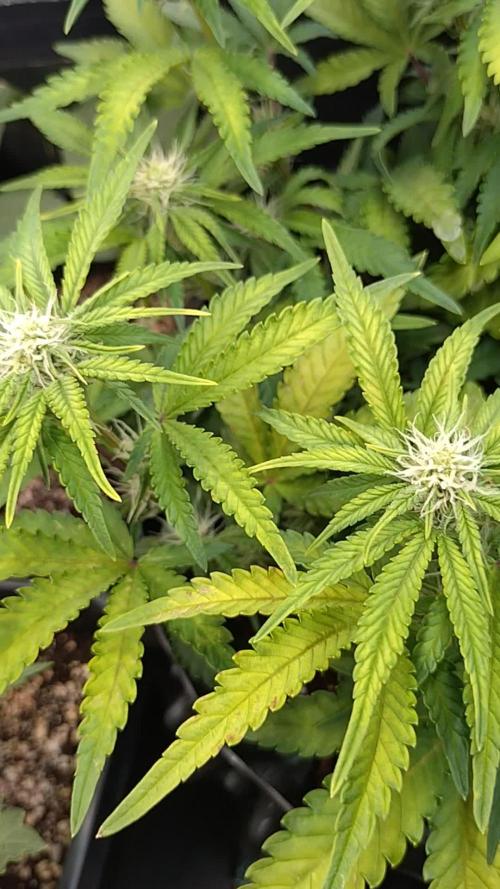
@Ganjagrandaddy
Follow
Hi Growmies ,
I am going to journal thisblady as she is my 1st ever self made seed I have grown.
I have dropped bagseed into cups and watched them sprout thenblet them keep over and die off in the past but never an actual Cross i produced.
Her father is from a previous grow here , Barneys Farm Blue Gelato 41 who threw out some pollen at 3 weeks flowering and also gave some perfect seeds and pods at 3 weeks flower !!!! Very odd but didnt hermie the whole plant but the pollen hit the lowers of the other 8 strains so I have some very promising cross seeds that look very striped and chubby. This cross is Him and a Barneys Gorilla Skittelz Mother who only dropped about 20bseeds all together. I managed to seperate around 8 more of this batch and here we have #1. There is another cross growingnwithba friend that is killing it so I am hopeful now. So far she has been topped at her 5th and stripped her #1 node only. I plan to 6 way her mains and thicken them with tip spreading . I lived the mother strain for her dense buds and the gelato was going beautiful till I culled her for the pollen worries. The very early harvest( 4 week flowering) had me gutted and shockingly the smokable buds from it had a hit to them that was way better than their age should have had them at. I do think the crosses will be a great combo


Likes
20
Share
@PhinolaGreen
Follow
7. Woche
Ich verstehe nicht so ganz, warum sie so schnell gelb wird. Der Drain hatte ein PH von 6,5, daran kann es also nicht liegen. Calmag kriegt sie mittlerweile auch, naja ich werde es weiter beobachten 😊
Da mein Boost von Hesi zur Neige geht, habe ich mich jetzt für Advanced Nutrients Additive entschieden und werde mein Setup langfristig umstellen 😄
Ich kriege es langsam mit dem Mg Mangel in den Griff, es sieht fjedenfall nicht so schlimm aus, wie auf den Bildern und ich habe das Gefühl, sie nimmt die beiden extras an CalMag dankend an.
Likes
43
Share
@TheCannaProphet
Follow
~ GG4 SHERBET FAST FLOWER by FastBuds ~
Well fam, here we go again with another epic strain from FastBuds Fast Flowering stable. After having such tremendous success growing their Gorilla Cookies Fast Flower outdoors last year, I've decided to run another of their fast flowering strains outdoors this year... GG4 Sherbet Fast Flower!
The best description of this awesome cultivar comes directly from my friends at FastBuds which is as follows:
"Bred from extremely potent and flavorful Gorilla Glue and Orange Sherbet genetics, GG4 Sherbet FF (Fast-Flowering) takes all the best traits to the next level, offering a high-yielding strain that can produce up to 600 g/m2 in a 7-week flowering time. This super resilient Indica-leaning hybrid thrives indoors and outdoors, and in all types of climates while producing mouth-watering sweet, fruity, spicy and earthy terps that translate into a delicious sugary hazelnut aroma. Expect an extremely relaxing and overall happy effect that’ll leave you with a huge smile from ear to ear. It’s the perfect strain for growers of all levels of experience seeking low-maintenance yet highly productive photoperiod varieties that deliver quality and quantity without extra effort.
GG4 Sherbet FF grows chunky buds with long dark orange hairs and spade-shaped calyxes that get encrusted with trichomes by harvest time, giving them a gorgeous silvery-white appearance. This medium-sized photoperiod can reach up to 200 cm in height and yields up to 650 g/m2 while developing that typical hybrid structure. GG4 Sherbet FF grows with a stocky, bushy appearance, developing one sturdy main cola and fat side branches that support huge yields without much effort. This super-fast variety produces distinctive light-green buds with a high bud-to-leaf ratio, making your trimming sessions a breeze. It’s a top-notch resin producer that doesn’t need much maintenance and will thrive in almost every climate, rewarding growers of all levels with extremely flavorful resin that makes for outstanding hash end extracts."
________________________________________________________________________________________________________________________________________________________________________________________________________________________________________________________________________________________________________________________
The Setup:
This is going to be an outdoor grow, but I have started the GG4 Sherbet Fast Flower indoors as our weather is still too cold to put her outside (nighttime temp's dipping regularly into the 30's℉).
The plan is simple... let her grow inside under a 19/5 light schedule until the nighttime temperatures stay above the mid 40's℉, at which point she'll be moved outside and transplanted into the soil which I have already setup and inoculated with beneficial microbes, and then let the fun begin!🤪💚
________________________________________________________________________________________________________________________________________________________________________________________________________________________________________________________________________________________________________________________
Weekly Updates:
8/10- Wow! Here we go into Week 4 of flower for the GG4 Sherbet Fast Flower by FastBuds and this lady is on a mission! The GG4 Sherbet FF has large cola's forming all over her and they are rapidly stacking up. Her flowers are continuing to develop and are beginning to get a thick layer of trichomes on them!
8/12- Today, the daily watering routine continues at sunset with around 5g of well water from the hose. I also went into the canopy and removed a bunch of dead and/or completely yellowed leaves to keep the foliage clear of debris which can cause insect and fungal issues if allowed to get out of hand.
8/14- I am continuing to water the FastBuds GG4 Sherbet Fast Flower daily with 5-8 gallons of well water from the garden hose.
Yesterday, I top dressed the FastBuds GG4 Sherbet FF with 3 cups of Gaia Green 2-8-4 Power Bloom which I watered in with well water from the hose. I then applied 1/2 gallon of a nutrient mix I made up in 2 1/2g of well water consisting of: 1/4 cup Neptune's Harvest Seaweed(kelp) plant food and 2 1/2 tsp. of Plantonics Amino Bliss.
8/16- We have rain in the forecast over the next three days. There were a couple of passing light rain showers today which didn't provide a lot of rain so I went ahead and watered the GG4 Sherbet FF with approximately 5g of well water just to make sure that she didn't get thirsty.
There's a month in flower for this beautiful fast flowering cultivar from the experts at FastBuds and all I can say is WOW! I can't say enough positive things about this strain and will, for sure, be running it again! See you next week!😎✌️
Thank you for checking out my diary, your positive comments and support make it all worthwhile! 💚Growers Love!💚😎🙏
Likes
5
Share
@Wilstang
Follow
Sunset Sherbet's grow was simple, no hold back what-so-ever. Hungry eater fed ever other day for the whole grow. Performed super cropping, LST, and topping equaling 12 tops. Strong branches and enormous stalk needing no support during all of flower. Overall a powerful strain lineage to create Sunset Sherbet. Recommended all day to all for a great solid grow.🏅

Likes
5
Share
@momothehobo
Follow
Day 15 - Gave the girls 500ml of plain RO at 6.3(ish) PH. Watered in a ring around 'em to encourage the roots to spread out.
Day 16 - Didn't do anything today just monitoring grow environment Temp, RH, Leaf Temp, VPD etc.
Day 17 - Waterred 'em down again, 500ml plain RO at ~ 5.9 PH.
Days 18 &19 - Nothing done, just monitoring the grow environment Temp, RH, Leaf Temp, VPD, etc.
Day 20 - Waterred 'em down with around 700ml plain RO at ~ 6.1 PH.
Day 21 - Didn't do anything today just monitoring grow environment Temp, RH, Leaf Temp, VPD etc.
Notes:
I'm starting an Arduino project that automatically waters the plants based on the soil moisture and will calculate weekly water consumption. I already have one setup that does all of that and has a water level indicator that alerts me when the water level is low.
Automatic Watering Kit: https://www.adafruit.com/product/4746
Soil Moisture Kit: https://www.adafruit.com/product/4241
Processing
Likes
26
Share
@GrowGuy97
Follow
Day 14, Two of the Orange Sherbets are a little behind & the one I’m trying to pull back from nutrient burn.. So far the White Widow Autos by Seedsman have been doing the best!
Day 17 two of the Orange sherbet are a little behind the rest of the plants but overall I would say everything is going good! Seems like the orange sherbet that had the nutrient burn is starting to bounce back!
Day 19 They are all really starting to take off! Probably gonna do some LST tonight or tomorrow!


Likes
14
Share
@SUMAN
Follow
This week everything was going great, until boom I broke the stem of the runtz muffins trying to dry off some excess water. Also I've started to see some yellowing leaves in the Yuhbary and blackberry moonrocks.Let's see what happens


Likes
7
Share
@Grower420x
Follow
These are the gorilla strain as I never took any of the sour diesel, height levelled itself out to a nice height (learnt from past mistakes not to veg for too long) few smaller bud sites and leaves removed from the bottom

Likes
8
Share
@High_Grade_Dadli
Follow
All love so far girls are beginning to fatten and scent it getting a bit louder without touch...#happy growing
Likes
14
Share
@NewtDawg
Follow
Have been practically fizzing this week knowing the end is nigh for lady No1.
Ended up giving her an extra day, mainly to prove to myself I could but was up early the next morning resolved to chop.
Dismantled her branch by branch but only took the big fan leaves off hoping it will help her dry slowly and ended up with a nice collection of flowers. I’m pretty chuffed to how she has turned out although I know it’s not a massive yeald. Have learned loads though and already planning on what I’m going to change for next time. Thanks to all who’ve shared the benefit of wisdom, the forum has helped immeasurably. Will be back after she’s lost some moisture with a weight check and maybe a cheeky premature smoke report. Thanks gang xx
Update:
I managed to leave it drying for 13 days in total before taking the scissors to it for the jar. All told weighed in at 33g and as I’m not going to start lying to you now have to admit to being a little disappointed with that. Not sure if my expectations were too high or if it’s because of my novice status ( or more likely both) but still grateful for what I did mange to produce which I have to admit seems decent quality which I believe will only get better with a decent cure. Now just need to stop carrying the jar around like a cradled infant and find somewhere dark and cool for it to rest. X
Likes
36
Share
@TaterheadJohnson
Follow
7/19: Started new nutrients today. Filled gallon jug with new nutes. Poured half of new nute mix in half gallon jug. Poured the entire half gallon jug into reservoir.
7/20: Bumped light intensity to 50%
7/21: Filled reservoir to the 2nd line today. Added a total of 1 gallon to res to get it to that line. Poured the rest of the mixed nutes for this week (half gallon) and then another half gallon of just plain water.
7/24: Bumped light intensity to 55%
7/25: Sadness today 😞.. While in the process of doing more LST today I accidentally snapped the main stem. I Panicked! Moved plant back in opposite direction to counteract the split. Will be monitoring very closely! 🙏🏾
***** For this Grow******
“Day Air Temperature” will be the max temp of tent for the week.
“Substrate Temperature” will be the average temp of tent for the week.
“Night Air Temperature” will be the lowest temp of the tent for the week.
Likes
6
Share
@Troy_Farms
Follow
Start of 3rd week of flowering looking good. Pollinated last week with some feminized Black Jack Auto pollen. Will make for a nice feminized hybrid. Great 3rd week of flowering.

Likes
26
Share
@KingSalomonsWeed
Follow
Jo, wird! aber schon wieder Blattläuse. Damn.
Die Galato? Überall wo sie gebrochen war ist das jetzt n baum.
Ach und 1.10 m hoch. Und voll... Yes!
Die Sensi. Und, gut oder?
Füe 12 h Licht. Auf jedenfall!
Ja, der geneigte aufmerksame Beobachter wird es gesehen haben. ICH HABE SIE ANGENAGT!
(ok schnell trocknen, dann mit tabak.. Knallt.
Musste weil hier wiedermal im eh nicht gur sortierten FACHHANDEL,nix war, alles doof).
SENSI SEEDS macht sich selbst alle Ehre.
Hat trotz 12 h Licht angefangen Amber trichome zu zeigen.
Ach ja, sheppert scheppert knallt, wummst. Explodiert, potent..POTENT.
habe ne Knospe getrocknet (langsam).
Genießbar. Und...
Boah ich bin lemon.
LEMON! nice one.
Musik voll geil!.
Und das ungecured.
Yes. YES! YEAHH!


