
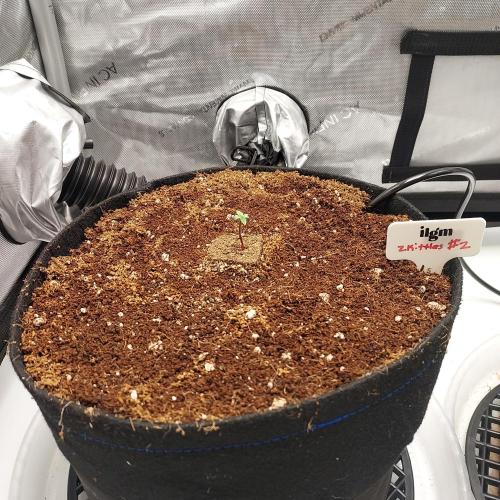
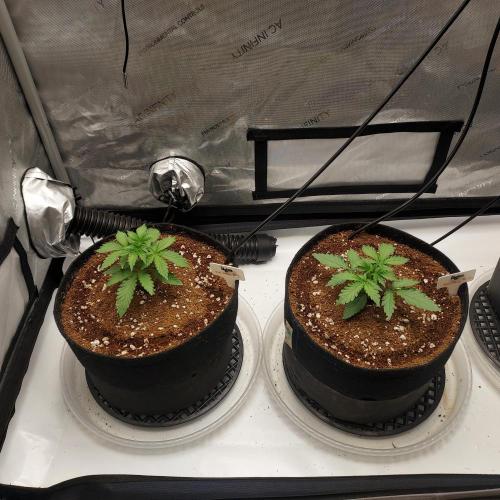
Zkittlez (#2) - Double the Rainbow


Coco Coir
Platonix

Perlite
xGarden
Indoor
Room Type
LST
weeks 3-5
15 l
Pot Size
Start at Harvest
G
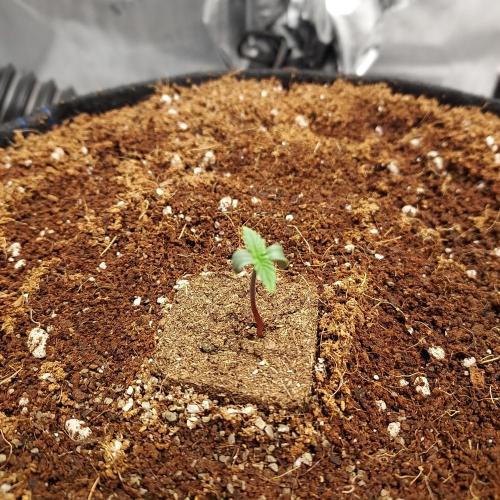
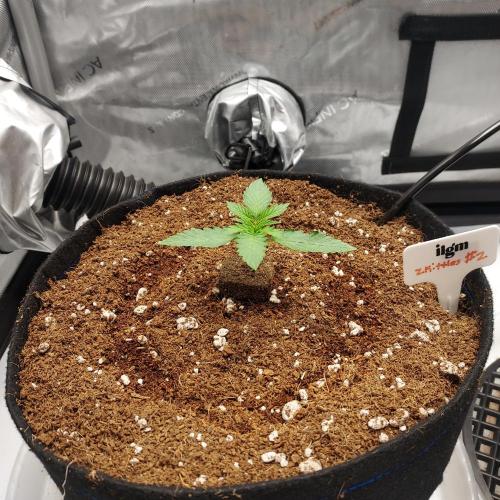
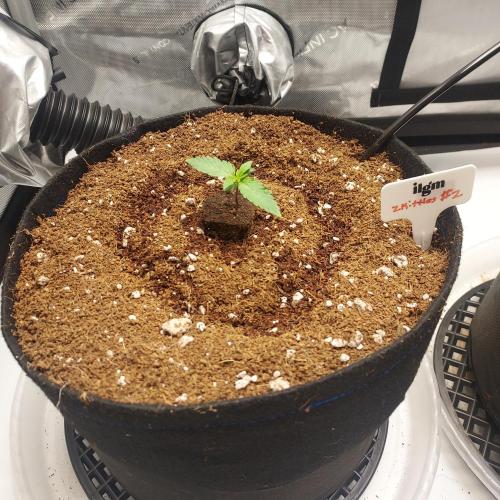
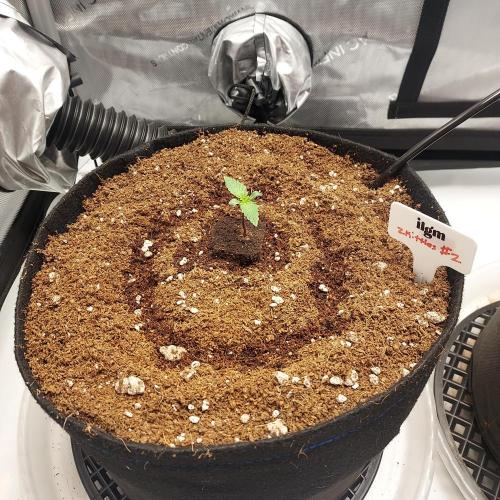
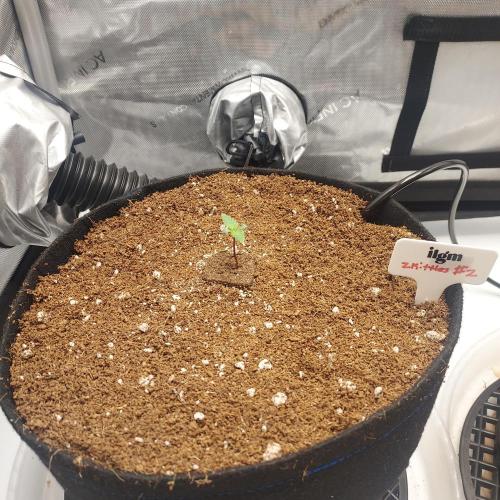
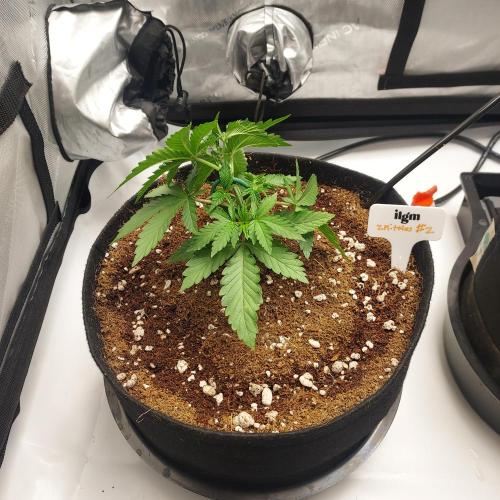
Germination3mo ago


Nutrients 3

Structure (Silica)
1.849 mll

Expand 0-4-4
0.132 mll

Grow 0-1.5-4
0.132 mll
Aeromatics Goals for the Grow:
Beat my 3.9 Personal Record = 99 g Northern Lights CBD from Royal Queen Seeds!
I’ve run a full 4 x 4 auto run and a failed 3.9 photo run since that 3.9 gallon personal record. I obtained a new general personal record of 207 grams from my Critical Mass CBD Auto in a 6.6 Gallon Autopot, so delicious… but my 3.9 gallon autopot run failed (2 Punch Pies Photo and 1 Wedding Gelato) due to an extreme winter and my own disregard and prioritization. Lesson learned and now I will be sure to have my external grow room and settings, let alone the seasons, match my grow.
I’ll buy another AC infinity heater next winter so I have 1 for each tent!
I would love to beat 99 g per plant for each of these.
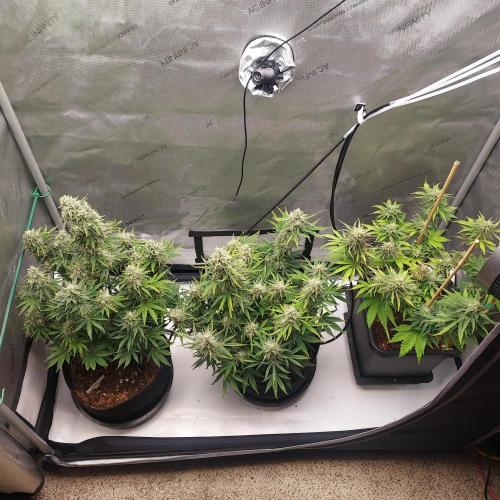
I will break up this tent into 3 separate grow diaries. X 2 will be Zkittlez (Zkittlez #1 and Zkittlez #2 and a CBG 30:1 Auto). I don’t plan on treating them initially, but we will see as they progress. CBG Auto is from Seedsman, and if it is anything like their Pink Kush CBD Auto… I can't wait!
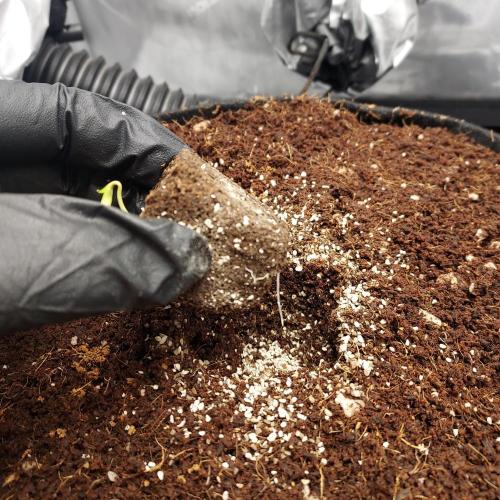
During my last autopot run, I made two germination into potting mistakes.
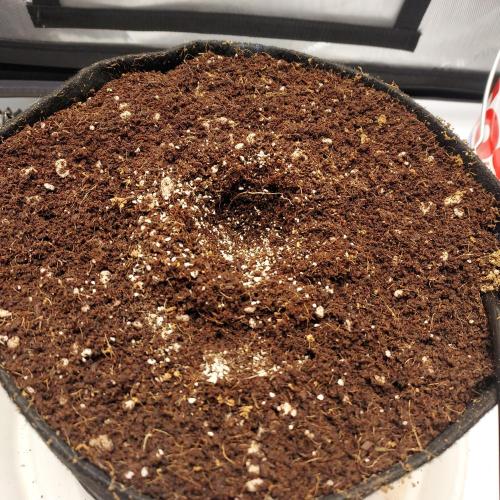
The buffered coco was way too wet when potting. This stifled root growth initially, and also prevented me from adding any water and generally slowed down the entire process. I could tell because when I pulled the coco out from the pots, there was a strong taproot but little to no root growth in the middle to upper root zone.
I packed the coco a bit too much when adding to my pots. I didn’t super pack it tight, but I did pat it down a little but it layers, and I think that inhibited root growth as well.
So my solution, or at least hypothesis to try and solve against these observed mistakes is to:
I let the buffered coco dry and a few extra days in the bin, and I also laid it out on a tard to let it air dry for around 48 hours before potting up. It was still dark and moist, but when I squeezed a handful of it, only a drop or 2 rang out, as opposed to a fountain like my previous run. It looked much better!
I tossed the coco into the pot with my two hands and used the back of my hands to simply even out the layers as opposed to compressing them throughout the potting process. This will allow the coco to naturally settle over time, and hopefully allow for proper aeration and root development!
Coco Buffering
I am trying a new buffering mix for this run! Stash recently released 2 new products to go along with their fantastic Stash Blend nutrient enhancement: Stash Base (Veg Nutrients) and Stash Bloom (Flower Nutrients). I am excited to add Stash Base into my buffering mix, it will hopefully create a beautiful growing environment for my gals.
I buffered twice (both for 24 hours). I had 12 gallons of coco and I used 10 gallons of RO water to buffer:
For my first buffer, I went with around 1 ec charge and a ph of 5.75 for each 10 gallons.
My nutrients included:
70 ml Ventana Plant Science Support
5 grams Stash Base - New Product! (Formulated with a diverse blend of organic and mineral inputs—including calcium phosphate, biochar, crustacean meal, feather meal, fishbone meal, glacial and volcanic rock dusts, alfalfa, insect frass, giant kelp meal, neem seed kernel meal, oyster shell dust, sulfate of potash, calcium carbonate, and fish meal—Stash Base delivers a broad spectrum of macro and micronutrients, plus biology-friendly carbon sources.)
3 grams Stash Blend
ec: 1.1 ph 5.75
After the first 24 hour soak, I fully drained it and resoaked the two bins in another batch of 10 gallons of RO mix. I adjusted the recipe.
My second buffer nutrients included:
60 ml Ventana Plant Science Support
5 ml Ventana Plant Science Expand
2 grams Stash Base
2 grams Stash Blend
5 ml Ventana Plant Science Grow
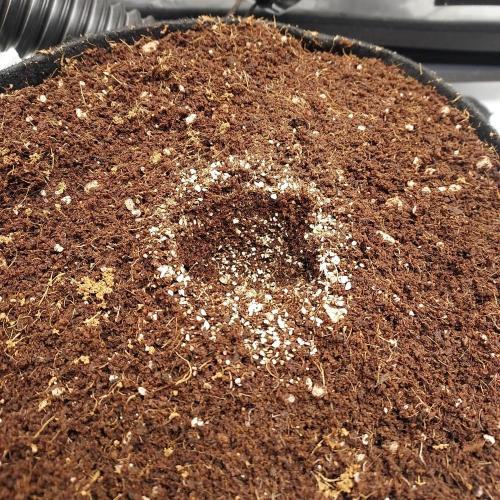
I waited another 24 hours, and then I fully drained the coco and worked to dry it out much more than last grow.
As I mentioned above, I let it drain for more than 48 hours in the tub, stirring a bit here and there. I knew it was necessary because there was a bunch of water let loose once I stirred. That made me thing i need to punch more holes into my bin, or maybe I need to put a huge slice of garden fabric at the base of the bin so that the coco does not clog the holes. I’ll likely try both on my 4 x 4 run which is coming soon!
Once the coco felt good to go, and my measurement for that was that I could grab and handful…squeeze it, and only 1 or two drops would come out… my medium was ready!
Germination:
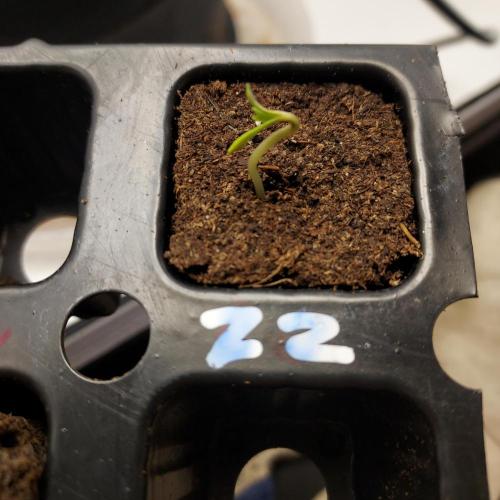
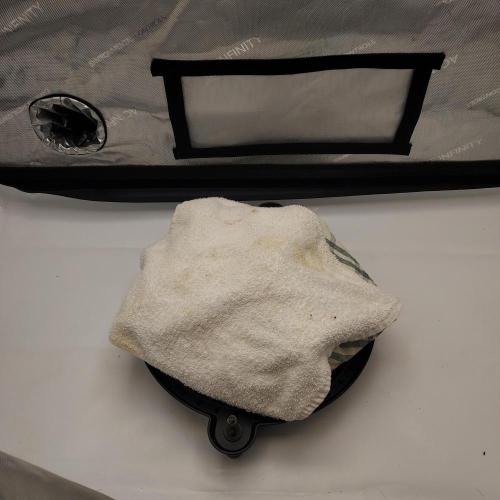
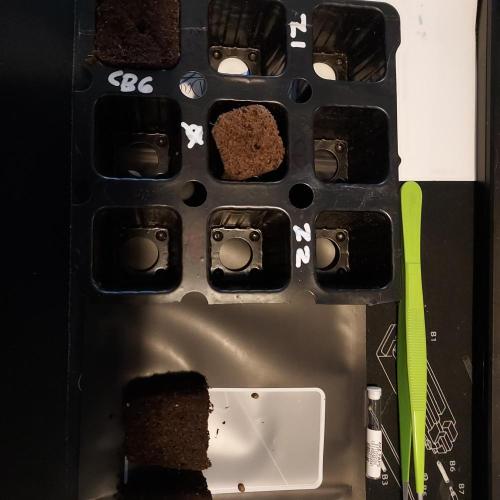
I’ve been using Organiplugs for all my germination for my last 20+ seeds, and I am not going back to any previous system. All you do is: insert the seed, place into a germination cube holder, place in a ziplock back, wrap it up in a towel, place it in a tent, and wait for her to sprout!
I don’t have to worry about anything really, and it almost protects the seed from any real concerns from the seedling/sprouting process.
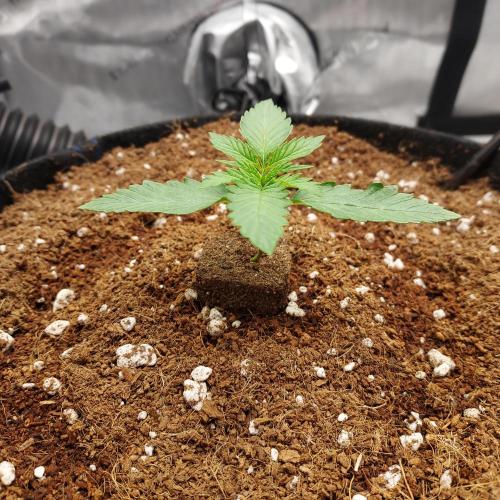
Once she sprouted (either I see a taproot, or the sprout actually pops out of the hole, or both!), I placed her about ¾ of the way down into the coco.
In the coco hole, I added some Xtreme Mykos to encourage root development, one of my favorite reasons to use organiplugs!
I didn’t need to “water her in’ to the coco, as the coco was still very moist from the buffering process. I was actually worried it was a bit too moist, but I went with it anyway.
How to separate the diaries from here?
I’ll be running three separate diaries from this tent:
Zkittlez #1 (ILGM)
Zkittlez #2 (ILGM)
CBG Auto (Seedsman)
While I won’t treat them any different (again, not my initial plan), I think it is always beneficial to work with each plant as an individual, especially with the possibility of phenotype variance and the fact that I really don’t know how each plant will go on the onset of this grow.
However, expectations are solid… hopes are high… and thank you for coming along with the journey!
15 likes
8 comments
Share
Used method
Rockwool Cube
Germination Method
1
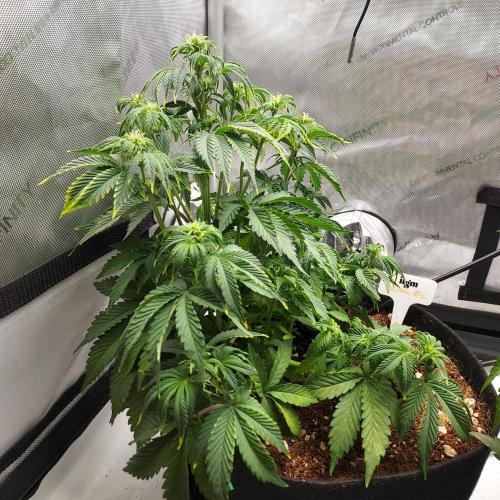
Week 1. Vegetation3mo ago
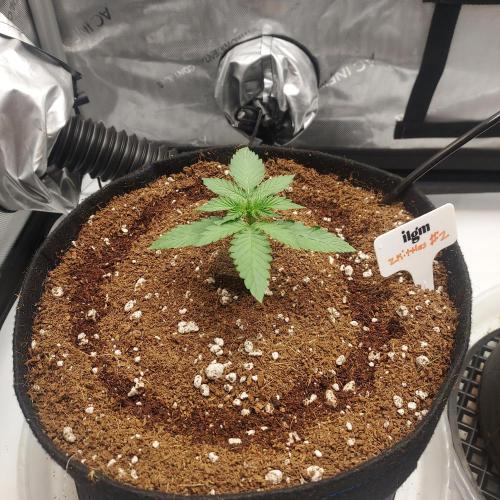
7.62 cm
Height
5.8
pH
No Smell
Smell
330 PPM
TDS
65 %
Air Humidity
14.76 l
Pot Size
121.92 cm
Lamp Distance
Nutrients 3
Base
1.82 mll

Mammoth P
0.032 mll
Structure (Silica)
1.057 mll
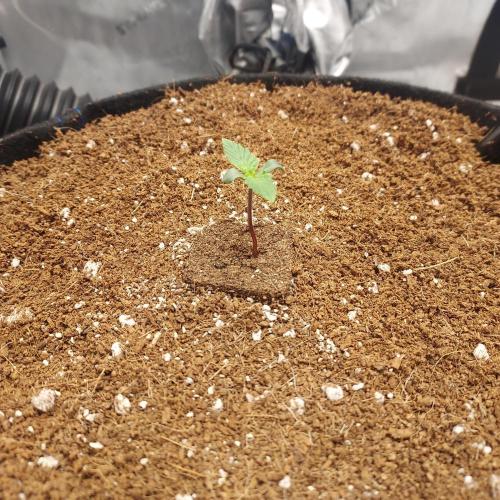
Aeromatics First week has gone great, my treatment of the coco has resulted in, what I feel like, is a great growing environment.
I don't see any signs of poor root growth or hesitation, so drying out the coco a bit and not packing it down into the pot was a great move and general growers development from my last run.
I watered a few times throughout this first week, with my strategy being to water 50 ml at the organiplug planting site, and an increasingly larger volume in a dug out circle to encourage root development outward from the plug (see pictures). I am hand watering until around day 21, and then I will turn on my Autopots. I might turn my airdomes on around day 14 on very low to see if that makes any differences and as an additional experiment, but we will see.
My water recipe is for hand-watering is
1 Gallon RO water
4 ml Ventana Plant Science Support
.75 g Stash Base
12 drops Mammoth P Microbes
I watered:
Day 4: 50 on plug, 150 in ring
Day 6: 50 no plug, 200 in ring
Day 10: 400 in ring
I am close to upping the water levels closer to 1 liter!
My Light output is
20 DLI
220 PPFD
The big decision of this week is turning on the airdomes, check in in a few days to see what I do!
10 likes
comments
Share
2
Week 2. Vegetation3mo ago
12.7 cm
Height
25 °C
Day Air Temp
5.8
pH
No Smell
Smell
445 PPM
TDS
65 %
Air Humidity
14.76 l
Pot Size
121.92 cm
Lamp Distance
Nutrients 4
Mammoth P
0.159 mll

Support 4-0-0
1.057 mll
Base
0.66 mll
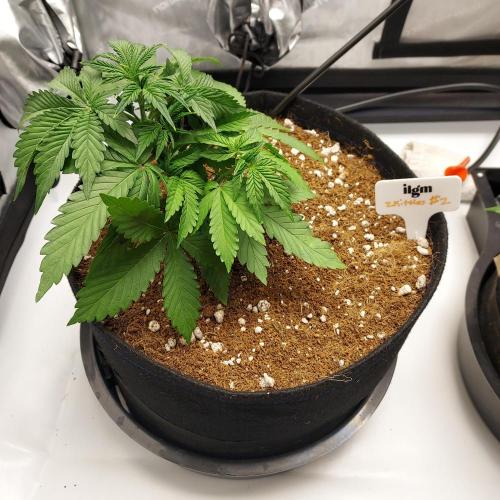
Aeromatics Zkittlez #2 Update: Nothing specific for her yet, except that she presents like the slightly larger gal in the first two weeks. Interesting to see how this presents over time, but I haven't done anything different between the two yet!
Tent-Wide Update: Airdomes are ON... and MUCH earlier (Day 15) than my previous 2 grow, and from what I read, much earlier than conventionally recommended for most grows. This was a part of the experiment for this grow, as I wanted to see what it would be like to really provide a light, aerated coco (non-compressed at potting) while still moist, and let Mykos and Mammoth P do it's work early.
I went with a very low initial setting with my air pump, as my goal is merely to increase airflow within the root system, and since I don't have my Autopot system rocking yet, I am sticking to slow and steady initially with this experiment. So far, so good!
Speaking of Autopots, I have prepared the system, but I am looking for a day 20 or 21 operation date. For now, I have handwatered two doses for this week.
My recipe was a 1 Gallon batch:
1 Gallon RO Water
4 ml Ventana Plant Science Support
1 ml Ventana Plant Science Expand
2.5 g Ventana Plant Science Stash Base - I weighed this on my scale and thoroughly mixed it into my 1 gallon
12 drops Mammoth P Active Microbes
Day 13: 600 ml water in largest possible ring
Day 15: 800 ml water in largest possible ring
I am thinking I'll give it 1.5 Gallons in the next water, likely on day 17, which will carry it over to my day 20 trigger point for activating my autopots. At that point, we will see the boom!
PPFD is at 320 and will continue to rise over time as I slowly increase my lights levels (Level 8 at max tent height right now).
I am as happy as I can be for the first two weeks, based on my goals! I expect to see a boom of veg growth next week, stay tuned!
11 likes
1 comment
Share
3
Week 3. Vegetation3mo ago

17.78 cm
Height
25 °C
Day Air Temp
5.7
pH
No Smell
Smell
525 PPM
TDS
65 %
Air Humidity
14.76 l
Pot Size
121.92 cm
Lamp Distance
Nutrients 6
Mammoth P
0.132 mll
Support 4-0-0
1.321 mll
Expand 0-4-4
0.396 mll
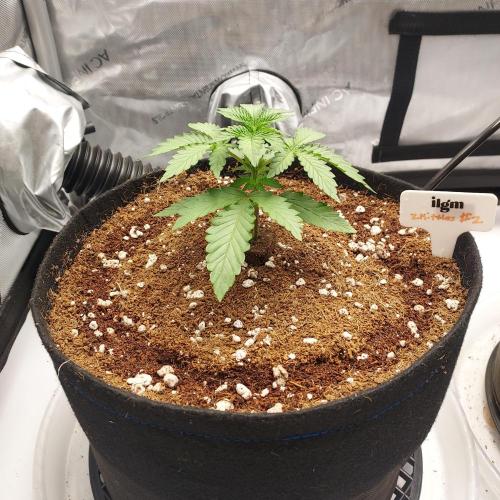
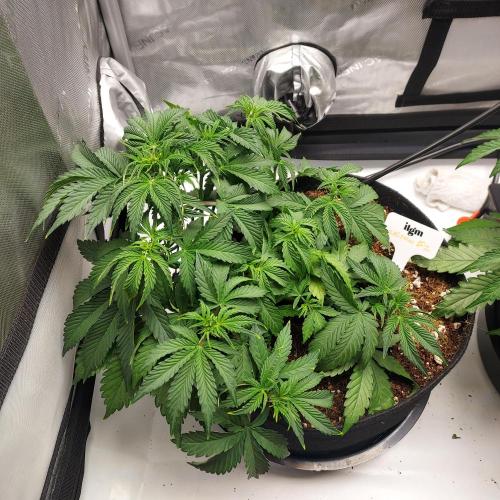
Aeromatics Zkittlez #2 Update: This is the first real week we have a separate of treatment between the two beauties! Zkittlez #2 is looking taller than her sister companion, mostly due to a very unique growing structure of #1 (see journal). In order to grow a bushy, solid canopy, I am adjusting her main stem with some LST, hoping to expose those lower nodes to light and bring them up to equal height while also slowly leveling out the main stem. It's going well and with day the autopots now activated, my favorate part of the whole grow has commenced. Fruits of the labor, commence!
Tent Updates: AUTOPOTS ON.... WOO!
Day 21 is the earliest that I have turned on my autopots since I converted to a full autopot system, and every aspect of my preparation has steered me towards developing a root systems that grew to build an environment that could tolerate an early activation of both airdome and autopot early activation. I am happy to say I think we succeeded here!
I gave her two waters this week in preparation. One on day 16 (600 ml) and one on day 18 (800 ml). Each water was delivered at the very outside of the pots to encourage max root exploration of the pots.
I also slowly increased the strength of my airdome pump heading into day 21 to give them some extra oxygen, they responded well to that and showed some perky growth.
The morning of day 21, I mixed 10 gallons of RO water with the following recipie:
10 Gallons Water
50 ml Ventana Plant Science Support
26 ml Ventana Plant Science Grow
15 ml Ventana Plant Science Expand
7.5 ml Ventana Plant Science Structure
11 g Ventana Plant Science Stash Base
5 ml Mammoth P Active Microbial
ec 1.05
ph 5.7
I loaded up my reservoir, plugged in my air pump and water stone to keep her aerated, and opened up my aquavalves.
I also adjusted my Ionboard S44 to level 9, giving out about 350 PPFD, but I will be looking to max that out to level 10 by day 24. They are almost ready to push to the max!
We are officially in full system operational mode... stay tuned for the boom. Week 4 will hopefully bring monsters!!
10 likes
comments
Share
Used techniques
LST
Technique
4
Week 4. Vegetation2mo ago

25.4 cm
Height
24 hrs
Light Schedule
25 °C
Day Air Temp
5.7
pH
No Smell
Smell
525 PPM
TDS
65 %
Air Humidity
14.76 l
Pot Size
121.92 cm
Lamp Distance
Nutrients 6
Mammoth P
0.132 mll
Support 4-0-0
1.321 mll
Expand 0-4-4
0.396 mll
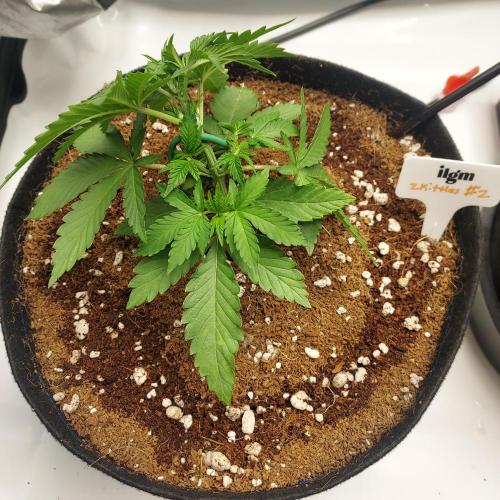
Aeromatics Zkittles #2: She is growing beautifully, with her height coming in around 10 to 12 inches due to LST, and her canopy looking even and beautiful. I am trying to keep manipulation to a minimal to avoid stress during stretch, but I also am trying to build out that even light exposure as best as possible. She is a bit droopy due to missing a day of PH balancing, but I think she will bounce back quick! Week 5 is going to bring early flower and hopefully even more growth!
Tent-Wide Update: No big changes as they are still drinking from the first reservoir (see recipe below). I have keep everything the same, but the only issue thus far has been maintaining a steady PH that does not need to be adjusted daily. I think it is the Mammoth P microbes that mushes the PH north a bit more aggressively than normal, but it is totally worth it.
I had one two day period of a stronger drift from 5.7 to 6.8, but I was able to bring it back within a few minutes. I will do my best to check it daily, but I will look to set my PH closer to 5.6 on average to give me a bit of extra buffer if I miss a day.
All in all, heading into week 5, I am excited for a successful first 4 weeks. Goals for the grow....check!
7 likes
comments
Share
Used techniques
LST
Technique
5
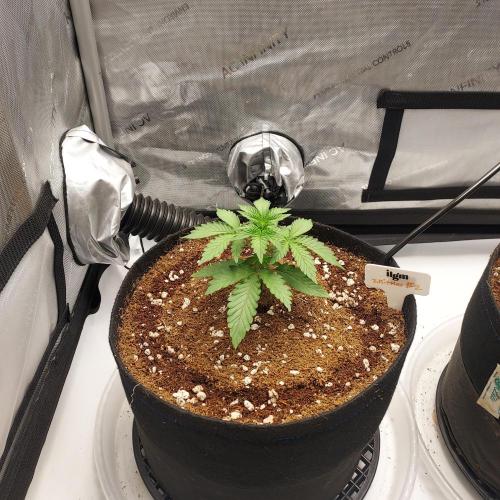
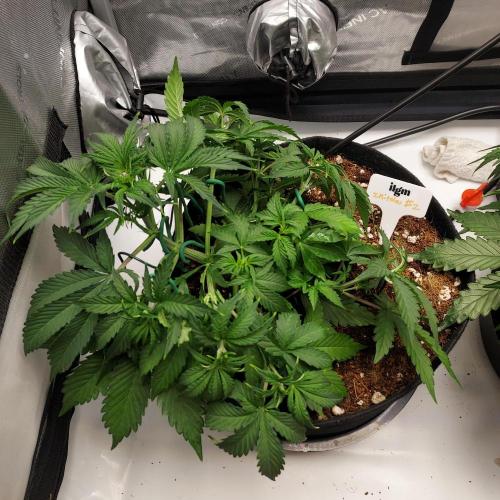
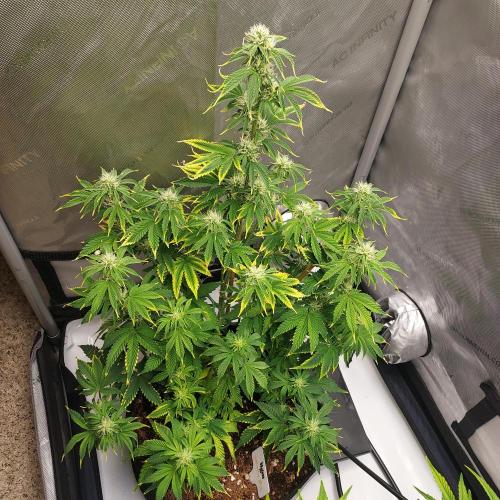
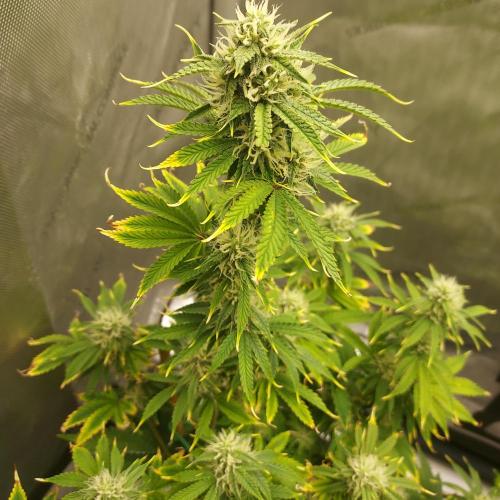
Week 5. Flowering2mo ago
35.56 cm
Height
24 hrs
Light Schedule
25 °C
Day Air Temp
5.7
pH
No Smell
Smell
375 PPM
TDS
65 %
Air Humidity
14.76 l
Pot Size
101.6 cm
Lamp Distance
Nutrients 6
Mammoth P
0.264 mll
Support 4-0-0
0.925 mll
Expand 0-4-4
0.291 mll
Aeromatics Zkittlez #2: She looks more damaged from the ph drift than her sister, but I dig the colors to be honest! Her leaves are still looking a bit twisted and out of wack, but flowers are starting to form and I think cutting back on all aspects is reeling in the stress (lower ec, slightly lower ppfd, and an uber consistent ph). We are moving into a pretty full flower now, so I may need to adjust my feeding sooner than my reservoir runs out, but we are also sharing a reservoir with my CBG Auto, which is a week behind. Let's see how this transition week goes!
Tent-wide Update: We definitely hit some PH issues heading into Day 34, cresting into the start of week 5 and hitting pre-flower.
My droop issues were still existing and I decided to get a bit more aggressive with a fix, mainly in pulling the gals out of their autopot reservoirs, dumping the remaining mix, and starting fresh and clean with a lower EC (move from 1.1 closer to .75 for recovery) and a lower starting PH (5.5) so they are forced to reset.
As a bit of a checkpoint, I wanted to measure the nutrient solution in the autopots before disposal, and even though I had been adjusting my PH in the reservoir daily, it came in super hot at 6.8! There is the source of my problems 100%!
With my new solution, I hoped to have a quick response in the form of perky plants and better nutrient uptake, which should in turn allow for some better drinking and quicker reservoir turnover. I may also move to smaller reservoir batches, perhaps 6 to 8 gallons as opposed to 12 gallons, so I can freshen them up a bit more often.
For this recovery/Pre-flower batch, I went with the following recipe:
10 Gallons RO Water
Ventana Plant Science Support 35 ml
Ventana Plant Science Grow 15 ml
Ventana Plant Science Expand 11 ml
Ventana Plant Science Structure 6 ml
Ventana Plant Science Stash Base 8 g
Mammoth P Active Microbes 10 ml
ec .75
ph 5.45 (set lower to account for high PH imbalance and potential issues)
Heading into Week 6 (day 36), and recovery is going well! The move to a bit lower of of EC, a bit lower in PPFD (380 as opposed to 400) and and nice clean of those trays where the spike hit… I think we are in a solid space here!
7 likes
comments
Share
Used techniques
LST
Technique
6
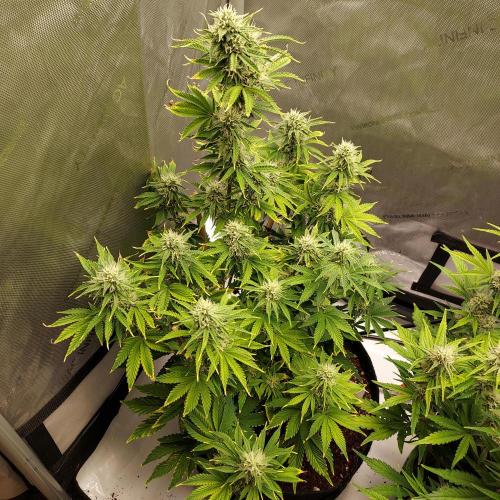
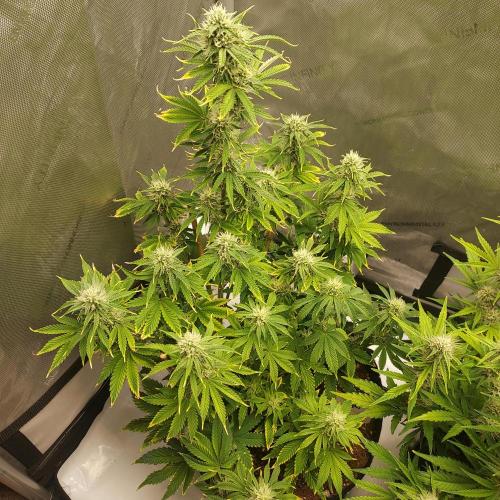
Week 6. Flowering2mo ago
60.96 cm
Height
24 hrs
Light Schedule
25 °C
Day Air Temp
5.5
pH
No Smell
Smell
490 PPM
TDS
60 %
Air Humidity
14.76 l
Pot Size
101.6 cm
Lamp Distance
Nutrients 4
Support 4-0-0
1.321 mll
Expand 0-4-4
0.634 mll
Grow 0-1.5-4
0.37 mll
Aeromatics Zkittlez #2: I've definitely backed off a bit on pushing her too hard and focused more on letting her stabilize. She’s been easy to work with and continues to stack nicely even through the ups and downs. I'm not touching her at all and going to let her settle into flower and just let her stack as much as she can. Though they leaves are not perfect, I dig the color haha! Looking forward to seeing how she responds now that things are settling in!
Tent Update: With the PH struggles, I've been mulling over two paths to finish this run, either moving to a managed bio-reservoir or perhaps switching to moving my Mammoth P and Stash Trio out of the reservoirs and making top drench teas. This week was an experience in the "I have no idea what that decision will be, so let's do both" haha!
On day 38, I filled my 12-gallon reservoir with a more bio-rich solution:
5.5 Gallons RO Water
18 ml Ventana Plant Science Support
7 ml Ventana Plant Science Grow
6 ml Ventana Plant Science Expand
3 ml Ventana Plant Science Structure
4 g Ventana (2 tsp) Ventana Plant Science Stash Base
2 ml Mammoth P Active Microbes
ec came in at 1.0 and I dropped PH down to 5.4 to account for drift.
However, I immediately got nervous about this one as I measured PH 4 hours after and it shot up to 6.2, no doubt due to the microbes feasting on all the amazing nutrients. Ah! I want that happening in my plants!
I adjusted and turned the reservoirs on, but it was at this time I decided my next move would be towards the latter, I need reservoir stabilization
I have officially decided that my reservoirs will be VPS exclusive, and I will build root teas and drenches with Mammoth P and Stash Trio moving forward.
So on Day 43, I cleared out the remaining reservoir (about 1 gallon left), and I switched back to a stable, no microbe tank:
5 Gallons RO Water
25 ml Ventana Plant Science Support
7 ml Ventana Plant Science Grow
12 ml Ventana Plant Science Expand
6 ml Ventana Plant Science Structure
Let's see how they do heading into week 7, but I think we are on our way back from some experimentation and on our way to stability!
11 likes
2 comments
Share
7
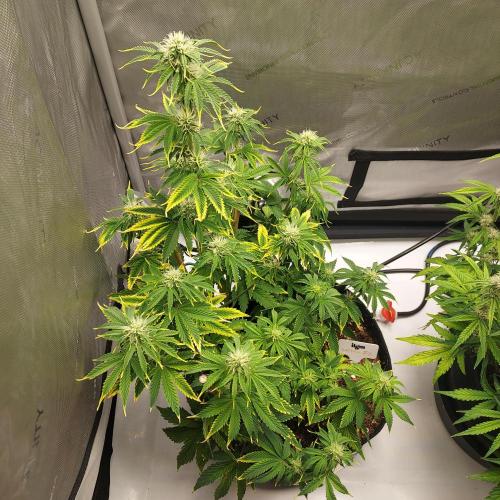
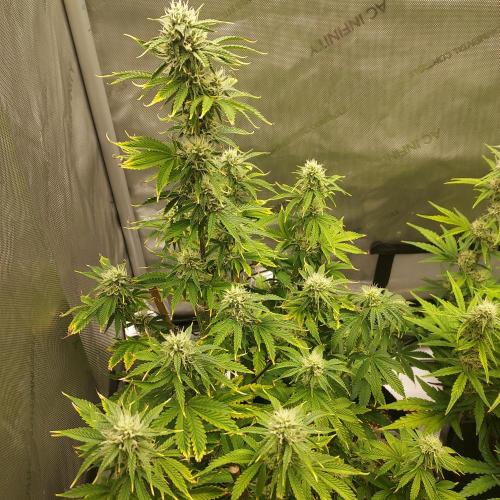
Week 7. Flowering2mo ago

60.96 cm
Height
24 hrs
Light Schedule
25 °C
Day Air Temp
5.5
pH
Normal
Smell
490 PPM
TDS
50 %
Air Humidity
14.76 l
Pot Size
101.6 cm
Lamp Distance
Nutrients 6
Mammoth P
0.264 mll
Support 4-0-0
1.585 mll
Expand 0-4-4
0.687 mll
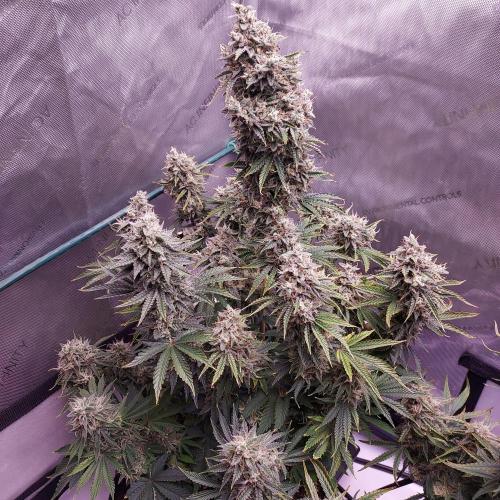
Aeromatics Zkittlez #2: She is stable, stacking, and her new growth is the beautiful dark green that I know and love! I haven't seen any stress from her since we had those PH issues, and she is starting to remind my of an Elven structure from Lord of The Rings, ha!
I removed a few dying leaves, but outside of that, she is starting to bulk up flowers across her canopy. I will remove a few very lower stems here and there daily, but I am going to very minimally limit stress moving forward from here. She is starting to smell sweet with a bit of tangy skunk bite.
Tent-Specific Updates: Once that stable reservoir was finished, I decided it was time to enter try a new protocol with Mammoth P and Stash Bloom:
A dry-back (24 - 36 hours) -- Autopots system on -- 24-hours -- top water root drench with Mammoth P and Stash Trio = rewarding fresh coco hydration with a microbial boost stimulation!
Officially on week 7 (day 49), we tried this out to see if I could do this multiple times throughout my future grows.
I let the pots dry back longer than usual (around 36 hours) which helped reintroduce oxygen into the root zone, then came back in with a much cleaner and more controlled reservoir.
Here was my reservoir mix for 5 Gallons:
5 Gallons RO Water
30 ml Ventana Plant Science Support
5 ml Ventana Plant Science Grow
5 ml Ventana Plant Science Flower
13 ml Ventana Plant Science Expand
5 ml Ventana Plant Science Structure
PH: 5.5 EC.98
On day 50, After 1 day of rehydrating and reestablishing a solid root zone, I went in with my root drench with a mix of:
1/2 Gallon RO Water
1 ml Mammoth P Microbes
1/2 tsp Ventana Plant Science Stash Bloom
Before I added my drench, I removed a bit of moldy coco just to be sure we were as safe as can be.
I added 400 ml to each plant slowly over the top of each plant and my hope is that the microbes will help bring even more stability to my roots, but also really boost flower stacking and development! I will try and get at least one more of these in before the grow is over.
I feel much more comfortable getting microbes in through this strategy, as my reservoirs were nice and stable over the past few weeks, and I could tell that my plants absolutely loved them as well! We are learning!
10 likes
comments
Share
8
Week 8. Flowering2mo ago
60.96 cm
Height
24 hrs
Light Schedule
25 °C
Day Air Temp
5.5
pH
Normal
Smell
490 PPM
TDS
50 %
Air Humidity
14.76 l
Pot Size
101.6 cm
Lamp Distance
Nutrients 6
Support 4-0-0
1.717 mll
Expand 0-4-4
0.66 mll
Grow 0-1.5-4
0.198 mll
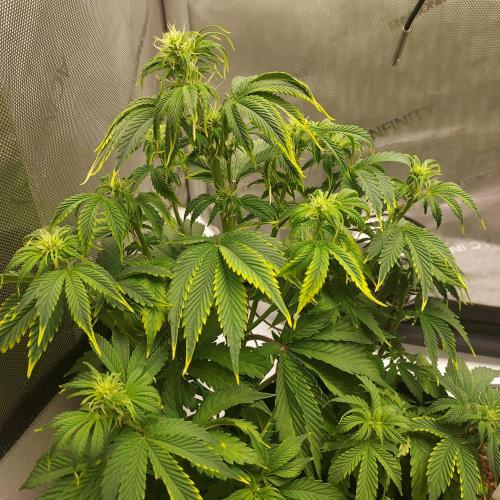
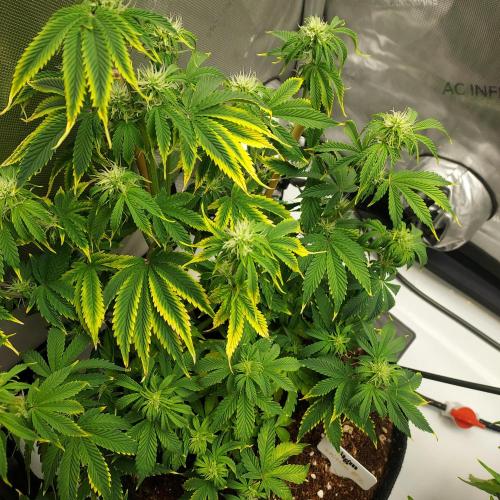
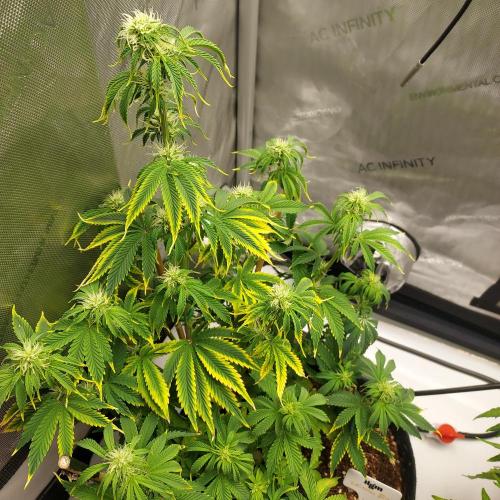
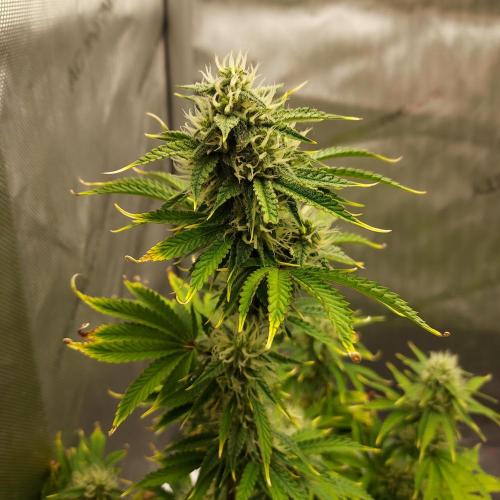
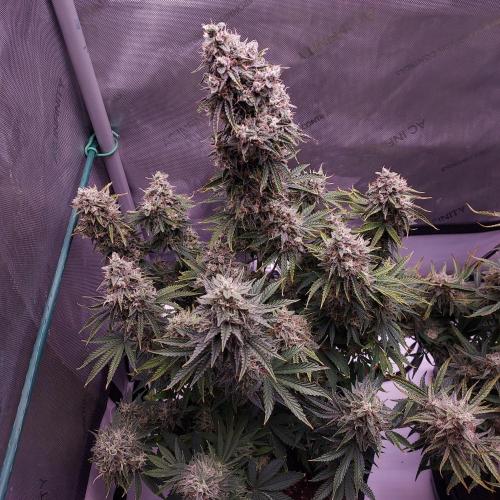
Aeromatics Zkittlez #2: She is looking mighty now, with the only real damage peaking out just on the tips of the already hurt tips of the leaves most affected by the early PH swings. Keeping my reservoirs tight has really improved health across the tent, but this gal specifically has benefited from consistency. We are pushing density now and an even canopy of beautiful, frosty colas is emerging, along with a sweet aeroma that I am excited for. Two to three weeks to go, let's stay strong!
Tent-Wide Update
Heading into day 56, my reservoir was 3 days old and starting to push how old I wanted any given reservoir to be for the rest of this grow. I have my x 2 air stones running constant oxygen at the lowest setting 24/7, but still I have realized (in this grow) that I want to preserve my reservoir health as much as possible, so less volume and more frequent changes are optimal.
I gave it a good sniff, and it smelled a bit stale. Upon examining the solution, it was definitely time to change it up! There was some discoloration, a touch of biofilm, and some small solids had started to grow at the very bottom. All good with me, they are ready for some fresh solution!
The timing was perfect too! I, as a bit of a curious grower, took my new turkey baster/science tool and drew some liquid from each reservoir… and I am happy I did!
PH was 7.0, EC had dropped .2 over the 3 days… some interesting data for sure.
I really want, and honestly need, to protect that root zone, so I pulled the reservoir and remaining solution in the trays and prepared a fresh batch of solution.
I’m going to go to three gallon batches moving forward with the goal to switch out every 3 days as well. That way, I get a fresh chance to change my recipes and adjust as needed.
My day 56 3 gallon recipe came in a little hot with the following mix (1.3 ec) so I ended up adding another gallon of RO water and doing a topper of 500 ml to the plants in the tent to try and stabilize the PH a bit after that high 7.0 reading.
My recipe (was meant for 3 gallons but dilluted to 4 gallons total):
26 ml Ventana Plant Science Support
3 ml Ventana Plant Science Grow
8 ml Ventana Plant Science Flower
10 ml Ventana Plant Science Expand
3 ml Ventana Plant Science Structure
3 ml Ventana Plant Science FlaVUH
1.1 ec ph 5.4
I also cleaned up my airstones and hoses in the reservoir, as they needed a good buffing out.
9 likes
2 comments
Share
9
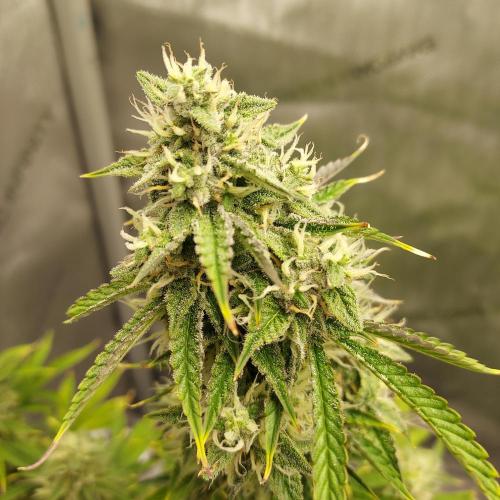
Week 9. Flowering1mo ago
60.96 cm
Height
24 hrs
Light Schedule
25 °C
Day Air Temp
5.5
pH
Strong
Smell
500 PPM
TDS
50 %
Air Humidity
14.76 l
Pot Size
101.6 cm
Lamp Distance
Nutrients 6
Support 4-0-0
2.113 mll
Expand 0-4-4
0.594 mll
Grow 0-1.5-4
0.132 mll
Aeromatics Zkittlez #2: She is thriving... I am not touching her haha! Bulking up nicely, trimming a few leaves here and there. But outside of that, we are in bud stacking mode 100%. I'm quite happy!
Tent Wide Update: Our big move away from those harder to control bio-fed reservoirs and back into stable Ventana Plant Science reservoirs has rewarded us with some beautiful plants in peak flower, that are now stacking density, frost, and starting to move into late flower.
Additionally, I can clearly see how our top feedings with Mammoth P and Stash Bloom are creating some beautiful feeding environments for our roots, because they are drinking away and looking great.
The main cola on each Zkittlez Auto is verging on 2 to 2.5 inches thick, and the lower 2/3 canopy as a whole is looking alive and well. We are heading into the final three weeks, and the beautiful genetics are revealing themselves daily.
We kept it pretty simple over the past week with only 1 reservoir fill:
4 gallons RO water
32 ml Ventana Plant Science Support
2 ml Ventana Plant Science Grow
7 ml Ventana Plant Science Flower
9 ml Ventana Plant Science Expand
3 ml Ventana Plant Science Structure
3 ml Ventana Plant Science FlaVUH
ec 1.0 PH 5.5
My canopy ppfd is 550 and I see a bit of vertical tacoing on the very top main cola, so I am not going to push it more than that for the rest of this grow.
I’ll keep trimming away a few unsightly leaves here and there, but our focus is now on a steady fade and finish.
She smells great and I am excited for our final few weeks!
10 likes
2 comments
Share
10
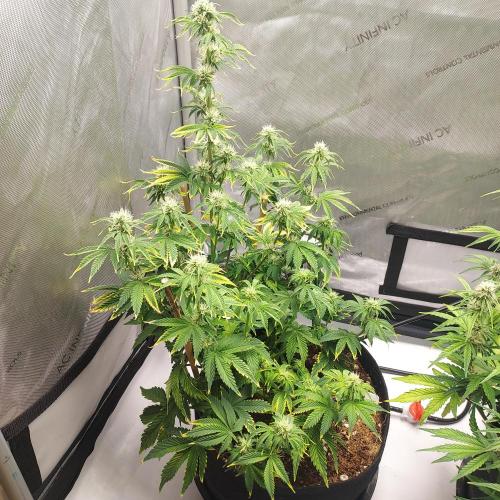
Week 10. Flowering1mo ago

60.96 cm
Height
24 hrs
Light Schedule
25 °C
Day Air Temp
5.5
pH
Strong
Smell
50 %
Air Humidity
14.76 l
Pot Size
101.6 cm
Lamp Distance
Nutrients 6
Support 4-0-0
1.717 mll
Expand 0-4-4
0.594 mll
Grow 0-1.5-4
0.211 mll
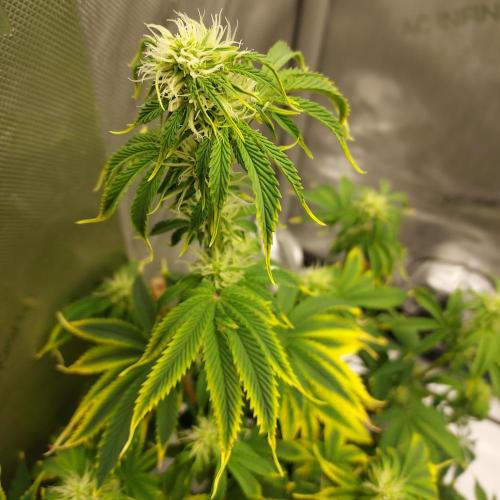
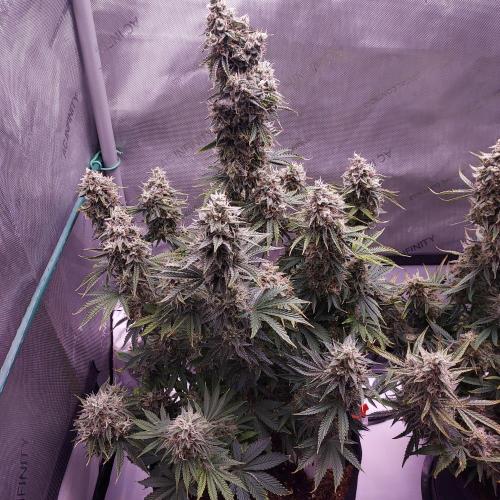
Aeromatics Zkittlez #2: Not much more to say on this gal. Minas Tirith? haha She is a frosty beast and with my valves off and her starting to dry out, we are coasting to our finish.
I'll spot trim here and there as leaves start to die out... but I am one happy man with her!
Tent-Wide Updates: Day 67 had some big action preparing for our final 2 weeks, which from here on out will hopefully be an easy fade to chop.
They are still drinking up, so I prepared another 3.5 gallon reservoir of the following recipe:
23 ml Ventana Plant Science Support
1 ml Ventana Plant Science Grow
9 ml Ventana Plant Science Flower
8 ml Ventana Plant Science Expand
3 ml Ventana Plant Science Structure
4 ml Ventana Plant Science FlaVUH
Additionally, I wanted to get in a final topwater of Stash Bloom before the end of our grow, so I prepared a quick batch up top water solution of the following recipie:
.5 gallon RO water
1/2 tsp Stash Bloom
1/4 tsp Stash Blend
I cleared away from mold/mildewy coco and gave around 500 ml of the Stash Bloom/Blend solution to each of the plants for a final burst of food to help them finish strong!
I also did a final clean of my auto pot system, cleaning out the trays and hoses, all in an effort to let my gals finish as strong as possible.
On day 70, it was time to flip off my autopot reservoirs and let these gals glide into their finishing windows with grace and happiness!
They are frosty and smell ripe, putting off lemon, sugar, and a touch of that finishing flower smell we all know and love.
I plan on letting them cruise another week, at least, with the coco taking at least 4 full days to dry out. I may do 1 RO-Only flush between the dryout period and cut down date as an experiment, but traditionally I let the coco dry out, and the plant draw as much terpene deliciousness from the sugar and fan leaves as possible.
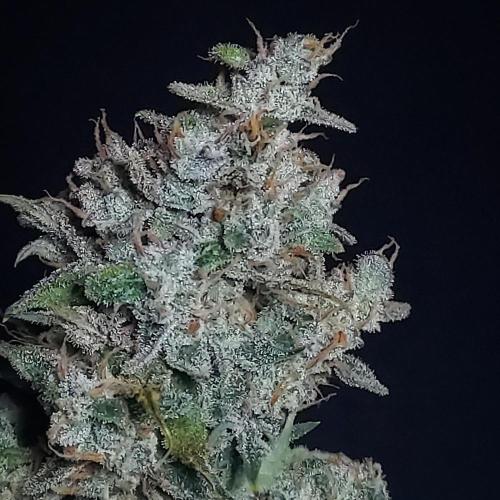
I examined the trichomes this morning and I am seeing around 2% amber, and I am looking for around 10% on these gals before harvest.
I love this part!
11 likes
comments
Share
11
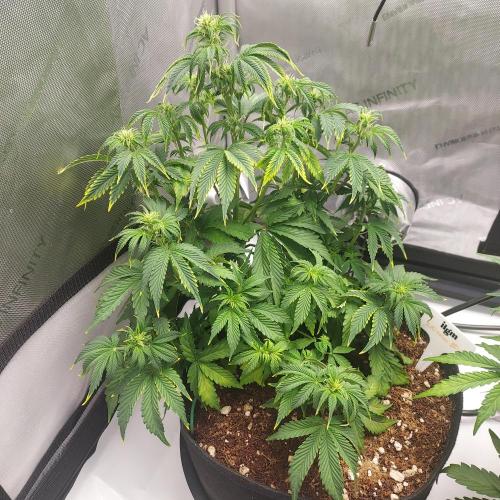
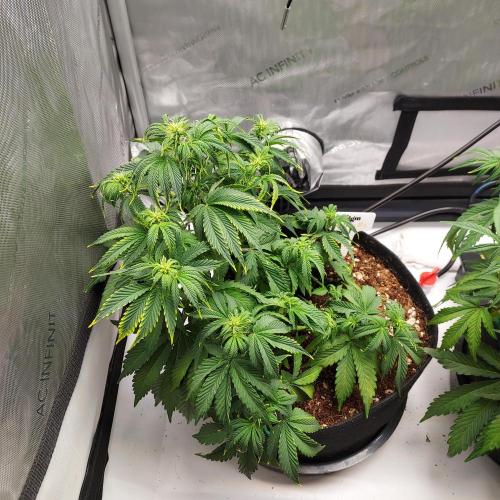
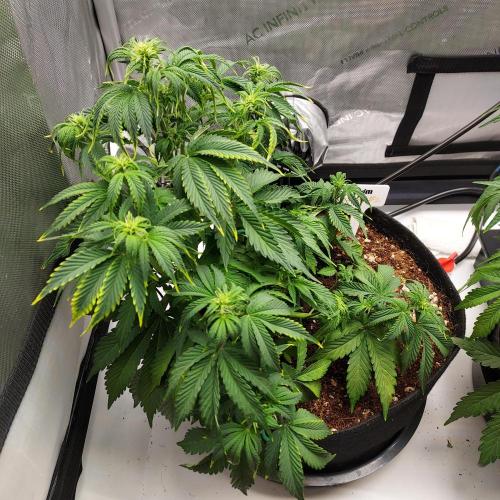
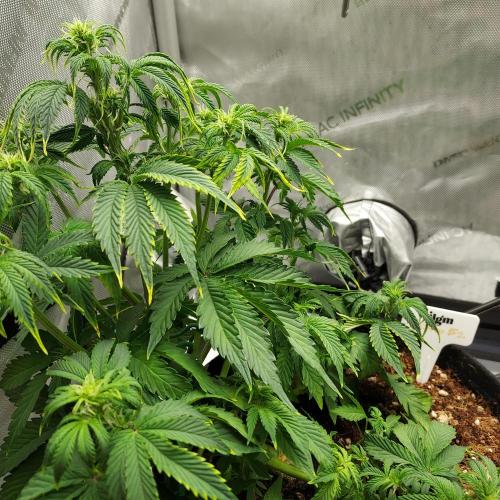
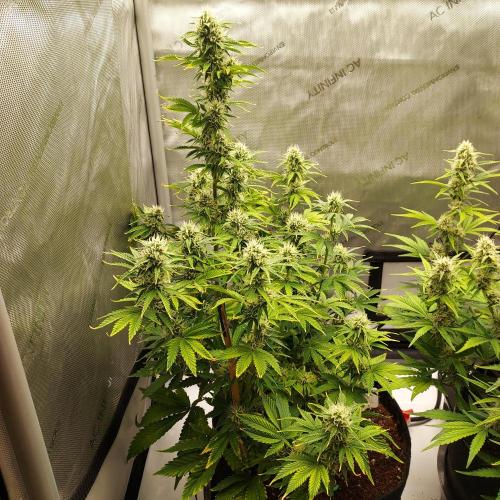
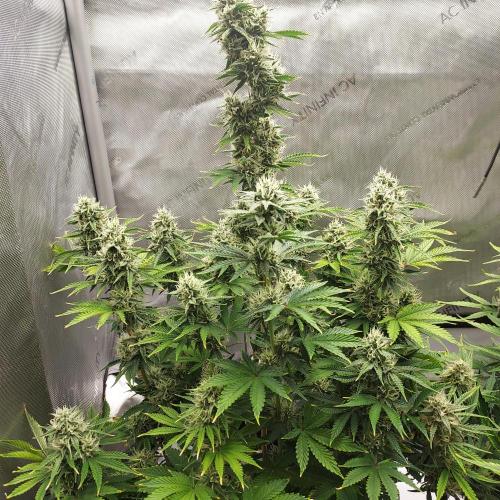
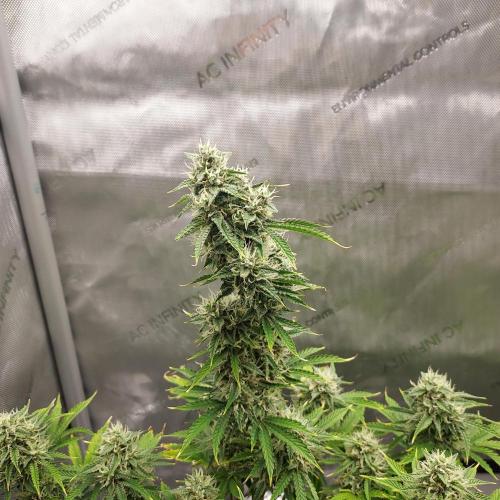
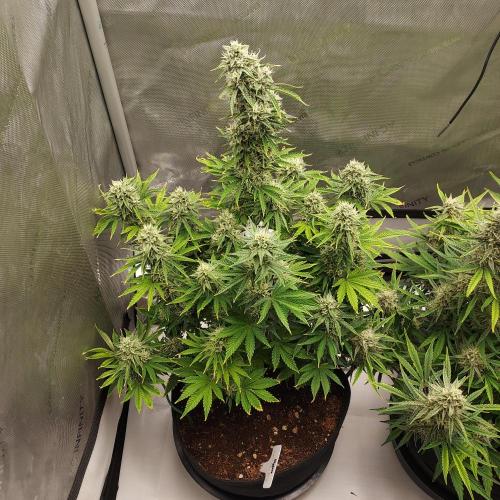
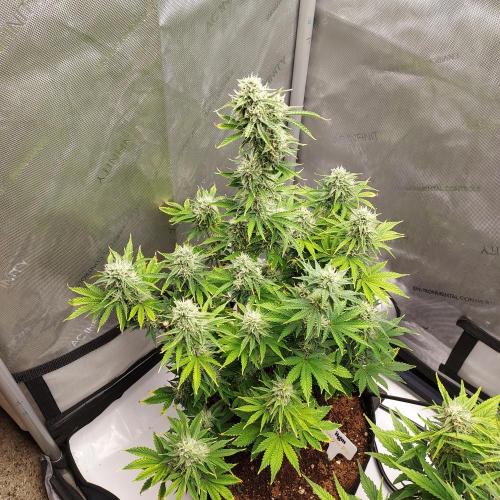
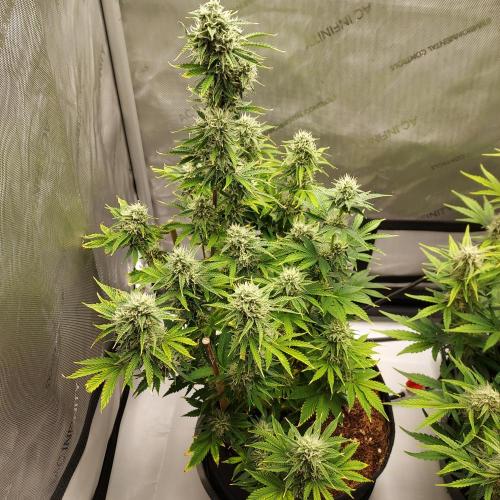
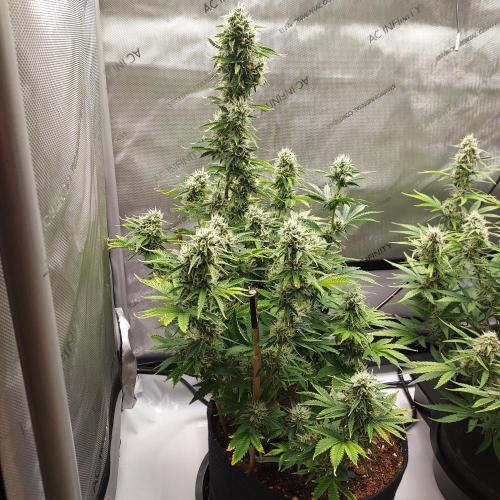
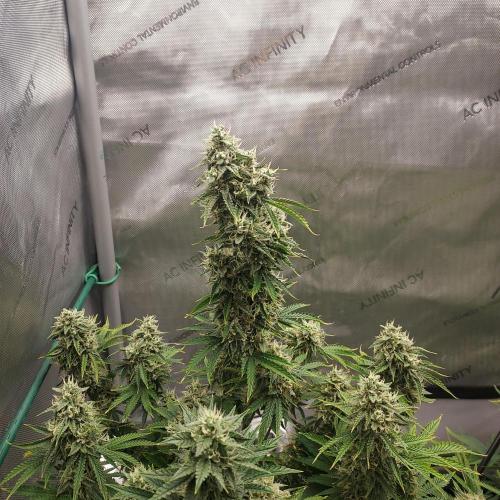
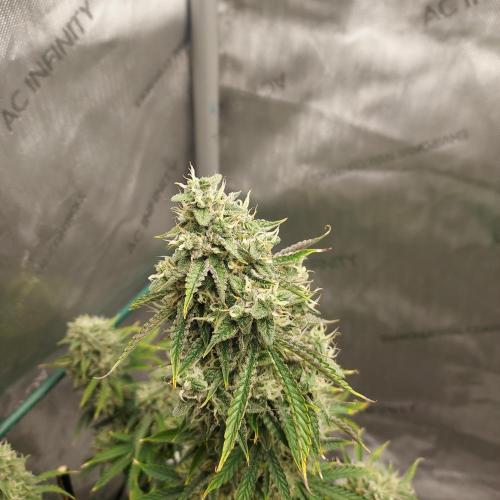
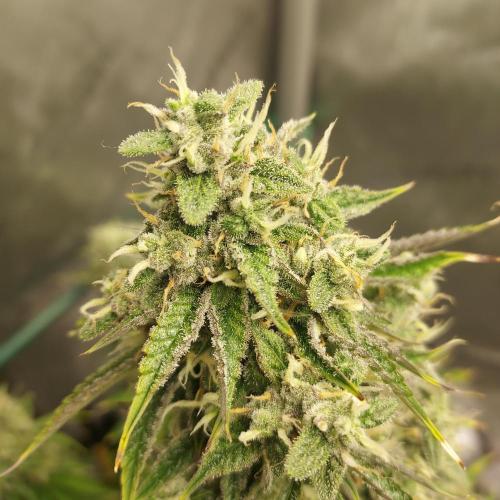
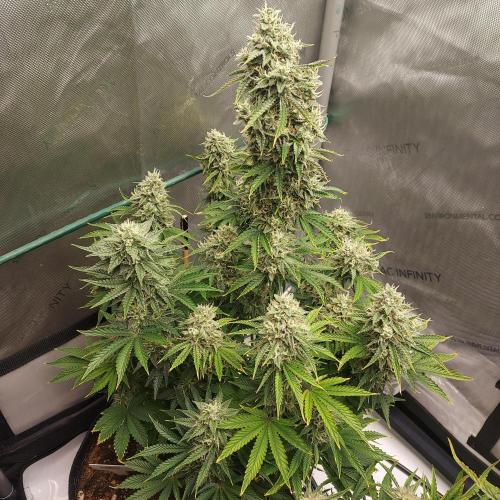
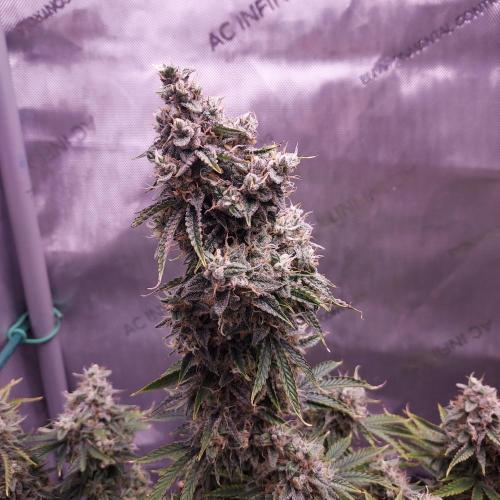
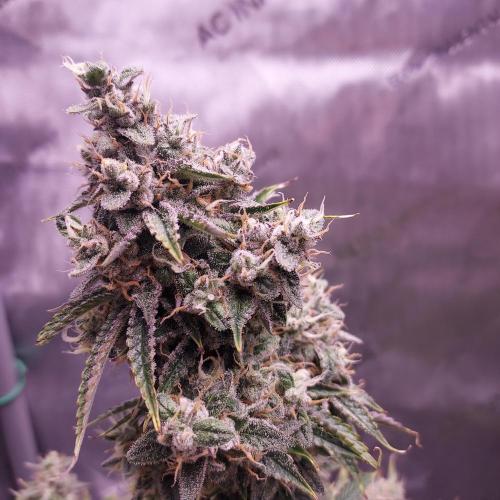
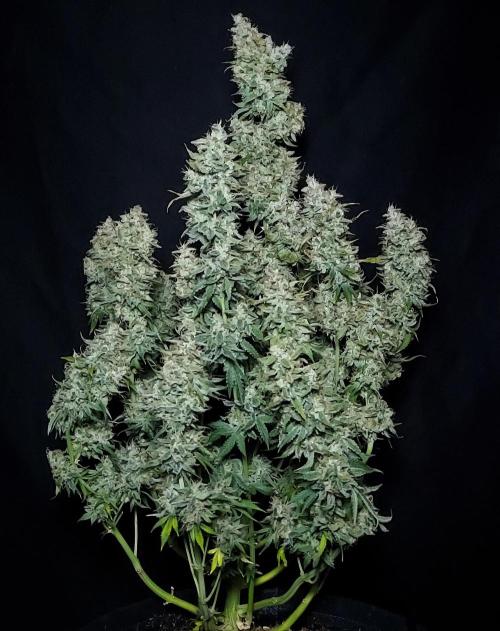
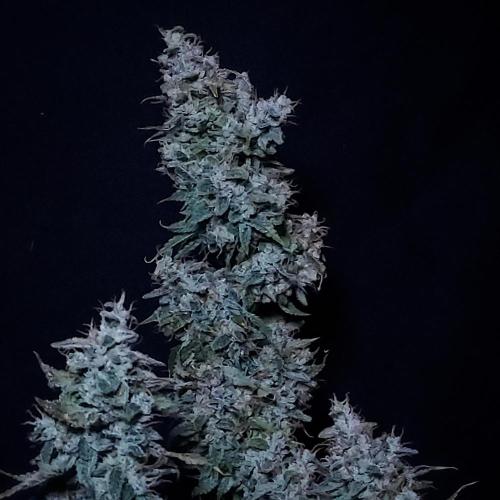
Week 11. Harvest9d ago
Happy Harvest Day!


10/10
Rated
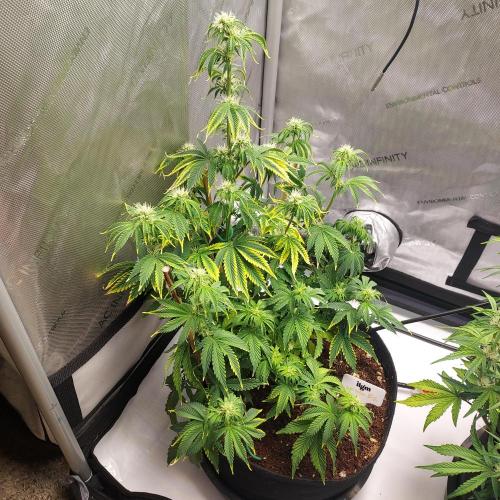
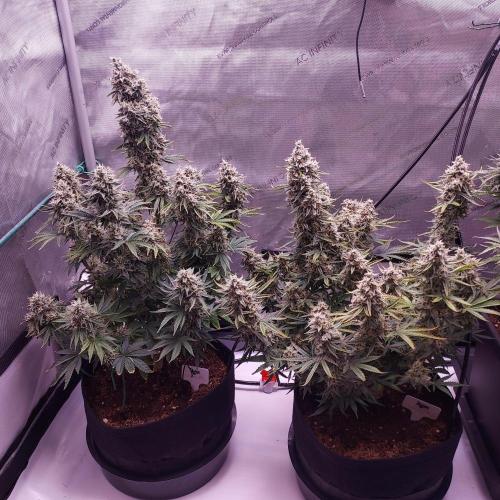
Zkittlez #2 finished incredibly strong once she recovered one a single PH spike in the middle of the grow.
She coasted easily throughout her flowering weeks producing lemony-pine terpene profile fragrance with a classic deep hash smell when trimming. She yielded exactly what I had hoped for, 3 oz (85 g) for a 3.9 gallon autopot in a 2 x 4 tent, and was a very easily and tolerant plant to experiment with as I continued to hone my autopot experience.
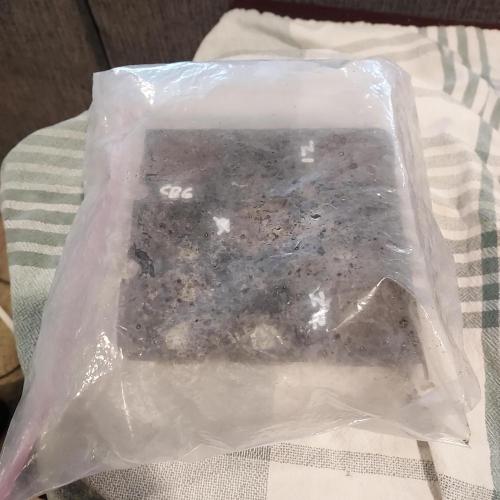
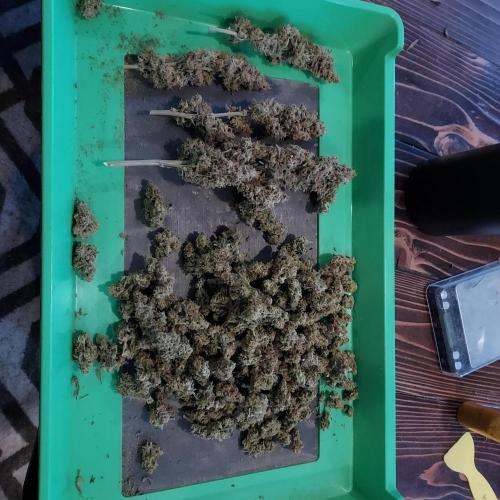
I whole plant dried her over 10 days in 65 degrees at 60% humidity and she is curing in a sweet decades bag. I got a nice vial of dry sift kief that I will cure for three months as well, and I might try to do some hash balls from this batch, as I am drowning in the kief a bit now. I use the Common Culture Tray when trimming to catch everything, and when I am done, I run my hands through the trim to sift out and break the trichomes through the screen. It's absolutely wonderful!
Zkittlez Auto from ILGM was a great experience this round, definite recommend!
Show more
Translate
Spent 72 days
Ger Veg Flo Har
85 g
Bud dry weight per plant
1
Plants
Easy
Difficulty
Height
Day air temperature
Air humidity
PPM
PH
Light schedule
Pot size
Lamp distance

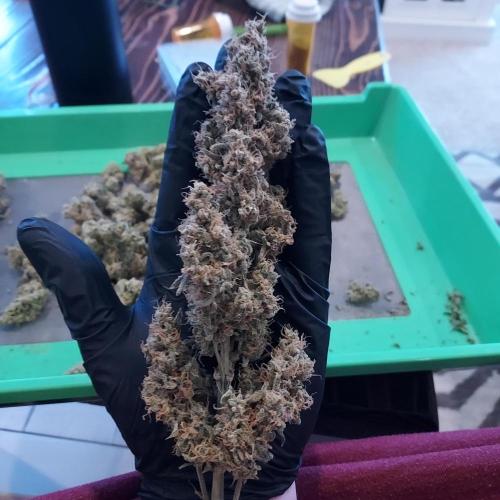
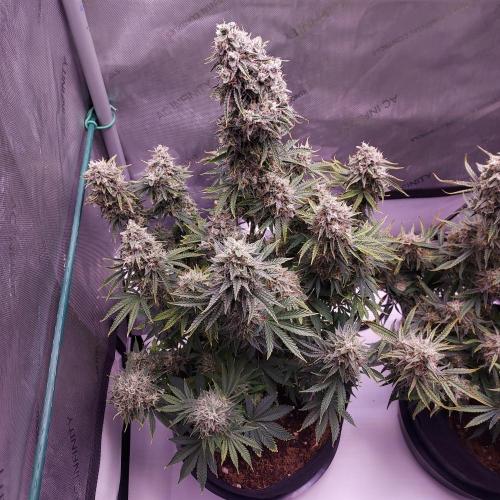
Aeromatics She was cut down officially on day 76, with her being pulled on day 75 into a dark tent for 24 hours. I trimmed her down a bit before taking her pre-cut pictures.
The two sisters did amazing in the 2 x 4 and I will surely grow again!
13 likes
1 comment
Share
Equipment Reviews


the end.
Enjoying this diary? Follow for more updates!


Prefer the old Diary view?
Go back to the old Diary view