The Grow Awards 2026 🏆 


Likes
Comments
Share
@BLAZED
Follow
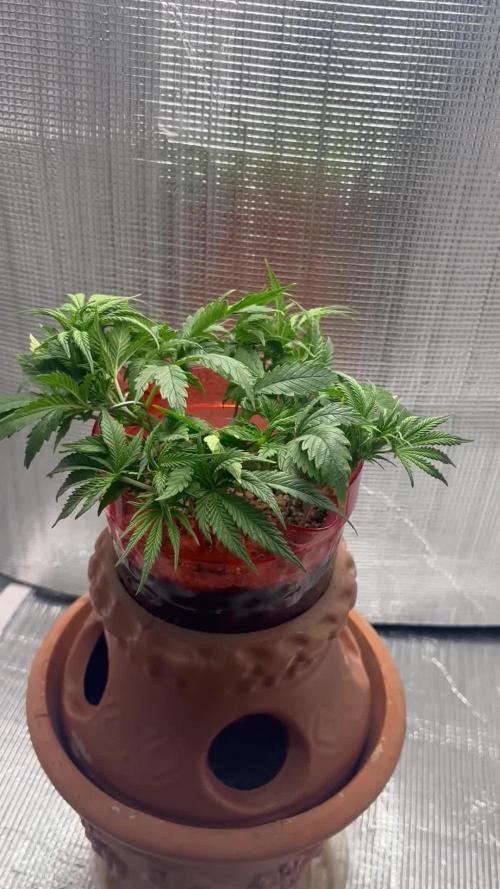
Week 16 (Harvest)
1-2 Drying day 1
Temperature: 24.5 to 19.5 degrees
Humidity: 65% to 50%
The girls are ready to be harvested!
Before chopping them down, i took a lot of pictures.
I was able to remove most of the soil from the Biscotti #2 to see the rootball.
I hang the plants as a whole to have a slow dry.
The exhaust fan is on setting 4.
2-2 Drying day 2
Temperature: 19.1 to 17.5 degrees
Humidity: 62% to 57%
I changed the exhaust fan to setting 2 because setting 4 was a bit high in my opinion.
3-2 Drying day 3
Temperature: 19.9 to 18 degrees
Humidity: 62% to 59%
Today i checked up on the drying plants, and i see there are some buds touching other buds, so i chopped the plants in half.
The buds are still to the main stem for a slow dry, but are hanging more spreaded out to prevent any budrot issues.
I changed the exhaust fan to setting 1, as someone told me that it was enough air movement for drying.
4-2 Drying day 4
Temperature: 19.8 to 18.5 degrees
Humidity: 62% to 59%
5-2 Drying day 5
Temperature: 19.9 to 18.8 degrees
Humidity: 62% to 59%
Today i checked on the drying plants and the buds are shrinking a bit, they are getting a little bit crispy on the outside aswell,
I hope they wont dry as fast, and i aim for a 12/14 day dry.
For the next grow i already germinated 2x Chemdog (GreenHouseSeeds) 2x Gorilla Kush (GanjaFarmerSeeds) and 1x Deep Candy CBD (GreenHouseSeeds)
And I have some upgrades planned aswell!
I bought a autopot kit with 4 15L pots, this way the plants will have water and air 24/7 whenever they need it. I have seen alot of great results using autopots so i am very exited to try it out!
And I bought a small camera so i can shoot some weekly timelapses!
Feel free to Follow me if you like to get notified for the upcoming diaries!
Thanks for checking out this diary, peace!
(More harvest updates coming in the next couple of days!)
Huge thank you to Zamnesia for the seeds, and Plagron for the collection of nutrients, and the opportunity to participate in the POWERBUDS contest!
It was a fun and learningful adventure!

Likes
1
Share
@Aleks555
Follow
4th week of vegetation
The fourth week of vegetation has started, and we are preparing to switch the light cycle to 12/12 for flowering. So far, everything is going great—Xpert Nutrients fertilizers have started showing fantastic results, and our lady is looking wonderful. A huge thank you to Xpert Nutrients for the amazing fertilizers and continuous support! We’re confident that great results are ahead.
Likes
11
Share
@toxikexotic
Follow
after not being happy on how it was on week 13, i decided to push it this far. I'm more satisfied than i was, but I remain disappointed in apera instruments for screwing me over on IP67 warranty promise. They said after this replacement they wont do it again. total bs.


Likes
4
Share
@KyGrow42
Follow
The experiment is going good in my opinion she’s stretching out a bit and got about four or five nodes on each of her main branches I moved her in her own tent cause she is going to be to wide in there with my other chicks I got her under a viper spectra 100 watt light in the other tent she wasn’t getting the light she needed cause she was pushed off to the side but she’s good now got her own and should really take off now I’m excited to see how it goes until next time happy growing peace I trimmed a lil bit and took some pipe cleaners and tied the four branches down she trying to grow outwards just need a lil direction and her other nodes tied down so far so good if you shop fast buds use my discount code #kygrow get a 15% discount on the whole store and it’ll help me out too peace

Likes
15
Share
@MrJones
Follow
Mr. Jones Fast Buds Moby Dick
´🌿⊱╮🌿╰⊰🌿 WEEKLY GOALS 🌿╰⊰´🌿╰⊰´🌿
🏡Indoor - 3"x4"x8" Custom Built Grow Closet
🌾This strain likes to stretch, so a heavy training regiment will be needed.
🗓️Germenation - Soaking in Water Strait into Amended Soil.
⚱️3-Gallon Pots 📊6.4 / 6.8 PH
💧 Feeding - Gaia Green Grow / Bloom
🕷️ IPM - We will be using Green Cleaner" 1 OZ per Gallon, and CannControl from Mammoth alternating between products each month for Integrated Pest Management.
🌿╰⊰´🌿╰⊰´🌿 PLANT UPDATES 🌿╰⊰´🌿╰⊰´🌿
🗓️Saturday 10/14/23 - Saturday 10.21.23 Removed the humidity domes today, the humidity in the closet is sitting above 75% pushing 80% RH and will be misting for a few more days, the pushed down just enough to keep the plants engaged, for the next week will maintain the 24h light cycle, then reduce to 20 for week 2 and 18 for week 3 for the rest of the grow.
🗓️Wednesday 10.25.23 - These ladies are doing well, just starting to grow, going to move the light cycle from 20/4 to 18/6 on Saturday.
╰⊰´🌿 ╰⊰´🌿 ╰⊰´🌿 ╰⊰´🌿 ╰⊰´🌿 ╰⊰´🌿 ╰⊰´🌿
📝 Notes - Original Moby Dick Auto is a world-renowned Sativa-dominant giant created from two of the most popular strains ever, the White Widow and Haze cannabis strains which are known for the huge delicious aroma, huge size and yields; It’s an extremely easy-to-grow variety highly recommended for growers of all levels seeking for maximum yields with minimum effort as this strain grows up to 150cm and yields up to 650 g/m2 in 10 weeks without extra maintenance. Thanks to its 23% THC, this marvelous hybrid is all about happiness as it will melt your worries away while boosting your mood, leaving you with a big fat smile on your face and ready to get things done as soon as you take the first hit, making it an excellent choice for social scenarios and busy workdays. The Sativa effect comes hand-in-hand with a mix of lemony, piney, and woody terpenes that translate into that classic aroma every stoner loves.
╰⊰´🌿 ╰⊰´🌿 ╰⊰´🌿 ╰⊰´🌿 ╰⊰´🌿 ╰⊰´🌿 ╰⊰´🌿
Processing
Likes
14
Share
@Fre_84
Follow
Northern: 12/13 cm. Grow very fine!
Fat banana: 7/8 cm! Come on Babies!
Light: 40 cm - Veg Mode

Likes
48
Share
@Theia
Follow
Not much to say this week. Back on trak with feeding,colour is coming back and flowers are filling up. Chiba 1 flowers are huge domes,really round and fat. I hope they just grow up and out some more. Number 2 is also pushing some great flower with 2 main colas and loads of little node growth underneath, also 2 clones are well into flower and are doing great, Love this plant. Feeding is up to 1.7 every other feed is nutes and water inbetween.
Thanks for looking.
Stay safe and happy growing.


Likes
24
Share
@Jays_Not_Here_Man
Follow
The Apple Betty babies are doing great 😊 I’m very pleased with the results so far, I just wished I would have known they would have such a large stretch, they D almost doubled in size in 14 days.
At day 8 I stopped tucking the branches and allowed them to grow up. In hindsight, I probably should have kept going for another couple of days. They continued to stretch rapidly all the way up to date 12 or so, much more than my other strain that I have going as well.
At day 10 I cleaned up some of the small bud sites and leaves that were below the 1st trellis. These sites do not get enough light to make anything good, and take away energy from the main tops as they grow and compete. A quick snip here and there will really help the end result.
At day 13 I decided to add a second trellis net to provide support to the tops that came up so fast. They seem to have stopped their main stretch faze, and are looking happy and healthy now. I’ve continued my water, water, feed schedule and have not seen any cause for concern. The girls are taking a little over a gallon of water every 72 hours at this point.
Humidity is being controlled automatically with my in-line fan and humidifier. RH is set to 57% and temps hover between 77-80 degrees with lights on, and about 70-72 with light off thanks to my furnace being back on for the cooler temps.
The 2x4 5 gallon girl is doing great as well. 😊During the stretch, she flourished just as the girls in my big tent did as well. She is going to have some great bud, the branch structure is nicely developed with tight node spacing and large tops.
I’ve been plucking off all the lower growth, and tucking leaves as they block bud sites. I will be doing a defoliation next week. Happy Gardening 🇨🇦👊❤️

Likes
18
Share
@Sti_Cazz
Follow
More defoliation and nutes this week, they are seriously getting hungry now! I ordered a new 30cm honeywell ground fan and dehumidifier to quickly solve the RH issues, I don't want to risk mold or other surprises.

Likes
27
Share
@Ganjagrandaddy
Follow
Hi Growmies
Another week of flowering behind us and 3 weeks to the finish post and fruity highs
They have all been productive in the flowering this week with plenty of nice fluffy pistils springing up daily now. They are also producing a very sweet smell when I open the tent too. A nice fruity terp indeed. They have been performing excellent from seed and with no concerns at all for their genetics, it is all about what the new additions to my feeding schedule can do. So far the results do seem to support the flower production claim with lots of fresh sites throughout the canopy, thankfully they have also not created wide spacing between the flower sets either so could hopefully become long chunky colas.
Using the viparspectra and it's great specs for just the 3 plants has also been a new thing for me to try instead of the crammed in 6 plants. No issues to report around bugs or deficiency still and with the dehumidifier on the case , hopefully no mould spores will show up either.
Until next time , be lucky and keep it green
Likes
7
Share
@Zuppler
Follow
Week 10 - Fifth Week of Flower
The Donutz tent is stepping into its fifth week of flower with some exciting developments and a few surprises. The plants are thriving, and the vibes remain immaculate as the grow progresses.
Key Updates:
Purple Phenos: 3-4 of the plants are starting to show stunning purple hues in their buds and sugar leaves. The color shift adds a beautiful contrast to the tent and hints at the unique expressions within the Donutz genetics.
Different Phenotypes: While most of the plants are stacking up nicely, 1-2 phenos are a bit on the thinner side with less bud density. It’s a reminder of the natural variability in genetics, but there’s still time for them to fill out in the coming weeks.
Environment & Care:
Stable Conditions: Temperature, watering (reverse osmosis), and overall care are dialed in perfectly. The plants are enjoying a consistent, stress-free environment with plenty of love.
Healthy Growth: The rest of the tent is looking strong, with vibrant buds and trichome development continuing to ramp up.
Observations:
The purple phenos are a standout feature this week, bringing extra visual appeal to the tent.
Even the thinner phenos are showing healthy structure and potential to develop further before harvest.
Trichome production is increasing, and the tent is starting to radiate that sweet, sticky aroma.
Next Steps:
Continue monitoring the thinner phenos to ensure they’re getting enough light and nutrients.
Maintain stable environmental conditions and nutrient levels to support bud development.
Keep a close eye on trichomes as they mature, watching for any signs of ripening as the grow approaches the final stretch.
The Donutz are flourishing, and the tent is alive with color, aroma, and promise. The Florida Gang grind is paying off big time — the finish line is in sight!

Likes
332
Share
@OrganicNature420
Follow
Germination date 🌰 10/03/2021
Day 85 🌱 08/06/2021
Strain 🍁
Purple Matcha, Humboldt seed bank
Nutrients 💉
Advanced nutrients
PH perfect sensi grow A+B (veg)
PH perfect sensi bloom A+B (flower)
B-52 (through veg until week2 of flower)
Voodoo juice (🖕🏻)
Tarantula (🖕🏻)
Piranha (🖕🏻)
Sensizym (all the way through)
Rhino skin (🖕🏻) add first leave for an hour
Big bud coco (week2+ of flower
Bud xfactor (🖕🏻)
Nirvana (🖕🏻)
Bud igniter (first 2weeks of flower)
Overdrive (last 2weeks of flower)
Flawless finish (flush week)
RockHoldings Rockresinator(week2+ of flower)
Vitalink calmag
Set Up
⛺ amazon special 1.2m x1.2m
💡 spiderfarmer sf4000
📤📥 AC infinity 6inch
💧 10lt dehumidifier
Notes🗒️✏️
So nutrients now done that was the last week. Now on to flush to finish this beauty off. Will use Flawless finish by advanced nutrients for 5 days and then stick her in a dark cupboard for 48hrs. Stressing over curing temps, I'm no way going to get the 11c I want to cure this at so trying to think outside the box without having to fork out £350 for a decent ac unit. At this rate its going to to be 20c + and that's only going to ruin it. Time to make a couple of phone calls. Thanks for all the love ❤️
Stay turned and happy growing fam ❤️🍁🌱👍🏻


Processing
Likes
13
Share
@ImagiNathan
Follow
Transplanted Tabitha to a 5 gallon root pouch today. Going to keep bushing her out, as my flower tent is full of flowering Bubblegum. Might get interesting soon with space but we shall see. She’s doing great, very leggy and I decided not to do any more training as of now, just going to keep fortifying with silica and will lollipop this time near flower.
Likes
15
Share
@Viccrazyweed
Follow
Hello guys!! Trip is closely going to end and it was the first and by the time the best trip of my life, cannaculture its amazing
Next step: chop
19 February;
Last weekend i added just the “bloom plantastic” wich is organic and only sugars, this week ladys haven’t seen a drop of water, im gonna pour clean could water on the soil 2/3 hours before harvesting to calm the thirst and make the buds go heavier
I have been reducing photoperiod this week, 15 minutes every 2 days, rn 11/13 hours, winter is coming and im just letting her now she has to be quick and use the last single drop of food
It seems like the critical its on point, looks like in her peak of THC, haven’t seen orange trichomes, just milky ones but 90% of pistils are orange so i think im gonna chop her tonight, at 4:20 😜
Probably ill let the cookies a few days to mature correctly but im afraid if i wait longer for the critical i could regret it
What do you think about? Was this diary a good experience to follow?
Personally i enjoyed it to the maximum and thank you everyone that has come with me through this


Likes
11
Share
@Sauce_XL
Follow
3.9.2024: Start of week 8. Day 50 from seed, 46 from sprout. Nothing doing today, plant is healthy and getting fatter by the day. Plucked a few leaves but thats it.
3.10.2024: Day 51. Fed 1/4 strength fox farm trio mixed w/ calmag into over a gal of 6.5ph water. Gave roughly 3 liters of the solution. Runoff ppm is finally under 1000. Might increase nutes to 1/2 strength moving forward. I'm no pro when it comes to taking pictures so its hard for me to get clear, detailed shots of the nugs.
3.11.2024: Day 52, 48 from sprout. Moving along nicely. Some nice purple hues here and there. Still very "hairy."
3.12.2024: Day 53. Fed 1/4 strength, roughly 96oz at 6.4ph. I broke the feed/water/feed schedule and fed twice in a row. Also did some lite defoliation on the bottom fan leaves that weren't getting light.
3.13.2024: Day 54 from seed. Plant is doing its thing.
3.14.2024: Day 55. Fed again at 1/4 strength, 96oz at 6.6ph. Runoff ppm was 880.
3.15.2024: Day 56 from seed, 52 from sprout.
Likes
10
Share
@Roscio99
Follow
hello beautiful ones, they managed to enter flowering!! everything is going smoothly apart from a few insects... I think it's normal when you do them outdoors. They have been flowering for a week and continue to grow every day! DAJE ROMA DAJE


