The Grow Awards 2026 🏆 


Likes
Comments
Share
@tschw1
Follow
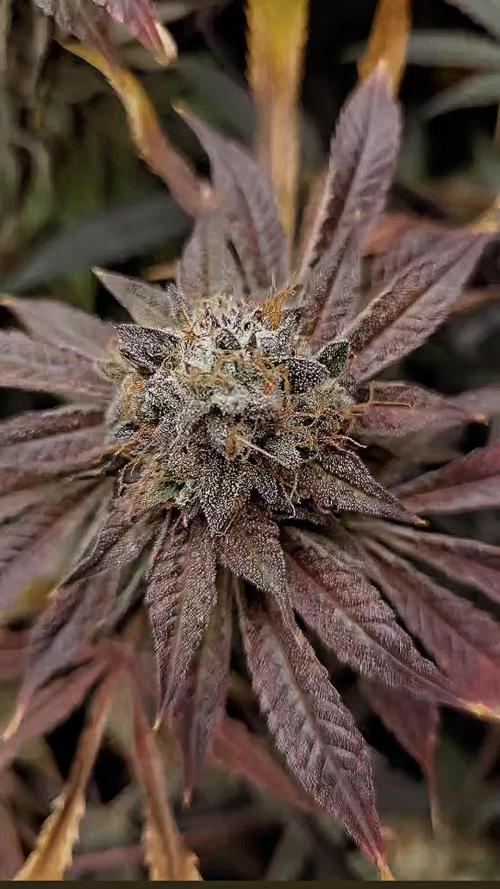
In this week i removed a few big leaves to ensure the light exposure for the blossom.
They look a bit naked now but they can focus the energy in the buds now and I‘m looking forward to harvest them in the next few weeks.

Likes
55
Share
@BodyByVio
Follow
Just got done with trimming the 4x4 @greenhouseseedco Super Silver Haze / @blimburnseeds Silver Surfer Haze tent.
The final yield is exactly 1000g plus some (kind of a lot)that I smoke in the last 2 weeks 😃
Also got 6, gallon size ziploc bags filled with good quality trim for concentrate.
To be honest I was expecting a little more but keeping in mind that this grow I did not supplemented with bottled CO2 I think I’m good with the results.
Definitely I enjoyed a lot this grow and I’ve learned even more.

Likes
15
Share
@Lukeskywalker
Follow
Ufff... Fortunately finish...
😄 Starting a new Breedbros project, see ya soon

Likes
51
Share
@Dunk_Junk
Follow
23cm vertical growth this week. Over doubled her height and got a lot more bushy too.
I think she's going to be a fab plant!


Likes
25
Share
@eldruida_lamota
Follow
Vamos familia, actualizamos estas Runtz de Seedstockers, séptima semana de floración.
Tienen un porte y un color espectacular, se ve que están completamente sanas, hasta el momento genial.
La humedad está en su punto, y la temperatura al final lo solucionamos ya está estable en 24/25 grados.
Empiezan a oler ya que alimenta, tienen toques muy dulces y el aroma ya es bastante fuerte.
Esta semana seguimos con el explotacogollos de Agrobeta, que harán que las flores acaben de reventar.
Vemos como progresan esta próxima semana.
A partir de ya los riegos va a ir solo Agua controlando Ph y ya empieza la recta final.
Mars hydro:
Code discount: EL420
https://www.mars-hydro.com/
Agrobeta:
https://www.agrobeta.com/agrobetatiendaonline/36-abonos-canamo
Hasta aquí todo, Buenos humos 💨💨💨

Likes
17
Share

Likes
7
Share
@CanadianFillmore
Follow
Heavy dense buds, covered in sticky frosty trichomes. Candy Kush is a true joy to watch grow and I think she'll be sticky around in my garden for a while.
Will update in 6-7 days with the dry weight and smoke report.

Processing
Likes
1
Share


Likes
32
Share
@Ts1Ko
Follow
Everything is going as intended 😁 She is growing her buds and making new ones 💚 no signs of any kind of dis balance ✌️ I gave out other plant because of hermaphroditism 🤷♂️

Likes
4
Share
@LittleBigTrees
Follow
I've been pulling the top fan leaves to stop the main stem growing any taller and repotted them into 4L pots, once they show roots I'll flip them over to flower.
They've all outgrown their mutations but the apple fritter has a slight varigation.

Likes
12
Share
@2SeedsToParadise
Follow
LFG!!
First week of flower and the auto kicked in. We've been at 24HR ON since seedling 🌱 and boom💥 during week 6 flower coming in @Fast_Buds genetics kicking in
Letzgetit
Likes
11
Share
@Hydro_sweetness
Follow
Welcome back in the 8th week of flowering with Dutch Passion’s Colorado Cookies.
She is ripening good, buds are rock solid and covered in trichomes, such a beauty. The smell is exactly what I hoped for, the Cookies characteristic as we all know from the GSC.
Last Sunday I gave her the last bits of nutrients, so this week is flushing till Sunday, Sunday will be harvest day!!
I noticed that this one Colorado Cookies less to almost non purple than the rest, since most of the GSC genetics do have purple in them. But it doesn’t matter im happy with how the buds look and smell.
Cant wait to have a taste!
After this one is cut down ill put the other 2 cookies straight in the flower room for at least 1 week maby 2 depends on how well they will perform in there.
My next grow will take place first or second week of December, in the meantime I will chooce a new strain to grow and prepare the next grow. This time I will perfom my first real ScrOG and combine it with the airdome underneath my pot (they say you can improves your yield by 20-30%). So it got my attention and im very curious about the results.
That’s it for now see you all back on Sunday harvest day!!

Likes
29
Share
@MadeInGermany
Follow
Info:
Unfortunately, I had to find out that my account is used for fake pages in social media.
I am only active here on growdiaries.
I am not on facebook instagram twitter etc All accounts except this one are fake.
Hi everyone :-)
This week it has developed really well again :-).
I didn't train her this week, I'll do it again next week :-).
It was poured twice this week with 1.2 l each time (see nutrient table above for adding nutrients).
I sprayed them all with GreenBuzzLiquida Fast Plant spray.
I also cleaned the entire tent and checked everyone's health.
Fresh osmosis water was prepared and filled into canisters.
Yellow boards against flies have been put up and blue tags to prevent trips.
Unfortunately I still struggle with them but they have become significantly less pushed.
I think in a few weeks the last story should be :-).
Otherwise, like every day, they were looked at and petted for a while ;-).
I wish you lots of fun and stay healthy 🙏🏻
You can buy this Nutrients at :
https://greenbuzzliquids.com/en/shop/
With the discount code: Made_in_Germany you get a discount of 15% on all products from an order value of 100 euros.
You can buy this Strain at :
https://www.amsterdamgenetics.com/product/kosher-tangie-kush/
Type:
Kosher Tangie Kush
☝️🏼
Genetics:
Kosher Kush
X
Tangie
👍
Vega lamp:
2 x Todogrow Led
Quantum Board 100 W
💡
Bloom Lamp :
2 x Todogrow Led
Cxb 3590 COB 3500 K 205W
💡💡☝️🏼
Soil :
Canna Coco Professional +
Nutrients :
Green Buzz Liquids :
Organic Grow Liquid
Organic Bloom Liquid
Organic more PK
More Roots
Fast Buds
Humic Acid Plus
Growzyme Big Fruits
Clean Fruits
Cal / Mag
Organic Ph - Pulver
☝️🏼🌱
Water: Osmosis water mixed with normal water (24 hours stale that the chlorine evaporates) to 0.2 EC. Add Cal / Mag to 0.4 Ec Ph with Organic Ph - to 5.8

Likes
4
Share
@ganjaman24
Follow
Just giving these lil ladies pure h20 sunshine and a lil love for now..they’re going into 3 gal once they fill up current pot n then 5 maybe 7 but 5 is final for sure.

Likes
56
Share
@MrGrow
Follow
10.11.2022
130 giorni dopo la germinazione
70 giorni di fioritura (10 settimane intere)
è stato un piacere poter coltivare questa genetica! I geni della Green House Seeds hanno creato un capolavoro! Genetica all'altezza della sua fama, produttività elevata, profumo di limone e agrumi favoloso e unico! mai sentito un aroma del genere in nessuna genetica che ho potuto coltivare in questi anni.
Ragazzi provatela e non ve pentirete!!
Rapporto sul fumo e sul peso con foto dettagliate tra un paio di settimane


Likes
2
Share


Likes
18
Share
@maneaura
Follow
I came back from vacay. Im harvesting the amensia haze next week!! i’m really excited! i wonder if the painkiller will make it tho. spider mites and thrips somehow got to the plant even though it was inside. and all the pests collectively decided to leave the amnesia alone? Also got new seeds! only paid for 3 lol


Likes
9
Share
@MuzzFuzz
Follow
Running out of space with the GSC 1 of the GSC is looking great with some really nice flowers coming along the other 2 seem to have a-lot less bulk in the flowers and seem to be stretching a fair amount. I have had to do some super cropping to keep the top of the flowers from getting too close to the light. Had a problem with the nutrient tank filter getting clogged and al, the auto pots drying out! One of the plants had started to wilt. Ended up taking the reservoir out and cleaning it before adding fresh nutes. Have been using professors gold terpintine for flower but have had this problem before the additive ends up causing build up of growth in the tank and this build up blocks the hoses. For now have stopped using and just using:
GT FLOWER FOR COCO A & B
GT FLUVAIC ACID
GT CAL MAG
GT POTASSIUM ADDITIVE
PPM at around 600 down from 800 as I was getting a bit of tip burn on the shade leaves.
Not really happy with how a couple of the plants are progressing, the buds seem way undersized for week 5 but will carry on

