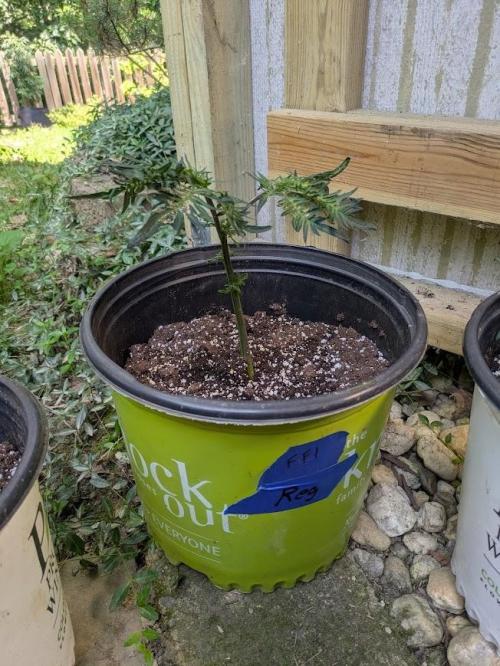
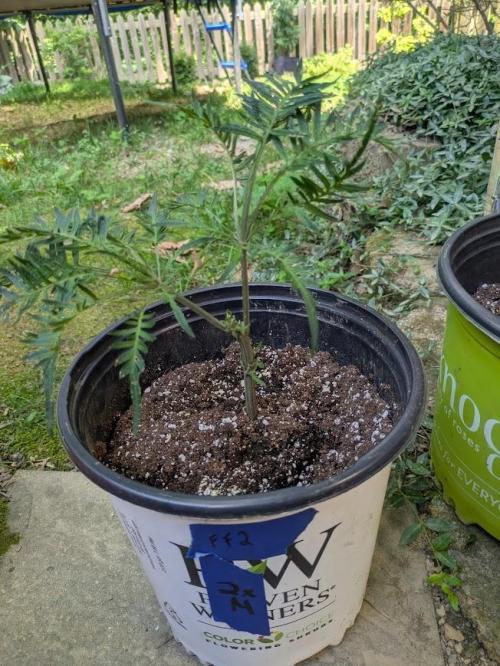
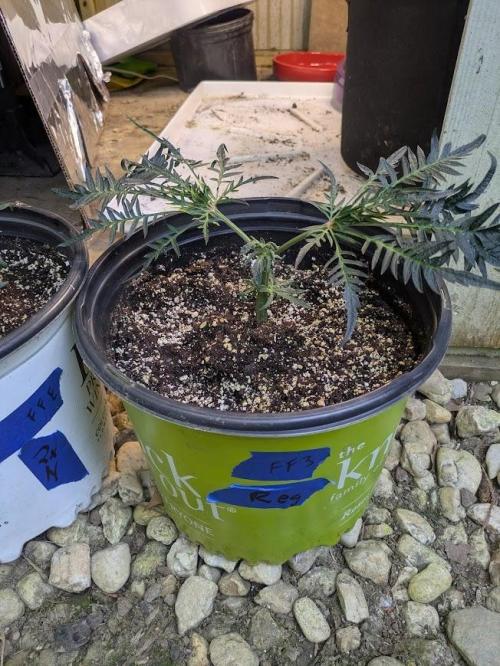
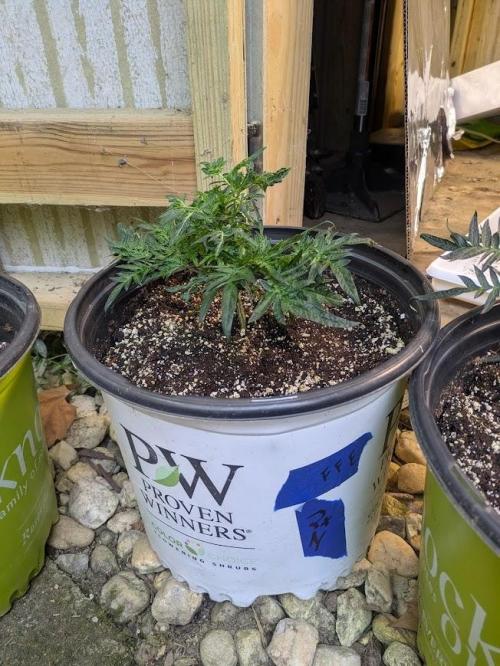
BC_Green I can't even begin to tell you how excited I am to grow Fruity Freak by Hi-Elevation Genetics (https://www.hielevationgenetics.com/). After several home grows, I searched for unique strains known to perform the best outdoors. That’s when I came across the Freakshow Strain, and my mind was blown.
Shapeshifter (the genius behind these strains) has isolated rare phenotypes that make many of his plants look entirely unlike any other cannabis plant. His incredibly disciplined work to stabilize these strains, including his work outdoors, means these plants will thrive if I can grow them well. And, the description of the Fruity Freak strain is too much to resist: “Fruity Freak is a masterpiece hunted and selected out of 60+ different phenotypes of Supafreak, which is the Pineapple Express backcross. Aptly named for its irresistible, ripe berry aroma, Fruity Freak stands out with its formidable structure and notably denser buds compared to the original Freakshow and Supafreak.” (It also certainly does not hurt they threw in two free OG Fun feminized seeds with my order. They are a cross of Tahoe OG and Good Clean Fun and a strain I have never seen before!)
My plan is an indoor pre-grow (allowing the plants to increase in size for larger yield and greater pest resistance), then finish growing outdoors.
Indoor Phase (January - April)
Soil/nutrients
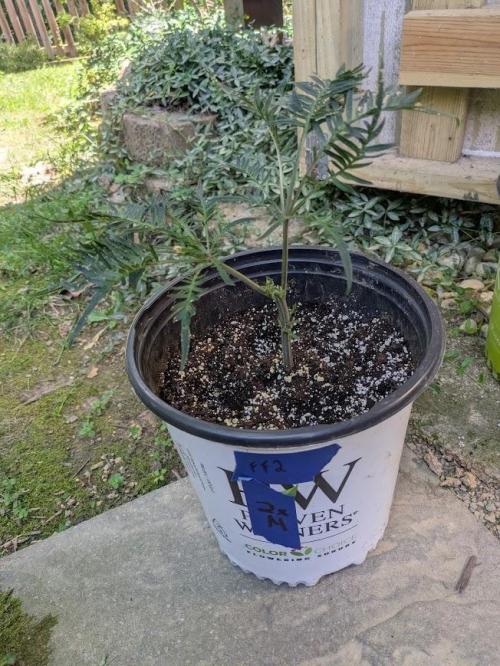
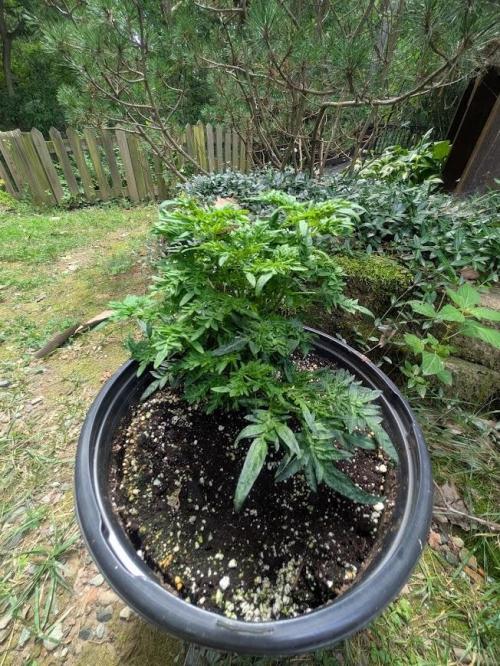
1) Germination - Ziplock bag - damp paper towel
2) Seedling - Covered paint pail liner - native soil blend (⅓ from the area they will be planted with lower quality soil, ⅔ from forest boundary that is high-quality soil, and Dr. Earth’s Alfalfa Meal 2-1-2, Burpee Blood Meal 12-0-0, and Vermibloom 3-10-5 based on my soil test results)
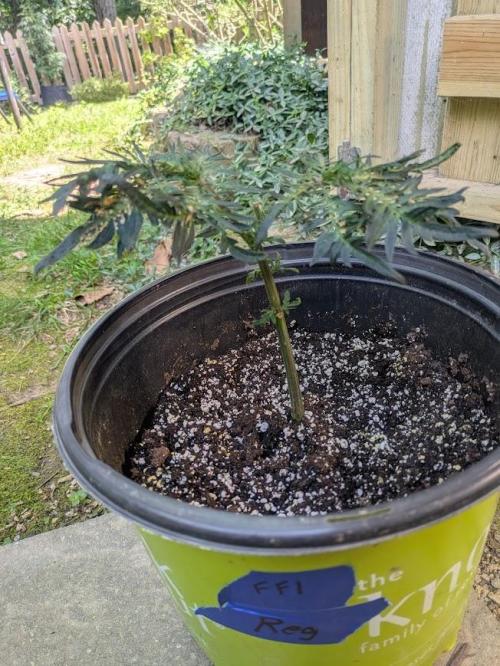
3) Indoor vegetative - 10 gal fabric pot - the same ratio as above
Lighting
1) HLG Rspec 100 18 hours per day
2) Grow will occur near a window
3) Supplement with an off-brand 65w light as necessary
Other
1) Water will be given by hand (monitored by water meter)
2) Pest control - Neem oil or other organic solutions as needed
Transition Phase (April/May)
Soil/nutrients
1) Plants remain in 10 gal fabric pots
Other
1) Water will be given by hand (monitored by water meter)
2) Pest control - Slugs may pose a threat; I will use Sluggo if absolutely necessary. Other issues will be handled with neem oil or other organic solutions.
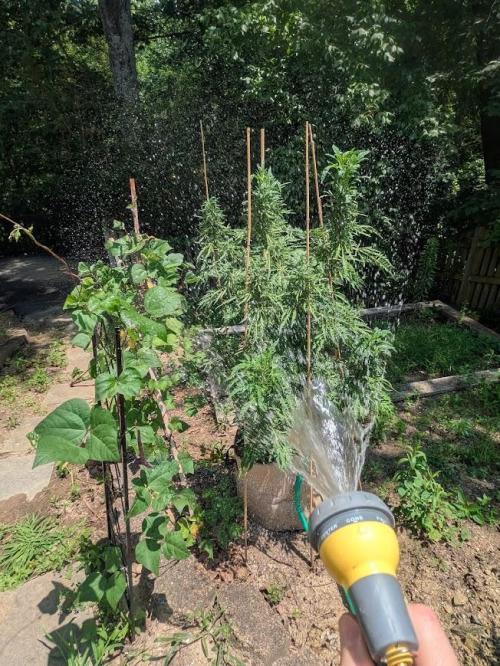
Outdoor Phase (June-October)
Soil/nutrients
1) Plants will be planted into the ground
2) Soil test recommendations were 200 N, 150 P, and 190 K lbs./acre. Therefore, I am applying Dr. Earth’s 2-1-2 alfalfa meal, composted cow manure from a local dairy, Burpee Blood Meal, and Vermibloom 3-10-5
Lighting
1) 8+ hours of direct sunlight daily
Other
1) Water will be on a Wifi timer
2) Pest control - Botrytis will be the greatest concern in Sept/Oct and may necessitate building a basic plastic sheet tent to protect buds from getting too wet. Powdery mildew as well as other funguses are common and will be handled with Neem Oil (I use Neem Oil Max and dilute it) foliar spray and soil drenches. Other pests will be controlled with neem or other organic solutions.
Harvest- Hang whole plants in the garage with a dehumidifier
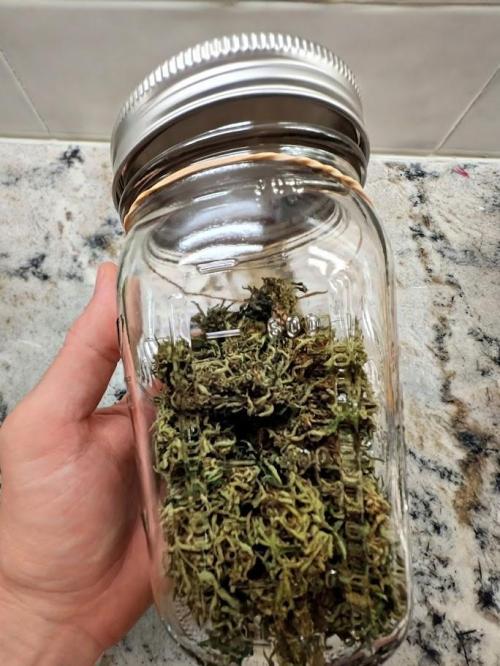
Cure- Mason jars in a dark closet
8 likes
1 comment
Share
Used method
Paper Towel
Germination Method
1
Week 1. Vegetation
1y ago
1/5
5.08 cm
Height
18 hrs
Light Schedule
24 °C
Day Air Temp
6.3
pH
No Smell
Smell
55 %
Air Humidity
18 °C
Night Air Temp
1 liters
Pot Size
60.96 cm
Lamp Distance
BC_Green It is awe-inspiring to watch these ladies pop out of the soil. I know this will sound weird, but sometimes I sit beside them just staring at them–they are such incredible plants.
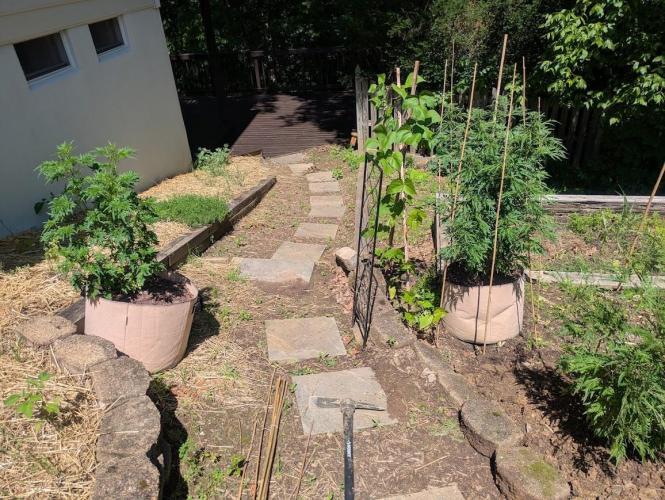
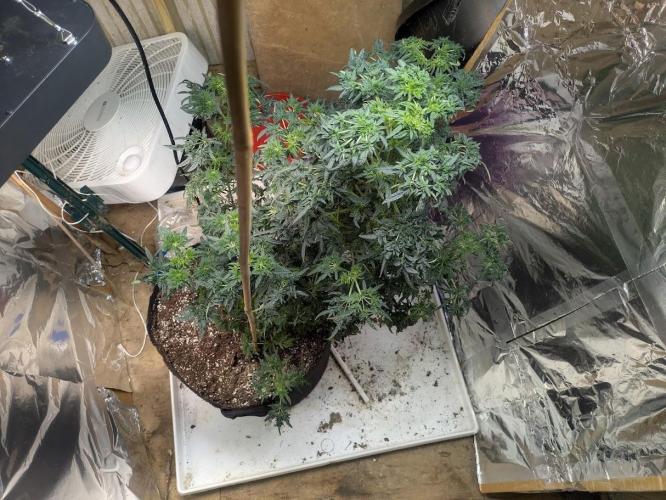
As you can see, my grow setup is fairly humble. The platform is made of 2x4’s, plywood scrap, and a few screws. I placed a plastic washing machine drain pan on top to catch water. The containers are paint bucket liners with a bit of clear packing tape to clamshell them together (allowing me greater control over heat and humidity) and holes poked in the bottom to allow excess water to drain. I have a digital humidity/temperature gauge (which I normally use for curing) taped to the side of one of the containers to monitor conditions. I am growing inside my house to avoid using a space heater to grow in my garage (I will plant them outside long before flowering). The light is an HLG RSPEC 100, and I have it plugged into a WIFI smart socket scheduled to automatically turn on the light at 5:59 am and off at 11:59 pm.
7 likes
comments
Share
2
Week 2. Vegetation
1y ago
1/5
5.08 cm
Height
16 hrs
Light Schedule
24 °C
Day Air Temp
6.3
pH
No Smell
Smell
55 %
Air Humidity
18 °C
Night Air Temp
1 liters
Pot Size
0.03 liters
Watering Volume
60.96 cm
Lamp Distance
BC_Green Another week, and now I am really enjoying Fruit Freak’s unique genetic makeup that causes it to grow such beautiful leaves! It is really fun to grow it side by side with OG Fun, which has a more stereotypical appearance at this stage.
Seed Husk Stuck:
Fruity Freak #1’s leaves had slowly been peaking out of the shell of the seed but ultimately stalled. I decided to intervene using the method described in this link (squeezing tweezers inward enough to slip the ends inside the seed husk then release the tweezers so it pushes the shell open and falls right off):
https://www.growweedeasy.com/my-cannabis-seedling-leaves-are-stuck-together-from-the-seed-shell-what-do-i-do
There is some additional information here:
https://growdiaries.com/journal/common-cannabis-seedling-problems-new-growers-face
I should have intervened sooner (I waited three days, but should have intervened by two at the latest)–her growth was stunted as a result. The rounded cotyledon leaves appear as though there may have been some damage to the cell walls that prevents them from moving in response to the light. However, plant/leaf growth has continued–therefore, I expect her to recover (clearly strong genetics). And, having started growing in January, I have plenty of time to start new seeds if anything goes wrong.
Lighting Update
I noticed the intense 12:00p sunlight (peak intensity) pouring through the window on my plants while the LED grow light was running–probably too much light for a seedling, although the plants were fully upright and the leaves were green and tilting toward the sun.
I knew from my Bannizzle experiments (my last grow) that higher light intensity during vegetation and flowering produced bigger yields. And that notion was reinforced by this study (for flowering): https://pmc.ncbi.nlm.nih.gov/articles/PMC8144505/
But I hadn’t checked to see what light intensity is best at each stage.
I downloaded the Photone app (a well-reviewed grow light meter app) to measure light intensity (in Photosynthetic Photon Flux Density, or PPFD, which is how many photons of light the plant can actually use every second). Then I made a homemade diffuser out of printer paper (per the instructions inside the app) and found that my light intensity (1,000 PPFD with the grow light and sun combined and 765 PPFD with the sun alone) was well above their recommendations for a seedling (100-300 PPFD) as outlined in one of Photone’s well-written article:
https://growlightmeter.com/lighting-requirements-of-cannabis-over-the-full-grow-cycle/
And also discussed here:
https://growdiaries.com/journal/how-to-increase-the-dli-in-the-cannabis-grow-room-for-better-yields
I decided to schedule my grow light to turn off from 10:30a - 12:45p while the plants receive direct sunlight (on cloudy days I override the WIFI socket and run the light during this time). I also decided to change my WIFI socket to shut off the grow light at 9:59p (it turns on at 5:59a) so that total light hours are kept to 16. I think this combination will make for the easiest transition for her to move outdoors. I do recognize that the total DLI from the sun added to the total DLI of the grow light for the remaining hours is a bit higher than recommended, but the plants seem healthy and I don't want to make too many adjustments at once.
I also became curious how much DLI these plants would receive growing outdoors (so I can prepare them for similar DLI before I put them outside). This is a cool tool for that: https://dli.suntrackertech.com/
Finally, I implemented a container rotation schedule and now move the plants one position counterclockwise every day. After four days I will turn all containers ninety degrees. This should promote more even plant growth.
Water
I am watering the plants once a week (my native soil is dense and retains water) using about two tablespoons worth. The plants only get melted snow warmed to room temperature or captured rainwater to keep soil pH and conditions consistent with the outdoors.
Airflow
The tops of the clamshells are now removed. I am running my ceiling fan during daylight hours. I am also using an oscillating fan while the plants receive direct sunlight (I am using a WIFI socket to turn it on and off automatically for me) to help cool the plants and begin strengthening their stems before the transition outdoors. Two interesting articles on the subject:
https://growdiaries.com/journal/ventilation-in-the-cannabis-grow-room-a-detailed-guide
https://www.cannabissciencetech.com/view/providing-sufficient-airflow-for-plant-growth-environments
6 likes
comments
Share
3
Week 3. Vegetation
1y ago
1/15
7.62 cm
Height
16 hrs
Light Schedule
24 °C
Day Air Temp
6.3
pH
No Smell
Smell
50 %
Air Humidity
18 °C
Night Air Temp
1 liters
Pot Size
0.02 liters
Watering Volume
55.88 cm
Lamp Distance
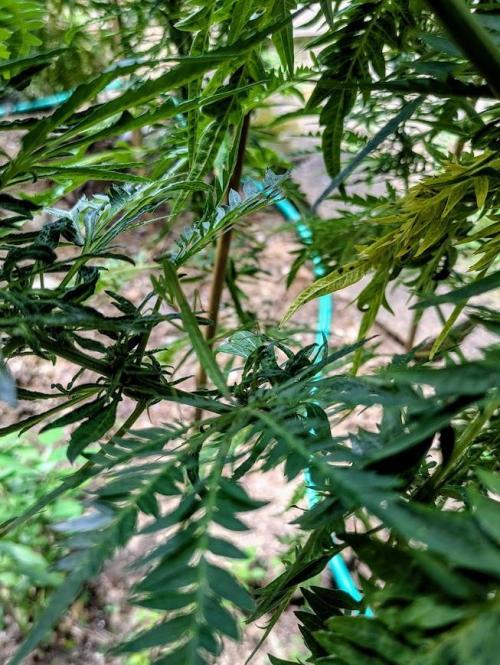
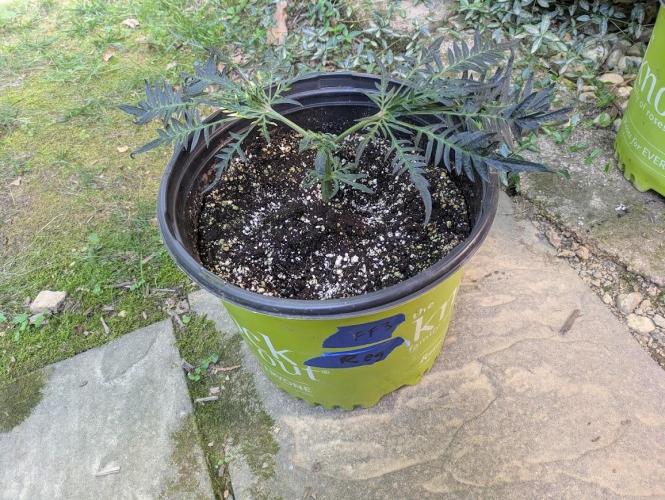
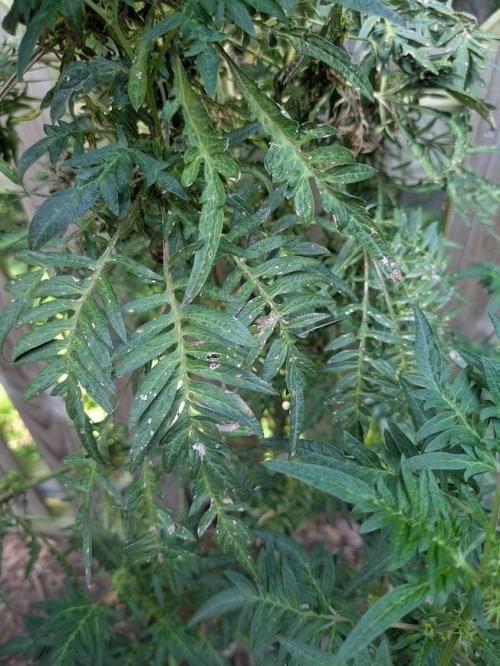
BC_Green It has been another amazing week of the plants growing. I have been watching as the Fruity Freak leaves become progressively more fern-like, and ornamental as a result!
Based on my Banizzle grows, I knew I needed to understand plant nutrients in a more meaningful way if I wanted these plants to thrive. So, I decided to get a soil test (see Ref. 1 below on how to perform a test) to understand what nutrients my plants needed. The report I received advised that I needed to add 200 lbs/acre of nitrogen, 150 lbs/acre of phosphorus, and 190 lbs/acre of potassium (see picture labeled Pic.1 (FYI you can't see these images unless you login to growdiaries)).
I then researched what to do with my results (Ref. 2 helped), and I figured out that my nutrient needs of 200-150-190 fall close to a 2-1-2 ratio. I then looked at different types of organic fertilizers (see Ref. 3 and Ref. 4) and considered that I already had a 3-10-5 fertilizer (Vermibloom) on hand. I discovered Dr Earth’s Alfalfa Meal is 2-1-2 and includes beneficial bacteria and mycorrhizae (to promote healthy plant growth and disease resistance). However, I knew I would be low on nitrogen if I only used those two fertilizers. Therefore, I decided to buy some blood meal (12-0-0). I also liked that blood meal is more fast acting while the other two are more moderate.
I hunted around for a solid fertilizer calculator and found an amazing tool from the University of Georgia Extension (Ref. 5). I entered all three fertilizers into the calculator, and it kicked out the exact amount of each fertilizer I needed to apply to 1 square foot (see Pic. 2). As I am using 10-gallon fabric pots (that can hold 1.5 cubic feet, but I put stone on the bottom and there’s space left at the top) I decided to use the one square foot application rate as I can always add more later, but I can’t take it away.
Not only did I want to understand the nutrients I needed, but I also wanted to understand the structure of the soil (as it was not included in my test results). North Dakota State University has a nice page that discusses this (Ref. 6), and I performed a soil ribbon test (see Video 1) based on this information. I determined my soil to be medium textured (which is great), but I have seen occasional water pooling on the surface, suggesting that it may be more of a medium-fine. This means adding peat moss, coco coir, or other amendments might improve drainage (and plant hydration) and allow for roots to grow more easily. In the long run, I plan to use compost to enhance the soil structure and nutrients.
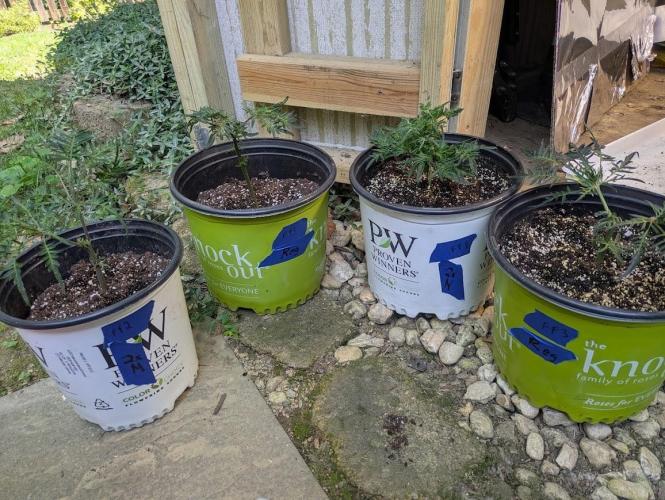
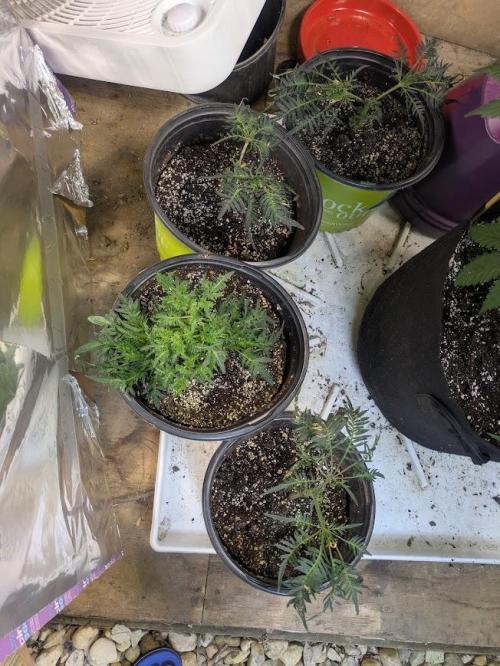
I filled the bottom of my 10-gallon fabric pots with a ½” of pea stone to allow for drainage (Pic. 3). I then partially filled two 5-gallon buckets with topsoil from near where I will plant (but not in an area the roots will reach). I used a digital scale to measure the amount of fertilizers recommended by the calculator (Pic. 4, 5, and 6) and added it to one of the 5-gallon buckets (see Pic. 7). I mixed the fertilizers into the soil as evenly as possible (Pic. 8 and 9). I then poured a two-inch layer of non-fertilized soil, then peat moss, and then fertilized soil (in a roughly 2:1:1 ratio) and blended them together. I repeated this until the pot was full (getting additional soil as needed), and then I repeated the process for the other three pots.
I set the filled fabric pots in my garage (Pic. 10) for two days to allow any upset bugs to flee into my garage instead of my house. I then moved the pots (wrapping them in a contractor garbage bag to prevent making a mess) into the room with the grow light. I placed a board on top of the fabric pots to insulate the plants (in their smaller pots) from the cold soil (Pic. 11). Once the soil in the fabric pots reaches room temperature, I will transplant.
(Ref. 1) This video shows the method I used to take a soil sample. I didn’t have a field to test, so I took four samples from the area where I will eventually plant outdoors and blended them together. I then mailed my soil sample off to the lab, and about a week later, I received an email with a PDF of my results (included with my pictures this week).
https://www.youtube.com/watch?v=N9AwxmFxBwg&t=8s
(Ref. 2) This video from the University of Minnesota Extension (many universities have agriculture extensions that can assist you with soil testing and growing information for your area) discusses what to do with your soil testing results:
https://youtu.be/HYrkcfE62Pg
(Ref. 3) This is a nice article that discusses organic fertilizer solutions:
https://www.grow-it-organically.com/npk-fertilizer.html
(Ref. 4) This article lists the NPK values of many organic fertilizer solutions:
https://www.epicgardening.com/organic-fertilizers/
(Ref. 5) Many websites tout a fertilizer calculator…but this one is hands down the best I have found. If you scroll down to the bottom, you can enter any fertilizer type you want (and the cost, if you want). It will give you the exact blend of multiple fertilizers to solve your nutrient deficiencies (I included a snapshot of the solution I used in my pictures).
https://aesl.ces.uga.edu/soil/fertcalc/
(Ref. 6) This is an excellent article that discusses how to evaluate your soil:
https://www.ndsu.edu/agriculture/extension/publications/evaluating-preparing-and-amending-lawn-and-garden-soil
5 likes
comments
Share
4
Week 4. Vegetation
1y ago
1/13
8.89 cm
Height
16 hrs
Light Schedule
21 °C
Day Air Temp
6.3
pH
No Smell
Smell
45 %
Air Humidity
18 °C
Night Air Temp
10 liters
Pot Size
0.1 liters
Watering Volume
55.88 cm
Lamp Distance
BC_Green We are officially four weeks in, and what could be ignored at week two or three as possibly stunted growth is now undeniable. My experience and comparing this grow to similar grows on this website (including grows of Supafreak (a relative of Fruity Freak) in similar conditions and grows using an HLG RSPEC 100 light with similar settings) show that these plants are at least 50% delayed.
Having discovered my native soil has a medium-fine texture last week, I already had a good idea of what the issue might be. I also observed the soil compacting in the containers over time as I watered the plants. As I had originally dug up the soil (and therefore created air pockets), some level of compaction was expected, but when I measured it, I found that the soil level had fallen an inch (and the containers only had 3.5” of soil on top of 1” of rock). That is roughly a 30% compaction of the soil, now squeezing in on my young plants’ roots, restricting nutrient uptake.
I needed to move forward with transplanting into a soil mix that compacts less. I had already added peat moss (and nutrients) to my 10-gallon containers of soil last week, but even peat moss can compact over time. Therefore, I needed an additional amendment. I decided on perlite after I read this article (and saw that it is superior for situations with higher clay content, which is likely driving my soil’s compaction):
https://www.epicgardening.com/perlite-vs-vermiculite/#:~:text=We've%20already%20covered%20the,into%20many%20seed%20starting%20systems.
As a result, I removed half of the soil from each 10-gallon container, filled 25% of the container with perlite, mixed it into the soil, then filled the container back to the top with soil and blended that into the soil below. This resulted in the container weight dropping from 58 lbs. to 46 lbs. The soil was slightly damp (and there is a ½” of pea stone in the bottom), so the dry bulk weight is actually lower. That means the weight of my mix is within the range of potting mixes you can buy. Hopefully, this means I have the correct porosity to allow for proper drainage and root growth and will solve the growth issues.
At this point, you may be asking why not buy good soil instead of amending my native soil. Well, I noticed native soil greatly improved disease and drought resistance of the outdoor plants I grew previously. Also, it might be cheaper and more environmentally friendly in the long run, and the flavor of the bud will be improved (which I noticed during my Banizzle grows). Additionally, I have a dual benefit here–the more I learn about growing these plants in my native soil, the more successful my approach to my yard and garden will be. Therefore, I’m going to keep experimenting.
While the pots were out of the room, I added a drop cloth beneath the platform and up the guest bed to ensure that dirt and water/humidity are contained.
After amending the soil, I returned the 10-gallon containers to the room and transplanted the seedlings. I watered them carefully toward the middle to avoid excessive watering, especially since thesr plants are small for the container at this moment.
6 likes
comments
Share
5
Week 5. Vegetation
1y ago
1/4
10.16 cm
Height
16 hrs
Light Schedule
24 °C
Day Air Temp
6.3
pH
No Smell
Smell
35 %
Air Humidity
21 °C
Night Air Temp
10 liters
Pot Size
0.17 liters
Watering Volume
55.88 cm
Lamp Distance
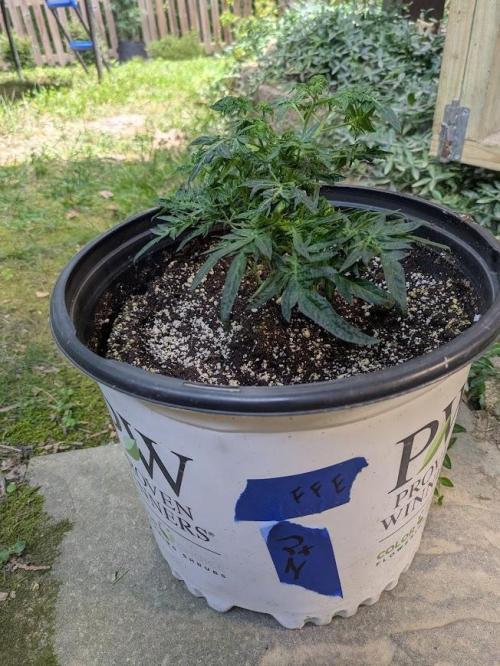
BC_Green We are now over a week out from the transplant, and the results are mixed. Fruity Freak 3 is definitely growing! Fruity Freak 2 has grown a little but is starting to show a bit of brown on the tips of two leaves. Fruity Freak 1 has shown little growth.
Unfortunately, I made a critical error in my experiment–I don’t know when my organic nutrients will be available to my plants (because I don’t know exactly how long it will take for them to release), and this (presumed nutrient deficiency) could be causing the browning leaf tips. This article explains why:
https://www.gardenmyths.com/limitations-of-organic-fertilizer/
Normally, I use leaf coloration information to troubleshoot these issues–but it appears that this may not provide reliable results:
https://www.gardenmyths.com/can-leaves-identify-nutrient-deficiencies/
The browning tips of Fruity Freak 2 (and simultaneous browning of leaves on the OG Fun plant I am growing under identical conditions) could be: (1) A response to lowering the grow light (which was necessary to keep the light intensity the same as when these plants were in small containers and directly under the light). I have since raised the light to eliminate this variable. (2) It could be a change in pH due to the addition of 25% peat moss. I have ordered a pH pen that will arrive this evening, and I will perform a soil slurry test to rule this out. (3) An imbalance in nutrients that could be difficult to troubleshoot without another lab soil test (easy to perform and only eleven bucks plus shipping), but that information would quickly become irrelevant as the organic nutrients continue to release. I am trying an extremely small dose of a water-soluble synthetic 20-10-20 fertilizer on Fruity Freak 1 only (to reduce the risk of damage to other plants) as the majority of the organic fertilizer I used is 2-1-2 alfalfa meal and is likely still decomposing into a usable state. If Fruity Freak 1 responds positively, the pH test is normal, and the leaves remain unchanged after the light adjustment, I will add synthetic fertilizer to the other plants.
I did add some aluminum taped to cardboard next to the plants on the sides that do not face windows, and it increased light intensity by over 20%! I also added a space heater to the room, and I am keeping it at 75 during the day and 70 at night–this should encourage growth, and it helps the soil dry out faster (I am watering approximately 0.85 liters every 5 days).
I am going to germinate another seed to create a “control” plant. As I have never grown this strain before, and there are no photos of this exact strain online. I want a clearer idea of the differences between my organic experiment and a more standard approach. I will post that new diary soon!
7 likes
comments
Share
6
Week 6. Vegetation
1y ago
1/5
12.7 cm
Height
16 hrs
Light Schedule
24 °C
Day Air Temp
6.2
pH
No Smell
Smell
35 %
Air Humidity
18 °C
Night Air Temp
37.85 liters
Pot Size
0.38 liters
Watering Volume
55.88 cm
Lamp Distance
Nutrients 1
20-10-20 water soluble
0.65 mll
BC_Green Success! The synthetic water-soluble 20-10-20 fertilizer worked fantastically with noticeable growth in all three plants–in particular, Fruity Freak 3! Additionally, my concerns about soil pH were alleviated when I tested the soil and got a 6.2.
This initial dose of fertilizer was a mere ⅛ tsp (I actually filled it just under, so closer to a 10th) per gallon. That would make it roughly 26 ppm of nitrogen and potassium and 13 ppm of phosphorus. Several controlled studies I have seen recommend optimal plant growth for cannabis at 150-200 ppm nitrogen, including this one from Israel:
https://israelagri.com/advances-in-science-based-fertilization-technologies-for-medical-cannabis/#:~:text=optimal%20nitrogen%20level%20at%20the,concentration%20of%20cannabinoids%20and%20terpenoids.
As I still don’t know how much nutrient is being released from the organic fertilizers in the soil, I don’t want to apply the full 150-200 ppm. I decided for this round to use ½ tsp per gallon (actually a ¼ tsp per half gallon as I don’t have a gallon-sized vessel), which will give approximately 132 ppm of nitrogen and potassium and 66 ppm of phosphorus. Here's the calculator I used for ppm (I weighed one tsp of my fertilizer and it was 5 grams, therefore 2.5 grams is 1/2 tsp):
https://www.omnicalculator.com/biology/water-soluble-fertilizer
7 likes
comments
Share
7
Week 7. Vegetation
10mo ago
1/7
19.05 cm
Height
16 hrs
Light Schedule
24 °C
Day Air Temp
6.2
pH
No Smell
Smell
35 %
Air Humidity
18 °C
Night Air Temp
37.85 liters
Pot Size
0.27 liters
Watering Volume
50.8 cm
Lamp Distance
Nutrients 1
20-10-20 water-soluble
0.65 mll
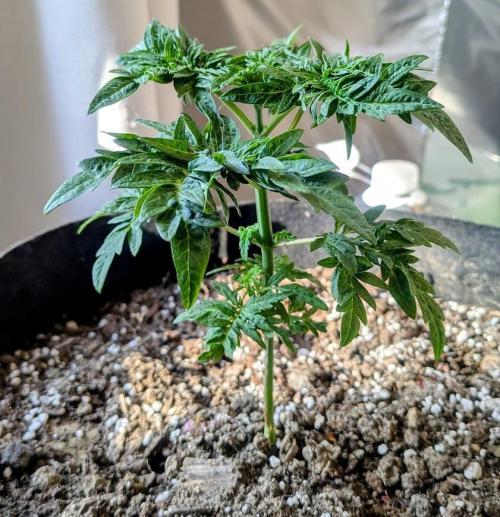
BC_Green The 20–10-20 water-soluble fertilizer continues to work wonders for these little ladies. Fruity Freak 3 has almost doubled her height in the last week and leads the pack at 9”. Fruity Freak 2 is 7.5” and Fruity Freak 1 is 5”. All three are looking extremely healthy and beautiful, almost resembling tomato plants at the moment. I’m starting to get really excited to watch them get big!
I have not adjusted the distance of the grow light to the plants, so as the plants grow taller, they are getting a higher light intensity.
I have switched from captured rainwater (with higher acid and lower micronutrients) to tap water (mine has a 6.8 pH and more micronutrients).
I’m not adjusting nutrients at this time, as everyone looks happy. Therefore, the dose of 20-10-20 remains the same ½ tsp per gallon (I am using an empty gallon water jug to mix and pour the solution). I am giving them each about ½ gallon per week on Mondays.
7 likes
2 comments
Share
8
Week 8. Vegetation
10mo ago
1/8
30.48 cm
Height
16 hrs
Light Schedule
24 °C
Day Air Temp
6.2
pH
No Smell
Smell
40 %
Air Humidity
21 °C
Night Air Temp
37.85 liters
Pot Size
0.53 liters
Watering Volume
30.48 cm
Lamp Distance
Nutrients 1
20-10-20 Water-Soluble
0.65 mll
BC_Green Wishing everyone a Happy and green St Patrick’s Day!
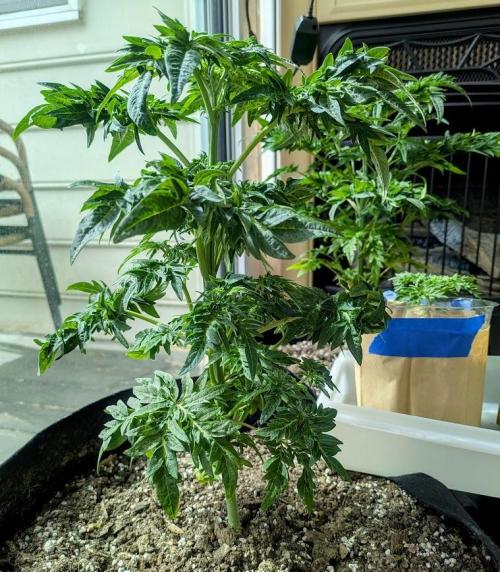
These freaky plants had another excellent week of growth! Fruity Freak 3 is now 13”, Fruity Freak 2 is 12”, and Fruity Freak 1 is 8”, about a 4” increase each! They look stronger every day, which is great because the weather is getting warmer, the sun is getting stronger, and I am excited to transition them outside!
Now that the nutrients are better aligned with the plants’ needs, I have been adjusting the lighting. I was using an HLG Rspec 100 only–but when I transitioned these ladies to larger pots, I inadvertently decreased the light intensity of each plant because they are further from the center of the light (if I had to do it again, I would transition them to one or two-gallon pots before ten, and I would purchase a light that was at least as large as the 3x3 grow footprint). A few days ago, I added a 65w Fecida grow light (I already had) and dropped both lights to 12” above the plants. This increased the light intensity from 300 PPFD to 600 PPFD (measured with the Photone app). They have tolerated the light increase well, but with the closer lamp distance to the plants, I am paying attention to signs of damage to the leaves.
They continue to receive intense doses of light between 10a-1p as the sun passes by the south-facing window in the room (I have the timer set to turn off the grow lights accordingly, which I override on cloudy days), and they are now getting a little afternoon sun from the west-facing window.
I continue to dose ½ tsp of Pennington 20-10-20 per gallon of water. This past week, I was able to water each plant a ½ gallon on Monday and another on Friday–however, there was a tiny bit of runoff from two containers on Friday, so I will be more careful this week.
7 likes
comments
Share
9
Week 9. Vegetation
10mo ago
1/9
31.75 cm
Height
16 hrs
Light Schedule
24 °C
Day Air Temp
6.2
pH
No Smell
Smell
40 %
Air Humidity
21 °C
Night Air Temp
37.85 liters
Pot Size
0.38 liters
Watering Volume
25.4 cm
Lamp Distance
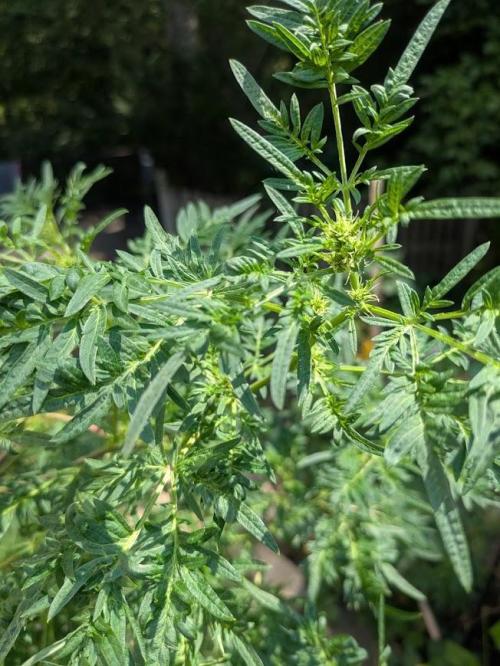
BC_Green Each week these plants get bigger and stronger, and I watch this incredible growth pattern exploding from the top of the plant. It is strangely mesmerizing and unlike anything I have ever seen.
All three plants continue strong growth. Fruity Freak 3 is 15”, Fruity Freak 2 is 12.5” (but reaches its leaves to 16”), and Fruity Freak 1 is 10”. I did, however, notice yellowing/browning leaves at the bottom of all three plants. This could be a result of them getting much larger and no longer needing these old leaves near the bottom that are getting little light under their ever-expanding canopies.
The brown leaves could also be nutrient burn from a combination of the alfalfa meal (I blended into the soil six weeks ago) starting to release nutrients while I am using a synthetic fertilizer. In the future, I might skip the slow-release nutrients because my goal is to grow the best plants I can in a relatively short growing season. If I can supply the plants' nutrient demand perfectly (which is far easier with synthetic water-soluble or liquid fertilizer), yield and quality should be optimal. Either way, I am at one month of synthetic fertilizer use, so it is a good time to use water only, which I did this morning to help clear out any salts.
I also came across an article that gives me concern about the synthetic fertilizer I am using:
https://www.gardenmyths.com/chelates-improve-plant-growth/
Pennington 20-10-20 uses chelates (a substance that prevents nutrients from reacting with oxygen or other ions so that the nutrients remain available to the roots), which, normally, would be fantastic. Pennington uses EDTA, and in acidic soils with high calcium levels (like my native soil that I blended in these containers), this can lead to the formation of stable calcium complexes that may lock out nutrients from the plants. Out of an abundance of caution, I am going to change fertilizers.
As I am changing from chelated to non-chelated fertilizer, I also wanted to consider the 20-10-20 ferilizer that I am using. The soil testing company that I used recommends 177 ppm Nitrogen, 87 ppm Phosphorus, and 187 ppm Potassium (approximately a 2-1-2 ratio) to grow hemp. However, an Israeli-controlled study suggests 160 ppm Nitrogen, 30-90 PPM Phosphorus for vegetative and less than 30 ppm for flowering (for the highest quality, but the highest yield would be 90 ppm), and 175 ppm Potassium during vegetative and 60 ppm during flowering is the most optimal. Therefore, I am going to search for fertilizer solutions that are 5-1-5 for vegetative and 6-1-2 for flowering.
The Israeli study I referenced:
https://israelagri.com/advances-in-science-based-fertilization-technologies-for-medical-cannabis/#:~:text=optimal%20nitrogen%20level%20at%20the,concentration%20of%20cannabinoids%20and%20terpenoids
4 likes
comments
Share
10
Week 10. Vegetation
10mo ago
1/7
39.37 cm
Height
16 hrs
Light Schedule
24 °C
Day Air Temp
6.2
pH
No Smell
Smell
40 %
Air Humidity
18 °C
Night Air Temp
37.85 liters
Pot Size
0.38 liters
Watering Volume
25.4 cm
Lamp Distance
BC_Green What an incredible week of growth–another 3”- 5” each (Fruity Freak 3 is now 20”, Fruity Freak 2 is 15.5”, and Fruity Freak 1 is 13.5)! I gave them water only for both waterings this week to clear any salts (including EDTA) and also try to determine if the slow-release nutrients were contributing to growth. Their strong growth rate suggests they have adequate nutrients. I am planning to continue limiting water-soluble fertilizers for the time being, but I am keeping a careful eye on them as my OG Fun plant (growing under identical conditions) has some yellowing leaves.
When they are ready for water-soluble fertilizers, I have found some really cool ones that I am excited to try, including:
Soy hydrolysate, which I will use as a source of nitrogen. However, it also acts as a biostimulant and can help correct soil pH back to a 6-7 range regardless of whether the pH is higher or lower. Here are two interesting articles:
https://www.researchgate.net/publication/371968847_Protein_Hydrolysate_A_Promising_Biostimulant_for_Sustainable_Agriculture
https://pmc.ncbi.nlm.nih.gov/articles/PMC10819947/
Langbeinite, which I will use as a source of potassium, magnesium, and sulfur. It has the added benefit of being pH-neutral.
https://www.cropnutrition.com/resource-library/potassium-magnesium-sulfate-langbeinite/
I also plan to use super phosphate as my source of phosphorus (as it is less acidic). However, I need to determine how I will supply the remaining micronutrients (so tune in next week ;)
This week begins their transition outside. I am not transitioning them fully outdoors until we hit 14 hours of sun (in about a month). But for the time being, they will hang out in the sunroom to give them more sun and exposure to varying temperatures. Additionally, I will move them outside for increasingly longer periods to allow them to harden off.
4 likes
comments
Share
11
Week 11. Vegetation
9mo ago
1/7
45.72 cm
Height
15 hrs
Light Schedule
27 °C
Day Air Temp
6.2
pH
No Smell
Smell
55 %
Air Humidity
10 °C
Night Air Temp
37.85 liters
Pot Size
0.38 liters
Watering Volume
22.86 cm
Lamp Distance
BC_Green The plants have transitioned seamlessly to the sunroom and the addition of outdoor time! I have also been slowly reducing their grow light hours to transition them to the 14 hours of sunlight they will receive when they move outside full time. Despite the changes, Fruity Freak 3 is now 24” (4” increase), Fruity Freak 2 is 18” (2.5” increase), and Fruity Freak 1 is 17.5” (4” increase).
I did give them a small amount of fertilizer two days ago (each received 1/16th of a tsp of Pennington 20-10-20 with two cups of water). However, that was my final application of that product, as today begins my first attempt at my own fertilizer blend!
I have read a lot about blending, and I believe that these ingredients will have no adverse reactions–in fact, soy hydrolysate should assist in nutrient chelation (as noted in the PubMed article included in last week’s journal entry), making some nutrients more available to the plant–but there are many unknowns.
My mix (in 1 liter of water) will consist of:
Soy hydrolysate (12-0-0) - 1.33 grams (160 ppm)
Super Phosphate (0-18-0) - 0.38 grams (30 ppm)
Langbeinite (0-0-22 and S 22% and Mg 10.8%) - 0.96 grams (175 ppm)
Micro nutrient blend (Prevegenics 0.75% Mg, Mn, Ca, Zn, Cu, B, Ni, Fe) - ¾ tsp
I used this calculator to determine the needed weight of each fertilizer (except the micro-nutrient blend, for which I am following the instructions):
https://www.omnicalculator.com/biology/water-soluble-fertilizer
To test this blend, I will mix a half-strength version to test on Fruity Freak 1 first. If there is no adverse response, I will proceed with the half-strength dose on the other plants. As there are still slow-release nutrients in the soil, I will proceed with caution from there.
4 likes
2 comments
Share
12
Week 12. Vegetation
9mo ago
1/7
57.15 cm
Height
15 hrs
Light Schedule
21 °C
Day Air Temp
6.2
pH
No Smell
Smell
55 %
Air Humidity
10 °C
Night Air Temp
37.85 liters
Pot Size
0.57 liters
Watering Volume
17.78 cm
Lamp Distance
BC_Green After some colder weather, there are finally some opportunities to get these ladies outside, and they are absolutely loving it! Fruity Freak 1 has just outgrown her sister at 21”, Fruity Freak 2 is now 20.5”, and Fruity Freak 3 is now 26”.
I had to adjust my fertilizer mix from last week. Although sources I read suggested that pulverized super phosphate is water soluble, I have yet to discover a method that will pulverize the phosphate enough for that to happen. Therefore, I have replaced it with a liquid 4-10-3. I am, however, able to effectively pulverize the langbeinite with a hammer and get most of it to dissolve. Still, it does make it so that I need to weigh any material that does not dissolve (a small amount that sinks to the bottom) and pulverize more to replace it. The soy hydrolysate and langbeinite behave well together in solution, but I noticed some cloudiness (possible precipitation) when mixing the 4-10-3. I am continuing to experiment with mixing the fertilizers, but I am able to deliver them separately without issue.
I am giving them (per gallon):
Soy hydrolysate (12-0-0) - 4.2 grams (160 ppm nitrogen (133 from soy hydrolysate + 27 from liquid fertilizer))
Liquid Fertilizer (4-10-3) - 2.6 grams (30 ppm phosphorus - measured with a cup on a scale)
Langbeinite (0-0-22 and S 22% and Mg 10.8%) - 3.28 grams (175 ppm potassium (158 from langbeinite + 17 from liquid fertilizer))
Micro nutrient blend (0.75% Mg, Mn, Ca, Zn, Cu, B, Ni, Fe) - 15 ml
4 likes
5 comments
Share
13
Week 13. Vegetation
9mo ago
1/9
65.2 cm
Height
14 hrs
Light Schedule
24 °C
Day Air Temp
6.2
pH
No Smell
Smell
55 %
Air Humidity
10 °C
Night Air Temp
37.85 liters
Pot Size
0.57 liters
Watering Volume
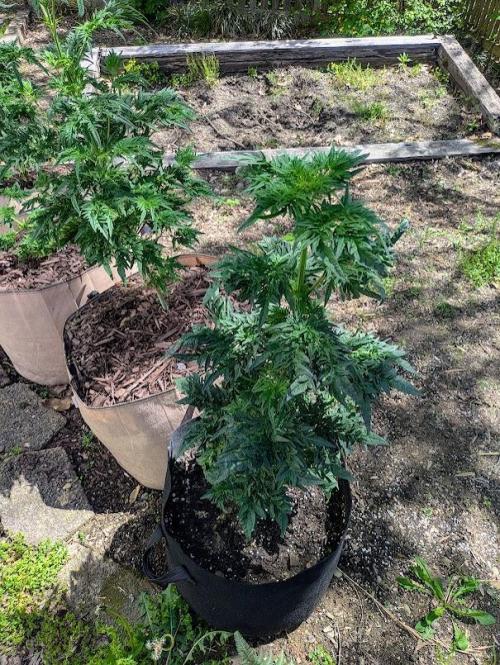
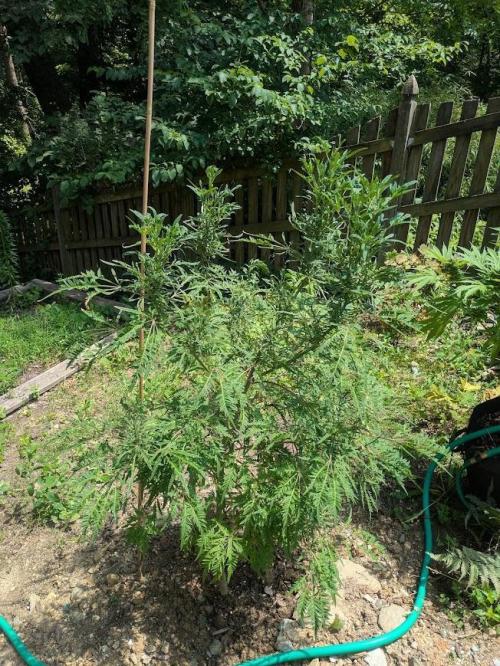
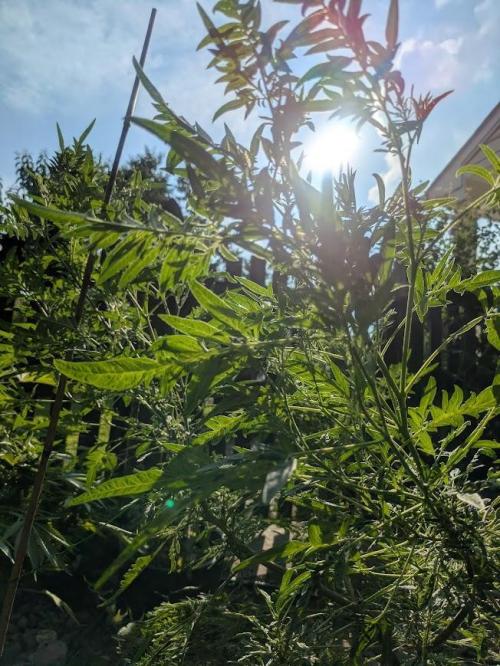
BC_Green We are officially outside full-time, and the ladies are loving the extra light and space! Fruity Freak 3 picked up another 4” this past week and is now 30” (definitely thinking about cloning her)! Fruity Freak 1 and 2 are both 23.5”. All three have beautiful, thick stems and are looking incredibly healthy.
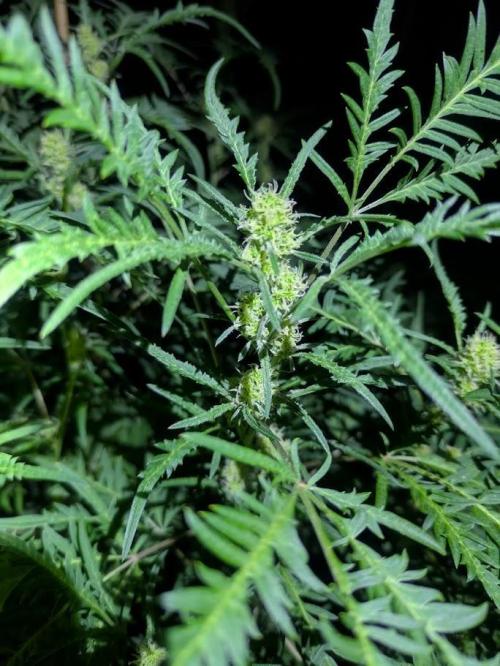
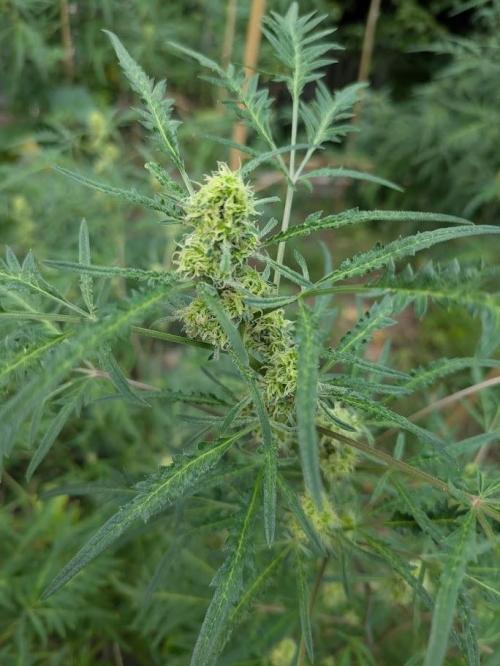
They all have pre-flowers as of a few days ago, and this is always an exciting and reassuring development!
I am using an outdoor floodlight from 8p-10p each night to interrupt their sleep cycle and discourage flowering until daylight exceeds 15 hours.
I am continuing to experiment with my fertilizer blend. The micro-nutrient fertilizer appears to precipitate when combined with the liquid 4-10-3 fertilizer–however, the other ingredients seem to combine without issue. Therefore, I am delivering the micro-nutrient fertilizer separately from the others. The langbeinite is also somewhat challenging to pulverize sufficiently to dissolve it completely in water, and I may seek out a more soluble source of potassium.
I am still giving them (per gallon):
Soy hydrolysate (12-0-0) - 4.2 grams (160 ppm nitrogen (133 from soy hydrolysate + 27 from liquid fertilizer))
Liquid Fertilizer (4-10-3) - 2.6 grams (30 ppm phosphorus - measured with a cup on a scale)
Langbeinite (0-0-22 and S 22% and Mg 10.8%) - 3.28 grams (175 ppm potassium (158 from langbeinite crushed with a hammer + 17 from liquid fertilizer))
Micro nutrient blend (0.75% Mg, Mn, Ca, Zn, Cu, B, Ni, Fe) - 15 ml (delivered separately on a different day)
5 likes
comments
Share
14
Week 14. Vegetation
9mo ago
1/6
78.23 cm
Height
14 hrs
Light Schedule
24 °C
Day Air Temp
6.2
pH
No Smell
Smell
55 %
Air Humidity
7 °C
Night Air Temp
75.71 liters
Pot Size
1.14 liters
Watering Volume
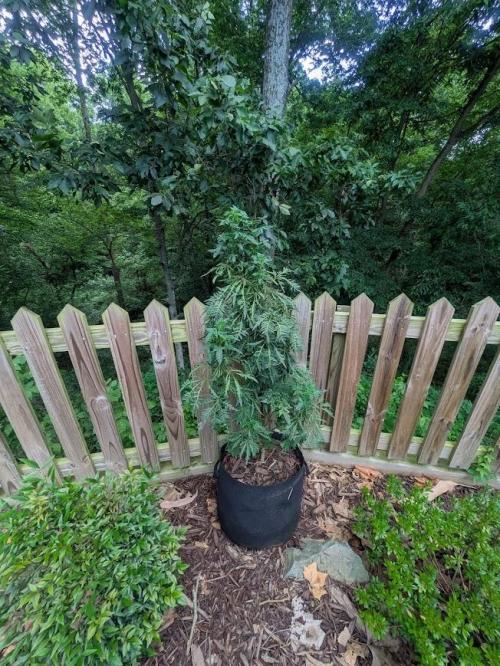
BC_Green Fruity Freak 3 is 3 ft., and it isn’t even May, what a beast! Fruity Freak 2 is 27.5” and Fruity Freak 1 is 29”. You will notice that Fruity Freak 2 and 3 are now in 20-gallon containers, located in my south-facing side yard. I used a mixture of 33% soil from my yard, 33% peat moss, and 33% perlite to fill the containers. The soil I selected from my yard already had weeds, oregano, and mint growing in it, in the hopes that the plant matter and, more importantly, the living roots were included. The idea was inspired by this article, which speaks about the benefits of living roots on the micro-biome and soil quality:
https://www.gardenmyths.com/latest-science-on-soil-health/
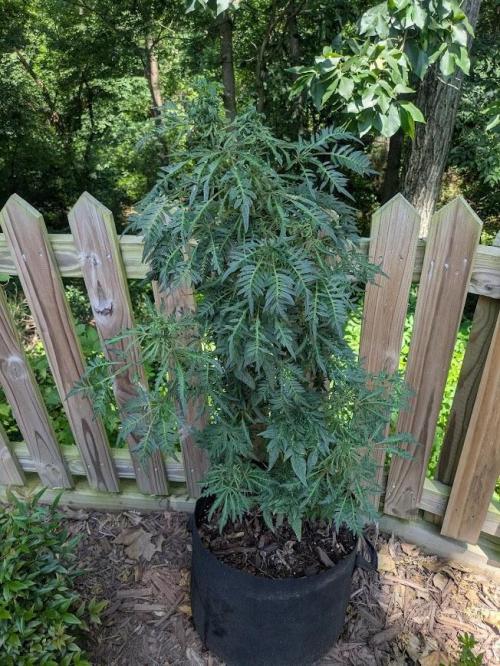
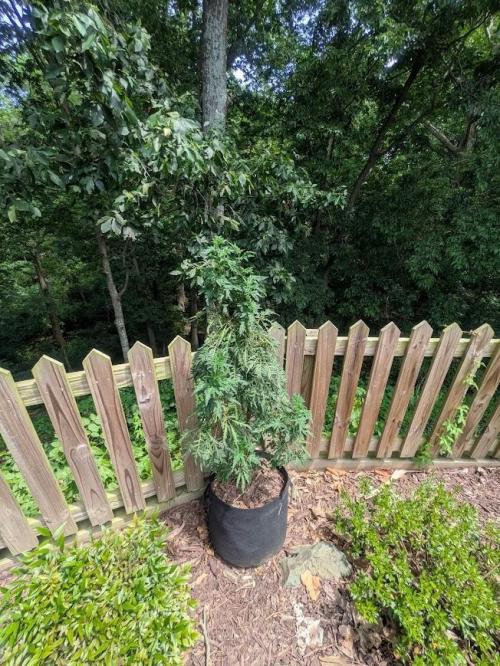
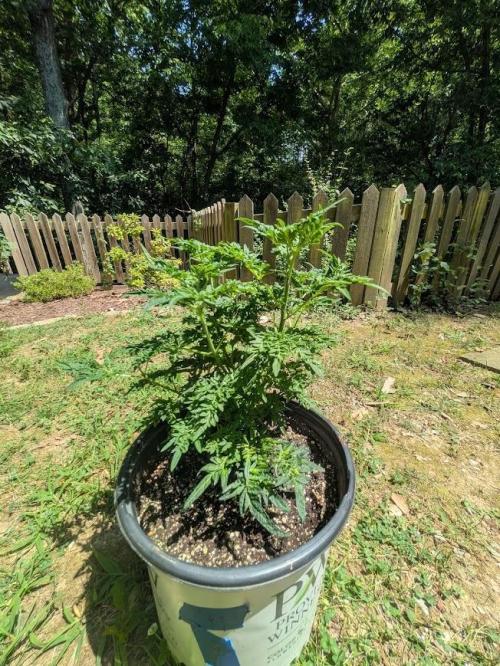
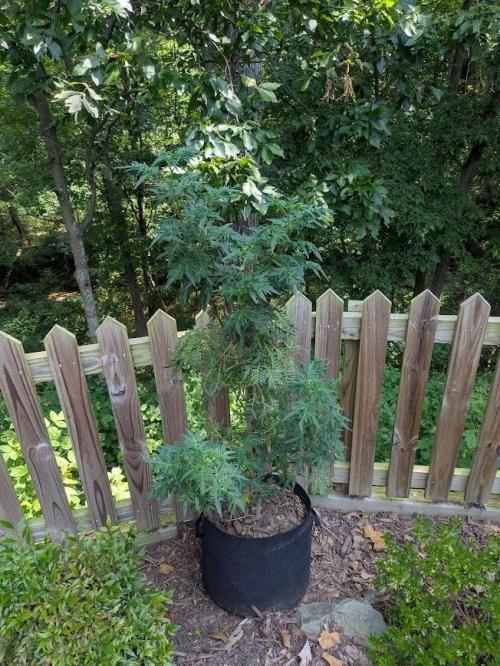
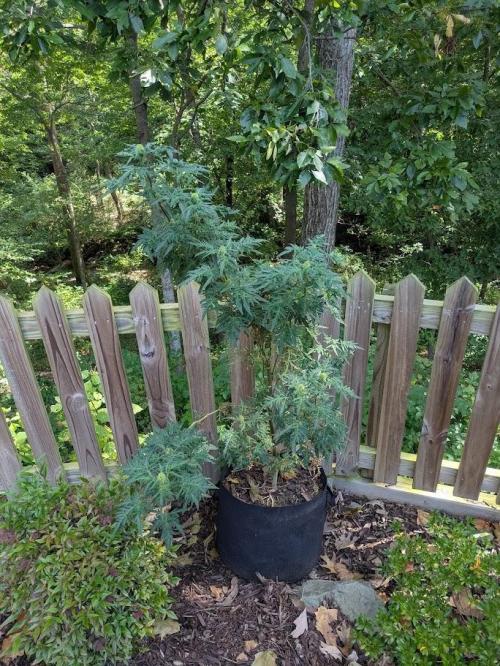
Fruity Freak 1 remains in her 10-gallon container and will be relocated into a 4x4 bed with Fruity Freak A (from my other Fruity Freak grow) at my friend’s house. I am sad to see her go, but it will be really interesting to see any differences resulting from my gardening techniques vs. my friend’s. He has promised to provide pictures and updates.
It had become somewhat cumbersome to pulverize and use langbeinite as a source of potassium in my fertilizer blend, so I switched to potassium nitrate. My new mix is below.
New fertilizer mix (per gallon):
- Soy hydrolysate (12-0-0) - 2.43 grams (160 ppm nitrogen (77 ppm from soy hydrolysate + 27 ppm from liquid fertilizer + 56 ppm from potassium nitrate))
- Liquid Fertilizer (4-10-3) - 2.6 grams (30 ppm phosphorus - measured with a cup on a scale)
- Potassium Nitrate (13.5-0-46.2) - 1.56 grams (175 ppm potassium (158 ppm from potassium nitrate + 17 ppm from liquid fertilizer))
** Soy hydrolysate, liquid fertilizer, and potassium nitrate are combined together with no noticeable precipitation
- Micro nutrient liquid fertilizer (0.75% Mg, Mn, Ca, Zn, Cu, B, Ni, Fe) - 15 ml (delivered separately on a different day to avoid precipitation when blended with the 4-10-3)
6 likes
2 comments
Share
15
Week 15. Vegetation
9mo ago
1/10
94.74 cm
Height
14 hrs
Light Schedule
24 °C
Day Air Temp
6.2
pH
No Smell
Smell
55 %
Air Humidity
7 °C
Night Air Temp
75.71 liters
Pot Size
1.14 liters
Watering Volume
BC_Green Fruity Freak 3 is now 42”, how big will she be in October…only time will tell! Fruity Freak 1 and 2 are tied at 35” and looking healthy. Those having read last week’s entry will recall Fruity Freak 1 was heading to my friend’s house, and he has picked up Fruity Freak A (from another grow), but he has been a little slow to pick up Fruity Freak 1. However, I love her and she’s welcome to stay as long as needed :)
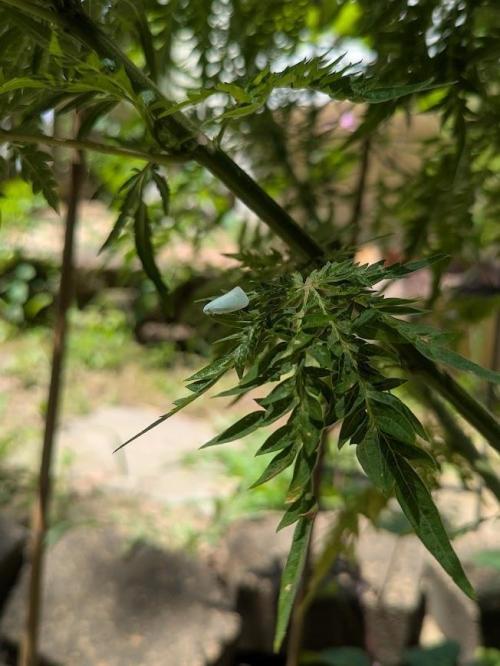
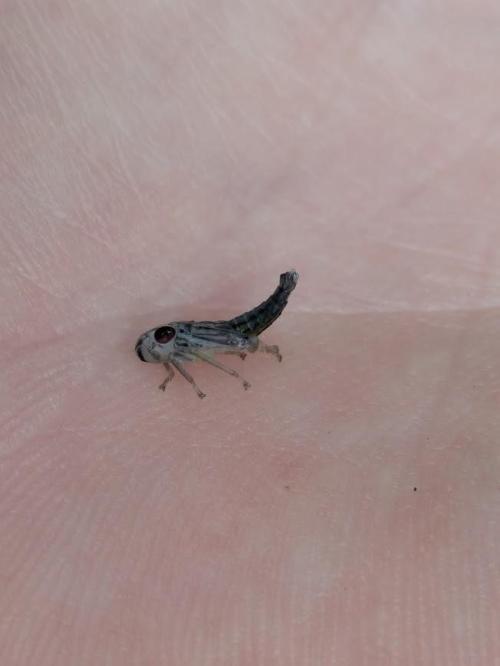
I did notice three spotted lanternfly (SLF) nymphs on Fruity Freak 3 two days ago and chased them off (I haven’t seen any since). Last summer, I killed approximately 200 adult SLFs that landed on my plants out of an abundance of caution (even though cannabis is not a preferred food source). They can suck sap out of the stem with their proboscis (and if there are enough of them they will weaken or kill the plant) and their feces can cause mold, so I prefer not to take risks with them. Unfortunately, neem oil spray and drenches seemed to make no impact–only cutting off the neck of a disposable water bottle and covering the SLFs with it (causing them to jump into the bottle), then crushing them worked. Here's an article on the subject:
https://www.cannabisbusinesstimes.com/hemp/news/15691550/need-to-know-spotted-lanternfly-and-hemp#:~:text=While%20little%20research%20exists%20on,an%20outsized%20threat%20to%20hemp
I'm using the same fertilizer blend (per gallon):
- Soy hydrolysate (12-0-0) - 2.43 grams (160 ppm nitrogen (77 ppm from soy hydrolysate + 27 ppm from liquid fertilizer + 56 ppm from potassium nitrate))
- Liquid Fertilizer (4-10-3) - 2.6 grams (30 ppm phosphorus - measured with a cup on a scale)
- Potassium Nitrate (13.5-0-46.2) - 1.56 grams (175 ppm potassium (158 ppm from potassium nitrate + 17 ppm from liquid fertilizer))
* Soy hydrolysate, liquid fertilizer, and potassium nitrate are combined together with no noticeable precipitation
- Micronutrient liquid fertilizer (0.75% Mg, Mn, Ca, Zn, Cu, B, Ni, Fe) - 15 ml (delivered separately on a different day to avoid precipitation when blended with the 4-10-3)
I have been reading a lot about plant hormones (particularly auxin and cytokinin, but also gibberellin, abscisic acid, and ethylene). I am curious how, when, and why people use them in the vegetative and flowering phases, and what ppm dose.
Sounds like you’re on the right track, digging into plant hormones—it's a deep rabbit hole, but super useful if applied right. In veg, most growers stick to auxins like IBA or NAA for cloning (typically 500–2000 ppm in gels), and some use cytokinins in low doses (1–10 ppm foliar) to promote bushier growth or more lateral branching. If you're looking to stretch tight plants or help stubborn seeds, a bit of GA3 (10–50 ppm) can do the trick—but it’s easy to overdo.
For flowering, ethephon is used by some to promote female flowers or help speed up ripening, usually around 150–500 ppm. Cytokinins can be used in flower, too, but they need to be low-dose or you risk getting leafy buds. ABA is more niche, but some advanced growers experiment with it near harvest to signal the plant to finish strong and boost trichome production.
It all comes down to that auxin-to-cytokinin ratio—higher auxin leans toward root growth, higher cytokinin toward shoots and branching. Just start low and dial it in slowly if you're experimenting. Most hobbyists don’t go this deep, but for those chasing dialed-in results, hormones can be a game changer.
BC_Green This past week was almost all rain, and even though we’re above 14 hours of daylight, the ladies decided to flower, lol. I knew there was a risk starting as early as I did, and heading outside when I did, but that’s ok. I took advantage of their flowering state and took a few cuttings, so maybe I’ll have some bushy monster clones to experiment with. In the meantime, my Fruity Freak #2 grow, with plants started 6 weeks later, did not experience flowering–therefore, I will be adjusting timing for next year.
I took the cuttings from the top of the plants as I am concerned their height could exceed 9’ (a wonderful problem to have), which would be visible from the street, and thus require me to move them into the back yard (which has less sun). I know I am late in the game, but I’m going to prune/train them to stay below 8’ and use some stakes to support them.
The cuttings were taken with disinfected scissors. I wiped them clean with rubbing alcohol between plants to minimize any risk for disease transfer (even though these ladies have been impressively healthy outdoors). All cuts were made at a 45-degree angle to prevent rain from pooling on stems (and creating potential for infection). I cut off all but two small leaves near the top of each cutting to minimize moisture loss until they can root. All cuttings were dipped in rooting hormone (IBA) and tapped on the side of the container to remove any excess. They were immediately placed in small pots with Pro-Mix BX that I had wet with ¼ strength of my fertilizer blend, and covered in plastic wrap to act as a humidity dome.
¼ strength is (per gallon):
Soy hydrolysate (12-0-0) - 0.6 grams
Liquid Fertilizer (4-10-3) - 0.65 grams
Potassium Nitrate (13.5-0-46.2) - 0.39 grams
Before the ladies had flowers, I contemplated using plant hormones to encourage growth. I want to thank everyone who answered my question on the subject once again. It is such a fascinating topic, and everyone had such interesting insights. I had considered experimenting with kinetin, a cytokinin that looked promising (it is supposed to encourage bushier growth). However, some of the controlled studies I looked at had inconsistent results. But now that I am topping the plants, they will create a bunch of cytokinin as a natural response, and probably won’t revisit this topic until next year. In the meantime, this article is an interesting read on the subject: https://pmc.ncbi.nlm.nih.gov/articles/PMC7355821/
Fruity freak 1 was 42”, but is now 34”
Fruity freak 2 was 39”, but is now 34”
Fruity freak 3 was 49”, but is now 37”
2 likes
comments
Share
Used techniques
Topping
Technique
17
Week 17. Vegetation
8mo ago
1/12
92.2 cm
Height
14 hrs
Light Schedule
27 °C
Day Air Temp
6.2
pH
No Smell
Smell
65 %
Air Humidity
10 °C
Night Air Temp
75.71 liters
Pot Size
BC_Green We’ve had about 5” of rain so far this month, but these ladies are holding strong. Each had one or two yellow leaves at the bottom of the plant, prompting me to remove them, but otherwise look very healthy.
Fruity Freak 3 developed a bit of mold below the topping cut I made to her stem last week. I removed the moldy section with another 45-degree cut below it (closer to the node), and I am now spraying it and all topping cuts (on the other plants) with neem oil. I also gave Fruity Freak 3 a neem oil soil drench to boost her ability to fight off the infection.
Considering the amount of powdery mildew, septoria, and other issues I have seen (especially during lots of rain and high humidity), it is quite impressive that these plants are doing so well. Additionally, slugs attacked some of my plants at this time last year (and are attacking other plants in our yard), but haven’t touched any of these plants.
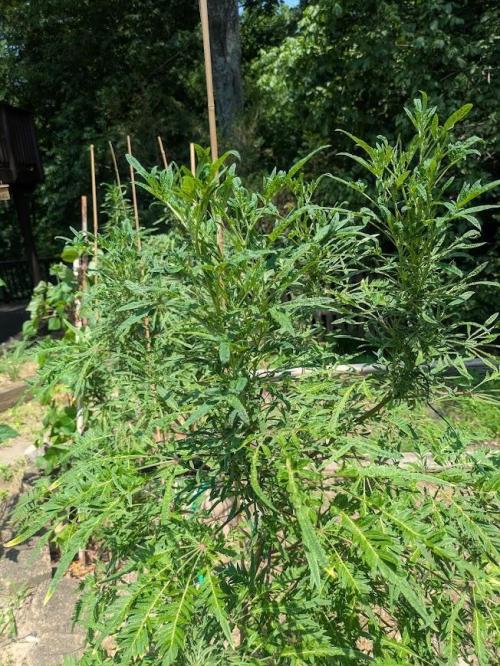
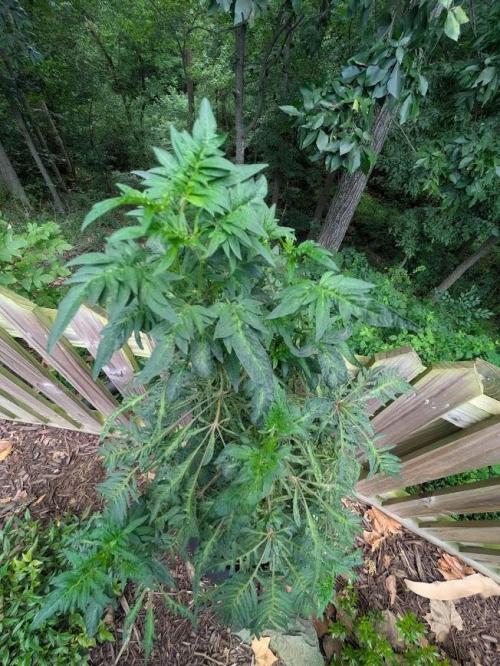
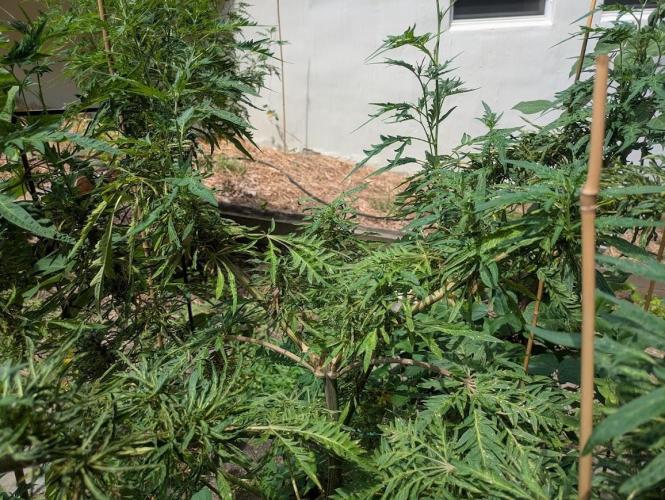
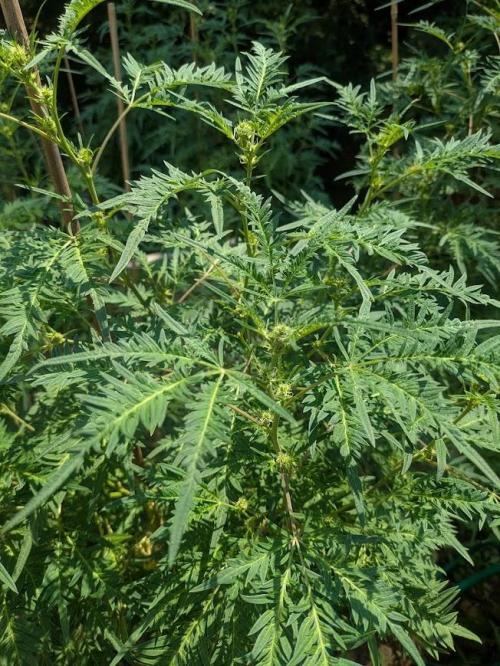
The topping cuts have caused all three plants to start bushing out nicely, particularly Fruity Freak 2. It will be interesting to see which one is the highest yielder this year. Fruity Freak 1 was the fastest to germinate, Fruity Freak 3 has shown the fastest vertical growth, but Fruity Freak 2 might have the right shape. Hopefully, they continue to grow even bushier as the flowers continue to disappear with the increasing daylight hours and the plants re-vegetate.
I haven’t been able to deliver the water-soluble nutrients these past two weeks because the soil/media has been too wet, but I will give them some in the next day or two.
The cuttings are holding color so far, which is encouraging. They are a bit dry–I have been spraying the leaves with water and keeping the humidity dome on just a bit longer to try and help. I also sprayed any exposed cuts with neem oil.
I topped my plants last week and one of them developed an infection below the cut. I have removed the infected plant material, sprayed the plant with neem oil, and gave the plant a neem oil soil drench. Is there anything else you recommend doing?
Neem oil is a rather weak solution for something like this IMO. I usually defer to Neem outdoors but HOCl or CannaGuard-Pro or something might be better. At least double check your scissor cleaning procedures.
BC_Green The fruity freak ladies have been doing wonderfully. No return of the white mold (from below the topping cut on Fruity Freak 3) from last week, but I did go ahead and buy some HOCL just in case (thanks again for those that answered my grow question).
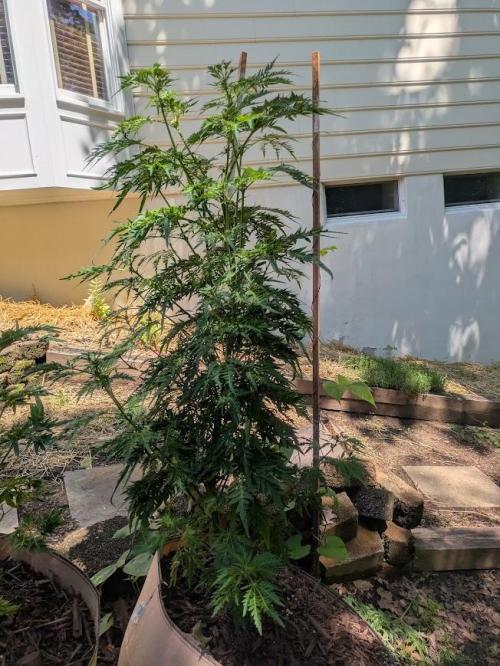
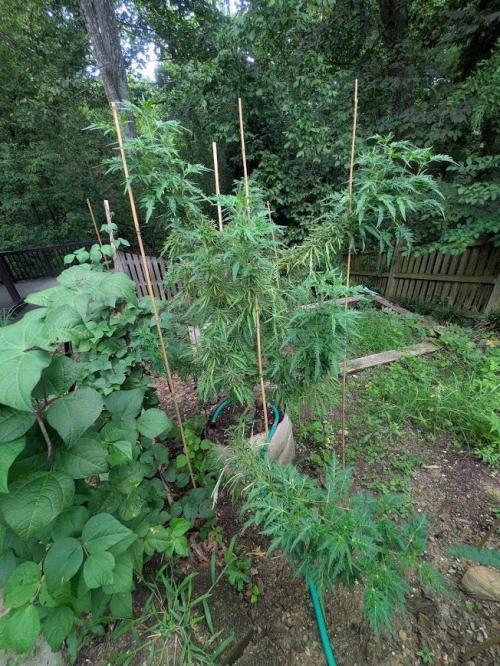
I am beginning to do some LST (low-stress training) on Fruity Freak 2 and 3 with bamboo stakes and garden wire to encourage outward growth (instead of upward) and open up the plant's interior (by pulling branches slightly downward, more level with the ground, the leaves have more space) to maintain good airflow and hopefully prevent disease. I am ensuring the garden wire is not constricting around the branches (to avoid restricting growth/delivery of nutrients), but I am placing a slight lateral tension on each branch to promote growth in that direction. The plants are responding well!
As I have been working with the plants, the wonderful citrusy smell of the flowers has been in my face, and I have been really enjoying it!
2 likes
2 comments
Share
19
Week 19. Vegetation
8mo ago
1/11
101.6 cm
Height
14 hrs
Light Schedule
21 °C
Day Air Temp
6.2
pH
No Smell
Smell
60 %
Air Humidity
7 °C
Night Air Temp
75.71 liters
Pot Size
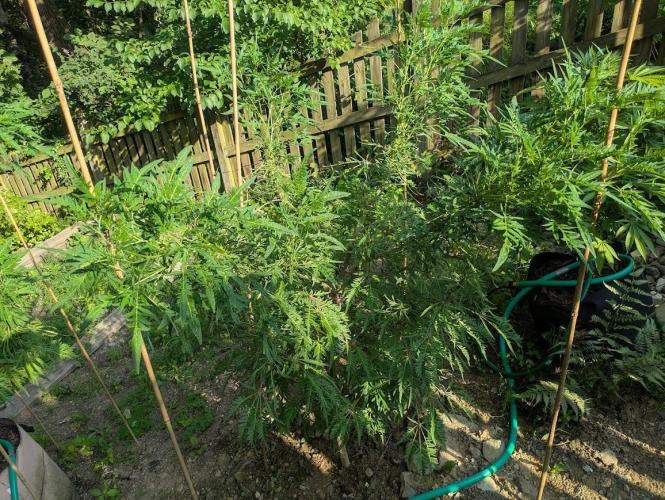
BC_Green Everyone is healthy and thriving despite the rain! I did, however, notice that with the expansion of the crown of the pin oak in my backyard, direct sunlight hours are only 6 hours a day, and not the 8 I hoped. But it’s still the best place in my yard, and with the size of these plants, I still expect a decent yield and quality. I am carefully watching the sun and will adjust some of the container locations to maximize direct light and provide more space as they are starting to grow into each other.
I continue to gently train Fruity Freak 2 and 3 for more horizontal growth without issue. Both of their stems are quite large, and the plant structure is solid.
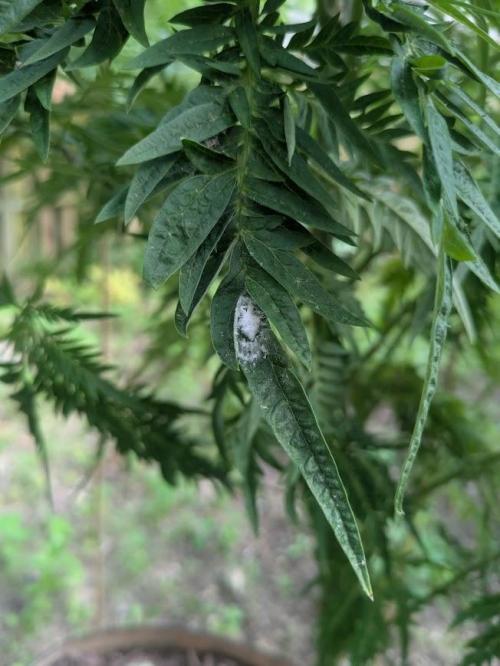
All of the clones are continuing to do well, which is great! I will note that I had previously assumed that the white spots on Fruity Freak 3 after I took the cutting were a sign of disease (mold, specifically powdery mildew, is a common issue here, and I saw it on my cannabis plants last year). In hindsight, I wish I had slowed down, gotten curious, and more carefully researched this issue before jumping to conclusions–because there is a decent chance this may have been high humidity (from all the rain) causing the plant to try to root. However, at least I now have a good solution (HOCL) for fighting disease that might be possible to use as late as harvest, and be effective against bud rot.
Otherwise, another happy week of growing!
2 likes
1 comment
Share
Used techniques
LST
Technique
20
Week 20. Vegetation
7mo ago
1/7
104.14 cm
Height
14 hrs
Light Schedule
27 °C
Day Air Temp
No Smell
Smell
55 %
Air Humidity
16 °C
Night Air Temp
75.71 liters
Pot Size
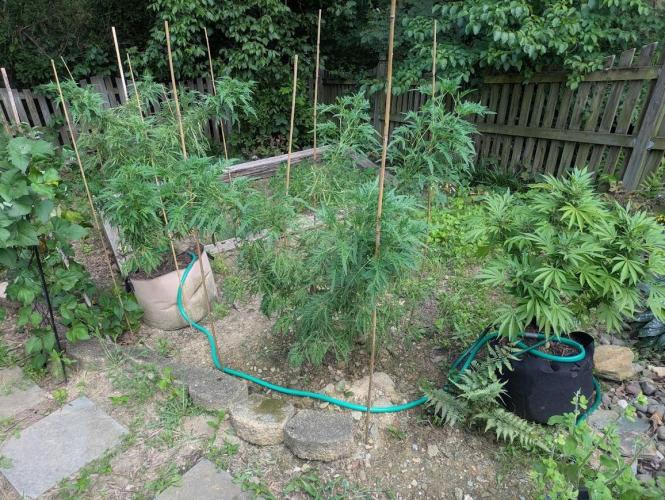
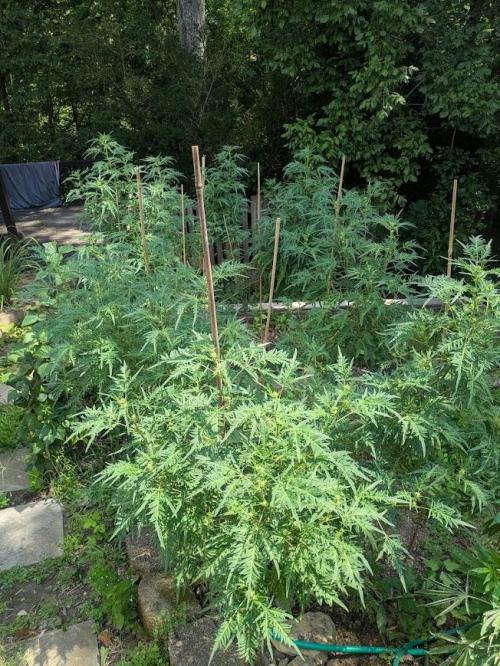
BC_Green These ladies are definitely getting big, and they need more space to grow. I went ahead and moved Fruity Freak E (from a different grow) to the other side of my garden path. Everyone should get better light and airflow as a result.
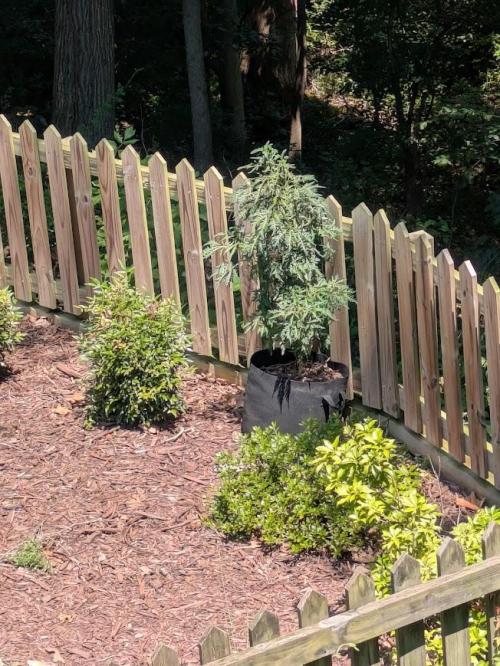
I planted Fruity Freak 2 in the ground yesterday. I had been hesitant to plant any of them in the ground as I haven’t grown on this side of the yard, and I wasn’t sure if I would need to move them around due to sunlight, smell, or pests/disease. But at this point, the location seems solid. It was hard transitioning a root ball this large (and I probably won't do this with pots this large in the future), but I am watching carefully to see how she handles it--everything seems fine so far.
Fruity Freak 2 did have a few leaves with yellowing tips before this transition, so I am also carefully monitoring that as well.
I watered once this week using my fertilizer blend (per gallon):
- Soy hydrolysate (12-0-0) - 2.43 grams (160 ppm nitrogen (77 ppm from soy hydrolysate + 27 ppm from liquid fertilizer + 56 ppm from potassium nitrate))
- Liquid Fertilizer (4-10-3) - 2.6 grams (30 ppm phosphorus - measured with a cup on a scale)
- Potassium Nitrate (13.5-0-46.2) - 1.56 grams (175 ppm potassium (158 ppm from potassium nitrate + 17 ppm from liquid fertilizer))
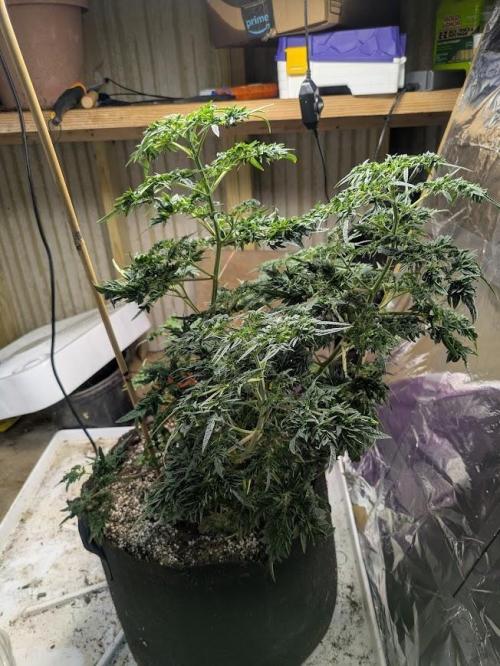
All of the Fruity Freak clones rooted. The most promising new leaf growth was from Fruity Freak E’s clone, but the best root growth was from the apical cutting from Fruity Freak 3. These two clones have been moved into 3-gallon pots with Pro-Mix BX to allow them to continue to grow. I had given the clones ¼ dose of nutrients when I took the cutting, ½ dose two weeks later, and now I am using full-strength Gardenwise 3-1-2.
I am heading out of town at the end of the week, so no updates next weekend. But I am setting up a soaker hose controlled by a WIFI timer (that I can adjust remotely), and I will water them with nutrients before I leave.
*** Update *** I figured out that all leaves with yellow tips (low stress response) on Fruity Freak 2 are branches that have been subjected to low stress training. I am currently giving them a break from this training.
4 likes
comments
Share
Used techniques
Transplantation
Technique
22
Week 22. Vegetation
7mo ago
1/13
108.2 cm
Height
14 hrs
Light Schedule
27 °C
Day Air Temp
No Smell
Smell
55 %
Air Humidity
16 °C
Night Air Temp
75.71 liters
Pot Size
BC_Green Considering my absence for more than a week, everyone is looking great! Before my departure, I had set up a WIFI timer with soaker hoses. The ladies were a bit overwatered, but there were no real issues, which is awesome.
As the plant hormone auxin is produced at the apical shoots and sent down to the roots (suppressing lower bud sites on the branch and the lower branches as it goes), I removed some of those branches and buds to hopefully focus the plants’ energy on creating larger bud sites where they remain.
The bud sites are all currently small, and the flower has receded slightly over time (perhaps due to finally hitting peak daylight hours), but both Fruity Freak 2 and Fruity Freak 3 have started stacking bud sites, which, if filled in, may produce very nice results.
Fruity Freak 1 continues to sit in my backyard, receiving only two hours of direct sunlight. She is currently 38”, very lanky, and hasn’t grown much since she was placed there. Fruity Freak 2 is 43” and Fruity Freak 3 is 47”, and they are much bushier. However, they enjoy 6 hours of direct light and larger containers.
I had updated last week that Fruity Freak 2 had yellow tips on a few leaves that appeared to be the result of low-stress training (as only leaves on the trained branches had been impacted). After discontinuation of the low-stress training, there has been no further leaf coloration changes. I’m guessing the early flowering is likely contributing to total plant stress, and this situation.
The cuttings all survived. This week I plan to start experimenting with different fertilizer levels and see how they respond. It will be interesting to see what happens!
3 likes
comments
Share
Used techniques
Defoliation
Technique
23
Week 23. Vegetation
7mo ago
1/15
113.54 cm
Height
14 hrs
Light Schedule
35 °C
Day Air Temp
No Smell
Smell
55 %
Air Humidity
21 °C
Night Air Temp
75.71 liters
Pot Size
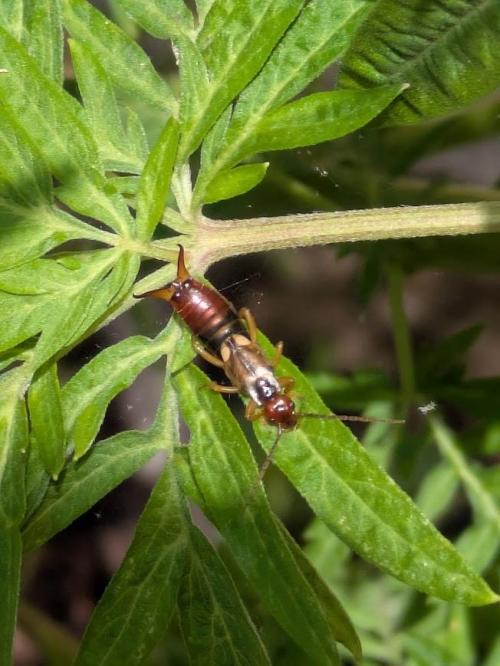
BC_Green Another week of healthy growth! Despite the ongoing presence of spotted lanternflies (now shifting to their fourth instar stage), woolly aphids, and earwigs, there are no visible signs of damage to any of the Fruity Freak adult plants (but the clones have suffered a bit of woolly aphid damage, and they have been sprayed with Captain Jacks Deadbug Brew as a result). Additionally, we had some intense heat this past week, but everyone held strong!
Almost all of the early flowers have disappeared, and there are signs of the plants re-entering a vegetative state. As Fruity Freak E (from my Fruity Freak #2 grow) never entered premature flowering, it will be interesting to see any differences.
As I mentioned last week, I have decided to use the clones and Fruity Freak 1 for a fertilizer experiment. Based on this Israeli article about fertilizer use, I decided to try doubling the nitrogen for some of the plants:
https://israelagri.com/advances-in-science-based-fertilization-technologies-for-medical-cannabis/#:~:text=optimal%20nitrogen%20level%20at%20the,concentration%20of%20cannabinoids%20and%20terpenoids
Fruity Freak 1 and Fruity Freak 3 clones (as well as Fruity Freak 2 and Fruity Freak 3) received the standard fertilizer mix that I use (including yesterday).
My standard fertilizer blend (per gallon):
- Soy hydrolysate (12-0-0) - 2.43 grams (160 ppm nitrogen (77 ppm from soy hydrolysate + 27 ppm from liquid fertilizer + 56 ppm from potassium nitrate)) (12.15 g for 5-gal)
- Liquid Fertilizer (4-10-3) - 2.6 grams (30 ppm phosphorus - measured with a cup on a scale) (13 g for 5-gal)
- Potassium Nitrate (13.5-0-46.2) - 1.56 grams (175 ppm potassium (158 ppm from potassium nitrate + 17 ppm from liquid fertilizer)) (7.8 g for 5-gal)
Fruity Freak 2 and Fruity Freak E clones, and Fruity Freak 1 all received a double nitrogen version of this fertilizer blend:
- Soy hydrolysate (12-0-0) - 7.48 grams (320 ppm nitrogen (237 ppm from soy hydrolysate + 27 ppm from liquid fertilizer + 56 ppm from potassium nitrate))
- Liquid Fertilizer (4-10-3) - 2.6 grams (30 ppm phosphorus - measured with a cup on a scale)
- Potassium Nitrate (13.5-0-46.2) - 1.56 grams (175 ppm potassium (158 ppm from potassium nitrate + 17 ppm from liquid fertilizer))
All of the clones (sitting near my auto flower that is directly under the grow light) and Fruity Freak 1 (only gets two hours of direct sunlight) are experiencing suboptimal lighting. I have another grow light that I will add later to help the clones, but I am curious to see if the plants can make use of the extra nitrogen despite the lack of ideal lighting first.
2 likes
comments
Share
24
Week 24. Vegetation
6mo ago
1/13
124.46 cm
Height
14 hrs
Light Schedule
32 °C
Day Air Temp
No Smell
Smell
55 %
Air Humidity
21 °C
Night Air Temp
75.71 liters
Pot Size
BC_Green Having returned to a vegetative state, all three of these ladies have started to take off again in height. Fruity Freak 2 is now 54”, Fruity Freak 3 is 53”, and Fruity Freak 1 is 40”.
Fruity Freak 1 continues with the slowest growth, having picked up only 1” this past week despite switching her to a double-nitrogen version of my fertilizer blend, and direct sunlight hours increasing closer to 3 hours (as the path of the sun changes, casting more light in her direction). But Fruity Freak 3 grew 5” and Fruity Freak 2 grew 7”!
I am continuing to chase off woolly aphids and spotted lanternflies, but they return every time, so it’s just an ongoing chore as they don’t seem to respond to Neem Oil or Captain Jack’s Deadbug Brew. However, they also aren’t causing much damage.
I continued the clone fertilizer experiment this week. Fruity Freak E’s clone and Fruity Freak 2’s clone received more of the double-nitrogen fertilizer blend while Fruity Freak 3’s clone and Fruity Freak 1’s clone received the standard blend. Fruity Freak E’s clone grew 3.5” with a significant increase in the number of leaves. The other clones did not increase in height and did not demonstrate much vegetative growth.
Fruity Freak 2, Fruity Freak 3, Fruity 1’s clone, and Fruity Freak 3’s clone all received my vegetative fertilizer blend (per gallon):
- Soy hydrolysate (12-0-0) - 2.43 grams (160 ppm nitrogen (77 ppm from soy hydrolysate + 27 ppm from liquid fertilizer + 56 ppm from potassium nitrate)) (12.15 g for 5-gal)
- Liquid Fertilizer (4-10-3) - 2.6 grams (30 ppm phosphorus - measured with a cup on a scale) (13 g for 5-gal)
- Potassium Nitrate (13.5-0-46.2) - 1.56 grams (175 ppm potassium (158 ppm from potassium nitrate + 17 ppm from liquid fertilizer)) (7.8 g for 5-gal)
Fruity Freak 1, Fruity Freak E’s clone, and Fruity Freak 2’s clone received my double-nitrogen blend (per gallon):
- Soy hydrolysate (12-0-0) - 7.48 grams (320 ppm nitrogen (237 ppm from soy hydrolysate + 27 ppm from liquid fertilizer + 56 ppm from potassium nitrate))
- Liquid Fertilizer (4-10-3) - 2.6 grams (30 ppm phosphorus - measured with a cup on a scale)
- Potassium Nitrate (13.5-0-46.2) - 1.56 grams (175 ppm potassium (158 ppm from potassium nitrate + 17 ppm from liquid fertilizer))
4 likes
2 comments
Share
25
Week 25. Vegetation
6mo ago
1/8
124.46 cm
Height
14 hrs
Light Schedule
32 °C
Day Air Temp
No Smell
Smell
55 %
Air Humidity
21 °C
Night Air Temp
75.71 liters
Pot Size
Nutrients 3
12-0-0
1.3 mll
4-10-3
0.43 mll
13.5-0-46.2
0.33 mll
BC_Green These ladies are definitely taking off (Fruity Freak 2 and 3 were both 58”)--and with all of this new vegetative growth, I started training them out a bit more again (I had backed off when a few of Fruity Freak 2’s leaves on branches that had LST browned at the tips a few weeks back). They are recovering quickly from this round of LST and look great!
The double nitrogen fertilizer experiment has shown no real signs of growth improvement in a low-light setting, with Fruity Freak 1 only growing an inch per week and only one clone showing vigorous growth (and it had already shown similar growth before the change). At this time, I’m going to toss the three sluggish clones and place a grow light over Fruity Freak E’s clone (as well as up-pot). She is showing some really interesting bushy growth, and I want to see what she can do. I will also discontinue the double-nitrogen testing as I don’t see clear signs of impact (positive or negative), and I don’t have the ability to do a real controlled study with identical clones at this moment.
Otherwise, I’m still very impressed with the resilience to pests, heat, and stress!
1 like
comments
Share
Used techniques
LST
Technique
26
Week 26. Vegetation
6mo ago
1/9
129.54 cm
Height
14 hrs
Light Schedule
32 °C
Day Air Temp
No Smell
Smell
55 %
Air Humidity
21 °C
Night Air Temp
75.71 liters
Pot Size
1.89 liters
Watering Volume
Nutrients 3
12-0-0
1.3 mll
4-10-3
0.43 mll
13.5-0-46.2
0.33 mll
BC_Green Fruity Freak 2 (57”) and 3 (55”) are growing quickly. They look great! Their new vegetative growth has some unique leaves as compared to the older ones. Fruity Freak 1 is still slowly chugging along (with ½ the sunlight of the other two) and is about 41”.
The presence of pests, in particular the woolly aphids, has been naturally decreasing, which is wonderful.
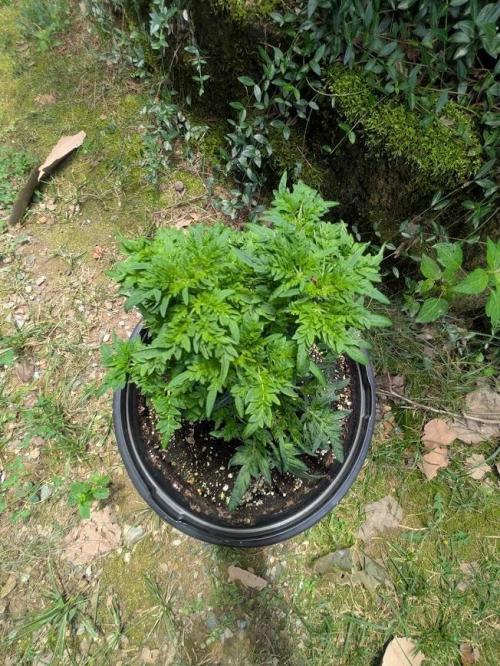
The clone is doing well–she is developing a nice natural bushy shape with no pruning. She’s 9” now, up 3.5” from last week. I skipped up-potting because she’s still got some space.
I wanted to share a bit more about my method for making the fertilizer blend I use.
First, I researched which nutrients I wanted to use. I knew I needed to source three fertilizers, each focusing on one nutrient (N (nitrogen) - P (phosphorus) - K (potassium)). The highest value in the NPK label (for example, the 10 in a 4-10-3) would then designate it as the fertilizer to satisfy the plants’ needs of that nutrient (in this example, phosphorus).
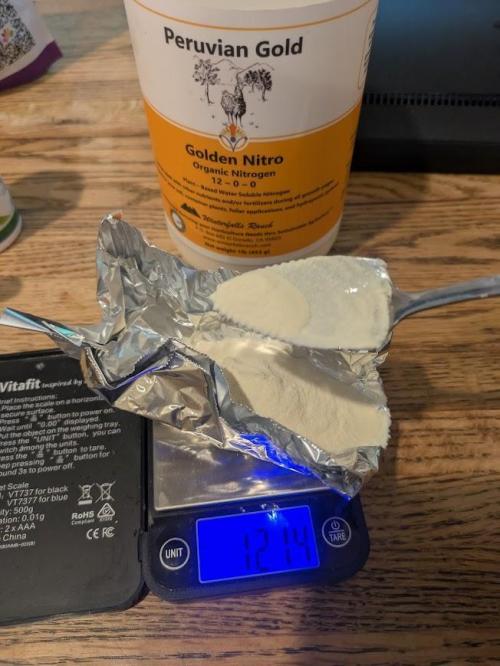
After a bunch of research, I found that Boca Hydro has some nice products (pH balanced) at good prices (a small amount will go a long way). I ordered and use their potassium nitrate 13.5-0-46.2 (to hit my potassium target), and I am planning on ordering their Mono-Potassium Phosphate 0-52-34 (to hit my phosphorus target at a better price). However, I am currently using a liquid fertilizer, Bonide Garden Rich Root & Grow Root Stimulator & Plant Starter 4-10-3, which has some Auxin (a plant hormone that encourages apical and root growth). I am also using Golden Nitro’s soy hydrolysate to hit my nitrogen target (and I discussed why a bit in week 10 of this journal). It is also an amino acid, so instead of being a protein (which is harder for a plant to break down and use), it is potentially easier for the plant to make use of immediately. I found this article about nitrogen sources very interesting:
https://www.gardenmyths.com/which-form-of-nitrogen-is-best-for-plants/?utm_source=rss&utmmedium=rss&utm_campaign=which-form-of-nitrogen-is-best-for-plants
I then determined how much of each fertilizer I wanted to use by researching the subject in articles and controlled studies. I really like these two articles:
https://israelagri.com/advances-in-science-based-fertilization-technologies-for-medical-cannabis/#:~:text=optimal%20nitrogen%20level%20at%20the,concentration%20of%20cannabinoids%20and%20terpenoids
https://www.cannabisbusinesstimes.com/climate-environment-control/greenhouse-cannabis-cultivation/article/15689911/put-your-fertilizer-program-to-the-test
I decided this year I would use the Israeli recommendations for trying to produce bud with the highest cannabinoid concentrations (potentially sacrificing some yield), and those numbers are 160 PPM nitrogen, 30 PPM phosphorus, and 175 PPM potassium during the vegetative phase.
PPM is the concentration of a substance in a solution (or mixture)--or how many parts of N or P or K do I have in one million parts of the solution. I then convert those PPM targets into grams of fertilizer I need to put into a liter of water. I use this calculator to make those calculations for me:
https://www.omnicalculator.com/biology/water-soluble-fertilizer
To use this calculator, I always start with the fertilizer that is the sole source of a nutrient because it makes it easier to get to the total targets when combining the three fertilizers. Currently I am using 12-0-0 soy hydrolysate, 4-10-3 liquid fertilizer, and 13.5-0-46.2 potassium nitrate. Only the liquid fertilizer provides phosphorus (the other are 0 for that nutrient), so I start with that one.
In the online calculator, I change the first drop-down (Fertilizer presets) to Custom. Then, I enter the NPK values of the fertilizer (from the label) under the Fertilizer Label section (in this example, 4 next to N (nitrogen), 10 for P2O5 (phosphorus), and 3 for K2O (potassium)). After that, I select the element I am targeting (in this example, phosphorus) and select that under Desired element. Then I enter the desired PPM (in this case, 30 ppm) under Mass Concentration. I scroll down to look at the Fertilizer Rate (and check it is set to g/l (grams per liter)). Then I bust out my scale and weigh that amount of fertilizer (in this case, 0.6874 grams, rounded to 0.69) and dump that into a liter of water and mix it in.
Looking back at the calculator, scrolling down to the bottom of the Nutrient Solution Recipe, I look at how many mg/l (same as PPM for aqueous solutions) of each element I have provided with fertilizer 1 (looking at the Mass Conc.) and record those numbers. I then subtract those numbers from my total target to determine my outstanding need for each nutrient (in this case I have provided 27.5 nitrogen, so I subtract that from 160 to get 132.5; for phosphorus I have provided all 30 ppm I need, so the outstanding need is 0; for potassium I have provided 17.1 of the 175 targeted, so I need to add 157.9 more).
I then move on to the fertilizer for targeting potassium (potassium nitrate 13.5-0.46.2 for this example) and repeat the steps above (entering in the new NPK label information, updating the Desired element to potassium, and entering 157.9 as the Mass concentration). After I mix that fertilizer into the water with the 4-10-3. I then move on to nitrogen, and calculate the outstanding nutrient demand by subtracting the previous fertilizers from the total target, and add the right amount of that fertilizer to the water and stir (you may have to reduce certain fertilizer amounts previously calculated to come up with the right balance).
Hopefully, I then have the fertilizer at the right concentration to avoid nutrient burn and provide what the plant needs for optimal growth at the best price.
For my ease of use, I convert everything to grams per gallon, and to do that I just take the g/l answer (for example, 0.6874 grams for the liquid fertilizer 4-10-3) and multiply that by the number of liters in a gallon (3.785412) to get how much fertilizer to use (in this case 2.6 grams). That is how I arrived at my vegetative fertilizer blend:
30 ppm phosphorus target
- Use 2.6 grams (measured by placing a cup on the scale, hitting tare, then adding the fertilizer to the cup) of Liquid Fertilizer (4-10-3) per gallon of water
175 ppm potassium target - (17 ppm from liquid fertilizer) = 158 ppm from potassium nitrate needed
- Use 1.56 grams of Potassium Nitrate (13.5-0-46.2) per gallon of water
160 ppm nitrogen target - (27 ppm from liquid fertilizer + 56 ppm from potassium nitrate) = 77 ppm from soy hydrolysate needed
- Use 2.43 grams of Soy hydrolysate (12-0-0) per gallon of water
I use this fertilizer blend every other time I water (to prevent nutrient burn), and I water when the surface of the soil becomes dry (I stick the tip of my finger in it to feel it is dry). Currently (due to the outdoor temp and humidity, as well as the size of the plants) I need to water approximately every other day, so I am fertilizing twice a week or so. I fit it in around the rain and I obviously don’t water if mother nature does it for me :)
2 likes
1 comment
Share
27
Week 27. Vegetation
6mo ago
1/6
134.62 cm
Height
14 hrs
Light Schedule
32 °C
Day Air Temp
No Smell
Smell
55 %
Air Humidity
21 °C
Night Air Temp
75.71 liters
Pot Size
1.89 liters
Watering Volume
Nutrients 3
12-0-0
1.3 mll
4-10-3
0.43 mll
13.5-0-46.2
0.33 mll
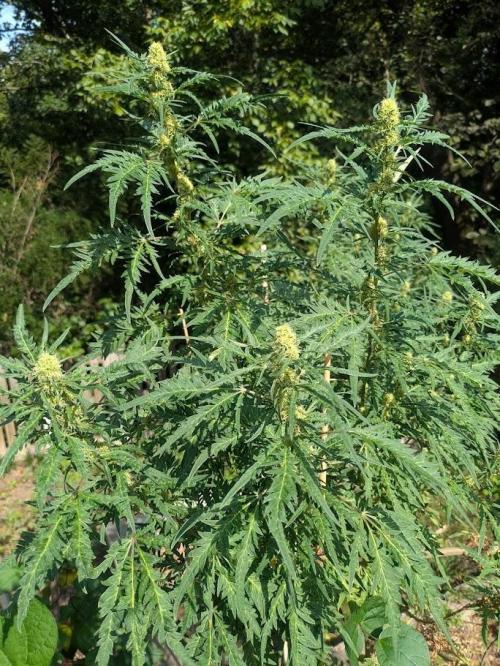
BC_Green Fruity Freak 2 and 3 are 57” tall and 48” across. They are both shedding any remaining premature flowers and sugar leaves. Their re-veg / pre-flower stretch looks like it is slowing, so they should be showing flowers soon.
The top four branches that had been LST’d have sprouted new shoots along the branches, and it looks like there will be several apical bud sites, which is great! Additionally, the growth tips on those four branches have now split into multiple shoots since the re-veg. It is also interesting to look at these plants as a whole–there are no secondary branches on any of the lower branches, so no need to prune! They also have a nice open shape that permits plenty of airflow. So, despite my delayed and reactive pruning/training, the plants look like they have great potential. I went ahead and took a video of them as it is hard to really capture them in pictures.
Fruity Freak 1 is up to 45”. She’s currently a backup plan, so if everything goes well, it is unlikely I will need any of her yield.
Fruity Freak E’s clone is taking off, now 14”, up 5” from last week.
I received my Mono-Potassium Phosphate this week and designed a new fertilizer blend using it. Now that these plants are about to flower, I am discontinuing the use of the liquid 4-10-3 fertilizer as it has a small amount of Auxin in it. The new recipe is:
Mono Potassium Phosphate - 0.5 grams per gallon
Potassium Nitrate - 1.36 grams per gallon
Soy hydrolysate - 3.52 grams per gallon
(Which still hits my targets of 160 ppm N, 30 ppm P, and 175 ppm K)
I will update the nutrient section once I have a good guess for tsp/gal conversion.
3 likes
2 comments
Share
28
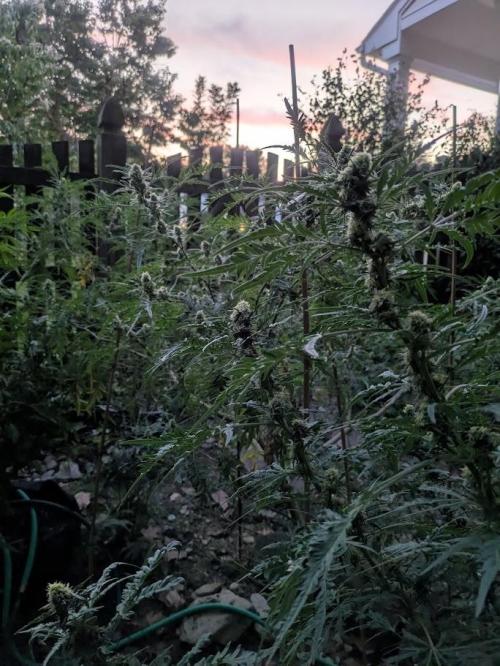
Week 28. Flowering
5mo ago
1/6
147.32 cm
Height
14 hrs
Light Schedule
32 °C
Day Air Temp
No Smell
Smell
55 %
Air Humidity
21 °C
Night Air Temp
75.71 liters
Pot Size
1.89 liters
Watering Volume
Nutrients 3
12-0-0
1.3 mll
4-10-3
0.43 mll
13.5-0-46.2
0.33 mll
BC_Green Life has been and will continue to be busy moving forward, so I will do my best to get pictures in when I can.
They’re flowering now (as of about 8/8, except the clone, which remains on a 20/4 schedule)! Everyone is looking healthy (Fruity Freak 1 has some leaves with holes from someone munching on her, but is fine) despite a hard rain a few weeks ago that stripped a bunch of soil off Fruity Freak 2, exposing her roots, but you wouldn’t know it by looking at her. Otherwise, things are going well.
I have been reviewing Robert Pavlis’s content a bit more thoroughly the past couple of weeks (after figuring out he had no documentation for his claim that 3-1-2 is the best fertilizer ratio) and will not be referencing his material moving forward as a result.
3 likes
comments
Share
30
Week 30. Flowering
4mo ago
1/11
147.32 cm
Height
14 hrs
Light Schedule
26 °C
Day Air Temp
No Smell
Smell
55 %
Air Humidity
14 °C
Night Air Temp
1.89 liters
Watering Volume
Nutrients 3
12-0-0
1.3 mll
4-10-3
0.43 mll
13.5-0-46.2
0.33 mll
BC_Green This is week 31…Grow Diaries wouldn't let me select anything more than 30.
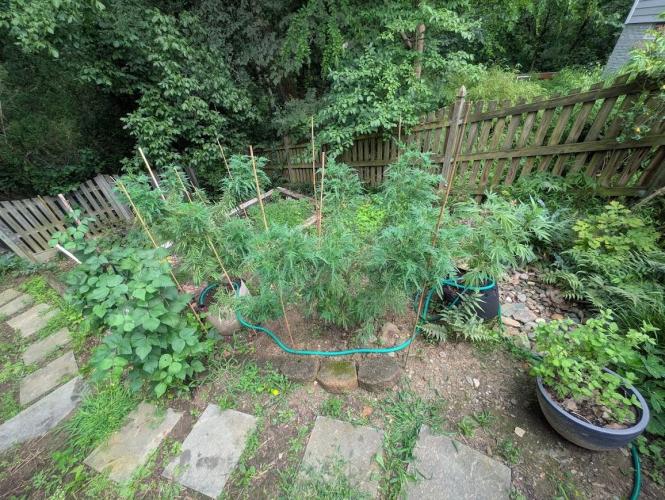
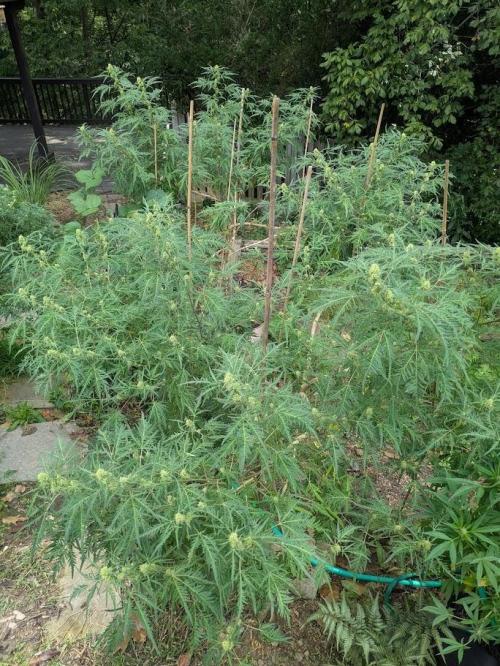
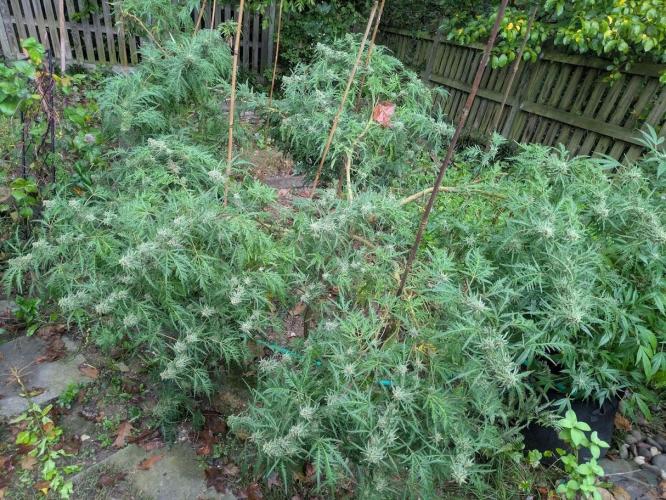
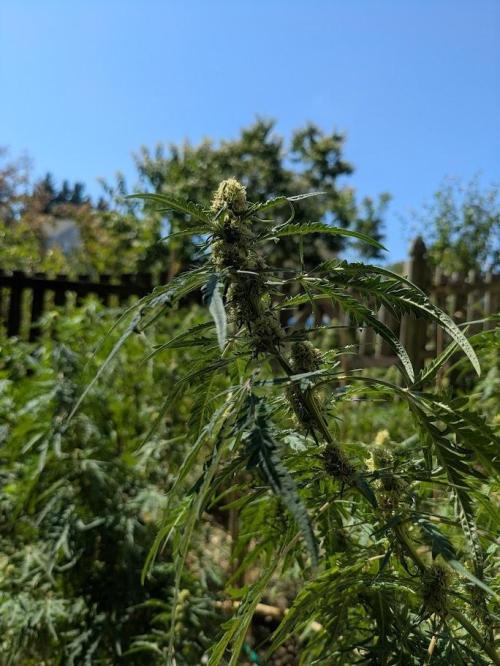
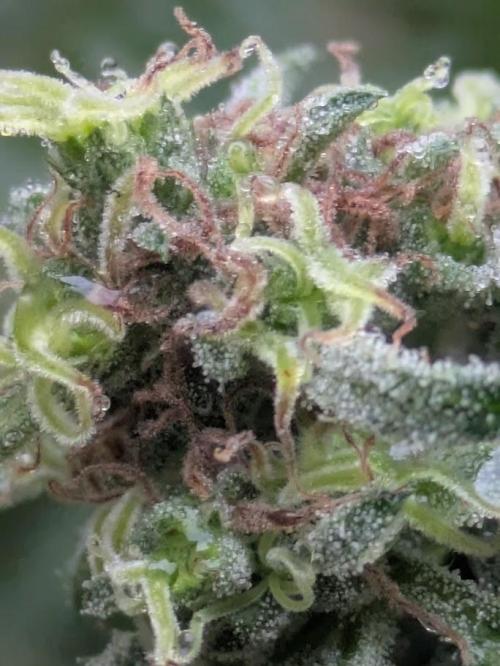
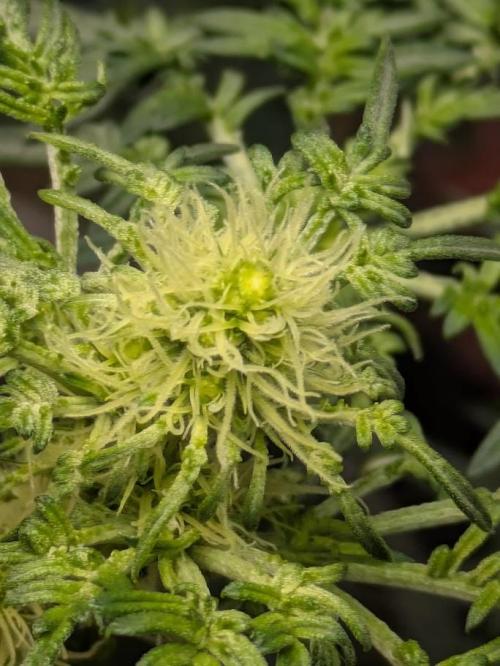
Anyway, all pests have disappeared, there are no signs of disease, and the weather has been perfect. All three original plants have beautiful flowers that are getting bigger with each week.
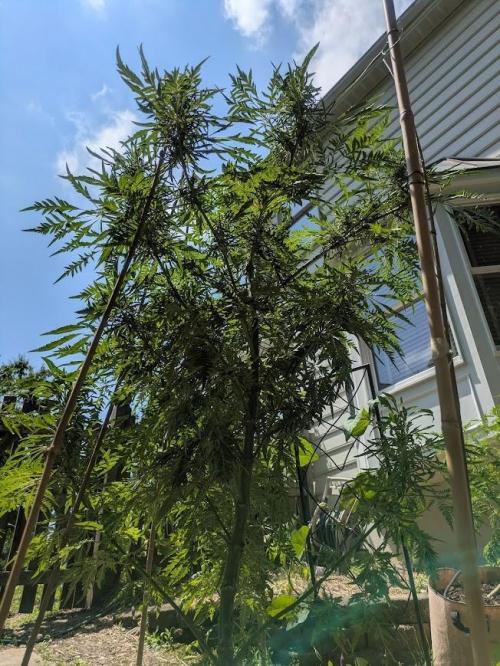
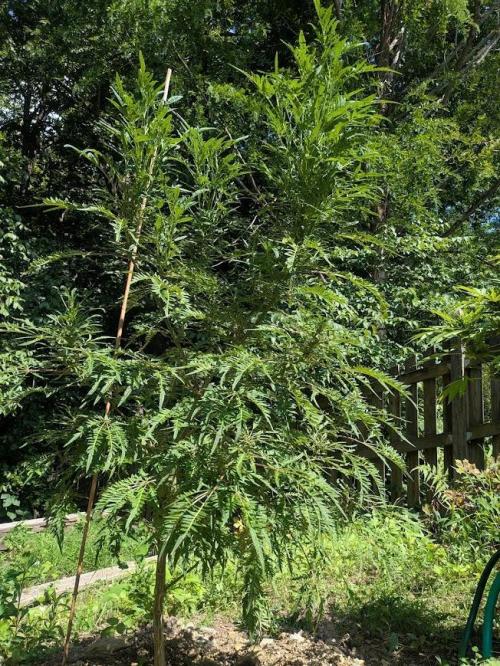
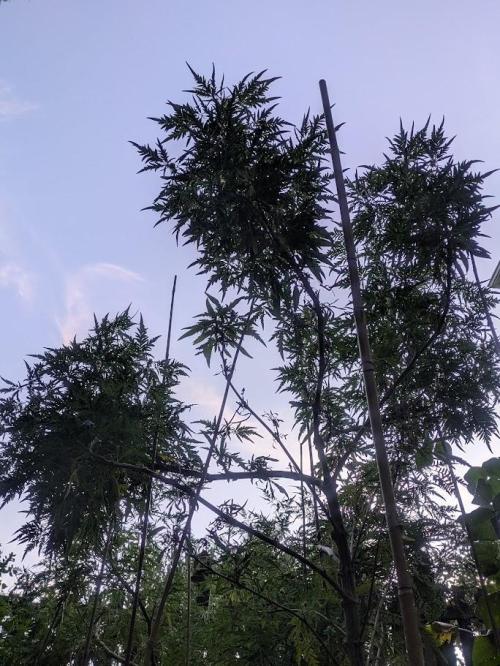
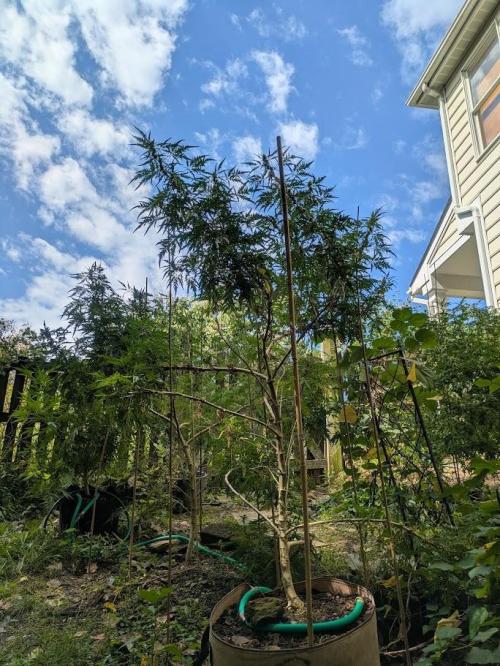
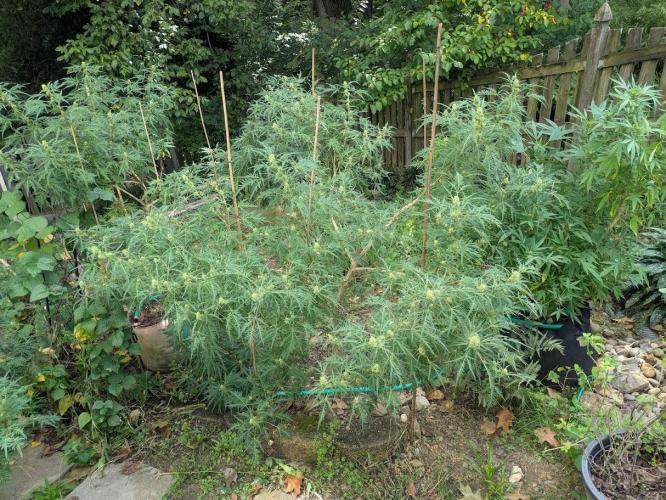
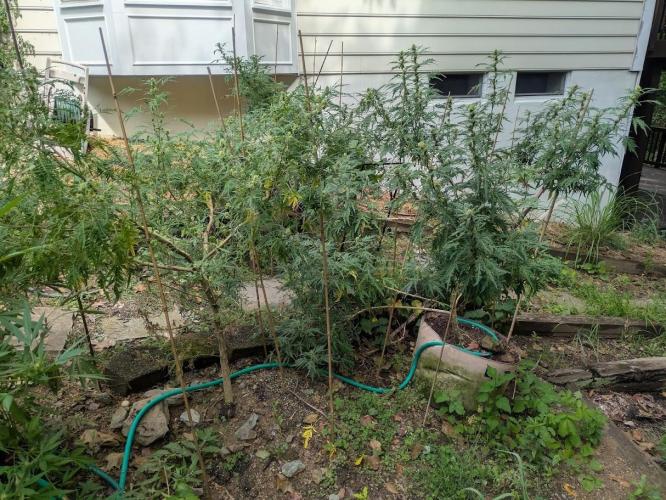
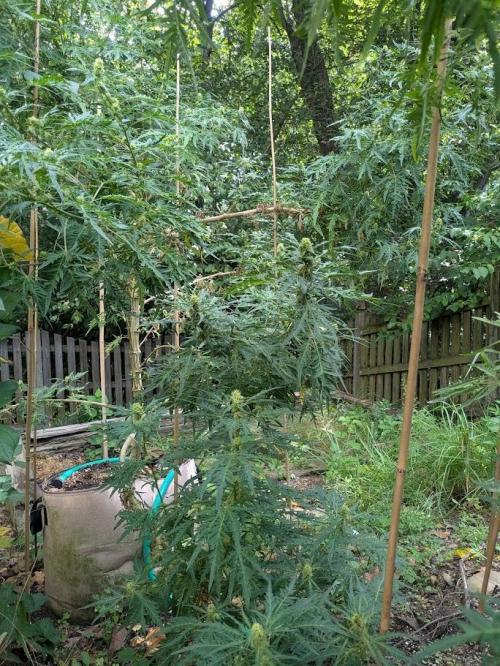
Fruity Freak 1 is now 51” tall and 38” wide, Fruity Freak 2 is 61” x 60”, and Fruity Freak 3 is 63” x 67”. After all of the experimentation with nutrients, soils, and plant age (comparing this grow against my Fruity Freak 2 diary), I have to say that the amount of sunlight the plant receives seems to have had the most profound impact on plant size and total yield.
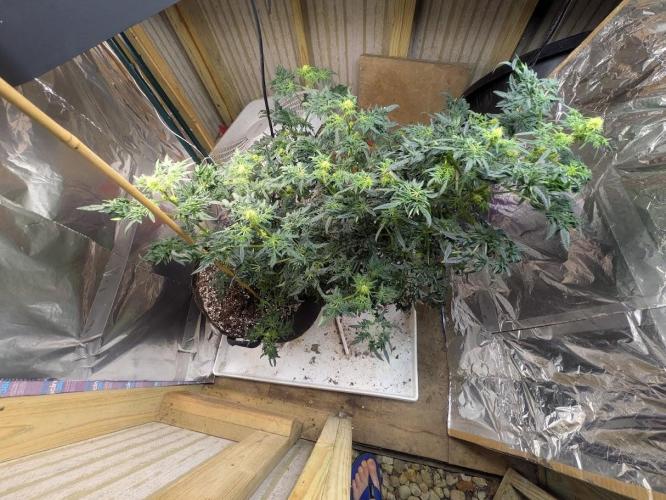
I have been slowly shifting the clone from 20 hours of light down to 12 hours (which I reached today) and added my second grow light to support her larger size (now 28” x 23”). It will be interesting to see if there is any noticeable impact on the flowers from the later harvest (about 1.5 months behind the other plants (which will impact temperatures/humidity)) and the use of grow lights instead of the sun. If it works out well, then I know I can run two rounds (one spring to summer, and the other summer to fall) of plants in the shed next year.
Otherwise, I am expecting a healthy harvest if everything continues so favorably!
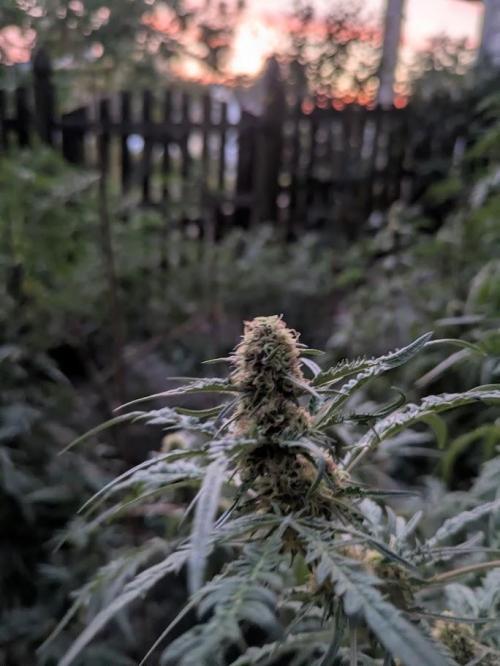
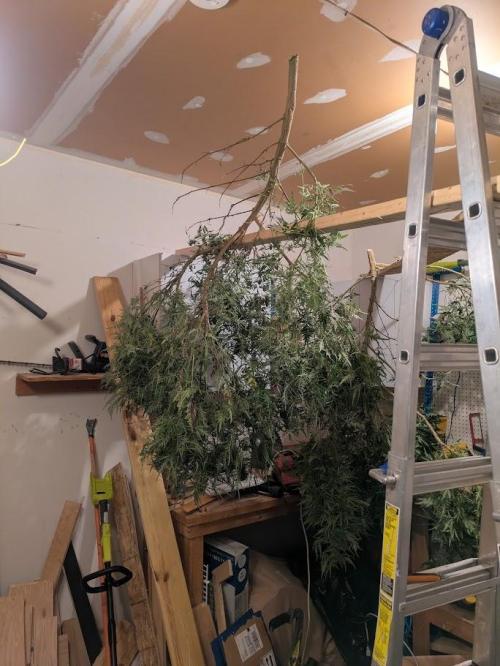
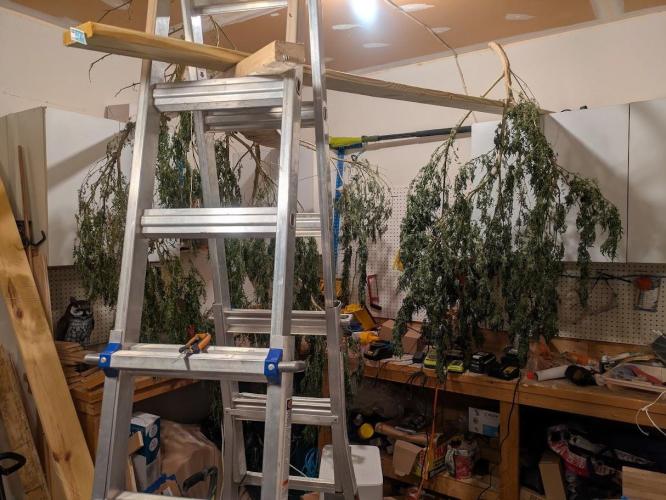
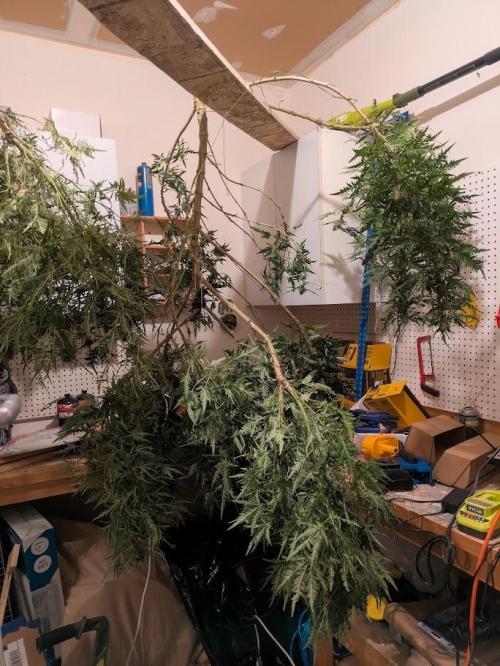
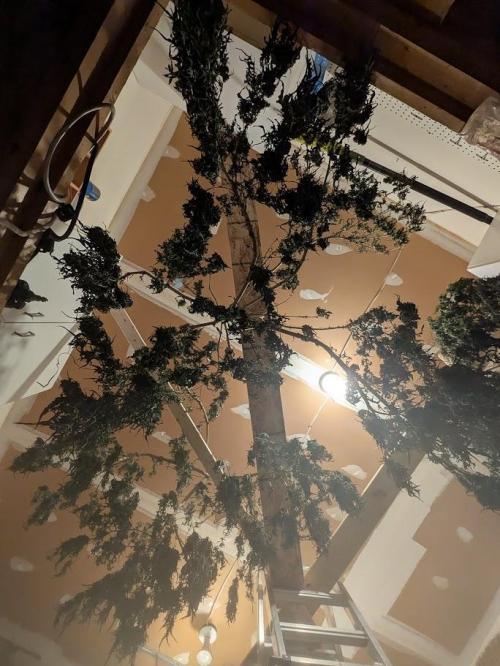
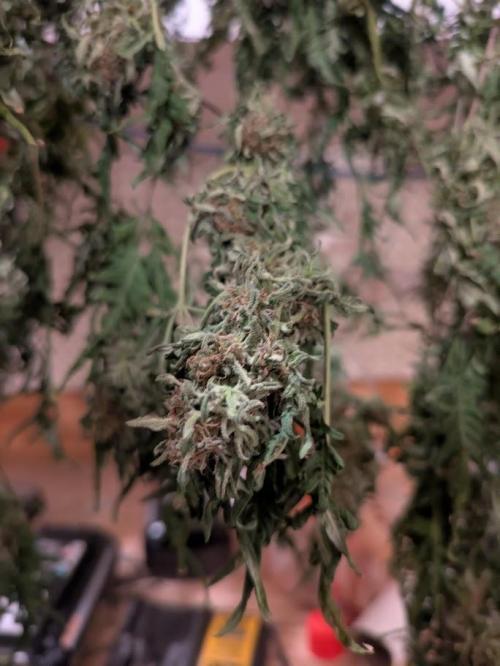
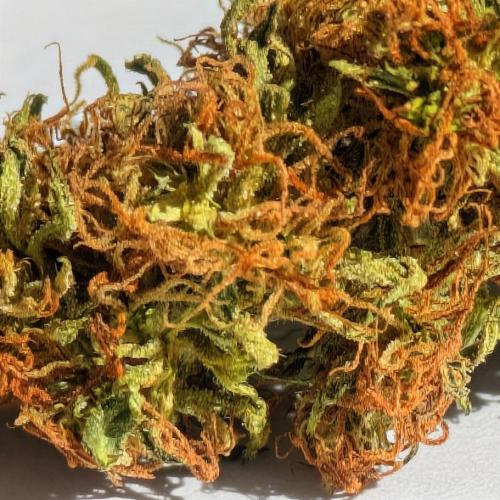
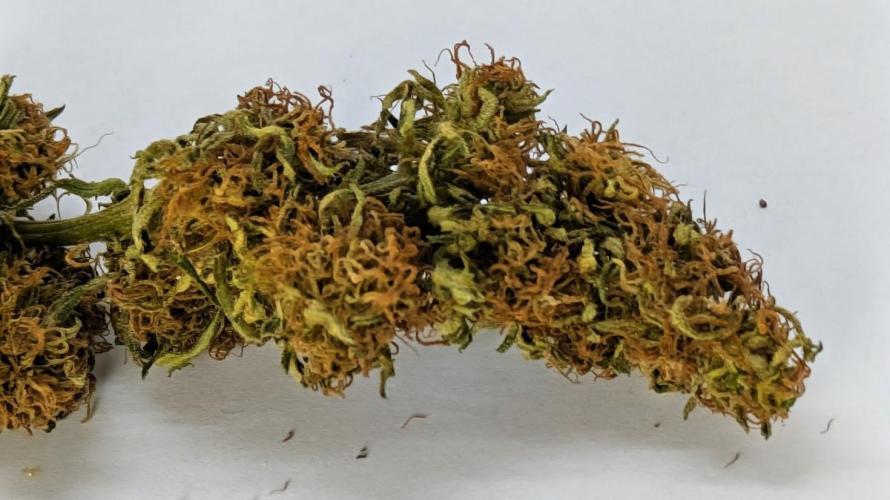
They sprouted their tap roots 1/22/25, and this past Friday, 9/26/25, after 247 days of life, I cut Fruity Freak 2 and 3 down with loppers and hung them upside down in my garage with a dehumidifier set to 50%. It has been a long journey, and I am grateful for all they taught me.
This past week brought an onslaught of rain--and despite this, there were no signs of mold. Truly, this strain is built for outdoors and faired extremely well despite the variable conditions thrown at it. The smell has been beautiful, more citrusy and piney, but I could never smell them at the sidewalk out front, which was great.
I'll return and share my thoughts after the buds have been dried and cured so that I can lend my thoughts on my final product. Thanks to everyone for reading this, it has been really cool to be able to share it.
*** Harvest Update 10/18/25 ***
Dry Weights
FF1 25 g (low yield due to placement in low sun area)
FF2 76 g
FF3 79 g
Growing this strain was super easy–it was so resistant to pest and disease I could have easily given them way less care. They were definitely a bit of a slow start, and maybe not the biggest yielders, but they have earned an annual place in my garden.
The buds are a bit smaller and fluffier than I expected for plants of this size (granted, I did not trim back enough of the small stuff, especially on the bottom). They are also not the most resinous on the exterior–so they may not have all the bag appeal. But they have an insane concentration of red hairs, and they can be a bit of a grinder jammer due to resin on the inside.
The berry smell in the jar flows beautifully into the smoke, and remains balanced in the profile. Notes of cranberry, raspberry, with a hint of mint and light tobacco ripple across the tongue. The flavor is so pleasant, and the smoke so smooth, the effects can sneak up on you.
A bubbly energy begins flowing as a pleasant euphoria takes over. The only strains I could think to compare it to are Thai Lights and G6, but Fruity Freak has its own trippy twist. At times I get sensations of time warp and dynamic perspective shifts. I am really impressed with the potency.
The combination of flavor and effect have made Fruity Freak my new favorite strain by far–I can’t wait until it fully cures! I’m also looking forward to experimenting with it in edibles—I have a chocolate recipe it would blend beautifully into.
Show more
Translate
Spent 198 days
Ger Veg Flo Har
60 g
Bud dry weight per plant
3
Plants
Easy
Difficulty
Euphoric, Energetic, Uplifted
Positive effects
Stress, Pain, Anxiety
Medical effects
Berries, Mint, Woody
Taste
Sleepy
Energy
Indica
Hybrid
Sativa
Height
Day air temperature
Air humidity
PH
Light schedule
Night air temperature
Pot size
Lamp distance
1/21
BC_Green Fruity Freak 2 and Fruity Freak 3 harvested!
Above are the pictures from the last few weeks. Sorry, I haven't been able to post regularly.
The clone is flowering and looking beautiful. It will be interesting to see if there are significant differences in the buds grown under lights instead of in the sun.
Look like you have 4 tops instead of 1 now mate,silver lining and all that.Mad looking plant.Whatever next.It wasnt that long ago autos were yielding 7 grams.
@oldskoolkool, I definitely think you're right about that, which is great! Pretty amazing how much their shapes have changed in a week from one cut. And it is crazy what people are breading these days, I'm trying out an auto flower I got from Dutch Passion when I ordered a few Durban Dew seeds I still need to get to, it will be interesting to see what she does.
Iv just come to look at that mad plant ofm yours.Iv never seen or heard of a fruity freak.Dutch Passion or Royal Queen do that Ducks foot.I'd block that hole up if I were you.The horitculture industry sometimes use wax to cover topped plants.I guess theres a number of things you could use.Something sterile and non biodegradable.Google it.
@oldskoolkool, lol, well thanks for checking it out, they've been super interesting to grow.
Thanks for that recommendation on the hole! I tried looking around to see if there solutions it, but the few places that I found that acknowledged holes in the stem can exist didn't recommend doing anything. But it does seem to be asking for infection, especially outside. And since I will be topping again, I don't want repeat infections--so again, thank you!
You had a good grow and I am waiting for your final thoughts before I decide to order my own (after they are back in stock). I am really hoping it's a good final report.
@Nevertooold, No problem at all! I'm definitely primarily edibles, but save some of the best buds for an occasional smoke. But good luck in your grow and reach out any time!
@TheFamilyShire, I am regretting not ordering and growing the original Freakshow, it would have been fun to grow side by side with Fruity Freak, maybe next year. But it is really fun growing Fruity Freak--the differences and similarities are really cool to watch.
@oldskoolkool, Yeah, I would rather avoid this in the future and I am trying to improve my IPM for pruning, so this seems like a worthwhile addition.
I know I will definitely clean my scissors before every cut, because I did clean them for the plant, but on this particular plant I cut off the extra leaves for the clone I was taking first, then made the cut to separate it from the plant. So I could have caused the problem there.
After the pruning she got two dry days before four days of rain, so I would also delay pruning based on forecast in the future.
I just put 4 popped fem Fruity Freak, and a pair of reg m/f Freakshow into some solo cups and good dirt for one of this years flavors, I grew a couple of FS a few years ago, but didn’t give them the attention i should have thinking they were more of a novelty plant. But it was one of my favs that year, and not sure what Tac was, but it did the job nicely. Loved the fragrance when in full flower. This year little miss fruity is getting a prime spot that gets sun all day. NorCal weather. I’m excited to see how yours turn out, looking good so far!
Loving the Mantis! I have them every year, and i make sure each plant has at least 1. I had a big GSC one year with a big female that would even eat frogs that ventured into the plant. But anything below her had to be thrown out….
@Dabbingit, Lol, was actually just reading your diary. Yeah, I've seen many reports are they are slow to start, mine were slower as well (the soil I was using in the beginning certainly didn't help). But they have been steady growers ever since!